start OPEL INSIGNIA BREAK 2020 Owner's Manual
[x] Cancel search | Manufacturer: OPEL, Model Year: 2020, Model line: INSIGNIA BREAK, Model: OPEL INSIGNIA BREAK 2020Pages: 315, PDF Size: 9.45 MB
Page 13 of 315

In brief111Power windows .....................41
2 Exterior mirrors .....................38
3 Central locking system ..........26
4 Side air vents ...................... 149
5 Cruise control .....................178
Speed limiter ....................... 180
Adaptive cruise control .......181
Forward collision alert .........190
6 Turn and lane-change
signals, headlight flash,
low/high beam, high beam
assist ................................... 135
Exit lighting ......................... 138
Parking lights ...................... 136
Buttons for Driver
Information Centre ..............111
7 Instruments ........................ 101
Driver Information Centre .... 111
8 Buttons for Driver
Information Centre ..............111
9 Head-up display ..................11810Windscreen wiper and
washer, headlight washer,
rear wiper and washer .........90
11 Centre air vents .................. 149
12 Hazard warning flashers ....134
13 Info Display ......................... 117
14 Anti-theft alarm system
status LED ........................... 35
15 Electronic Stability Control . 175
Traction Control system .....174
16 Glovebox .............................. 74
17 Controls for Info Display
operation ............................. 117
18 Climate control system ........ 140
19 Power outlet .......................... 94
20 Flexride controls .................. 176
Parking assist / advanced
parking assist .....................199
Lane keep assist ................218
Eco button for stop-start
system ................................. 157
21 Manual transmission ..........169
Automatic transmission ......16522Electric parking brake .........171
23 Power switch ....................... 153
24 Steering wheel adjustment ..89
25 Horn ..................................... 90
26 Bonnet release lever ..........231
27 Fuse box ............................ 252
28 Light switch ........................ 129
Headlight range
adjustment ......................... 132
Front / rear fog lights ..........135
Instrument illumination .......136
29 Head-up display controls ....118
Page 20 of 315
18In briefStarting off
Check before starting off ● Tyre pressure 3 255 and
condition 3 293.
● Engine oil level and fluid levels 3 232.
● All windows, mirrors, exterior lighting and number plates are
free from dirt, snow and ice and
are operational.
● Proper position of mirrors 3 38,
seats 3 48 and seat belts
3 58.
● Brake function at low speed, particularly if the brakes are wet.Starting the engine
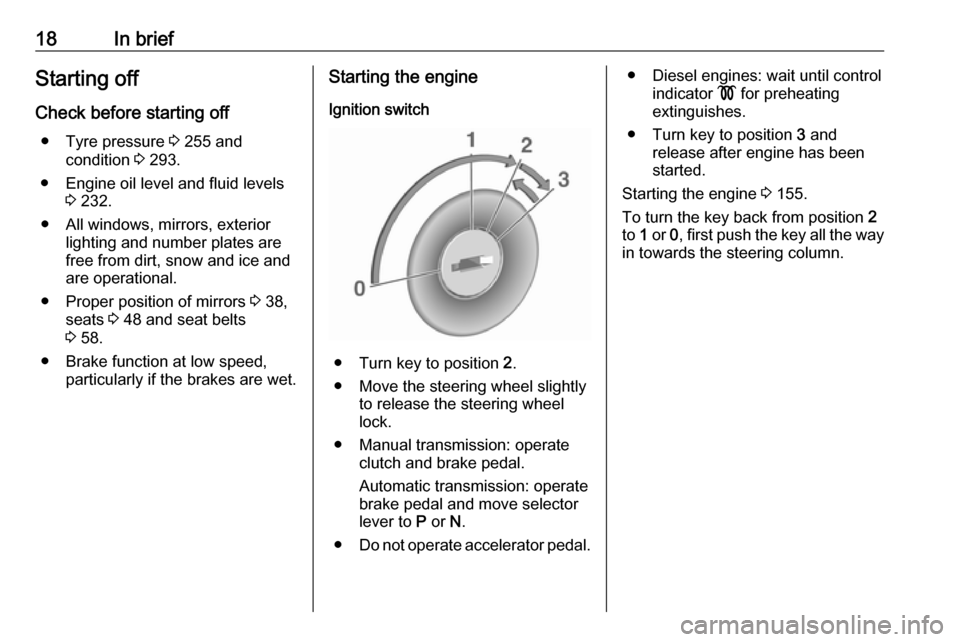
Ignition switch
● Turn key to position 2.
● Move the steering wheel slightly to release the steering wheel
lock.
● Manual transmission: operate clutch and brake pedal.
Automatic transmission: operate
brake pedal and move selector
lever to P or N.
● Do not operate accelerator pedal.
● Diesel engines: wait until control
indicator ! for preheating
extinguishes.
● Turn key to position 3 and
release after engine has been
started.
Starting the engine 3 155.
To turn the key back from position 2
to 1 or 0, first push the key all the way
in towards the steering column.
Page 21 of 315
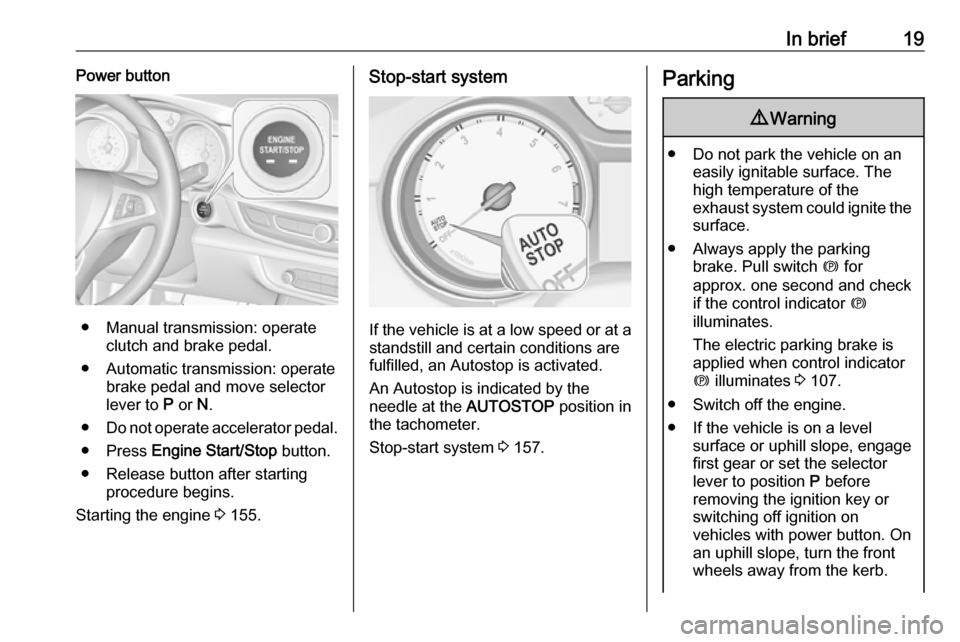
In brief19Power button
● Manual transmission: operateclutch and brake pedal.
● Automatic transmission: operate brake pedal and move selector
lever to P or N.
● Do not operate accelerator pedal.
● Press Engine Start/Stop button.
● Release button after starting procedure begins.
Starting the engine 3 155.
Stop-start system
If the vehicle is at a low speed or at a
standstill and certain conditions are
fulfilled, an Autostop is activated.
An Autostop is indicated by the
needle at the AUTOSTOP position in
the tachometer.
Stop-start system 3 157.
Parking9 Warning
● Do not park the vehicle on an
easily ignitable surface. The
high temperature of the
exhaust system could ignite the
surface.
● Always apply the parking brake. Pull switch m for
approx. one second and check
if the control indicator m
illuminates.
The electric parking brake is applied when control indicator
m illuminates 3 107.
● Switch off the engine. ● If the vehicle is on a level surface or uphill slope, engage
first gear or set the selector
lever to position P before
removing the ignition key or
switching off ignition on
vehicles with power button. On
an uphill slope, turn the front
wheels away from the kerb.
Page 23 of 315

Keys, doors and windows21Keys, doors and
windowsKeys, locks ................................... 21
Keys .......................................... 21
Radio remote control .................22
Electronic key system ................23
Memorised settings ...................26
Central locking system ..............26
Automatic locking ......................28
Child locks ................................. 29
Doors ........................................... 30
Load compartment ....................30
Vehicle security ............................ 35
Anti-theft locking system ...........35
Anti-theft alarm system ..............35
Immobiliser ................................ 38
Exterior mirrors ............................ 38
Convex shape ........................... 38
Electric adjustment ....................38
Folding mirrors .......................... 39
Heated mirrors ........................... 40
Automatic dimming ....................40
Parking assist ............................ 40Interior mirrors............................. 40
Manual anti-dazzle ....................40
Automatic anti-dazzle ................41
Windows ...................................... 41
Windscreen ............................... 41
Power windows ......................... 41
Heated rear window ..................43
Heated windscreen ....................44
Sun visors .................................. 44
Roof ............................................. 44
Sunroof ...................................... 44Keys, locks
KeysCaution
Do not attach heavy or bulky items to the ignition key.
Replacement keys
The key number is specified on a
detachable tag.
The key number must be quoted
when ordering replacement keys as it
is a component of the immobiliser
system.
Locks 3 273.
Central locking 3 26.
Starting the engine 3 155.
Radio remote control 3 22.
Electronic key 3 23.
The code number of the adapter for
the locking wheel nuts is specified on
a card. It must be quoted when
ordering a replacement adapter.
Wheel changing 3 265.
Page 25 of 315
Keys, doors and windows23Enables operation of the following
functions via the use of the remote control buttons:
● central locking system 3 26
● anti-theft locking system 3 35
● anti-theft alarm system 3 35
● power windows 3 41
● sunroof 3 44
The remote control has a range of up
to 100 m, but may also be much less
due to external influences. The
hazard warning flashers confirm
operation.
Handle with care, protect from
moisture and high temperatures and
avoid unnecessary operation.
Fault
If the central locking system cannot
be operated with the radio remote
control, the cause may be one of the
following:
● Fault in radio remote control.
● The range is exceeded.
● The battery voltage is too low.● Frequent, repeated operation of the radio remote control while not
in range, which will require re-
synchronisation.
● Overload of the central locking system by operating at frequent
intervals, the power supply is
interrupted for a short time.
● Interference from higher-power radio waves from other sources.
Manual unlocking 3 26.
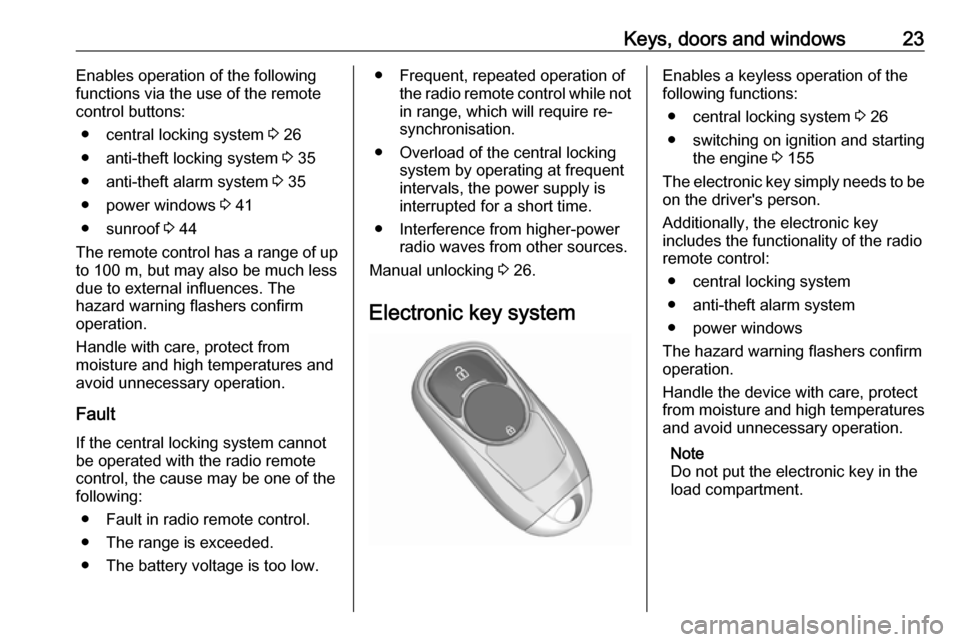
Electronic key systemEnables a keyless operation of the
following functions:
● central locking system 3 26
● switching on ignition and starting the engine 3 155
The electronic key simply needs to be on the driver's person.
Additionally, the electronic key
includes the functionality of the radio
remote control:
● central locking system
● anti-theft alarm system
● power windows
The hazard warning flashers confirm
operation.
Handle the device with care, protect
from moisture and high temperatures
and avoid unnecessary operation.
Note
Do not put the electronic key in the
load compartment.
Page 28 of 315

26Keys, doors and windowsIf the driver's door is not closed
properly, the central locking system
will not work.
Passive locking
Automatic locking 3 28.
Confirmation
Operation of central locking system is confirmed by the hazard warning
flashers. A precondition is that the
setting is activated in the vehicle
personalisation 3 123.
Fault
If the central locking cannot be
operated or the engine cannot be
started, the cause may be one of the
following:
● Fault in electronic key.
● Electronic key is out of reception range.
● The battery voltage is too low.● Overload of the central locking system by operating at frequent
intervals, the power supply is
interrupted for a short time.
● Interference from higher-power radio waves from other sources.
To rectify the cause of the fault,
change the position of the electronic
key.
Manual unlocking 3 26.
Memorised settings
Whenever the ignition is switched off, some of the following settings are
automatically memorised by the
currently used remote control unit or
the electronic key:
● automatic climate control
● lighting
● Infotainment system
● central locking system
● FlexRide interactive driving system
● comfort settingsThe saved settings are automatically
used the next time the ignition is
switched on with the memorised
electronic key 3 23.
A precondition is that Personalisation
by Driver is activated in the personal
settings of the Info Display. This must
be set for each electronic key which is
used. The status change is available
only after locking and unlocking the
vehicle.
The assigned memory position of the power seat is automatically recalled
when switching on ignition and Auto
Memory Recall is activated in the Info
Display for the memorised electronic
key.
Power seat 3 51.
Vehicle personalisation 3 123.
Central locking system
Unlocks and locks doors, load
compartment and fuel filler flap.
A pull on an interior door handle
unlocks the respective door. Pulling
the handle once more opens the door.
Page 34 of 315
32Keys, doors and windowsPress X twice to open or close the
tailgate. To prevent unintended
opening of the tailgate, X must be
pressed longer than during locking or unlocking.
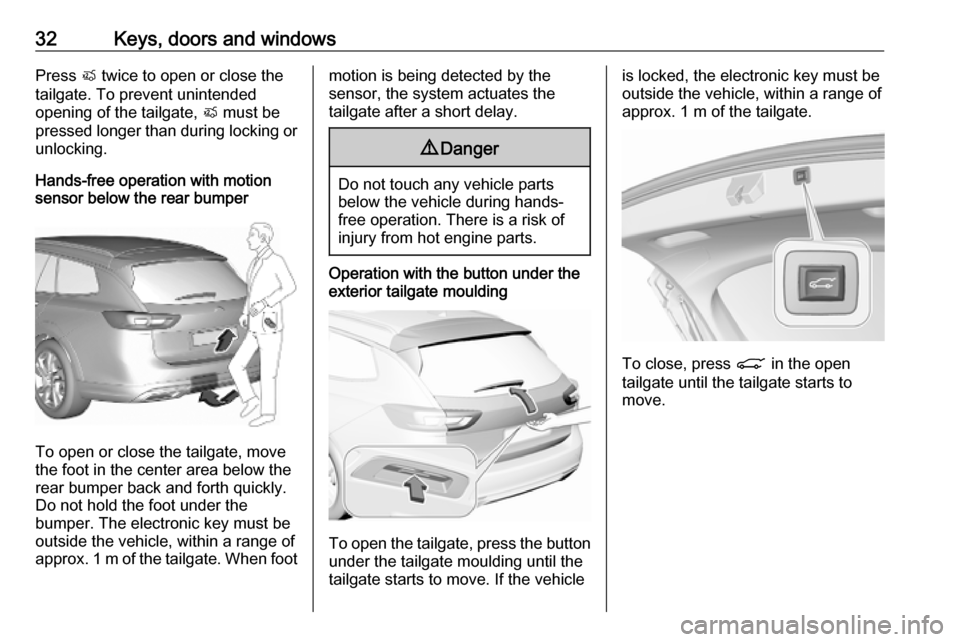
Hands-free operation with motion
sensor below the rear bumper
To open or close the tailgate, move
the foot in the center area below the
rear bumper back and forth quickly.
Do not hold the foot under the
bumper. The electronic key must be
outside the vehicle, within a range of
approx. 1 m of the tailgate. When foot
motion is being detected by the
sensor, the system actuates the
tailgate after a short delay.9 Danger
Do not touch any vehicle parts
below the vehicle during hands-
free operation. There is a risk of
injury from hot engine parts.
Operation with the button under the
exterior tailgate moulding
To open the tailgate, press the button
under the tailgate moulding until the
tailgate starts to move. If the vehicle
is locked, the electronic key must be
outside the vehicle, within a range of
approx. 1 m of the tailgate.
To close, press C in the open
tailgate until the tailgate starts to
move.
Page 35 of 315
Keys, doors and windows33Operation with the switch on the
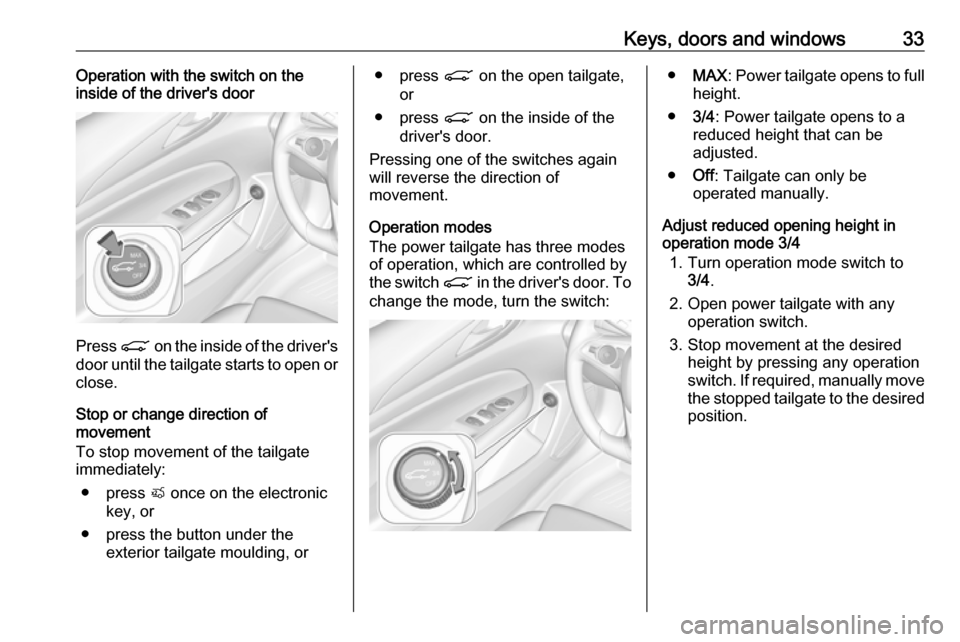
inside of the driver's door
Press C on the inside of the driver's
door until the tailgate starts to open or close.
Stop or change direction of
movement
To stop movement of the tailgate
immediately:
● press X once on the electronic
key, or
● press the button under the exterior tailgate moulding, or
● press C on the open tailgate,
or
● press C on the inside of the
driver's door.
Pressing one of the switches again
will reverse the direction of
movement.
Operation modes
The power tailgate has three modes
of operation, which are controlled by
the switch C in the driver's door. To
change the mode, turn the switch:● MAX : Power tailgate opens to full
height.
● 3/4: Power tailgate opens to a
reduced height that can be
adjusted.
● Off: Tailgate can only be
operated manually.
Adjust reduced opening height in
operation mode 3/4
1. Turn operation mode switch to 3/4 .
2. Open power tailgate with any operation switch.
3. Stop movement at the desired height by pressing any operation
switch. If required, manually move
the stopped tailgate to the desired
position.
Page 40 of 315
38Keys, doors and windowsIf the vehicle's battery is to be
disconnected (e.g. for maintenance
work), the alarm siren must be
deactivated as follows: switch the
ignition on then off, then disconnect
the vehicle's battery within
15 seconds.
Immobiliser
The immobiliser is activated
automatically.
If the control indicator d flashes when
the ignition is on, there is a fault in the
system; the engine cannot be started. Switch off the ignition and repeat the
start attempt. Retry with the key in the transmitter pocket. Operation on
vehicles with electronic key system in case of failure 3 153.
If the control indicator d continues
flashing, attempt to start the engine using the spare key.
Seek the assistance of a workshop.Note
Radio Frequency Identification
(RFID) tags may cause interference with the key. Do not have it placed
near the key when starting the
vehicle.
Note
The immobiliser does not lock the
doors. You should always lock the
vehicle after leaving it and switch on
the anti-theft alarm system 3 26,
3 35.
Control indicator d 3 110.Exterior mirrors
Convex shape The shape of the mirror makes
objects appear smaller, which will
affect the ability to estimate
distances.
Side blind spot alert 3 206.
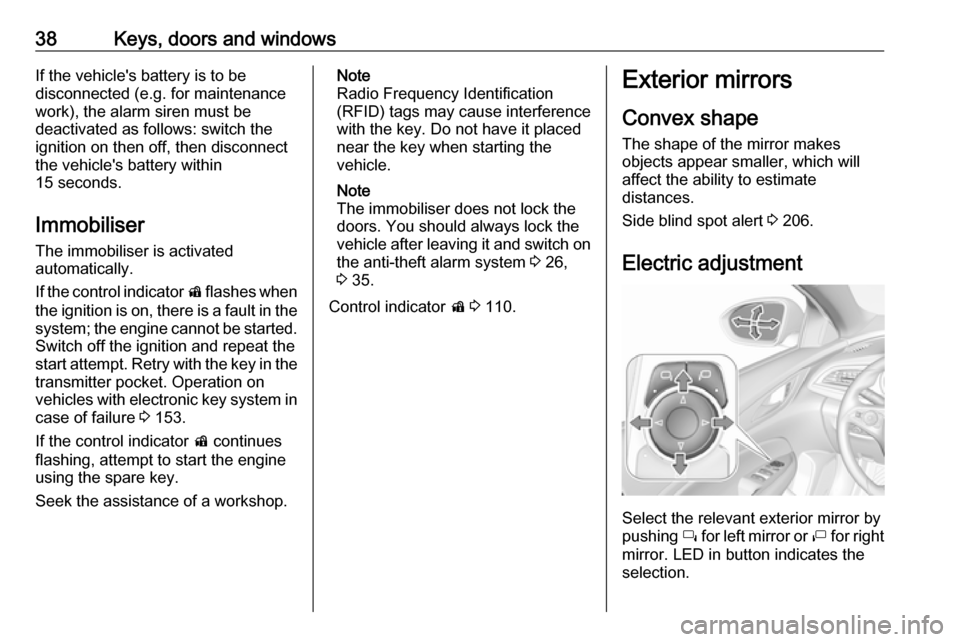
Electric adjustment
Select the relevant exterior mirror by
pushing í for left mirror or ì for right
mirror. LED in button indicates the
selection.
Page 57 of 315
Seats, restraints55Heating
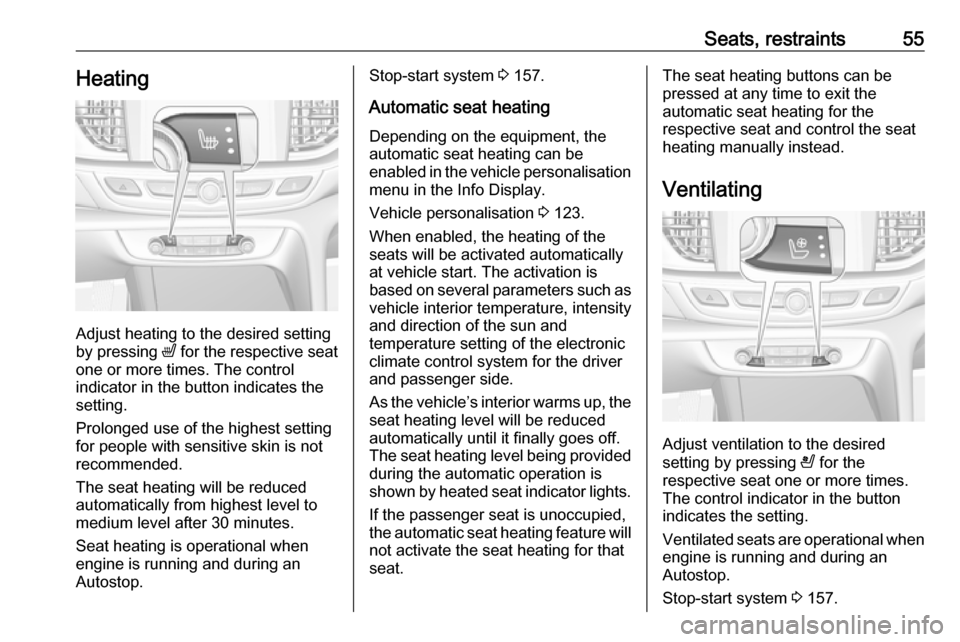
Adjust heating to the desired setting
by pressing ß for the respective seat
one or more times. The control
indicator in the button indicates the
setting.
Prolonged use of the highest setting
for people with sensitive skin is not
recommended.
The seat heating will be reduced
automatically from highest level to
medium level after 30 minutes.
Seat heating is operational when
engine is running and during an
Autostop.
Stop-start system 3 157.
Automatic seat heating Depending on the equipment, the
automatic seat heating can be
enabled in the vehicle personalisation
menu in the Info Display.
Vehicle personalisation 3 123.
When enabled, the heating of the
seats will be activated automatically
at vehicle start. The activation is
based on several parameters such as vehicle interior temperature, intensity
and direction of the sun and
temperature setting of the electronic
climate control system for the driver
and passenger side.
As the vehicle’s interior warms up, the seat heating level will be reduced
automatically until it finally goes off. The seat heating level being provided
during the automatic operation is
shown by heated seat indicator lights.
If the passenger seat is unoccupied,
the automatic seat heating feature will not activate the seat heating for that
seat.The seat heating buttons can be
pressed at any time to exit the
automatic seat heating for the
respective seat and control the seat
heating manually instead.
Ventilating
Adjust ventilation to the desired
setting by pressing A for the
respective seat one or more times.
The control indicator in the button
indicates the setting.
Ventilated seats are operational when
engine is running and during an
Autostop.
Stop-start system 3 157.