instrument panel OPEL KARL 2019 Owner's Manual
[x] Cancel search | Manufacturer: OPEL, Model Year: 2019, Model line: KARL, Model: OPEL KARL 2019Pages: 191, PDF Size: 5.51 MB
Page 12 of 191
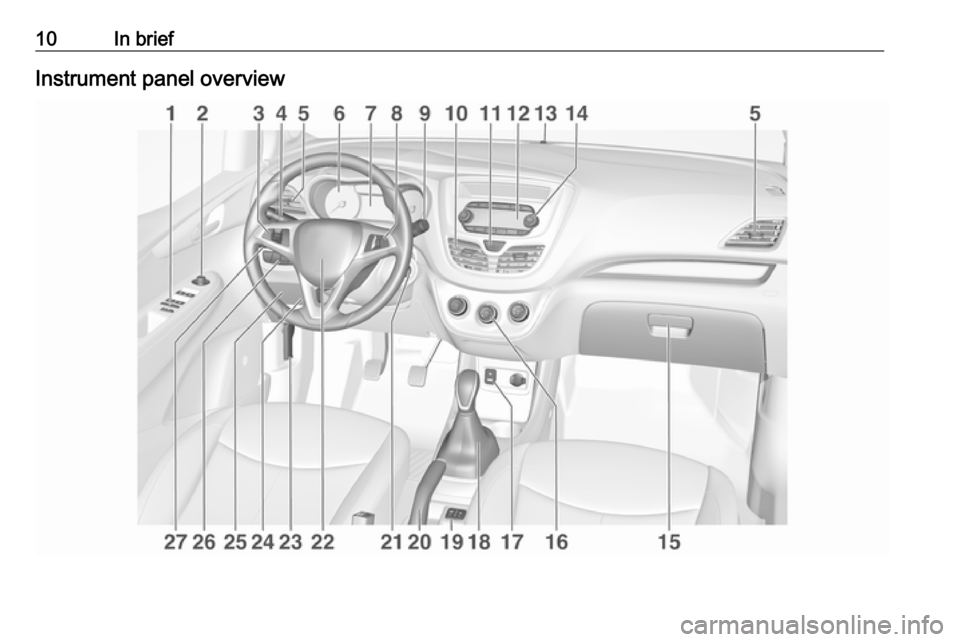
10In briefInstrument panel overview
Page 13 of 191

In brief111Central locking system ..........22
Power windows .....................30
2 Exterior mirrors .....................28
3 Cruise control .....................117
Speed limiter ...................... 118
Heated steering wheel ..........60
4 Turn lights, headlight
flash, low beam and high
beam ..................................... 92
Exit lighting ........................... 94
Parking lights ........................ 93
5 Side air vents ...................... 102
6 Instruments .......................... 64
7 Driver Information Centre ...... 75
8 Steering wheel controls .......60
9 Windscreen wiper,
windscreen washer
system, rear window
wiper, rear window washer
system ................................... 61
10 Centre air vents .................. 102
11 Hazard warning flashers ......91
12 Info Display ........................... 8013Anti-theft alarm system
status LED ........................... 27
14 Infotainment system
15 Glovebox .............................. 52
16 Climate control system .......... 96
17 AUX input, USB input
18 Selector lever .....................111
19 Seat heating .......................... 37
20 Parking brake ......................113
21 Ignition switch with
steering wheel lock ............105
22 Horn ..................................... 61
Driver airbag ........................ 43
23 Bonnet release lever ..........128
24 Steering wheel adjustment ..60
25 Fuse box ............................ 143
26 Traction Control system .....114
City mode ............................ 115
Stop-start system ................107
Lane departure warning .....121
Electronic Stability Control . 11527 Light switch .......................... 90
Headlight range
adjustment ........................... 91
Front fog light ........................ 92
Rear fog light ........................ 92
Brightness of instrument
panel illumination ..................93
Page 15 of 191

In brief131Central locking system ..........22
Power windows .....................30
2 Exterior mirrors .....................28
3 Cruise control .....................117
Speed limiter ...................... 118
Heated steering wheel ..........60
4 Turn lights, headlight
flash, low beam and high
beam ..................................... 92
Exit lighting ........................... 94
Parking lights ........................ 93
5 Side air vents ...................... 102
6 Instruments .......................... 64
7 Driver Information Centre ...... 75
8 Steering wheel controls .......60
9 Windscreen wiper,
windscreen washer
system, rear window
wiper, rear window washer
system ................................... 61
10 Centre air vents .................. 102
11 Hazard warning flashers ......91
12 Info Display ........................... 8013Anti-theft alarm system
status LED ........................... 27
14 Infotainment system
15 Glovebox .............................. 52
16 Climate control system .......... 96
17 AUX input, USB input
18 Selector lever .....................111
19 Seat heating .......................... 37
20 Parking brake ......................113
21 Ignition switch with
steering wheel lock ............105
22 Horn ..................................... 61
Driver airbag ........................ 43
23 Bonnet release lever ..........128
24 Steering wheel adjustment ..60
25 Fuse box ............................ 143
26 Traction Control system .....114
City mode ............................ 115
Stop-start system ................107
Lane departure warning .....121
Electronic Stability Control . 11527 Light switch .......................... 90
Headlight range
adjustment ........................... 91
Front fog light ........................ 92
Rear fog light ........................ 92
Brightness of instrument
panel illumination ..................93
Page 29 of 191
Keys, doors and windows27Vehicle security
Anti-theft alarm system
It monitors: ● doors, tailgate, bonnet
● ignition
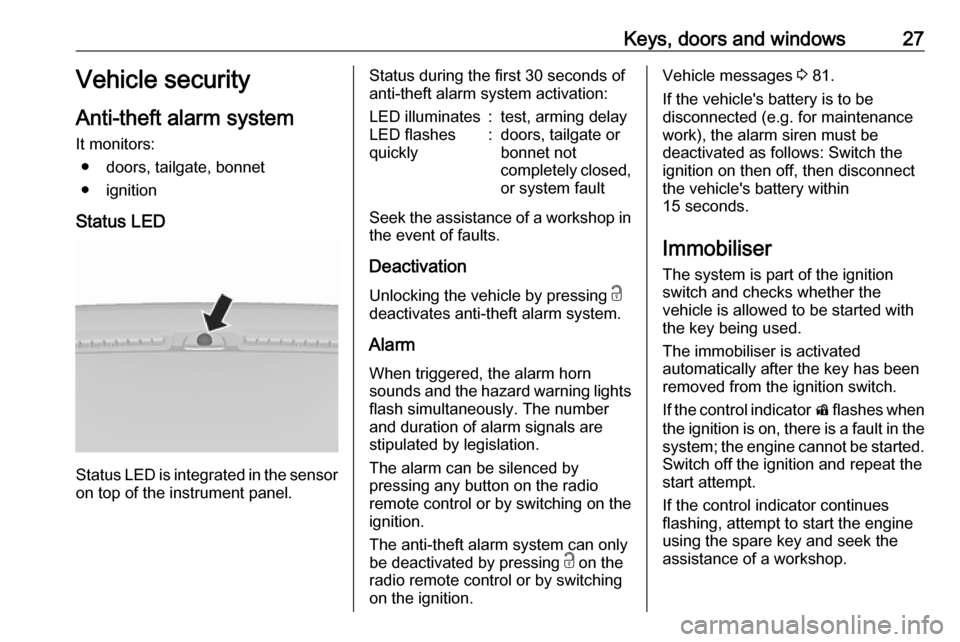
Status LED
Status LED is integrated in the sensor
on top of the instrument panel.
Status during the first 30 seconds of
anti-theft alarm system activation:LED illuminates:test, arming delayLED flashes
quickly:doors, tailgate or
bonnet not
completely closed,
or system fault
Seek the assistance of a workshop in the event of faults.
Deactivation Unlocking the vehicle by pressing c
deactivates anti-theft alarm system.
Alarm When triggered, the alarm horn
sounds and the hazard warning lights flash simultaneously. The number
and duration of alarm signals are
stipulated by legislation.
The alarm can be silenced by
pressing any button on the radio
remote control or by switching on the
ignition.
The anti-theft alarm system can only
be deactivated by pressing c on the
radio remote control or by switching
on the ignition.
Vehicle messages 3 81.
If the vehicle's battery is to be
disconnected (e.g. for maintenance
work), the alarm siren must be
deactivated as follows: Switch the
ignition on then off, then disconnect
the vehicle's battery within
15 seconds.
Immobiliser
The system is part of the ignition
switch and checks whether the
vehicle is allowed to be started with the key being used.
The immobiliser is activated
automatically after the key has been
removed from the ignition switch.
If the control indicator d flashes when
the ignition is on, there is a fault in the
system; the engine cannot be started. Switch off the ignition and repeat the
start attempt.
If the control indicator continues
flashing, attempt to start the engine
using the spare key and seek the
assistance of a workshop.
Page 42 of 191
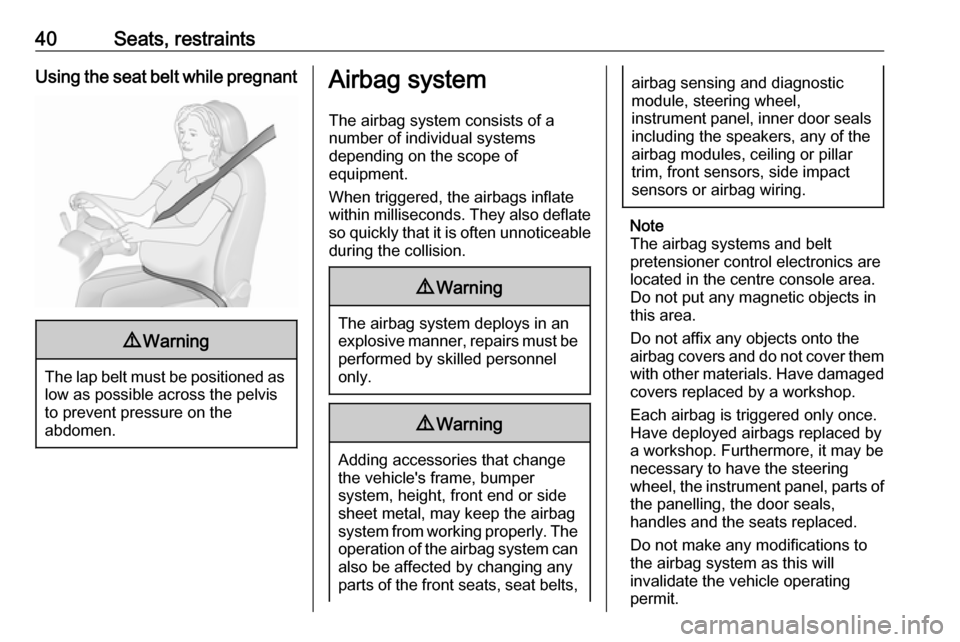
40Seats, restraintsUsing the seat belt while pregnant9Warning
The lap belt must be positioned as
low as possible across the pelvis
to prevent pressure on the
abdomen.
Airbag system
The airbag system consists of a
number of individual systems
depending on the scope of
equipment.
When triggered, the airbags inflate
within milliseconds. They also deflate
so quickly that it is often unnoticeable
during the collision.9 Warning
The airbag system deploys in an
explosive manner, repairs must be performed by skilled personnel
only.
9 Warning
Adding accessories that change
the vehicle's frame, bumper
system, height, front end or side
sheet metal, may keep the airbag
system from working properly. The operation of the airbag system can
also be affected by changing any
parts of the front seats, seat belts,
airbag sensing and diagnostic
module, steering wheel,
instrument panel, inner door seals including the speakers, any of the
airbag modules, ceiling or pillar
trim, front sensors, side impact
sensors or airbag wiring.
Note
The airbag systems and belt
pretensioner control electronics are
located in the centre console area.
Do not put any magnetic objects in
this area.
Do not affix any objects onto the
airbag covers and do not cover them with other materials. Have damagedcovers replaced by a workshop.
Each airbag is triggered only once.
Have deployed airbags replaced by
a workshop. Furthermore, it may be
necessary to have the steering
wheel, the instrument panel, parts of
the panelling, the door seals,
handles and the seats replaced.
Do not make any modifications to
the airbag system as this will
invalidate the vehicle operating
permit.
Page 45 of 191

Seats, restraints43чрез АКТИВНА ВЪЗДУШНА
ВЪЗГЛАВНИЦА пред нея - може да
се стигне до СМЪРТ или
СЕРИОЗНО НАРАНЯВАНЕ на
ДЕТЕТО.
RO: Nu utilizaţi NICIODATĂ un scaun
pentru copil îndreptat spre partea din
spate a maşinii pe un scaun protejat
de un AIRBAG ACTIV în faţa sa;
acest lucru poate duce la DECESUL
sau VĂTĂMAREA GRAVĂ a
COPILULUI.
CS: NIKDY nepoužívejte dětský
zádržný systém instalovaný proti
směru jízdy na sedadle, které je
chráněno před sedadlem AKTIVNÍM
AIRBAGEM. Mohlo by dojít k
VÁŽNÉMU PORANĚNÍ nebo ÚMRTÍ
DÍTĚTE.
SK: NIKDY nepoužívajte detskú
sedačku otočenú vzad na sedadle
chránenom AKTÍVNYM AIRBAGOM,
pretože môže dôjsť k SMRTI alebo
VÁŽNYM ZRANENIAM DIEŤAŤA.
LT: JOKIU BŪDU nemontuokite atgal
atgręžtos vaiko tvirtinimo sistemos
sėdynėje, prieš kurią įrengta AKTYVI
ORO PAGALVĖ, nes VAIKAS GALI
ŽŪTI arba RIMTAI SUSIŽALOTI.LV: NEKĀDĀ GADĪJUMĀ
neizmantojiet uz aizmuguri vērstu bērnu sēdeklīti sēdvietā, kas tiek
aizsargāta ar tās priekšā uzstādītu
AKTĪVU DROŠĪBAS SPILVENU, jo pretējā gadījumā BĒRNS var gūt
SMAGAS TRAUMAS vai IET BOJĀ.
ET: ÄRGE kasutage tahapoole
suunatud lapseturvaistet istmel, mille
ees on AKTIIVSE TURVAPADJAGA
kaitstud iste, sest see võib
põhjustada LAPSE SURMA või
TÕSISE VIGASTUSE.
MT: QATT tuża trażżin għat-tfal li
jħares lejn in-naħa ta’ wara fuq sit
protett b’AIRBAG ATTIV quddiemu;
dan jista’ jikkawża l-MEWT jew
ĠRIEĦI SERJI lit-TFAL.
GA: Ná húsáid srian sábháilteachta
linbh cúil RIAMH ar shuíochán a
bhfuil mála aeir ag feidhmiú os a
chomhair. Tá baol BÁIS nó GORTÚ
DONA don PHÁISTE ag baint leis.
Beyond the warning required by
ECE R94.02, for safety reasons a
forward-facing child restraint system
must only be used subject to the
instructions and restrictions in the
tables 3 49.The airbag label is located on both
sides of the front passenger sun visor.
Airbag deactivation 3 45.
Front airbag system
The front airbag system consists of
one airbag in the steering wheel and
one in the instrument panel on the
front passenger side. The location is
identified by the word AIRBAG.
The front airbag system is triggered in
the event of a front-end impact of a
certain severity. The ignition must be
switched on.
Page 47 of 191
Seats, restraints45Curtain airbag system
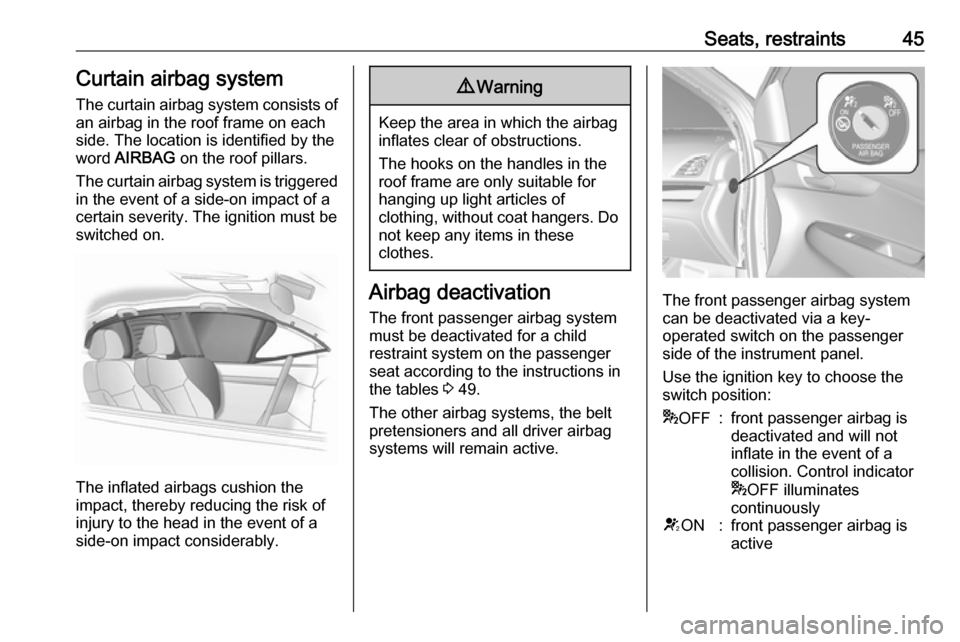
The curtain airbag system consists of an airbag in the roof frame on each
side. The location is identified by the
word AIRBAG on the roof pillars.
The curtain airbag system is triggered in the event of a side-on impact of a
certain severity. The ignition must be
switched on.
The inflated airbags cushion the
impact, thereby reducing the risk of
injury to the head in the event of a
side-on impact considerably.
9 Warning
Keep the area in which the airbag
inflates clear of obstructions.
The hooks on the handles in the
roof frame are only suitable for
hanging up light articles of
clothing, without coat hangers. Do not keep any items in these
clothes.
Airbag deactivation
The front passenger airbag system must be deactivated for a child
restraint system on the passenger
seat according to the instructions in
the tables 3 49.
The other airbag systems, the belt
pretensioners and all driver airbag
systems will remain active.The front passenger airbag system can be deactivated via a key-
operated switch on the passenger
side of the instrument panel.
Use the ignition key to choose the
switch position:
* OFF:front passenger airbag is
deactivated and will not
inflate in the event of a
collision. Control indicator
* OFF illuminates
continuouslyV ON:front passenger airbag is
active
Page 60 of 191

58StorageLoading information● Heavy objects in the load compartment should be placedagainst the seat backrests.
Ensure that the backrests are
securely engaged. If objects can
be stacked, heavier objects
should be placed at the bottom.
● Prevent sliding of loose objects by securing them with straps
attached to the lashing eyes.
● When transporting objects in the load compartment, the backrests
of the rear seats must not be
angled forward.
● Do not allow the load to protrude above the upper edge of the
backrests.
● Do not place any objects on the load compartment cover or theinstrument panel, and do not
cover the sensor on top of the instrument panel.
● The load must not obstruct the operation of the pedals, parking
brake and gear selector lever, orhinder the freedom of movement of the driver. Do not place any
unsecured objects in the interior.
● Do not drive with an open load compartment.9Warning
Always make sure that the load in
the vehicle is securely stowed.
Otherwise objects can be thrown
around inside the vehicle and
cause personal injury or damage
to the load or vehicle.
● The payload is the difference between the permitted gross
vehicle weight (see identification
plate 3 168) and the EC kerb
weight.
To calculate the payload, enter
the data for your vehicle in the
weights table at the front of this
manual.
The EC kerb weight includes
weights for the driver (68 kg),
luggage (7 kg) and all fluids (fuel
tank 90% full).
Optional equipment and
accessories increase the kerb
weight.
● Driving with a roof load increases
the sensitivity of the vehicle to
cross-winds and has a
detrimental effect on vehicle
handling due to the vehicle's
higher centre of gravity.
Distribute the load evenly and secure it properly with retaining
straps. Adjust the tyre pressure
and vehicle speed according to
the load conditions. Check and
retighten the straps frequently.
The permissible roof load for
vehicles with roof railing is 50 kg.
The roof load is the combined
weight of the roof rack and the
load.
Page 82 of 191
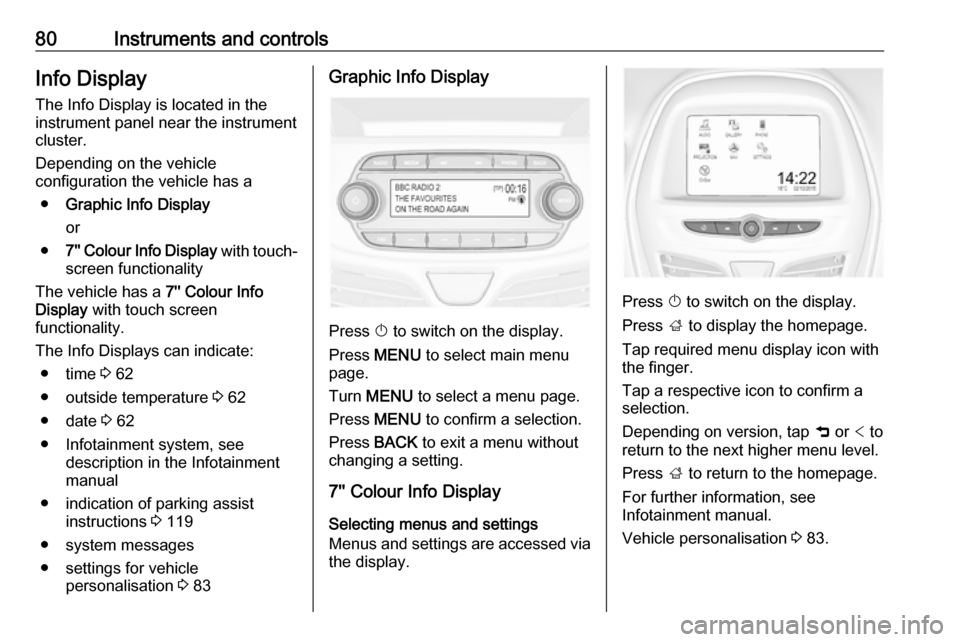
80Instruments and controlsInfo DisplayThe Info Display is located in the
instrument panel near the instrument
cluster.
Depending on the vehicle
configuration the vehicle has a
● Graphic Info Display
or
● 7'' Colour Info Display with touch-
screen functionality
The vehicle has a 7'' Colour Info
Display with touch screen
functionality.
The Info Displays can indicate: ● time 3 62
● outside temperature 3 62
● date 3 62
● Infotainment system, see description in the Infotainment
manual
● indication of parking assist instructions 3 119
● system messages
● settings for vehicle personalisation 3 83Graphic Info Display
Press X to switch on the display.
Press MENU to select main menu
page.
Turn MENU to select a menu page.
Press MENU to confirm a selection.
Press BACK to exit a menu without
changing a setting.
7'' Colour Info Display
Selecting menus and settings
Menus and settings are accessed via
the display.
Press X to switch on the display.
Press ; to display the homepage.
Tap required menu display icon with
the finger.
Tap a respective icon to confirm a
selection.
Depending on version, tap 9 or < to
return to the next higher menu level.
Press ; to return to the homepage.
For further information, see
Infotainment manual.
Vehicle personalisation 3 83.
Page 92 of 191
90LightingLightingExterior lighting............................ 90
Light switch ................................ 90
High beam ................................. 90
Headlight flash ........................... 90
Headlight range adjustment ......91
Headlights when driving abroad ...................................... 91
Daytime running lights ...............91
Cornering lights ......................... 91
Hazard warning flashers ............91
Turn lights .................................. 92
Front fog lights ........................... 92
Rear fog light ............................. 92
Parking lights ............................. 93
Reversing lights .........................93
Misted light covers .....................93
Interior lighting ............................. 93
Instrument panel illumination control ....................................... 93
Interior lights .............................. 94
Reading lights ............................ 94
Lighting features ..........................94
Exit lighting ................................ 94
Battery discharge protection ......95Exterior lighting
Light switch
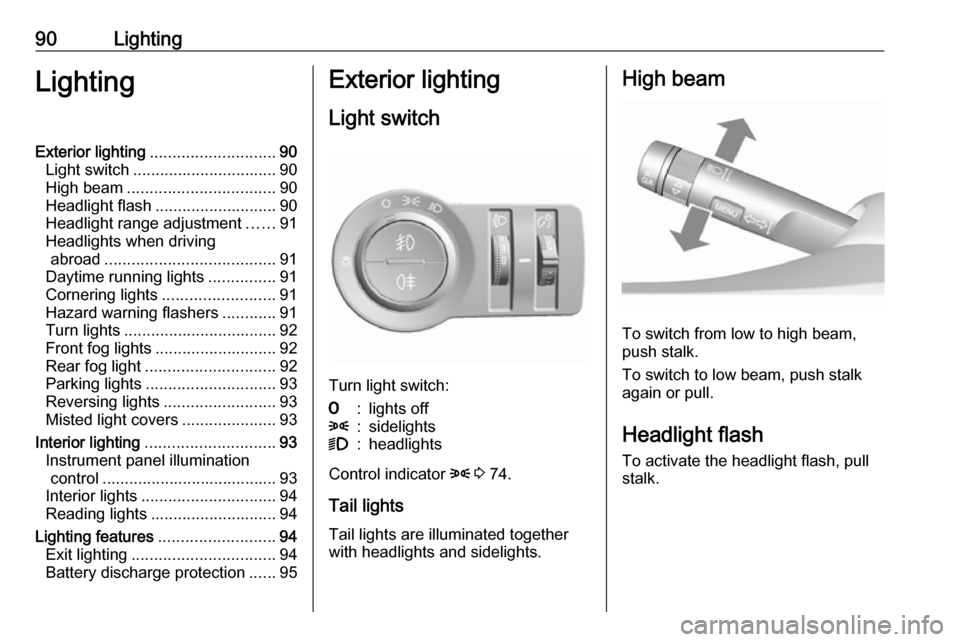
Turn light switch:
7:lights off8:sidelights9:headlights
Control indicator 8 3 74.
Tail lights Tail lights are illuminated together
with headlights and sidelights.
High beam
To switch from low to high beam,
push stalk.
To switch to low beam, push stalk again or pull.
Headlight flash To activate the headlight flash, pull
stalk.