turn signal bulb OPEL MOKKA X 2017 Manual user
[x] Cancel search | Manufacturer: OPEL, Model Year: 2017, Model line: MOKKA X, Model: OPEL MOKKA X 2017Pages: 247, PDF Size: 6.59 MB
Page 94 of 247

92Instruments and controlsIlluminates brieflyThe parking lights are switched on.
Flashes
A turn signal or the hazard warning flashers are activated.
Rapid flashing: failure of a turn signal
light or associated fuse, failure of turn
signal light on trailer.
Bulb replacement 3 186, Fuses
3 190.
Turn signals 3 122.
Seat belt reminder
Seat belt reminder on front seats
X for driver's seat illuminates or
flashes red in the instrument cluster.
k for front passenger seat illuminates
or flashes red in the centre console
when seat is occupied.
Illuminates
After the ignition has been switched on until the seat belt has been
fastened.Flashes
After having started the engine until
the seat belt has been fastened.
Seat belt status on rear seats
(vehicles with Midlevel display)
X illuminates or flashes white or grey
in the Driver Information Centre, after having started the engine.
Illuminates white
Seat belt is unfastened.
Illuminates grey
Seat belt has been fastened.
Flashes white or grey
Fastened seat belt has been
unfastened.
Fastening the seat belt 3 45.
Seat belt status on rear seats
(vehicles with Uplevel display)
X illuminates green or grey or flashes
yellow in the Driver Information
Centre, after having started the
engine.Illuminates grey
Seat belt is unfastened.
Illuminates green
Seat belt has been fastened.
Flashes yellow
Fastened seat belt has been
unfastened.
Fastening the seat belt 3 45.
Airbag and belt tensioners
v illuminates red.
When the ignition is switched on, the control indicator illuminates for a few
seconds. If it does not illuminate, does not go out after a few secondsor illuminates whilst driving, there is a
fault in the airbag system. Seek the
assistance of a workshop. The
airbags and belt pretensioners may
fail to trigger in the event of an
accident.
Deployment of the belt pretensioners
or airbags is indicated by continuous
illumination of v.
Page 188 of 247

186Vehicle careBulb replacement
Switch off the ignition and turn off the relevant switch or close the doors.
Only hold a new bulb at the base. Do
not touch the bulb glass with bare
hands.
Use only the same bulb type for
replacement.
Replace headlight bulbs from within
the engine compartment.
Note
After driving in heavy rain or after
washing, some exterior light lenses
could appear frosty.
This condition is caused by the
temperature difference between the
inside and outside of the light.
This is similar to the condensation
on your windows inside your vehicle during the rain and doesn't indicate
a problem with your vehicle.
If the water leaks into the light bulb
circuitry, have the vehicle checked
by your authorised workshop.Halogen bulbs9 Warning
Halogen bulbs have pressurized
gas inside and can burst if you
drop or scratch the bulb. You or others could be injured. Be sure to read and follow the instructions onthe bulb package.
LED lighting
This vehicle has several LED lights.
For replacement of any LED lighting
assembly, contact a workshop.
Halogen headlights
Baselevel headlight assembly
The base model vehicle has halogen
high beam and low beam headlights,
an LED turn and lane-change signal,
a sidelight and daytime running lights on the headlight assembly.
Passenger side shown, driver side
similar.
On the driver side remove the
windscreen washer bottle filler neck,
before changing a bulb.
1. High beam headlights
2. Low beam headlights
High beam and low beam headlights 1. Open the bonnet. Bonnet 3 179
Page 189 of 247

Vehicle care187
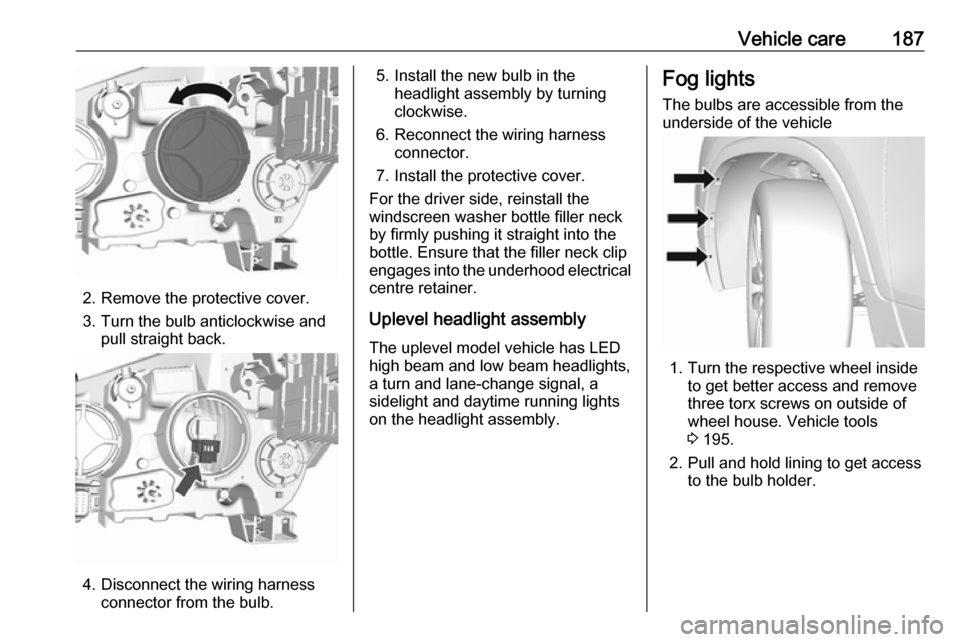
2. Remove the protective cover.
3. Turn the bulb anticlockwise and pull straight back.
4. Disconnect the wiring harnessconnector from the bulb.
5. Install the new bulb in theheadlight assembly by turning
clockwise.
6. Reconnect the wiring harness connector.
7. Install the protective cover.
For the driver side, reinstall the
windscreen washer bottle filler neck
by firmly pushing it straight into the
bottle. Ensure that the filler neck clip
engages into the underhood electrical centre retainer.
Uplevel headlight assembly The uplevel model vehicle has LED
high beam and low beam headlights, a turn and lane-change signal, asidelight and daytime running lights
on the headlight assembly.Fog lights
The bulbs are accessible from the
underside of the vehicle
1. Turn the respective wheel inside to get better access and remove
three torx screws on outside of
wheel house. Vehicle tools
3 195.
2. Pull and hold lining to get access to the bulb holder.
Page 190 of 247

188Vehicle care
3.Pull the retaining rib outwards and
remove plug connector from the
bulb socket.
4. Turn the bulb holder anticlockwise
and remove it from the reflector.
5. Remove and replace the bulb socket with bulb and attach the
plug connector.
6. Insert the bulb socket into the reflector by turning clockwise and
engage.
7. Re-assemble the lining and fasten
the three torx screws.
Tail lights
The vehicle has halogen turn and lane-change signals, a back-up light
and LED tail/stop lights on the tail light
assembly.
Left-hand side
1. Disengage both covers at the respective outer side by inserting
a screwdriver. Remove both
covers and unscrew screws.
Remove the panel.
2. First disengage cover by inserting
a screwdriver at the recess. Then
disengage cover at the front and
upper side. Remove cover.
Page 191 of 247

Vehicle care189Right-hand side
1.Remove the storage door and the
tyre repair kit.
2. Remove the cover.
3. Turn and lane-change signal light (1)
Back-up light (2)
4. Remove bulb holder. Remove and renew bulb.
5.Insert bulb holder into the tail light
assembly. Install tail light
assembly in body and tighten.
Close covers and engage.
6. Switch on ignition, operate and check all lights.
Number plate light
1. Prise the light out with a screwdriver.
2. Remove bulb housing downwards, taking care not to pull
on the cable.
Rotate bulb holder anticlockwise
to disengage.