audio OPEL MOKKA X 2018.5 Manual user
[x] Cancel search | Manufacturer: OPEL, Model Year: 2018.5, Model line: MOKKA X, Model: OPEL MOKKA X 2018.5Pages: 155, PDF Size: 2.54 MB
Page 89 of 155
Introduction89Usage
Control elements
The Infotainment system is operated
via function buttons, a touch screen
and menus that are shown on the
display.
Inputs are made optionally via: ● the central control unit in the control panel 3 86
● the touch screen 3 92
● audio controls on the steering wheel 3 86
● the speech recognition 3 111
Switching the Infotainment
system on or off
Short press X to switch the system
on. After switching on, the last
selected Infotainment source
becomes active.
Long press X to switch the system
off.Automatic switch-off
If the Infotainment system has been
switched on by pressing X while the
ignition is switched off, it will switch off
again automatically 10 minutes after
the last user input.
Setting the volume Turn X. The current setting is shown
on the display.
When the Infotainment system is
switched on, the last selected volume is set, provided that it is lower than themaximum start-up volume. For a
detailed description 3 95.
Speed compensated volume
When the speed compensated
volume is activated 3 95, the
volume is adapted automatically to
make up for the road and wind noise
as you drive.
Mute
Press X to mute the Infotainment
system.
To cancel the mute function, press
X again. The last selected volume is
set again.Modes of operation
Press ; to display the home menu.
Note
For a detailed description of menu
operation via touch screen 3 92.
Audio
Select Audio to open the main menu
of the last selected audio mode.
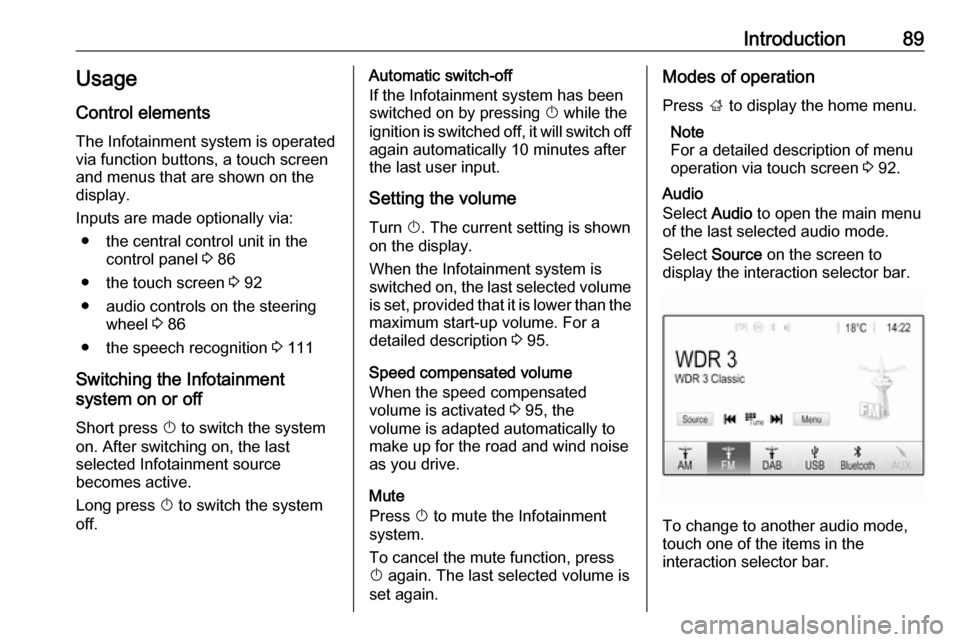
Select Source on the screen to
display the interaction selector bar.
To change to another audio mode,
touch one of the items in the
interaction selector bar.
Page 94 of 155
94Basic operationTo scroll from one page to another:● Place your finger anywhere on the screen and move it left to
scroll to the next page or right to
scroll to the previous page.
Note
Constant pressure must be applied
and the finger must be moved at a
constant speed.
● Touch q or p on the screen.
Tone settings
In the tone settings menu, the tone characteristics can be set. The menu
may be accessed from each audio
main menu.
To open the tone settings menu,
select Menu in the respective audio
main menu. If necessary, scroll through the list of menu items and
select Tone Settings . The respective
menu is displayed.
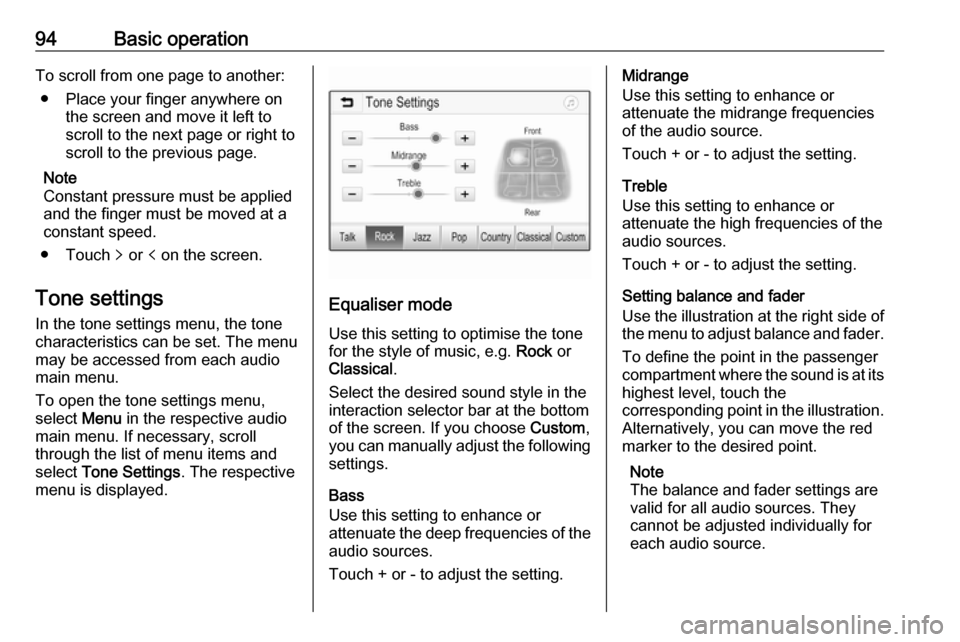
Equaliser mode
Use this setting to optimise the tone
for the style of music, e.g. Rock or
Classical .
Select the desired sound style in the
interaction selector bar at the bottom
of the screen. If you choose Custom,
you can manually adjust the following
settings.
Bass
Use this setting to enhance or
attenuate the deep frequencies of the audio sources.
Touch + or - to adjust the setting.
Midrange
Use this setting to enhance or
attenuate the midrange frequencies
of the audio source.
Touch + or - to adjust the setting.
Treble
Use this setting to enhance or
attenuate the high frequencies of the
audio sources.
Touch + or - to adjust the setting.
Setting balance and fader
Use the illustration at the right side of
the menu to adjust balance and fader.
To define the point in the passenger
compartment where the sound is at its highest level, touch the
corresponding point in the illustration.
Alternatively, you can move the red
marker to the desired point.
Note
The balance and fader settings are
valid for all audio sources. They
cannot be adjusted individually for
each audio source.
Page 96 of 155
96Basic operation
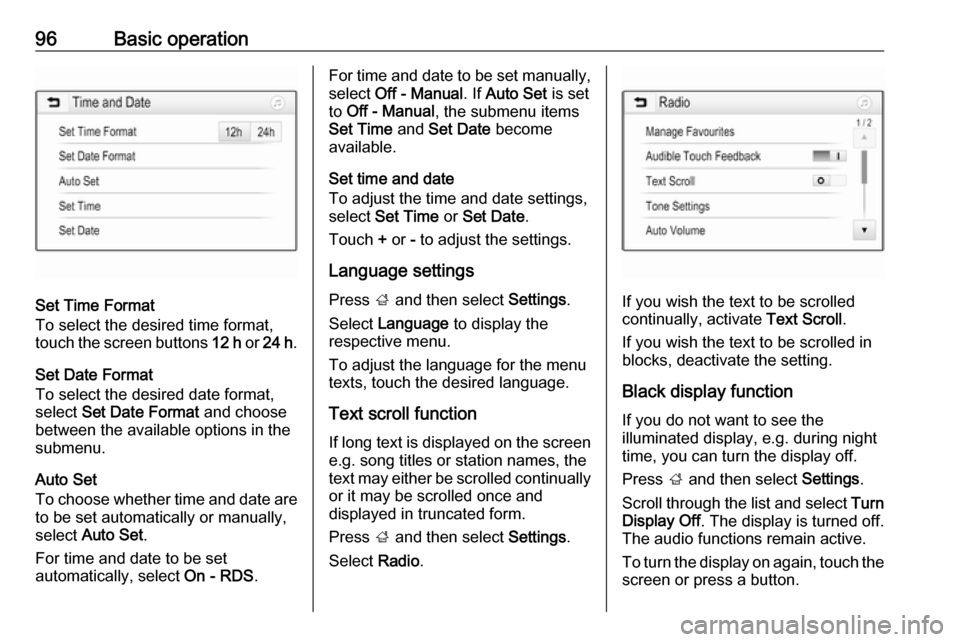
Set Time Format
To select the desired time format,
touch the screen buttons 12 h or 24 h .
Set Date Format
To select the desired date format,
select Set Date Format and choose
between the available options in the
submenu.
Auto Set
To choose whether time and date are
to be set automatically or manually,
select Auto Set .
For time and date to be set
automatically, select On - RDS.
For time and date to be set manually,
select Off - Manual . If Auto Set is set
to Off - Manual , the submenu items
Set Time and Set Date become
available.
Set time and date
To adjust the time and date settings, select Set Time or Set Date .
Touch + or - to adjust the settings.
Language settings
Press ; and then select Settings.
Select Language to display the
respective menu.
To adjust the language for the menu
texts, touch the desired language.
Text scroll function If long text is displayed on the screen
e.g. song titles or station names, the
text may either be scrolled continually or it may be scrolled once and
displayed in truncated form.
Press ; and then select Settings.
Select Radio.
If you wish the text to be scrolled
continually, activate Text Scroll.
If you wish the text to be scrolled in
blocks, deactivate the setting.
Black display function If you do not want to see the
illuminated display, e.g. during night
time, you can turn the display off.
Press ; and then select Settings.
Scroll through the list and select Turn
Display Off . The display is turned off.
The audio functions remain active.
To turn the display on again, touch the
screen or press a button.
Page 98 of 155
98RadioRadioUsage.......................................... 98
Station search .............................. 98
Favourite lists ............................. 100
Radio data system .....................100
Digital audio broadcasting .........102Usage
Activating radio
Press ; and then select Audio. The
audio main menu last selected is
displayed.
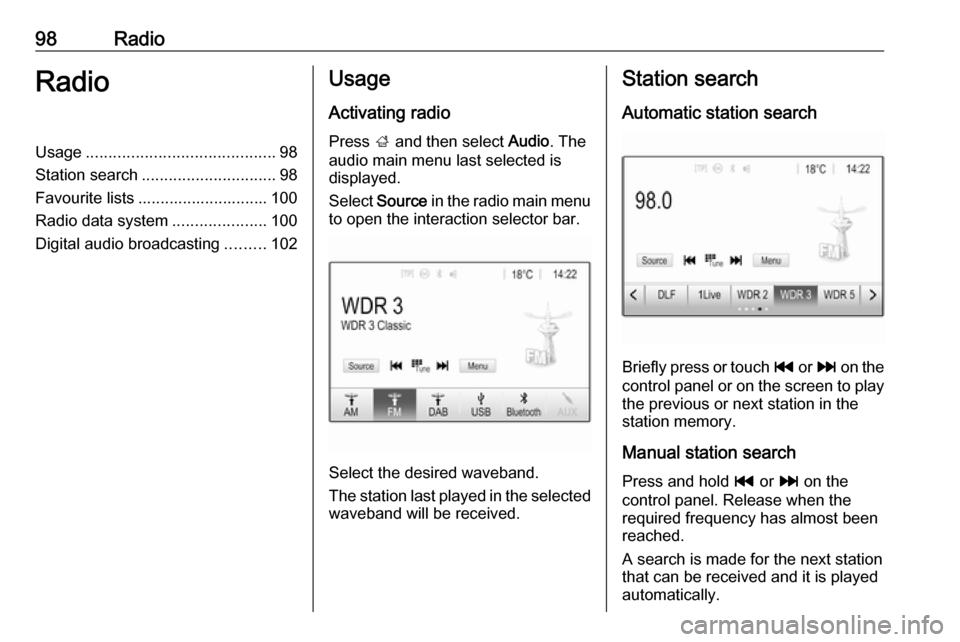
Select Source in the radio main menu
to open the interaction selector bar.
Select the desired waveband.
The station last played in the selected waveband will be received.
Station search
Automatic station search
Briefly press or touch t or v on the
control panel or on the screen to play the previous or next station in the
station memory.
Manual station search
Press and hold t or v on the
control panel. Release when the
required frequency has almost been
reached.
A search is made for the next station that can be received and it is played
automatically.
Page 101 of 155

Radio101Advantages of RDS● On the display, the programme name of the station appears
instead of its frequency.
● During a station search, the Infotainment system tunes in to
RDS stations only.
● The Infotainment system always tunes into the best receivable
broadcasting frequency of the set station by means of AF
(alternative frequency).
● Depending on the station that is received, the Infotainment
system displays radio text that
can contain e.g. information on the current programme.
RDS configuration Touch Menu in the FM radio main
menu to open the corresponding
waveband-specific submenu.
Scroll to RDS.
Activate or deactivate RDS.Traffic Programme
Radio traffic service stations are RDS
stations that broadcast traffic news. If the traffic service is switched on, the
currently playing audio source is
interrupted for the duration of the
traffic announcement.
Activating the traffic programme
function
Select Menu in the FM radio main
menu to open the corresponding waveband-specific submenu.
Touch the screen button next to
Traffic Programme to activate or
deactivate the function.
Note
In the station list, TP is displayed
next to the stations providing a traffic
programme.
If the radio traffic service is activated, [TP] is shown in the top line of all main
menus. If the current station is not a
radio traffic service station, TP is
greyed-out and a search is started
automatically for the next radio traffic
service station. As soon as a radio
traffic service station is found, TP ishighlighted. If no radio traffic service
station is found, TP remains greyed-
out.
If a traffic announcement is broadcast on the respective station, a message
is displayed.
To interrupt the announcement and return to the function previously
activated, touch the screen or press
m .
Regionalisation Sometimes RDS stations broadcast
regionally different programmes on
different frequencies.
Select Menu in the FM radio main
menu to open the corresponding
waveband-specific submenu and
scroll to Region
Activate or deactivate Region.
If regionalisation is activated,
alternative frequencies with the same regional programmes are selected
where necessary. If regionalisation is
switched off, alternative frequencies
of the stations are selected without
regard to regional programmes.
Page 102 of 155

102RadioDigital audio broadcasting
Digital audio broadcasting (DAB)
broadcasts radio stations digitally.
DAB stations are indicated by the
programme name instead of the
broadcasting frequency.
General information ● With DAB, several radio programmes (services) can be
broadcast on a single ensemble.
● Besides high-quality digital audio
services, DAB is also able to
transmit programme-associated
data and a multitude of other data services including travel and
traffic information.
● As long as a given DAB receiver can pick up the signal sent out bya broadcasting station (even if
the signal is very weak), sound
reproduction is ensured.
● In the event of poor reception, the
volume is reduced automatically
to avoid the output of
disagreeable noises.
If the DAB signal is too weak to
be picked up by the receiver,reception is interrupted
completely. This incident can be
avoided by activating DAB-DAB
Linking or DAB-FM Linking in the
DAB menu (see below).
● Interference caused by stations that are on nearby frequencies (a
phenomenon that is typical of AM and FM reception) does not
occur with DAB.
● If the DAB signal is reflected by natural obstacles or buildings,
the reception quality of DAB is
improved, whereas AM or FM
reception is considerably
impaired in such cases.
● When DAB reception is enabled, the FM tuner of the Infotainmentsystem remains active in the
background and continually
searches for the FM stations with the best reception. If TP 3 100 is
activated, traffic announcements
of the FM station with the best
reception are issued. Deactivate
TP if DAB reception should not
be interrupted by FM traffic
announcements.DAB Announcements
Besides their music programmes, a
lot of DAB stations also broadcast announcements of various
categories. If you activate some or all categories, the currently received
DAB service is interrupted when an
announcement of these categories is
made.
Select Menu in the DAB radio main
menu to open the corresponding
waveband-specific submenu.
Scroll through the list and select DAB
Announcements to display a list of the
categories available.
Activate all or just the desired
announcement categories. Different
announcement categories can be
selected at the same time.
DAB-DAB Linking
If this function is activated, the device switches over to the same service
(programme) on another DAB
ensemble (if available) when the DAB signal is too weak to be picked up bythe receiver.
Page 104 of 155

104External devicesExternal devicesGeneral information...................104
Playing audio ............................. 106
Displaying pictures ..................... 107
Playing movies ........................... 108
Using smartphone applications . 109General information
A USB port for the connection of
external devices is located in the
centre console.
Note
The USB port must always be kept
clean and dry.
USB port
An MP3 player, USB device, SD card (via USB connector / adapter) or
smartphone can be connected to the
USB port.
Up to two USB devices can be
connected to the Infotainment system at a time.
Note
For the connection of two USB
devices, an external USB hub is
required.
The Infotainment system can play
audio files, show picture files or play
movie files contained in USB devices.When connected to the USB port,
various functions of the devices
mentioned above can be operated via
the controls and menus of the
Infotainment system.
Note
Not all auxiliary devices are
supported by the Infotainment
system. Check the compatibility list
on our website.
Connecting / disconnecting a device Connect one of the devices
mentioned above to the USB port. If
required, use the appropriate
connection cable. The music function starts automatically.
Note
If a non-readable USB device is
connected, a corresponding error
message appears and the
Infotainment system automatically
switches to the previous function.
To disconnect the USB device, select
another function and then remove the USB device.
Page 105 of 155

External devices105Caution
Avoid disconnecting the device
during playback. This may
damage the device or the
Infotainment system.
USB Auto Launch
By default, the USB audio menu is displayed automatically as soon as a
USB device is connected.
If desired, this function can be
deactivated.
Press ; and then select Settings to
open the settings menu.
Select Radio, scroll to USB Auto
Launch and touch the screen button
next to the function.
To reactivate the function, touch the
screen button again.
Bluetooth Devices which support the Bluetooth
music profiles A2DP and AVRCP can
be connected wirelessly to the
Infotainment system. The
Infotainment system can play music
files contained in these devices.
Connecting a device
For a detailed description on how to
establish a Bluetooth connection
3 113.
File formats and folders
The maximum capacity of a device
supported by the Infotainment system amounts to 2500 music files,
2500 picture files, 250 movie files,
2500 folders and 10 stages of folder
structure. Only devices formatted in
the FAT16 / FAT32 file system are
supported.
If there are images included in the
audio metadata, these images are
displayed on the screen.
Note
Some files may not be played
properly. This may be due to a
different recording format or the
condition of the file.
Files from online shops to which
Digital Rights Management (DRM)
has been applied cannot be played.
The Infotainment system can play the
following audio, picture and movie
files stored on external devices.Audio files
The playable audio file formats are
MP3 (MPEG-1 Layer 3, MPEG-2
Layer 3), WMA, AAC, AAC+, ALAC
OGG WAF (PCM), AIFF, 3GPP
(audio only), Audio Books and LPCM.
iPod ®
and iPhone ®
devices play
ALAC, AIFF, Audio Books and LPCM.
When playing a file with ID3 tag
information, the Infotainment system
can display information, e.g. on the
track title and artist.
Picture files
The displayable picture file formats
are JPG, JPEG, BMP, PNG and GIF.
JPG files must be 64 to 5000 pixels in
width and 64 to 5000 pixels in height.
BMP, PNG and GIF files must be 64
to 1024 pixels in width and 64 to
1024 pixels in height.
The pictures should not exceed a file
size of 1MB.
Movie files
The playable movie file formats are
AVI and MP4.
Page 106 of 155
106External devicesThe maximum resolution is 1280 x
720 pixels. The frame rate must be
less than 30 fps.
The usable codec is H.264/MPEG-4
AVC.
The playable audio formats are MP3,
AC3, AAC and WMA.
The displayable subtitle format is
SMI.
Playing audio Activating the music function
If the device is not yet connected to
the Infotainment system, connect the
device 3 104.
Usually, the respective audio main
menu is displayed automatically.
If playback is not started
automatically, e.g. if USB Auto
Launch is deactivated 3 104 , take the
following steps:
Press ; and then select Audio to
open the audio main menu last
selected.Select Source in the interaction
selector bar and then select the
desired audio source to open the respective audio main menu.
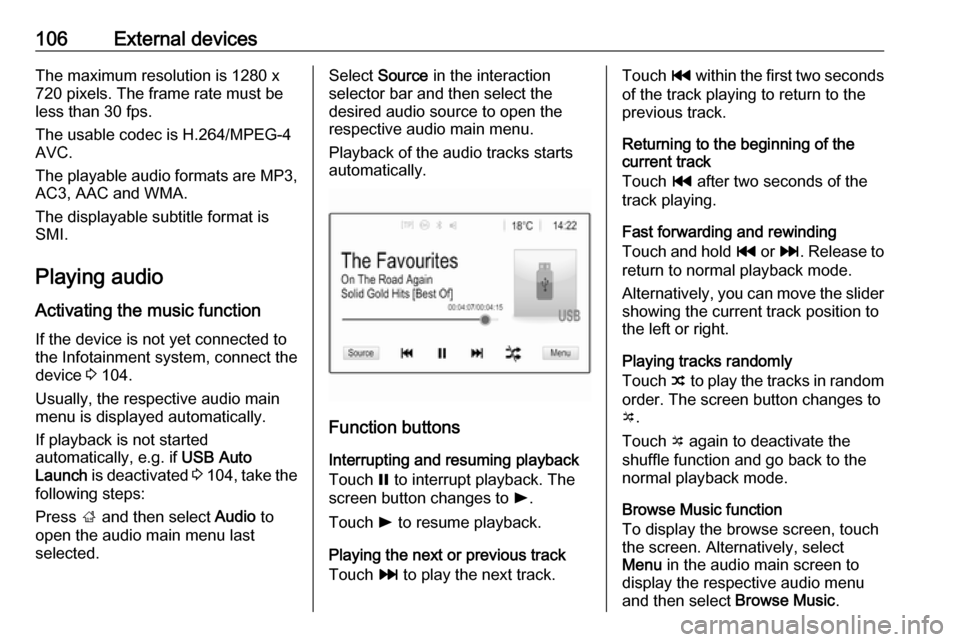
Playback of the audio tracks starts
automatically.
Function buttons
Interrupting and resuming playback
Touch = to interrupt playback. The
screen button changes to l.
Touch l to resume playback.
Playing the next or previous track
Touch v to play the next track.
Touch t within the first two seconds
of the track playing to return to the
previous track.
Returning to the beginning of the
current track
Touch t after two seconds of the
track playing.
Fast forwarding and rewinding
Touch and hold t or v. Release to
return to normal playback mode.
Alternatively, you can move the slider
showing the current track position to
the left or right.
Playing tracks randomly
Touch n to play the tracks in random
order. The screen button changes to
o .
Touch o again to deactivate the
shuffle function and go back to the
normal playback mode.
Browse Music function
To display the browse screen, touch
the screen. Alternatively, select
Menu in the audio main screen to
display the respective audio menu
and then select Browse Music.
Page 118 of 155
118PhoneContacts settings
The contacts list can be sorted by last name or first name.
Press ; and then select Settings to
display the respective menu.
Select Bluetooth and then Sort
Order . Activate the desired option.
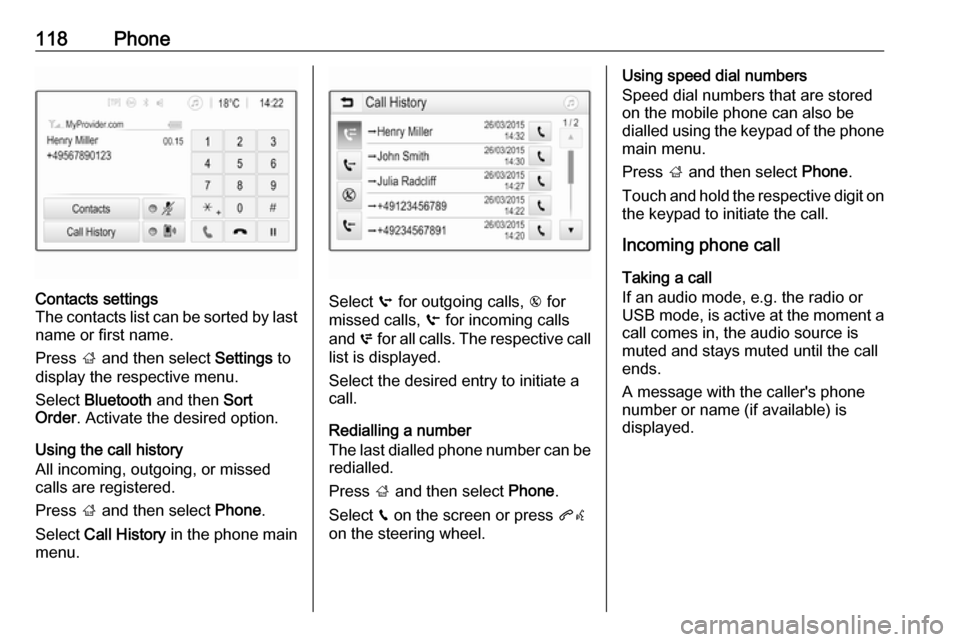
Using the call history
All incoming, outgoing, or missed calls are registered.
Press ; and then select Phone.
Select Call History in the phone main
menu.
Select q for outgoing calls, r for
missed calls, s for incoming calls
and p for all calls. The respective call
list is displayed.
Select the desired entry to initiate a
call.
Redialling a number
The last dialled phone number can be
redialled.
Press ; and then select Phone.
Select v on the screen or press qw
on the steering wheel.
Using speed dial numbers
Speed dial numbers that are stored
on the mobile phone can also be
dialled using the keypad of the phone
main menu.
Press ; and then select Phone.
Touch and hold the respective digit on the keypad to initiate the call.
Incoming phone call
Taking a call
If an audio mode, e.g. the radio or
USB mode, is active at the moment a
call comes in, the audio source is
muted and stays muted until the call
ends.
A message with the caller's phone
number or name (if available) is
displayed.