tow OPEL MOKKA X 2019.5 Manual user
[x] Cancel search | Manufacturer: OPEL, Model Year: 2019.5, Model line: MOKKA X, Model: OPEL MOKKA X 2019.5Pages: 247, PDF Size: 6.86 MB
Page 124 of 247

122Climate controlClimate controlClimate control systems.............122
Heating and ventilation system 122
Air conditioning system ...........123
Electronic climate control system .................................... 124
Auxiliary heater ........................126
Air vents ..................................... 126
Adjustable air vents .................126
Fixed air vents ......................... 127
Maintenance .............................. 127
Air intake ................................. 127
Air conditioning regular operation ................................ 127
Service .................................... 127Climate control systems
Heating and ventilation system
Controls for: ● air distribution
● temperature
● fan speed
● demisting and defrosting
Heated rear window Ü 3 37.
Temperature
red:warmblue:coldHeating will not be fully effective until
the engine has reached normal
operating temperature.
Air distributionl:to windscreen and front door
windowsM:to head areaK:to foot well and windscreen
Combination settings are possible.
Fan speed
Adjust the air flow by switching the fan
to the desired speed.
Demisting and defrosting ● Press V: fan automatically
switches to higher speed, the air
distribution is directed towards
the windscreen.
● Set temperature control to warmest level.
● Switch on heated rear window Ü.
● Open side air vents as required and direct them towards the doorwindows.
Page 125 of 247

Climate control123Air conditioning system
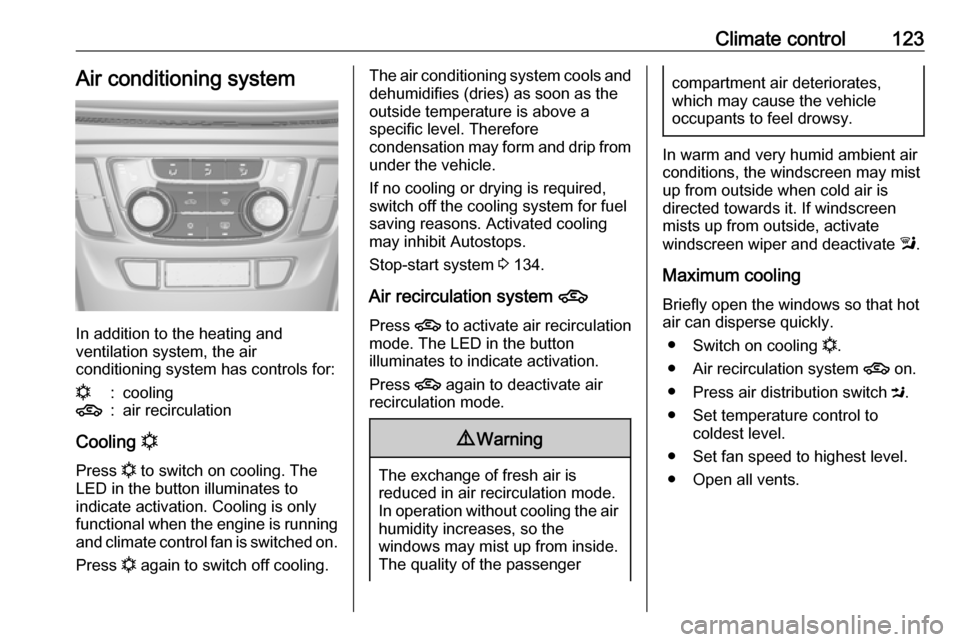
In addition to the heating and
ventilation system, the air
conditioning system has controls for:
n:cooling4:air recirculation
Cooling n
Press n to switch on cooling. The
LED in the button illuminates to
indicate activation. Cooling is only
functional when the engine is running and climate control fan is switched on.
Press n again to switch off cooling.
The air conditioning system cools and
dehumidifies (dries) as soon as the
outside temperature is above a
specific level. Therefore
condensation may form and drip from under the vehicle.
If no cooling or drying is required,
switch off the cooling system for fuel
saving reasons. Activated cooling
may inhibit Autostops.
Stop-start system 3 134.
Air recirculation system 4
Press 4 to activate air recirculation
mode. The LED in the button illuminates to indicate activation.
Press 4 again to deactivate air
recirculation mode.9 Warning
The exchange of fresh air is
reduced in air recirculation mode.
In operation without cooling the air humidity increases, so the
windows may mist up from inside.
The quality of the passenger
compartment air deteriorates,
which may cause the vehicle
occupants to feel drowsy.
In warm and very humid ambient air conditions, the windscreen may mist
up from outside when cold air is
directed towards it. If windscreen
mists up from outside, activate
windscreen wiper and deactivate l.
Maximum cooling
Briefly open the windows so that hot
air can disperse quickly.
● Switch on cooling n.
● Air recirculation system 4 on.
● Press air distribution switch M.
● Set temperature control to coldest level.
● Set fan speed to highest level.
● Open all vents.
Page 126 of 247

124Climate controlDemisting and defrosting the
windows V
● Press V: fan automatically
switches to higher speed, the air
distribution is directed towards
the windscreen.
● Set temperature control to warmest level.
● Switch on heated rear window Ü.
● Open side air vents as required and direct them towards the doorwindows.
Note
If V is pressed while the engine is
running, an Autostop will be inhibited
until V is pressed again.
If l is pressed with the fan switched
on and the engine running, an
Autostop will be inhibited until l is
pressed again or until the fan is
switched off.
If V is pressed while the engine is
in an Autostop, the engine will restart automatically.If l is pressed with the fan switched
on while the engine is in an
Autostop, the engine will restart
automatically.
Stop-start system 3 134.
Electronic climate control
system
Controls for: ● air distribution
● temperature
● fan speed
AUTO:automatic mode4:manual air recirculationV:demisting and defrosting
Heated rear window Ü 3 37.
The preselected temperature is
automatically regulated. In automatic
mode, the fan speed and air
distribution automatically regulate the
air flow.
The system can be manually adapted via the use of air distribution and air
flow controls.
Each change of settings is shown in
the Info Display for a few seconds.
The electronic climate control system
is only fully operational when the
engine is running.
Automatic mode AUTO
Basic setting for maximum comfort: ● Press AUTO: the air distribution
and fan speed are regulated
automatically.
● Open all air vents.
● Press n to switch on cooling.
● Set the desired temperature.
Page 130 of 247

128Driving and operatingDriving and
operatingDriving hints ............................... 129
Control of the vehicle ...............129
Steering ................................... 129
Starting and operating ...............129
New vehicle running-in ............129
Ignition switch positions ...........130
Power button ........................... 131
Retained power off ..................132
Starting the engine ..................132
Overrun cut-off ........................ 134
Stop-start system ....................134
Parking .................................... 136
Engine exhaust .......................... 137
Exhaust filter ............................ 137
Catalytic converter ...................138
AdBlue ..................................... 139
Automatic transmission ..............141
Transmission display ...............141
Selector lever .......................... 142
Manual mode ........................... 143
Electronic driving programmes 143
Fault ........................................ 143
Interruption of power supply ....144Manual transmission ..................144
Drive systems ............................ 145
All-wheel drive ......................... 145
Brakes ........................................ 146
Antilock brake system .............146
Parking brake .......................... 146
Brake assist ............................. 147
Hill start assist ......................... 147
Ride control systems .................147
Traction Control system ..........147
Electronic Stability Control ......148
Descent control system ...........149
Driver assistance systems .........150
Cruise control .......................... 150
Speed limiter ........................... 152
Forward collision alert .............153
Following distance indication ...155
Parking assist .......................... 156
Rear view camera ...................158
Traffic sign assistant ................160
Lane departure warning ..........163
Fuel ............................................ 164
Fuel for petrol engines .............164
Fuel for diesel engines ............166
Fuel for liquid gas operation ....166
Refuelling ................................ 167
Trailer hitch ................................ 171
General information .................171Driving characteristics and
towing tips .............................. 171
Trailer towing ........................... 172
Towing equipment ...................172
Page 132 of 247

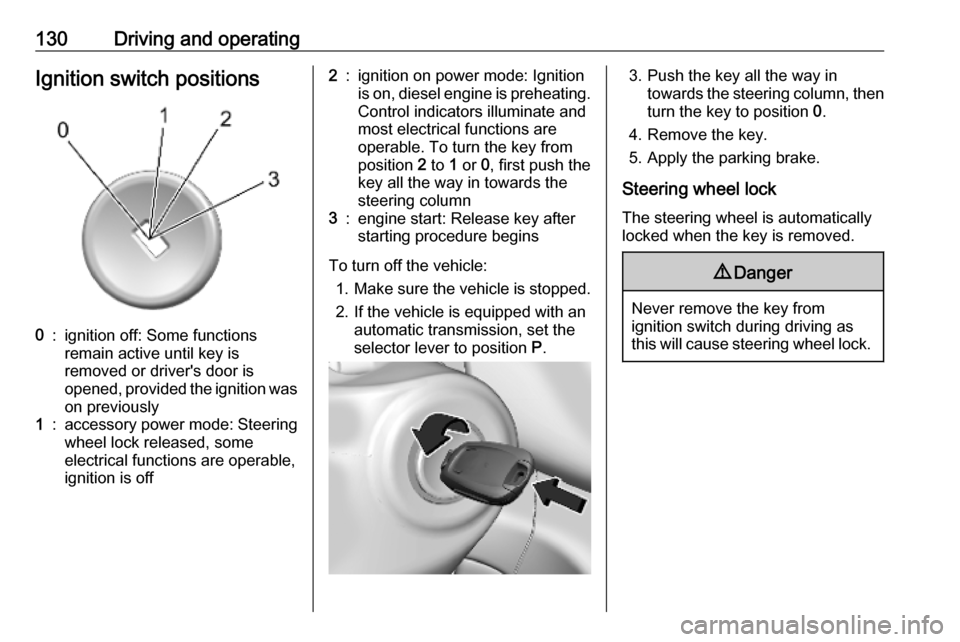
130Driving and operatingIgnition switch positions0:ignition off: Some functions
remain active until key is
removed or driver's door is
opened, provided the ignition was
on previously1:accessory power mode: Steering wheel lock released, some
electrical functions are operable,
ignition is off2:ignition on power mode: Ignition
is on, diesel engine is preheating.
Control indicators illuminate and
most electrical functions are
operable. To turn the key from
position 2 to 1 or 0, first push the
key all the way in towards the steering column3:engine start: Release key after
starting procedure begins
To turn off the vehicle:
1. Make sure the vehicle is stopped.
2. If the vehicle is equipped with an automatic transmission, set the
selector lever to position P.
3. Push the key all the way in
towards the steering column, then
turn the key to position 0.
4. Remove the key.
5. Apply the parking brake.
Steering wheel lock The steering wheel is automatically
locked when the key is removed.9 Danger
Never remove the key from
ignition switch during driving as
this will cause steering wheel lock.
Page 133 of 247

Driving and operating131Power button
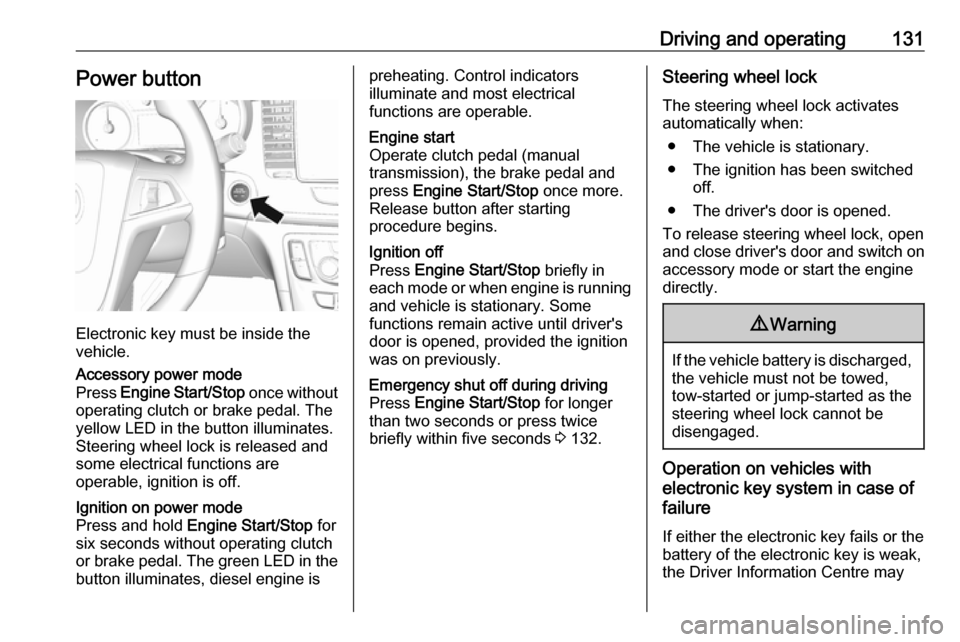
Electronic key must be inside the
vehicle.
Accessory power mode
Press Engine Start/Stop once without
operating clutch or brake pedal. The yellow LED in the button illuminates.
Steering wheel lock is released and
some electrical functions are
operable, ignition is off.Ignition on power mode
Press and hold Engine Start/Stop for
six seconds without operating clutch
or brake pedal. The green LED in the button illuminates, diesel engine ispreheating. Control indicators
illuminate and most electrical
functions are operable.Engine start
Operate clutch pedal (manual
transmission), the brake pedal and
press Engine Start/Stop once more.
Release button after starting
procedure begins.Ignition off
Press Engine Start/Stop briefly in
each mode or when engine is running and vehicle is stationary. Some
functions remain active until driver's
door is opened, provided the ignition
was on previously.Emergency shut off during driving
Press Engine Start/Stop for longer
than two seconds or press twice
briefly within five seconds 3 132.Steering wheel lock
The steering wheel lock activates
automatically when:
● The vehicle is stationary.
● The ignition has been switched off.
● The driver's door is opened.
To release steering wheel lock, open
and close driver's door and switch on accessory mode or start the engine
directly.9 Warning
If the vehicle battery is discharged,
the vehicle must not be towed,
tow-started or jump-started as the
steering wheel lock cannot be
disengaged.
Operation on vehicles with
electronic key system in case of
failure
If either the electronic key fails or the
battery of the electronic key is weak,
the Driver Information Centre may
Page 138 of 247

136Driving and operatingRestart of the engine by the stop-
start system
The selector lever must be in neutralto enable an automatic restart.
If one of the following conditions
occurs during an Autostop, the
engine will be restarted automatically
by the stop-start system:
● The stop-start system is manually deactivated.
● The bonnet is opened.
● The driver's seat belt is unfastened and the driver's door
is opened.
● The engine temperature is too low.
● The charging level of the vehicle battery is below a defined level.
● The brake vacuum is not sufficient.
● The vehicle is driven at least at walking speed.
● The climate control system requests an engine start.
● The air conditioning is manually switched on.If the bonnet is not fully closed, awarning message is displayed in the
Driver Information Centre.
If an electrical accessory, e.g. a
portable CD player, is connected to
the power outlet, a brief power drop during engine restart might be
noticeable.
Parking9 Warning
● Do not park the vehicle on an
easily ignitable surface. The
high temperature of the
exhaust system could ignite the
surface.
● Always apply the parking brake. Activate the parking
brake without pressing the
release button. Apply as firmly
as possible on a downhill slope
or uphill slope. Depress brake
pedal at the same time to
reduce operating force.
● Switch off the engine.
● If the vehicle is on a level surface or uphill slope, engage
first gear or set the selector
lever to position P before
removing the ignition key. On
an uphill slope, turn the front
wheels away from the kerb.
If the vehicle is on a downhill
slope, engage reverse gear or
set the selector lever to position P before removing the ignition
key. Turn the front wheels
towards the kerb.
● Close the windows and the sunroof.
● Remove the ignition key from the ignition switch. For vehicles
with automatic transmission,
the key can only be removed
when the selector lever is in
position P.
Turn the steering wheel until
the steering wheel lock is felt to engage.
● Lock the vehicle.
● Activate the anti-theft alarm system.
Page 140 of 247

138Driving and operatingindicated by illumination of % and a
warning message in the Driver
Information Centre.
% illuminates along with a warning
message illuminates when exhaust
filter is full. Start cleaning process as
soon as possible.
% flashes along with a warning
message when exhaust filter has
reached the maximum filling level.
Start cleaning process immediately to avoid damage to the engine.
Activate manual cleaning process
To activate cleaning process,
continue driving, keep engine speed
above 2000 rpm. Shift down if
necessary. Exhaust filter cleaning is
then started.
Cleaning takes place quickest at high
engine speeds and loads.
Control indicator % extinguishes as
soon as the self-cleaning operation is complete. Keep on driving until self-
cleaning operation is complete.Caution
If possible, do not interrupt
cleaning process. Drive until
cleaning is completed to avoid the need for service or repair by a
workshop.
Cleaning process not possible
If cleaning is not possible for anyreasons, control indicator Z
illuminates and a warning message
appears in the Driver Information
Centre. Engine power may be
reduced. Seek the assistance of a
workshop immediately.
Catalytic converter
The catalytic converter reduces the
amount of harmful substances in the
exhaust gases.
Caution
Fuel grades other than those listed on pages 3 164, 3 224 could
damage the catalytic converter or
electronic components.
Unburnt petrol will overheat and
damage the catalytic converter.
Therefore avoid excessive use of the starter, running the fuel tank
dry and starting the engine by
pushing or towing.
In the event of misfiring, uneven
engine running, a reduction in engine performance or other unusual
problems, have the cause of the fault
rectified by a workshop as soon as
possible. In an emergency, driving
can be continued for a short period,
keeping vehicle speed and engine
speed low.
Page 141 of 247

Driving and operating139AdBlue
General information
The selective catalytic reduction
(BlueInjection) is a method to
substantially reduce the nitrogen
oxides in the exhaust emission. This
is achieved by injecting a Diesel
Exhaust Fluid into the exhaust
system. The ammonia released by
the fluid reacts with nitrous gases
(NO x) from the exhaust and turns it
into nitrogen and water.
The designation of this fluid is AdBlue
® . It is a non-toxic, non-flammable,
colourless and odourless fluid which
consists of 32% urea and 68% water.9Warning
Avoid contact of your eyes or skin
with AdBlue.
In case of eye or skin contact,
rinse off with water.
Caution
Avoid contact of the paintwork with AdBlue.
In case of contact, rinse off with water.
AdBlue freezes at a temperature of
approx. -11 °C. As the vehicle is
equipped with an AdBlue pre-heater,
the emissions reduction at low
temperatures is ensured. The AdBlue
pre-heater works automatically.
The typical AdBlue consumption is
approx. 2 l per 1000 km , but can also
be higher depending on driving
behaviour (e.g. high load or towing).
AdBlue tank The AdBlue tank level can be found in the display menu.
Level warnings
Depending on the calculated range of
AdBlue, different messages are
displayed in the Driver Information
Centre. The messages and the
restrictions are a legal requirement.
The first possible warning is AdBlue
Range: 2400 km .
This warning will show up once briefly with the calculated range. Driving is
possible without any restrictions.
The next warning level is entered with
a range below 1750 km. The
message with the current range will always be displayed when ignition is
switched on and needs to be
confirmed 3 97. Refill AdBlue before
entering the next warning level.
At an AdBlue range below 900 km,
the following warning messages are
alternately displayed and cannot be
dismissed:
● AdBlue Low Refill Now
● Engine Restart Prevented in 900
km .
Additionally, control indicator Y
flashes continuously.
Note
In case of high AdBlue consumption,
the Driver Information Centre may
display this warning without the
previous warning stages.
Page 147 of 247

Driving and operating145Caution
It is not advisable to drive with thehand resting on the selector lever.
Gear shift indication 3 94.
Stop-start system 3 134.
Drive systems
All-wheel drive
The All-Wheel Drive (AWD) system
enhances driving characteristics and
stability, and helps to achieve the best
possible driveability regardless of
ground surface. The system is always
active and cannot be deactivated.
The torque is distributed steplessly
between the wheels of the front and rear axle, depending on the driving
conditions. Additionally the torque
between the rear wheels is distributed depending on the surface.
For optimum system performance,
the vehicle's tyres should not have
varying degrees of wear.
When using a temporary spare
wheel, the AWD system is
automatically disabled.
The AWD system will also be
temporarily disabled to protect the
system from overheating if there is
excessive wheel spin. When the
system cools down, AWD will be
restored.The deactivation of the AWD system
will be indicated by a message on the
Driver Information Centre.
If a service message or warning
code S73 is displayed on the Driver
Information Centre, there is a
malfunction in the AWD system. Seek
the assistance of a workshop.
Vehicle messages 3 104.
Towing the vehicle 3 211.