ESP OPEL MOKKA X 2019.5 Manual user
[x] Cancel search | Manufacturer: OPEL, Model Year: 2019.5, Model line: MOKKA X, Model: OPEL MOKKA X 2019.5Pages: 247, PDF Size: 6.86 MB
Page 190 of 247

188Vehicle care
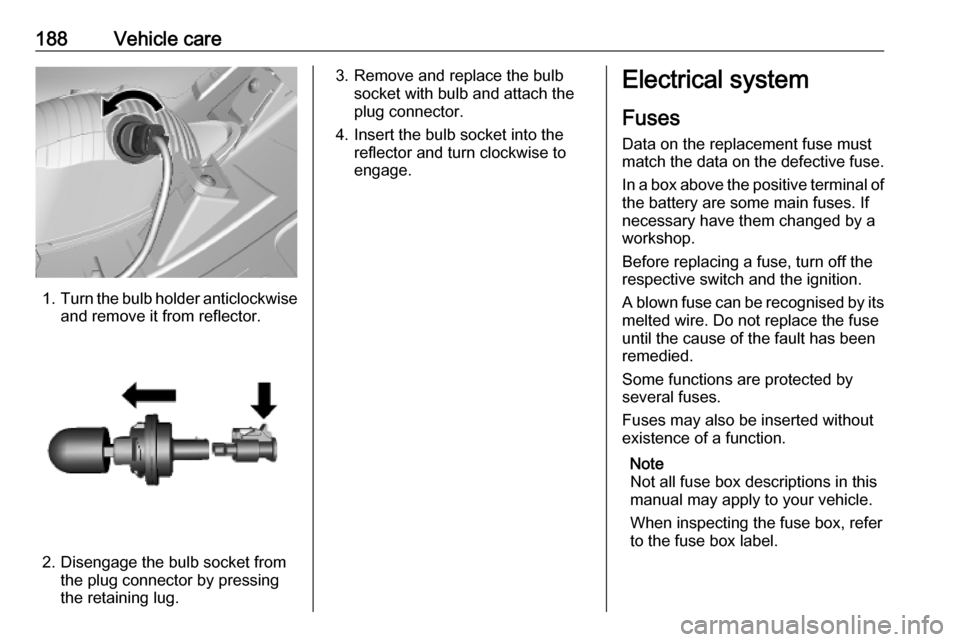
1.Turn the bulb holder anticlockwise
and remove it from reflector.
2. Disengage the bulb socket from the plug connector by pressing
the retaining lug.
3. Remove and replace the bulb socket with bulb and attach the
plug connector.
4. Insert the bulb socket into the reflector and turn clockwise to
engage.Electrical system
Fuses
Data on the replacement fuse must
match the data on the defective fuse.
In a box above the positive terminal of
the battery are some main fuses. If
necessary have them changed by a workshop.
Before replacing a fuse, turn off the
respective switch and the ignition.
A blown fuse can be recognised by its melted wire. Do not replace the fuse
until the cause of the fault has been
remedied.
Some functions are protected by
several fuses.
Fuses may also be inserted without existence of a function.
Note
Not all fuse box descriptions in this
manual may apply to your vehicle.
When inspecting the fuse box, refer
to the fuse box label.
Page 197 of 247

Vehicle care195tread life. After changing to winter
tyres, be alert for changes in vehicle
handling and braking.
If using winter tyres, make sure to use ● tyres of the same brand and tread
type on all four wheel positions.
● only radial ply tyres of the same size, load range and speed ratingas the tyres originally fitted at the factory.
Winter tyres with the same speed
rating as the tyres originally fitted at
the factory may not be available for H,
V, W, Y and ZR speed rated tyres. If
using winter tyres with a lower speed
rating, never exceed the tyre's
maximum speed capability.
Tyre designations
E.g. 215/60 R 16 95 H215:tyre width, mm60:cross-section ratio (tyre height
to tyre width), percentageR:belt type: RadialRF:type: RunFlat16:wheel diameter, inches95:load index e.g. 95 is equivalent
to 690 kgH:speed code letter
Speed code letter:
Q:up to 160 km/hS:up to 180 km/hT:up to 190 km/hH:up to 210 km/hV:up to 240 km/hW:up to 270 km/h
Choose a tyre appropriate for the
maximum speed of your vehicle.
The maximum speed is achievable at kerb weight with driver (75 kg) plus125 kg payload. Optional equipment
could reduce the maximum speed of
the vehicle.
Performance 3 226.
Directional tyres
Fit directional tyres such that they roll in the direction of travel. The rolling
direction is indicated by a symbol
(e.g. an arrow) on the sidewall.
Tyre pressure
Check the pressure of cold tyres at
least every 14 days and before any
long journey. Do not forget the spare
wheel. This also applies to vehicles
with tyre pressure monitoring system.
Tyre pressure 3 230.
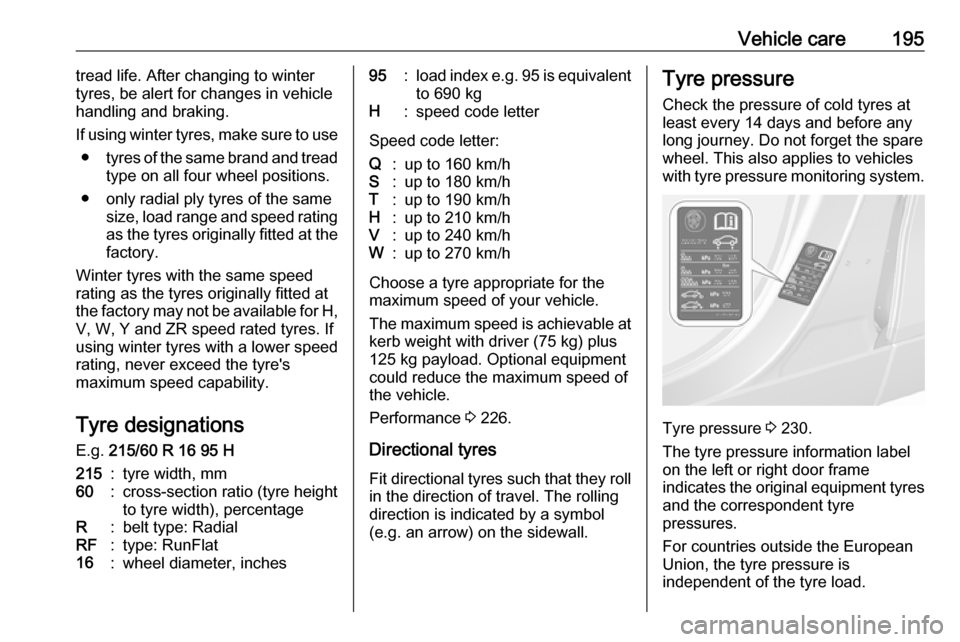
The tyre pressure information label
on the left or right door frame
indicates the original equipment tyres
and the correspondent tyre
pressures.
For countries outside the European
Union, the tyre pressure is
independent of the tyre load.
Page 198 of 247

196Vehicle careThe tyre pressure data refers to cold
tyres. It applies to summer and winter tyres.
Always inflate the spare tyre to the
pressure specified for full load.
The ECO tyre pressure serves to
achieve the smallest amount of fuel
consumption possible.
Incorrect tyre pressures will impair
safety, vehicle handling, comfort and
fuel economy and will increase tyre
wear.
Tyre pressures differ depending on
various options. For the correct tyre
pressure value, follow the procedure
below:
1. Identify the engine identifier code.
Engine data 3 224.
2. Identify the respective tyre.
The tyre pressure tables show all possible tyre combinations 3 230.
For the tyres approved for your
vehicle, refer to the EEC Certificate of
Conformity provided with your vehicle
or other national registration
documents.The driver is responsible for correct
adjustment of tyre pressure.9 Warning
If the pressure is too low, this can
result in considerable tyre warm-
up and internal damage, leading to tread separation and even to tyre
blow-out at high speeds.
9 Warning
For specific tyres the
recommended tyre pressure as
shown in the tyre pressure table may exceed the maximum tyre
pressure as indicated on the tyre.
Never exceed the maximum tyre
pressure as indicated on the tyre.
Temperature dependency
The tyre pressure depends on the
temperature of the tyre. During
driving, tyre temperature and
pressure increase. Tyre pressure
values provided on the tyre
information label and tyre pressure
chart are valid for cold tyres, which means at 20 °C.
The pressure increases by nearly
10 kPa for a 10 °C temperature
increase. This must be considered
when warm tyres are checked.
The tyre pressure value displayed in
the Driver Information Centre shows
the real tyre pressure. A cooled down
tyre will show a decreased value,
which does not indicate an air leak.
Tyre pressure monitoringsystem
The tyre pressure monitoring system
checks the pressure of all four tyres
once a minute when vehicle speed
exceeds a certain limit.Caution
Tyre pressure monitoring system
warns only about low tyre pressure condition and does not replace
regular tyre maintenance by the
driver.
Page 199 of 247

Vehicle care197All wheels must be equipped with
pressure sensors and the tyres must have the prescribed pressure.
Note
In countries where the tyre pressure
monitoring system is legally
required, the use of wheels without
pressure sensors will invalidate the
vehicle operating permit.
The current tyre pressures can be
shown in the Driver Information
Centre.
Midlevel display:
Select the Tyre pressure page under
the Vehicle Information Menu ? in
the Driver Information Centre 3 97.
Uplevel display:
Select the Tyre pressure page under
the Info Menu in the Driver
Information Centre 3 97.
System status and pressure warnings
are displayed by a message
indicating the corresponding tyre in
the Driver Information Centre.
The system considers the tyre
temperature for the warnings.
Temperature dependency 3 195.
A detected low tyre pressure
condition is indicated by the control
indicator w 3 95.
If w illuminates, stop as soon as
possible and inflate the tyres as
recommended 3 230.
If w flashes for 60-90 seconds and
then illuminates continuously, there is a fault in the system. Consult a
workshop.
After inflating, some driving may be
required to update the tyre pressure
values in the Driver Information
Centre. During this time w may
illuminate.
If w illuminates at lower temperatures
and extinguishes after driving, this
could be an indicator for approaching
a low tyre pressure condition. Check
tyre pressure.
Vehicle messages 3 104.
Page 203 of 247

Vehicle care201Changing tyre and wheelsize
If tyres of a different size than those
fitted at the factory are used, it may be necessary to reprogramme the
nominal tyre pressure and make
other vehicle modifications.
After converting to a different tyre
size, have the label with tyre
pressures replaced and the tyre
pressure monitoring system
reinitialised. 3 1969 Warning
The use of unsuitable tyres or
wheels may lead to accidents and will invalidate the vehicle
operating permit.
Wheel covers
Wheel covers and tyres that are
factory-approved for the respective
vehicle and comply with all of the
relevant wheel and tyre combination requirements must be used.
If the wheel covers and tyres used are
not factory-approved, the tyres must
not have a rim protection ridge.
Wheel covers must not impair brake
cooling.9 Warning
Use of unsuitable tyres or wheel
covers could lead to sudden
pressure loss and thereby
accidents.
Vehicles with alloy wheels: When
mounting steel wheels with alloy
wheel nuts, e.g. when changing to
winter tyres, the wheel covers cannot
be attached to the steel wheels.
Tyre chains
Use tyre chains only on front wheels.
9 Warning
Damage may lead to tyre blowout.
Tyre chains are permitted on tyres of
size 215/65 R16, 215/60 R17 and
215/55 R18.
On tyres of size 215/65 R16 and
215/60 R17 always use fine mesh
chains suitable for sport utility
vehicles that add no more than
9 mm to the tyre tread and the inboard sides (including chain lock).
Page 211 of 247

Vehicle care209
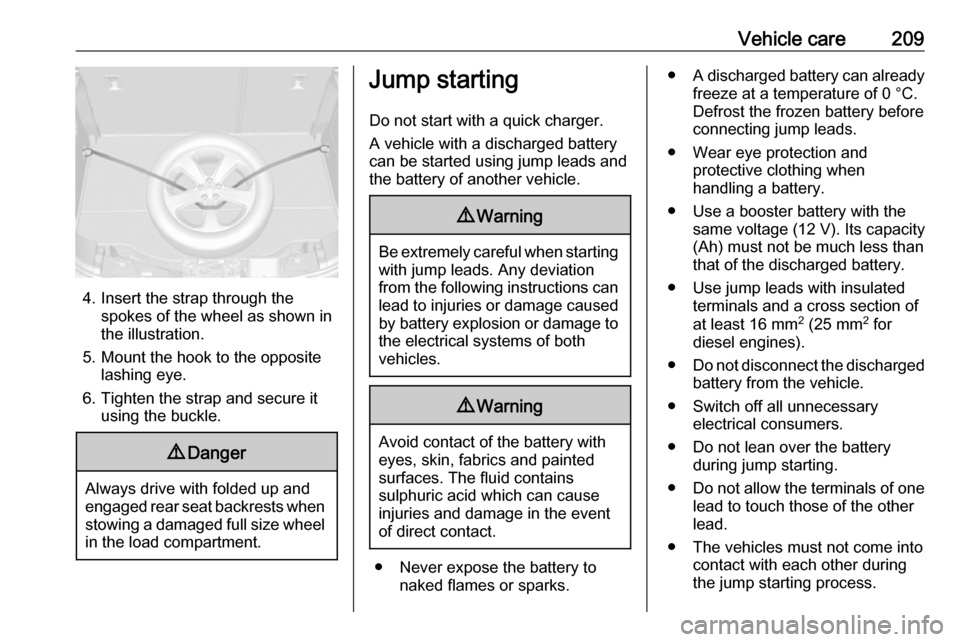
4. Insert the strap through thespokes of the wheel as shown in
the illustration.
5. Mount the hook to the opposite lashing eye.
6. Tighten the strap and secure it using the buckle.
9 Danger
Always drive with folded up and
engaged rear seat backrests when stowing a damaged full size wheel
in the load compartment.
Jump starting
Do not start with a quick charger.
A vehicle with a discharged battery
can be started using jump leads and the battery of another vehicle.9 Warning
Be extremely careful when starting
with jump leads. Any deviation
from the following instructions can
lead to injuries or damage caused
by battery explosion or damage to the electrical systems of both
vehicles.
9 Warning
Avoid contact of the battery with
eyes, skin, fabrics and painted
surfaces. The fluid contains
sulphuric acid which can cause
injuries and damage in the event
of direct contact.
● Never expose the battery to naked flames or sparks.
●A discharged battery can already
freeze at a temperature of 0 °C.
Defrost the frozen battery before
connecting jump leads.
● Wear eye protection and protective clothing when
handling a battery.
● Use a booster battery with the same voltage (12 V). Its capacity
(Ah) must not be much less than
that of the discharged battery.
● Use jump leads with insulated terminals and a cross section of
at least 16 mm 2
(25 mm 2
for
diesel engines).
● Do not disconnect the discharged
battery from the vehicle.
● Switch off all unnecessary electrical consumers.
● Do not lean over the battery during jump starting.
● Do not allow the terminals of one
lead to touch those of the other
lead.
● The vehicles must not come into contact with each other during
the jump starting process.
Page 217 of 247

Vehicle care215Before and after winter, wash the
underbody and have the protective
wax coating checked.
Liquid gas system9 Danger
Liquid gas is heavier than air and
can collect in sink points.
Take care when performing work
at the underbody in a pit.
For painting work and when using a
drying booth at a temperature above
60 °C, the liquid gas system must be
completely evacuated.
Do not make any modifications to the
liquid gas system.
Towing equipment
Do not clean the coupling ball bar with a steam-jet or high-pressure jet
cleaner.
Rear carrier system Clean the rear carrier system with a
steam-jet or high-pressure jet cleaner
at least once a year.
Operate the rear carrier system
periodically if not in regular use, in
particular during winter.
Interior care
Interior and upholstery Only clean the vehicle interior,
including the instrument panel fascia
and panelling, with a dry cloth or
interior cleaner.
Clean the leather upholstery with
clear water and a soft cloth. In case of
heavy soiling, use leather care.
The instrument cluster and the
displays should only be cleaned using
a soft damp cloth. If necessary use a
weak soap solution.
Clean fabric upholstery with a
vacuum cleaner and brush. Remove
stains with an upholstery cleaner.
Clothing fabrics may not be
colourfast. This could cause visible
discolourations, especially on light- coloured upholstery. Removable
stains and discolourations should be
cleaned as soon as possible.Clean seat belts with lukewarm water or interior cleaner.Caution
Close Velcro fasteners as open
Velcro fasteners on clothing could damage seat upholstery.
The same applies to clothing with
sharp-edged objects, e.g. zips, belts or studded jeans.
Plastic and rubber parts
Plastic and rubber parts can be
cleaned with the same cleaner as
used to clean the body. Use interior
cleaner if necessary. Do not use any
other agent. Avoid solvents and petrol in particular. Do not use high-
pressure jet cleaners.
Page 222 of 247

220Technical dataInformation on identification label:1:manufacturer2:type approval number3:vehicle Identification Number4:permissible gross vehicle weight
rating in kg5:permissible gross train weight
in kg6:maximum permissible front axle
load in kg7:maximum permissible rear axle
load in kg
Engine identification
The technical data tables show the
engine identifier code.
Engine data 3 224.
To identify the respective engine,
refer to the engine power in the EEC
Certificate of Conformity provided with your vehicle or other national
registration documents.
The Certificate of Conformity shows the engine identifier code, other
national publications may show the
engineering code. Check piston
displacement and engine power to identify the respective engine.