turn signal OPEL MOKKA X 2019 Manual user
[x] Cancel search | Manufacturer: OPEL, Model Year: 2019, Model line: MOKKA X, Model: OPEL MOKKA X 2019Pages: 253, PDF Size: 6.86 MB
Page 122 of 253

120LightingVehicles with adaptive forward
lighting system
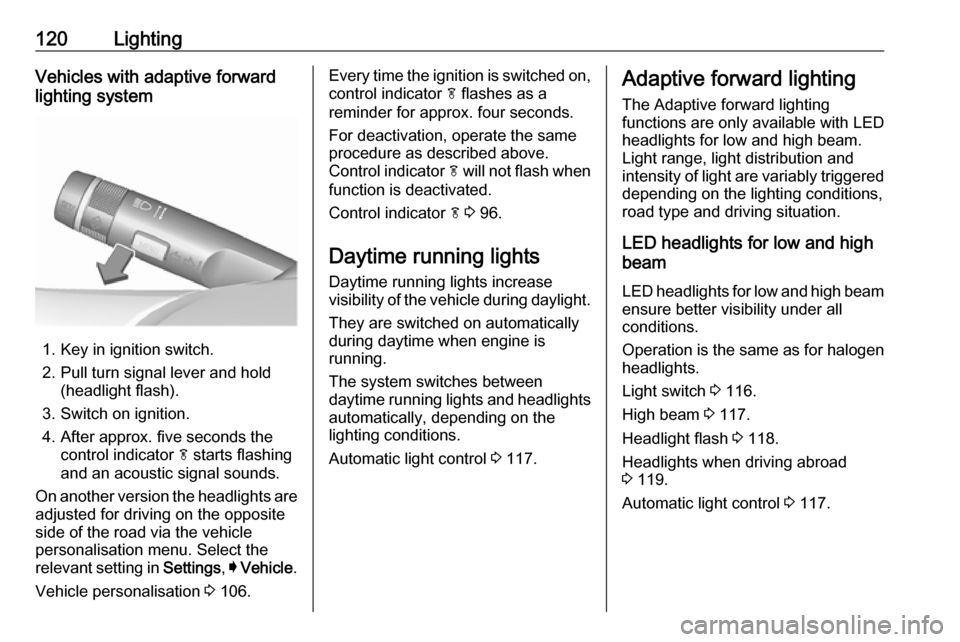
1. Key in ignition switch.
2. Pull turn signal lever and hold (headlight flash).
3. Switch on ignition.
4. After approx. five seconds the control indicator f starts flashing
and an acoustic signal sounds.
On another version the headlights are adjusted for driving on the opposite
side of the road via the vehicle
personalisation menu. Select the
relevant setting in Settings, I Vehicle .
Vehicle personalisation 3 106.
Every time the ignition is switched on,
control indicator f flashes as a
reminder for approx. four seconds.
For deactivation, operate the same
procedure as described above.
Control indicator f will not flash when
function is deactivated.
Control indicator f 3 96.
Daytime running lights Daytime running lights increase
visibility of the vehicle during daylight.
They are switched on automatically
during daytime when engine is
running.
The system switches between
daytime running lights and headlights automatically, depending on the
lighting conditions.
Automatic light control 3 117.Adaptive forward lighting
The Adaptive forward lighting
functions are only available with LED
headlights for low and high beam.
Light range, light distribution and
intensity of light are variably triggered
depending on the lighting conditions,
road type and driving situation.
LED headlights for low and high
beam
LED headlights for low and high beam
ensure better visibility under all
conditions.
Operation is the same as for halogen headlights.
Light switch 3 116.
High beam 3 117.
Headlight flash 3 118.
Headlights when driving abroad
3 119.
Automatic light control 3 117.
Page 123 of 253

Lighting121AFL-LED lighting functionsAFL-LED lighting functions are activeautomatically with light switch in
position AUTO. AFL-LED includes
following functions:
● curve and cornering lights
● town light
● country light
● motorway light
● high beam assist
● reverse parking function
● eco mode
● dynamic automatic headlight levelling
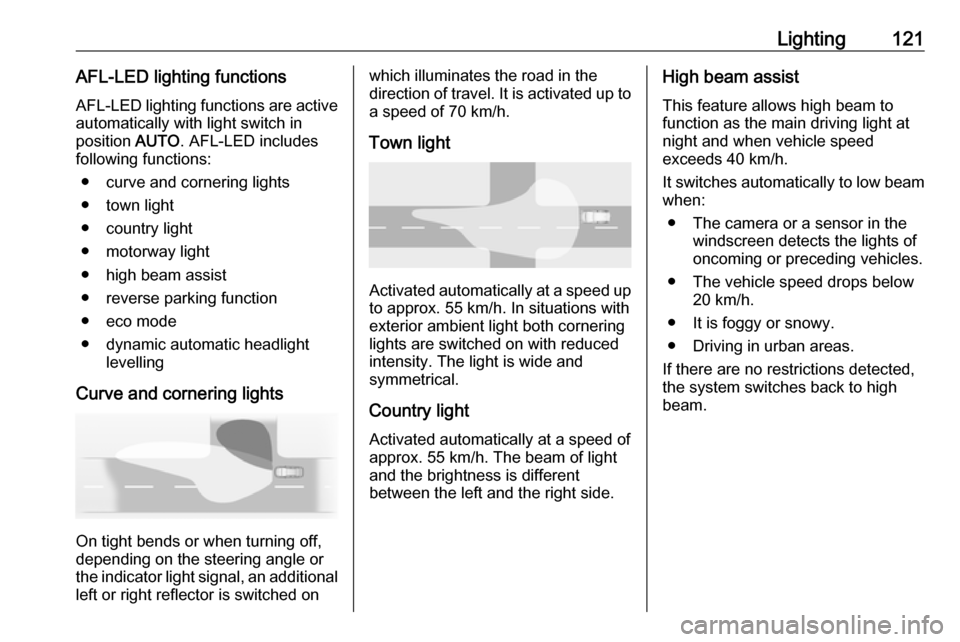
Curve and cornering lights
On tight bends or when turning off,
depending on the steering angle or
the indicator light signal, an additional left or right reflector is switched on
which illuminates the road in the
direction of travel. It is activated up to
a speed of 70 km/h.
Town light
Activated automatically at a speed upto approx. 55 km/h. In situations with
exterior ambient light both cornering lights are switched on with reduced
intensity. The light is wide and
symmetrical.
Country light
Activated automatically at a speed of
approx. 55 km/h. The beam of light
and the brightness is different
between the left and the right side.
High beam assist
This feature allows high beam to
function as the main driving light at
night and when vehicle speed
exceeds 40 km/h.
It switches automatically to low beam
when:
● The camera or a sensor in the windscreen detects the lights of
oncoming or preceding vehicles.
● The vehicle speed drops below 20 km/h.
● It is foggy or snowy.
● Driving in urban areas.
If there are no restrictions detected,
the system switches back to high
beam.
Page 125 of 253

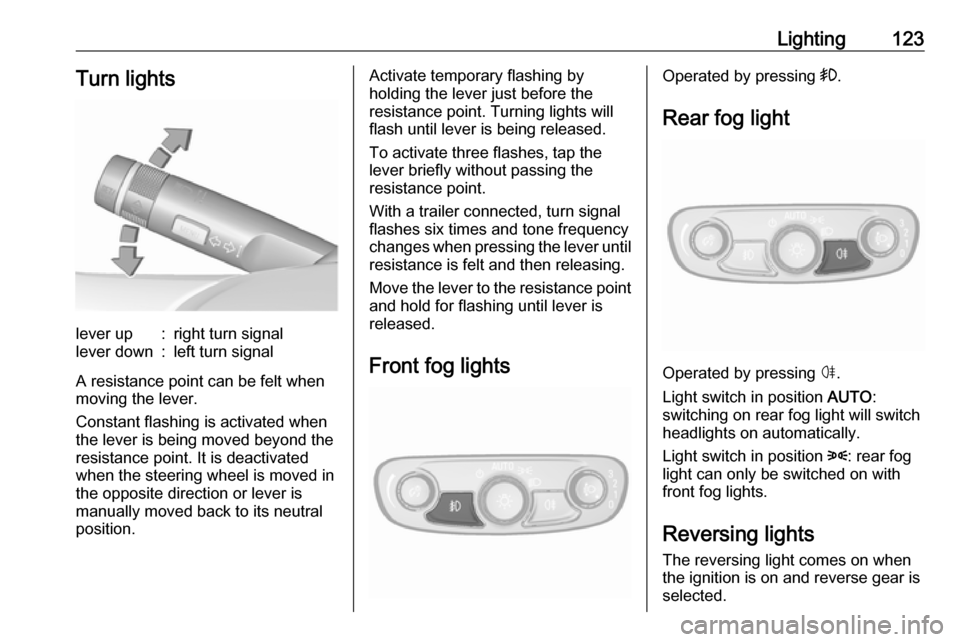
Lighting123Turn lightslever up:right turn signallever down:left turn signal
A resistance point can be felt when
moving the lever.
Constant flashing is activated when
the lever is being moved beyond the
resistance point. It is deactivated
when the steering wheel is moved in
the opposite direction or lever is
manually moved back to its neutral
position.
Activate temporary flashing by
holding the lever just before the
resistance point. Turning lights will
flash until lever is being released.
To activate three flashes, tap the
lever briefly without passing the
resistance point.
With a trailer connected, turn signal
flashes six times and tone frequency
changes when pressing the lever until
resistance is felt and then releasing.
Move the lever to the resistance point and hold for flashing until lever is
released.
Front fog lightsOperated by pressing >.
Rear fog light
Operated by pressing ø.
Light switch in position AUTO:
switching on rear fog light will switch
headlights on automatically.
Light switch in position 8: rear fog
light can only be switched on with
front fog lights.
Reversing lights
The reversing light comes on when
the ignition is on and reverse gear is
selected.
Page 128 of 253

126LightingExit lighting
Low beam, sidelights and tail lights
illuminate the surrounding area for an adjustable time after leaving the
vehicle.
Switching on
Activation, deactivation and duration of lighting of this function can be
changed in the vehicle settings.
Vehicle personalisation 3 106.
1. Switch off ignition.
2. Remove ignition key.
3. Open driver's door.
4. Pull turn signal lever.
5. Close driver's door.
If the driver's door is not closed the
lights switch off after a few seconds.
The lighting is switched off
immediately if the turn signal lever is pulled while the driver's door is open.
Battery discharge protection To prevent discharge of the battery
when the ignition is switched off,
some interior lights are switched off
automatically after some time.
Page 163 of 253

Driving and operating161When a preceding vehicle is detected
ahead, the distance is indicated in
seconds, displayed on a page in the
Driver Information Centre 3 97 . Press
MENU on the turn signal lever to
select Vehicle Information
Menu ? and turn the adjuster
wheel to choose following distance
indication page.
The minimum indicated distance is
0.5 s.
If there is no vehicle ahead or the vehicle ahead is out of range, two
dashes will be displayed: -.- s.
Parking assist
The parking assist makes parking
easier by measuring the distance between the vehicle and obstacles,
and giving acoustic signals. It is the
driver, however, who bears full
responsibility for the parking
manoeuvre.
The system consists of four ultrasonic parking sensors in the rear bumper. If
the vehicle is equipped with a front
parking assist the system consists of
four additional ultrasonic parking
sensors in the front bumper.
Activation
After ignition is switched on, the rear
parking assist is activated.
The front parking assist can also be activated at a low speed by pressing
r .
An illuminated LED in the parking
assist button indicates that the
system is ready to operate.
An obstacle is indicated by a buzzing
sound. The interval between the sounds becomes shorter as the
vehicle gets closer to the obstacle.
When the distance is less than
30 cm, the buzzing is continuous.
Page 168 of 253

166Driving and operatingDisplay indication
Information about the currently valid
traffic signs is available on the
designated traffic sign assistant page in the Driver Information Centre.
Additionally, the currently valid speed
limit is displayed permanently in the
lower line of the Driver Information
Centre. In case a speed limit with
addon is available, a + symbol is
displayed in this area.Choose ? via MENU and select
traffic sign assistant page with the
adjuster wheel on the turn signal lever 3 97.
When another page on the Driver
Information Centre menu was
selected and then traffic sign
assistant page is chosen again, the
last recognised traffic sign will be
displayed.
Alert function
The alert function can be activated or deactivated in the setting menu of the
traffic sign assistant page.Once activated and when the traffic
sign detection page is currently not
displayed, newly detected speed limit
and no passing signs are displayed
as popup alerts in the Driver
Information Centre.
Page 169 of 253

Driving and operating167
When traffic sign assistant page is
displayed, press SET/CLR on the turn
signal lever.
Select Alerts ON or Alerts OFF by
turning the adjuster wheel and press SET/CLR .
Pop-up alert is displayed for approx.
eight seconds in the Driver
Information Centre.
System reset The content of the traffic sign memory
can be cleared in the setting menu of the traffic sign assistant page by
selecting Reset and confirm by
pressing SET/CLR on the turn signal
lever.
Alternatively, SET/CLR can be
pressed for three seconds to clear the
content of the page.
Upon successful reset, a chime will
sound and the following “Default
Sign” is indicated until the next traffic
sign is detected.
In some cases, traffic sign assistant is
cleared up automatically by the
system.
Clearing of traffic signs
There are different scenarios that
lead to clearing the currently
displayed traffic signs. After clearing,
the “Default Sign” is displayed in the
Driver Information Centre.
Page 170 of 253

168Driving and operatingReasons for signs being cleared:● A predefined distance was driven
or time has elapsed (differs for
each sign type)
● Vehicle drives through a turn
● The speed becomes slower than 52 km/h (city entry detection)
Fault
The traffic sign assistant system may
not operate correctly if:
● The area of the windscreen, where the front camera is
located, is not clean or affected
by foreign items, e.g. stickers.
● Traffic signs are completely or partially covered or difficult to
discern.
● There are adverse environmental
conditions, e.g. heavy rain, snow,
direct sunlight or shadows.
● Traffic signs are incorrectly mounted or damaged.
● Traffic signs do not comply with the Vienna Convention on traffic
signs.Caution
The system is intended to help the driver within a defined speed
range to discern certain traffic
signs. Do not ignore traffic signs
which are not displayed by the
system.
The system does not discern any other than the conventional traffic
signs that might give or end a
speed limit.
Do not let this special feature
tempt you into taking risks when
driving.
Always adapt speed to the road
conditions.
The driver assistance systems do not relieve the driver from full
responsibility for vehicle
operation.
Lane departure warning
The lane departure warning system
observes the lane markings between
which the vehicle is driving via a front camera. The system detects lane
changes and warns the driver in the
event of an unintended lane change
via visual and acoustic signals.
Criteria for the detection of an
unintended lane change are:
● no operation of turn signals
● no brake pedal operation
● no active accelerator operation or
speeding-up
● no active steering
If the driver is active, no warning will
be issued.
Activation
Page 206 of 253

204Vehicle care●Light for comfort pressure up to
three people.
● Eco for Eco pressure up to three
people.
● Max for full loading.
Tyre pressure sensor matching process
Each tyre pressure sensor has a
unique identification code. The
identification code must be matched
to a new wheel position after rotating
the wheels or exchanging the
complete wheel set and if one or more tyre pressure sensors were replaced.The tyre pressure sensor matching
process should also be performed
after replacing a spare wheel with a
road wheel containing a tyre pressure
sensor.
The malfunction light w and the
warning message should extinguish
at the next ignition cycle. The sensors
are matched to the wheel positions,
using a relearn tool, in the following
order: left side front wheel, right side
front wheel, right side rear wheel andleft side rear wheel. The turn signal
light at the current active position is
illuminated until sensor is matched.
Consult a workshop for service. There are two minutes to match the first
wheel position, and five minutes
overall to match all four wheel
positions. If it takes longer, the
matching process stops and must be
restarted.
The tyre pressure sensor matching
process is:
1. Apply the parking brake.
2. Turn the ignition on.
3. On vehicles with automatic transmission: set the selector
lever to P.
On vehicles with manual
transmission: select neutral.
4. Press MENU on the turn signal
lever to select the Vehicle
Information Menu in the Driver
Information Centre.
5. Turn the adjuster wheel to scroll to
the tyre pressure menu.
Midlevel display:
Uplevel display:
Page 207 of 253

Vehicle care2056. Press SET/CLR to begin the
sensor matching process. A
message requesting acceptance
of the process should be
displayed.
7. Press SET/CLR again to confirm
the selection. The horn sounds
twice to signal that the receiver is
in relearn mode.
8. Start with the left side front wheel.
9. Place the relearn tool against the tyre sidewall, near the valve stem.
Then press the button to activate
the tyre pressure sensor. A horn
chirp confirms that the sensor
identification code has been
matched to this tyre and wheel
position.
10. Proceed to the right side front wheel, and repeat the procedure
in Step 9.
11. Proceed to the right side rear wheel, and repeat the procedure
in Step 9.
12. Proceed to the left side rear wheel, and repeat the procedure
in Step 9. The horn sounds twice
to indicate the sensoridentification code has been
matched to the left side rear
wheel, and the tyre pressure
sensor matching process is no
longer active.
13. Turn off the ignition.
14. Set all four tyres to the recommended air pressure level
as indicated on the tyre pressure
information label.
15. Ensure the tyre loading status is set according to the selected tyre
pressure 3 97.
Tread depth
Check tread depth at regular
intervals.
Tyres should be replaced for safety
reasons at a tread depth of 2-3 mm
(4 mm for winter tyres).
For safety reasons it is recommended
that the tread depth of the tyres on
one axle should not vary by more than 2 mm.
The legally permissible minimum
tread depth (1.6 mm) has been
reached when the tread has worn
down as far as one of the tread wear
indicators (TWI). Their position is
indicated by markings on the
sidewall.
If there is more wear at the front than
the rear, swap round front wheels and rear wheels. Ensure that the direction
of rotation of the wheels is the same
as before.
Tyres age, even if they are not used.
We recommend tyre replacement
every six years.