tow OPEL MOKKA X 2019 Manual user
[x] Cancel search | Manufacturer: OPEL, Model Year: 2019, Model line: MOKKA X, Model: OPEL MOKKA X 2019Pages: 253, PDF Size: 6.86 MB
Page 153 of 253

Driving and operating151Brakes
The brake system comprises two
independent brake circuits.
If a brake circuit fails, the vehicle can
still be braked using the other brake
circuit. However, braking effect is
achieved only when the brake pedal
is depressed firmly. Considerably
more force is needed for this. The
braking distance is extended. Seek the assistance of a workshop before
continuing the journey.
When the engine is not running, the
support of the brake servo unit
disappears once the brake pedal has
been depressed once or twice.
Braking effect is not reduced, but
braking requires significantly greater
force. It is especially important to bear this in mind when being towed.
Control indicator R 3 93.
Antilock brake system
Antilock brake system (ABS)
prevents the wheels from locking.ABS starts to regulate brake pressure as soon as a wheel shows a tendency to lock. The vehicle remains
steerable, even during hard braking.
ABS control is made apparent
through a pulse in the brake pedal
and the noise of the regulation
process.
For optimum braking, keep the brake
pedal fully depressed throughout the
braking process, despite the fact that
the pedal is pulsating. Do not reduce
the pressure on the pedal.
After starting-off the system performs
a self-test which may be audible.
Control indicator u 3 94.
Adaptive brake light
During full braking, all three brake
lights flash for the duration of ABS
control.Fault9 Warning
If there is a fault in the ABS, the
wheels may be liable to lock due
to braking that is heavier than
normal. The advantages of ABS are no longer available. During
hard braking, the vehicle can no longer be steered and may
swerve.
Have the cause of the fault remedied
by a workshop.
Parking brake
Page 164 of 253
162Driving and operatingIf r is pressed once within an
ignition cycle, the front parking assist
is reactivated if the vehicle speed
goes below a certain value and if the
vehicle speed has not exceeded 25 km/h beforehand.
Deactivation
Deactivate the system by pressing r .
The LED in the button will go out and
a message will be displayed in the
Driver Information Centre.
If the parking assist is deactivated manually, it will be reactivated
automatically the next time the
ignition is switched on.
The system is deactivated
automatically at a certain speed.
Fault
In the event of a fault in the system, a vehicle message is displayed in the
Driver Information Centre.
Additionally, a vehicle message is
displayed in the Driver Information
Centre if a malfunction of the system
due to temporary conditions, e.g.
snow covered sensors is detected.Vehicle messages 3 104.
Important hints for using the
parking assist systems9 Warning
Under certain circumstances,
various reflective surfaces on
objects or clothing as well as
external noise sources may cause the system to fail to detect
obstacles.
Special attention has to be paid to
low obstacles which can damage
the lower part of the bumper. If
such obstacles leave the detection area of the sensors during
approach of the vehicle, a
continuous warning tone will
sound.
Caution
Performance of the system can be reduced when sensors are
covered, e.g. by ice or snow.
Performance of the parking assist
system can be reduced due to
heavy loading.
Special conditions apply if there
are taller vehicles in the vicinity
(e.g. off-road vehicles, mini vans,
vans). Object identification and correct distance indication in the
upper part of these vehicles
cannot be guaranteed.
Objects with a very small reflection
cross-section, e.g. objects of
narrow size or soft materials, may
not be detected by the system.
Parking assist systems do not
detect objects outside the
detection range.
Note
The parking assist system
automatically detects factory-fitted
towing equipment. It is deactivated
when the connector is plugged in.
The sensor may detect a non-
existent object (echo disturbance)
caused by external acoustic or
mechanical disturbances.
Page 166 of 253
164Driving and operating
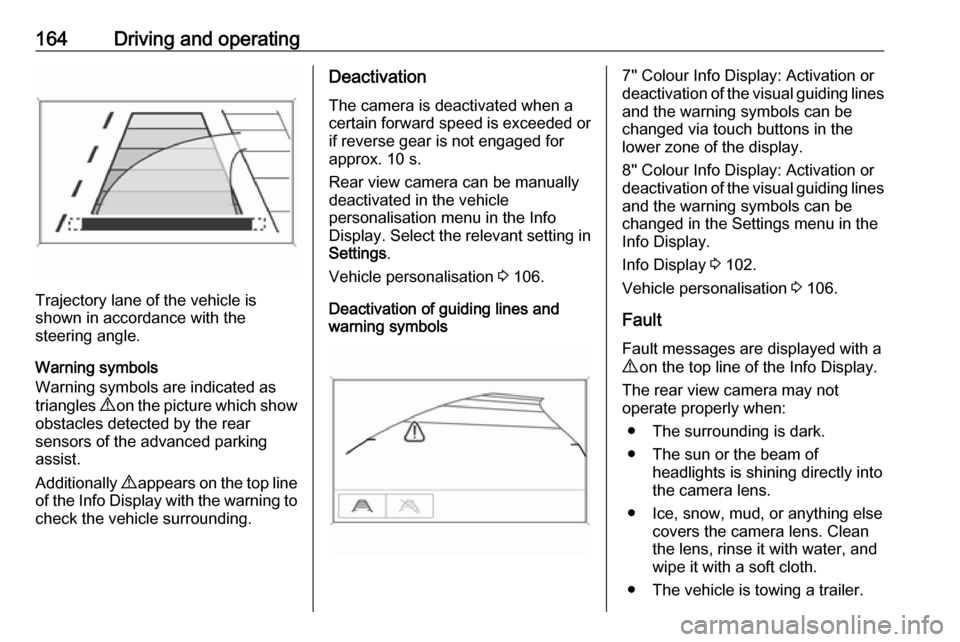
Trajectory lane of the vehicle is
shown in accordance with the
steering angle.
Warning symbols
Warning symbols are indicated as
triangles 9 on the picture which show
obstacles detected by the rear
sensors of the advanced parking
assist.
Additionally 9 appears on the top line
of the Info Display with the warning to
check the vehicle surrounding.
Deactivation
The camera is deactivated when acertain forward speed is exceeded or
if reverse gear is not engaged for
approx. 10 s.
Rear view camera can be manually
deactivated in the vehicle
personalisation menu in the Info
Display. Select the relevant setting in
Settings .
Vehicle personalisation 3 106.
Deactivation of guiding lines and
warning symbols7'' Colour Info Display: Activation or
deactivation of the visual guiding lines and the warning symbols can be
changed via touch buttons in the
lower zone of the display.
8'' Colour Info Display: Activation or
deactivation of the visual guiding lines
and the warning symbols can be
changed in the Settings menu in the
Info Display.
Info Display 3 102.
Vehicle personalisation 3 106.
Fault
Fault messages are displayed with a 9 on the top line of the Info Display.
The rear view camera may not
operate properly when:
● The surrounding is dark.
● The sun or the beam of headlights is shining directly into
the camera lens.
● Ice, snow, mud, or anything else covers the camera lens. Clean
the lens, rinse it with water, and
wipe it with a soft cloth.
● The vehicle is towing a trailer.
Page 167 of 253
Driving and operating165● The vehicle had a rear endaccident.
● There are extreme temperature changes.
Traffic sign assistant Functionality
The traffic sign assistant system
detects designated traffic signs via a
front camera and displays them in the
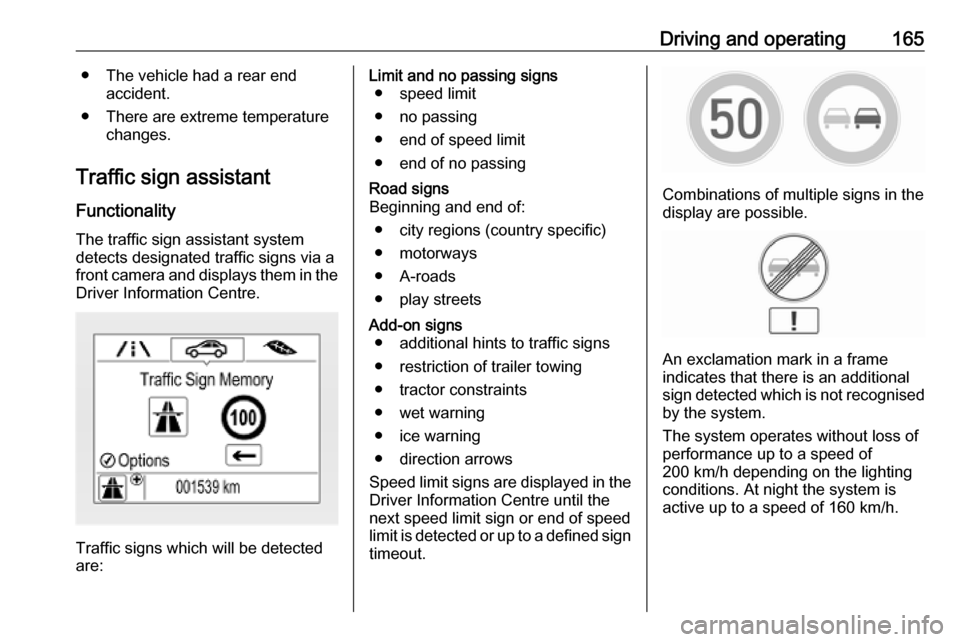
Driver Information Centre.
Traffic signs which will be detected
are:
Limit and no passing signs ● speed limit
● no passing
● end of speed limit
● end of no passingRoad signs
Beginning and end of:
● city regions (country specific)
● motorways
● A-roads
● play streetsAdd-on signs ● additional hints to traffic signs
● restriction of trailer towing
● tractor constraints
● wet warning
● ice warning
● direction arrows
Speed limit signs are displayed in the
Driver Information Centre until the
next speed limit sign or end of speed
limit is detected or up to a defined sign timeout.
Combinations of multiple signs in the
display are possible.
An exclamation mark in a frame
indicates that there is an additional
sign detected which is not recognised
by the system.
The system operates without loss of
performance up to a speed of
200 km/h depending on the lighting
conditions. At night the system is
active up to a speed of 160 km/h.
Page 176 of 253

174Driving and operating
The funnel is stowed in the load
compartment.
Place the funnel in storage bin and
store into polybag.
Use the funnel to fill in the fuel into the
filler neck.
After topping-up, stow the funnel into
polybag in the load compartment.
Liquid gas refuelling
Follow the operating and safety
instructions of the filling station when
refuelling.
Filling adapter
As filling systems are not
standardised, different adapters are
required which are available from
Opel Distributors and from Opel
Service Partners.
ACME adapter: Belgium, Germany,
Ireland, Luxembourg, Switzerland
DISH adapter: Austria, Bosnia-
Herzegovina, Bulgaria, Czech
Republic, Croatia, Denmark, Estonia, France, Greece, Hungary, Italy,
Latvia, Lithuania, Macedonia,
Poland, Portugal, Romania, Serbia,
Slovakia, Slovenia, Sweden,
Switzerland, Turkey, Ukraine
Page 177 of 253

Driving and operating175
Bayonet adapter: Netherlands,
Norway, Spain, United Kingdom
EURO adapter: Spain
The filling valve for the liquid gas is
behind the fuel filler cap.
Unscrew protective cap from the filler
neck.
Screw the required adapter hand-
tight onto the filler neck.
ACME adapter: Screw the nut of the
filling nozzle onto the adapter.
Engage the locking lever of the filler
nozzle.
DISH adapter: Place the filler nozzle
into the adapter. Engage the locking
lever of the filler nozzle.
Bayonet adapter: Place filler nozzle
on the adapter and turn one quarter
turn. Engage the locking lever of the
filler nozzle.
EURO adapter: Press the filler nozzle
onto the adapter. Engage the locking
lever of the filler nozzle.
Press the button at the liquid gas supply point. The filling system stops
or begins to run slowly when 80% of
the tank volume is reached
(maximum fill level).
Release button on filling system and
the filling process stops. Release the
locking lever and remove the filler
nozzle. A small quantity of liquid gas
may escape.
Remove adapter and stow in vehicle.
Page 178 of 253

176Driving and operatingFit protective cap to prevent the
penetration of foreign bodies into the
filler opening and the system.9 Warning
Due to the system design, an
escape of liquid gas after
releasing the locking lever is
unavoidable. Avoid inhaling.
9 Warning
The liquid gas tank should only be
filled to 80% capacity, for safety
reasons.
The multivalve on the liquid gas tank
automatically limits the fill quantity. If
a larger quantity is added, we
recommend not exposing the vehicle
to the sun until the excess amount
has been used up.
Fuel filler cap
Only use genuine fuel filler caps. Diesel-engined vehicles have special fuel filler caps.
Trailer hitch
General information
Only use towing equipment that has
been approved for your vehicle.
Entrust retrofitting of towing
equipment to a workshop. It may be
necessary to make changes that
affect the cooling system, heat
shields or other equipment.
The bulb outage detection function for
trailer brake light cannot detect a
partial bulb outage. E.g. in case of
four bulbs with a power of 5 W each,
the function only detects lamp outage when only a single 5 W lamp remains
or none remain.
Fitting of towing equipment could
cover the opening of the towing eye.
If this is the case, use the coupling ball
bar for towing. Always keep the
coupling ball bar in the vehicle when
not in use.Driving characteristics and
towing tips
Before attaching a trailer, lubricate the coupling ball. However, do not do
so if a stabiliser, which acts on the
coupling ball, is being used to reduce snaking movements.
For trailers with low driving stability
and caravan trailers with a permitted
gross vehicle weight of more than
1000 kg, a speed of 80 km/h must not
be exceeded. The use of a stabiliser
is recommended.
If the trailer starts snaking, drive more slowly, do not attempt to correct the
steering and brake sharply if
necessary.
When driving downhill, drive in the
same gear as if driving uphill and
drive at a similar speed.
Adjust tyre pressure to the value
specified for full load 3 235.
Page 179 of 253
Driving and operating177Trailer towingTrailer loads
The permissible trailer loads are
vehicle and engine-dependent
maximum values which must not be
exceeded. The actual trailer load is
the difference between the actual
gross weight of the trailer and the
actual coupling socket load with the
trailer coupled.
The permissible trailer loads are
specified in the vehicle documents. In general, they are valid for gradients
up to max. 12%.
The permitted trailer loads apply up to the specified incline and up to an
altitude of 1000 m above sea level.
Since engine power decreases as
altitude increases due to the air
becoming thinner, therefore reducing
climbing ability, the permissible gross
train weight also decreases by 10%
for every 1000 m of additional
altitude. The gross train weight does
not have to be reduced when driving
on roads with slight inclines (less than
8%, e.g. motorways).The permissible gross train weight
must not be exceeded. This weight is specified on the identification plate
3 224.
Vertical coupling load
The vertical coupling load is the load
exerted by the trailer on the coupling
ball. It can be varied by changing the
weight distribution when loading the
trailer.
The maximum permissible vertical
coupling load (75 kg) is specified on
the towing equipment identification
plate and in the vehicle documents.
Always aim for the maximum load,
especially in the case of heavy
trailers. The vertical coupling load
should never fall below 25 kg.
Rear axle load
The permissible axle loads (see
identification plate or vehicle
documents) must not be exceeded.Towing equipmentCaution
When operating without a trailer,
remove the coupling ball bar.
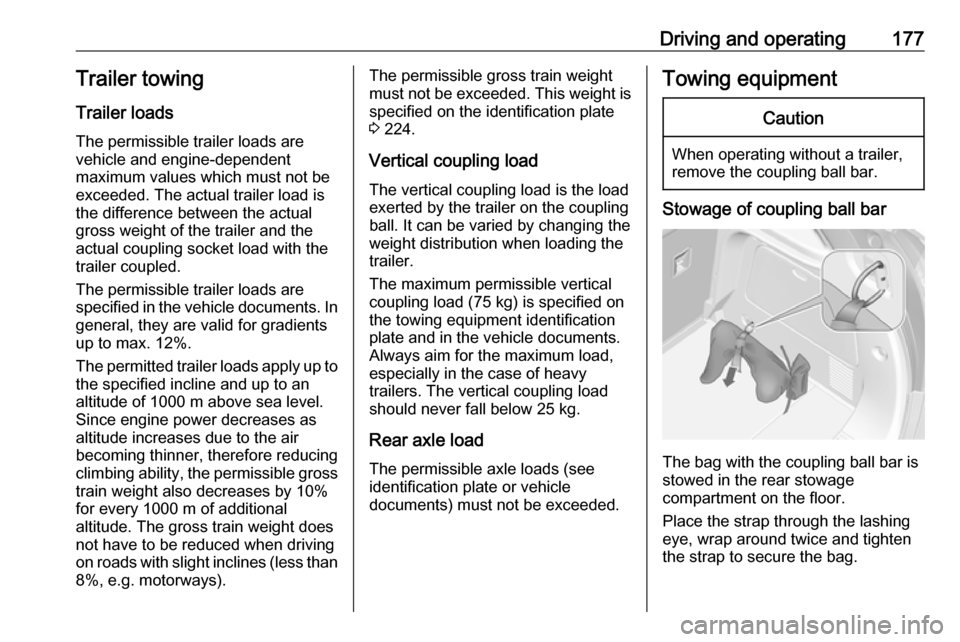
Stowage of coupling ball bar
The bag with the coupling ball bar is
stowed in the rear stowage
compartment on the floor.
Place the strap through the lashing
eye, wrap around twice and tighten
the strap to secure the bag.
Page 180 of 253

178Driving and operatingFitting the coupling ball bar
Disengage and fold down the socket.Remove the sealing plug from the
opening for the coupling ball bar and
stow it.
Checking the tensioning of the
coupling ball bar
● Red marking on rotary knob must
point towards green marking on
coupling ball bar.
● The gap between the rotary knob
and the coupling ball bar must be approx. 6 mm.
● The key must be in position c.
Otherwise, the coupling ball bar must be tensioned before being inserted:
● Unlock coupling ball bar by turning key to position c.
● Pull out rotary knob and turn
clockwise as far as it will go.
Inserting the coupling ball bar
Page 181 of 253
Driving and operating179Insert the tensioned coupling ball bar
in the opening and push firmly
upwards until it audibly engages.
The rotary handle snaps back into its
original position resting against the
coupling ball bar without a gap.9 Warning
Do not touch rotary handle during
insertion.
Lock the coupling ball bar by turning
the key to position e. Remove the key
and close the protective flap.
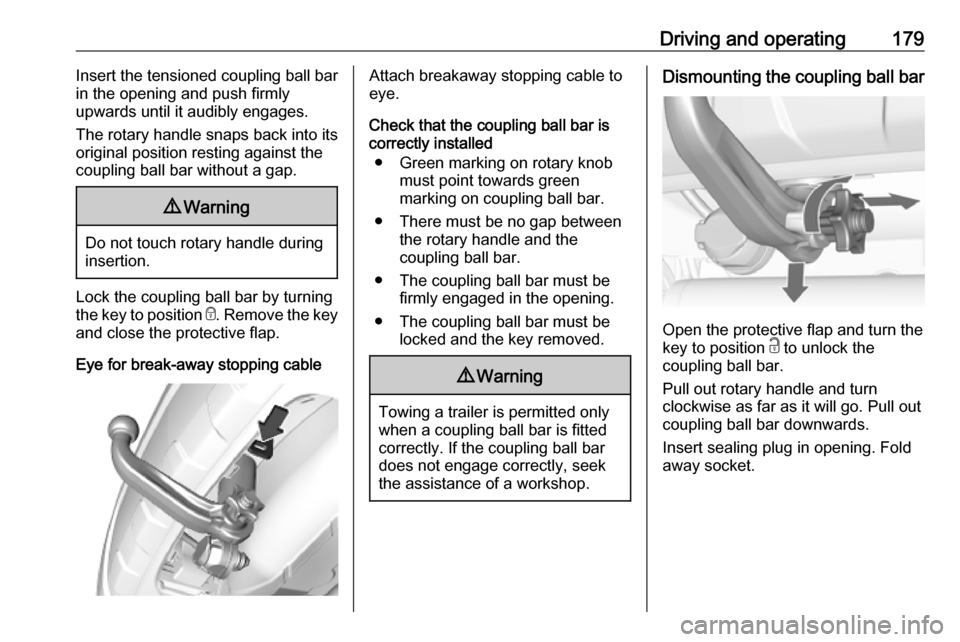
Eye for break-away stopping cable
Attach breakaway stopping cable to
eye.
Check that the coupling ball bar is correctly installed
● Green marking on rotary knob must point towards green
marking on coupling ball bar.
● There must be no gap between the rotary handle and the
coupling ball bar.
● The coupling ball bar must be firmly engaged in the opening.
● The coupling ball bar must be locked and the key removed.9Warning
Towing a trailer is permitted only
when a coupling ball bar is fitted correctly. If the coupling ball bardoes not engage correctly, seekthe assistance of a workshop.
Dismounting the coupling ball bar
Open the protective flap and turn the
key to position c to unlock the
coupling ball bar.
Pull out rotary handle and turn
clockwise as far as it will go. Pull out coupling ball bar downwards.
Insert sealing plug in opening. Fold away socket.