tow OPEL MOVANO_B 2018.5 Manual user
[x] Cancel search | Manufacturer: OPEL, Model Year: 2018.5, Model line: MOVANO_B, Model: OPEL MOVANO_B 2018.5Pages: 271, PDF Size: 6.5 MB
Page 158 of 271

156Driving and operatingstart off quickly, release the brake
pedal and accelerate immediately
after engaging a gear.
In automatic mode the transmission
shifts to other gears automatically,
dependent on driving conditions.
To engage manual mode, move the
selector lever towards A/M. The
current gear will appear in the
transmission display.
To engage first gear, depress brake
pedal and move selector lever
towards + or -. Shift to a higher or
lower gear by moving selector lever to + or -. Gears can be skipped by
moving the selector lever repeatedly
at short intervals.
Stopping the vehicle In automatic or manual mode,
first gear is engaged and the clutch is
released when the vehicle is stopped. In R, reverse gear remains engaged.
When stopping on gradients, engage parking brake or depress the brake
pedal. To prevent overheating of the
clutch, an intermittent audiblewarning may sound as a signal to
depress the brake pedal or apply the
parking brake.
Switch off engine if stopping for a lengthy period, e.g. in traffic jams.
When the vehicle is parked and the
driver's door is opened, a warning
chime will sound if neutral is not
selected or the brake pedal has not
been depressed.
Engine braking
Automatic mode
When driving downhill, the manual
transmission automated does not shift into higher gears until a fairly
high engine speed has been reached. It shifts down in good time when
braking.
Manual mode
To utilise the engine braking effect,
select a lower gear in good time when driving downhill.Rocking the vehicle
Rocking the vehicle is only
permissible if the vehicle is stuck in
sand, mud, snow or a hole. Move the
selector lever between R and A/M (or
between + and -) in a repeat pattern,
while applying light pressure to the
accelerator pedal. Do not race the
engine and avoid sudden
acceleration.
Parking
Apply the parking brake. The most recently engaged gear (see
transmission display) remains
engaged. With N, no gear is engaged.
When the ignition is switched off, the transmission no longer responds to
movement of the selector lever.
If the ignition is not switched off, or the parking brake has not been applied, a
warning chime will sound upon
opening the driver's door.
Manual mode If a higher gear is selected when the
engine speed is too low, or a lower
gear when the speed is too high, the
Page 160 of 271

158Driving and operatingDeactivation
The Laden mode is switched off by:
● pressing kg again
● turning off the ignition
Kickdown If the accelerator pedal is pressed
past the pressure point, the
transmission shifts to a lower gear depending on engine speed. Full
engine power is available for
acceleration.
If engine speed is too high the
transmission switches to a higher
gear, even in manual mode. Without
kickdown this automatic shift is not
effected in manual mode.
Fault
In the event of a fault, control indicator
W is shown in the transmission
display. Continued driving is possible
provided the vehicle is driven with
care and anticipation.
Have the cause of the fault remedied
by a workshop.Interruption of power supply
The clutch is not disengaged if there
is an interruption of the power supply
when a gear is engaged. The vehicle
cannot move.
If the vehicle battery is discharged,
start the vehicle using jump leads
3 219.
If the cause of the fault is not a
discharged vehicle battery, seek the
assistance of a workshop.
If neutral cannot be selected, the
vehicle must only be towed with the
drive wheels raised off the ground
3 221.
Towing the vehicle 3 221.Brakes
The brake system comprises two
independent brake circuits.
If a brake circuit fails, the vehicle can
still be braked using the other brake
circuit. However, braking effect is
achieved only when you depress the
brake pedal firmly. You need to use considerably more force for this. The
braking distance is extended. Seek the assistance of a workshop beforecontinuing your journey.
When the engine is not running, the
support of the brake servo unit
disappears once the brake pedal has
been depressed once or twice.
Braking effect is not reduced, but
braking requires significantly greater
force. It is especially important to bear this in mind when being towed.
Control indicator R 3 102.
Antilock brake system
Antilock brake system (ABS)
prevents the wheels from locking.
Page 170 of 271
168Driving and operatingOperation conditions
The system is operational at a vehicle
speed between 15 km/h and
100 km/h.
Activation The system is automatically activewhen the ignition is switched on.
Functionality
When driving in the speed range
mentioned above and a risk of
collision with the vehicle ahead is
imminent, l will flash and a warning
chime sounds.
The indicator light l and the chimes
stop when the system detects that a
collision is not imminent anymore.
Just before the imminent collision, the
system brakes automatically to
reduce the impact speed of the
collision or prohibit a crash.9 Warning
Do not rely on the system to brake
the vehicle. Active emergency
braking will not brake outside of its
operating speed range and only
responds to detected vehicles.
Deactivation and re-activation
Active emergency braking can be
deactivated with the vehicle
stationary and the ignition switched
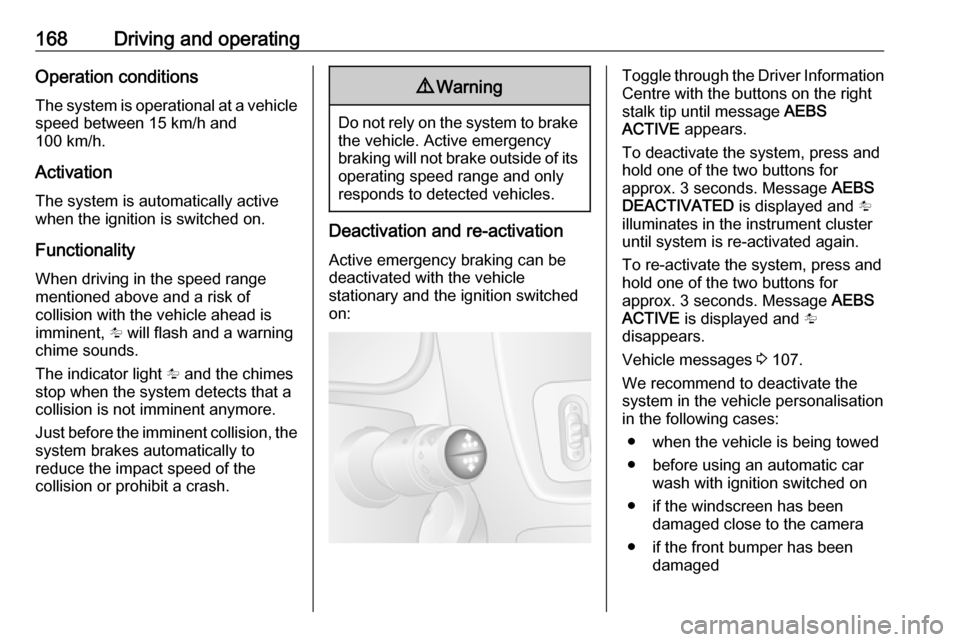
on:
Toggle through the Driver Information Centre with the buttons on the right
stalk tip until message AEBS
ACTIVE appears.
To deactivate the system, press and
hold one of the two buttons for
approx. 3 seconds. Message AEBS
DEACTIVATED is displayed and l
illuminates in the instrument cluster until system is re-activated again.
To re-activate the system, press and hold one of the two buttons for
approx. 3 seconds. Message AEBS
ACTIVE is displayed and l
disappears.
Vehicle messages 3 107.
We recommend to deactivate the
system in the vehicle personalisation
in the following cases:
● when the vehicle is being towed
● before using an automatic car wash with ignition switched on
● if the windscreen has been damaged close to the camera
● if the front bumper has been damaged
Page 179 of 271

Driving and operating177Trailer hitch
General information
Only use towing equipment that has
been approved for your vehicle.
Entrust fitting of towing equipment at
a later date to a workshop. It may be
necessary to make changes that
affect the cooling system, heat
shields or other equipment.
Driving characteristics and towing tips
In the case of trailers with brakes,
attach the breakaway stopping cable.
Before attaching a trailer, lubricate
the coupling ball. However, do not do
so if a stabiliser, which acts on the coupling ball, is being used to reduce
snaking movements. For trailers with
low driving stability the use of a
stabiliser is recommended.
A maximum speed of 80 km/h must
not be exceeded, even in countries
where higher speeds are permitted.If the trailer starts snaking, drive more slowly, do not attempt to correct the
steering and brake sharply if
necessary.
When driving downhill, drive in the
same gear as if driving uphill and
drive at a similar speed.
Adjust tyre pressure to the value
specified for full load 3 252.
Trailer towing
Trailer loads The permissible trailer loads are
vehicle-dependent and engine-
dependent maximum values which
must not be exceeded. The actual
trailer load is the difference between
the actual gross weight of the trailer
and the actual coupling socket load
with the trailer coupled.
The permissible trailer loads are
specified in the vehicle documents. In
general, they are valid for gradients
up to max. 12%.
The permitted trailer load applies up to the specified incline and up to an
altitude of 1000 m above sea level.Since engine power decreases as
altitude increases due to the air
becoming thinner, therefore reducing
climbing ability, the permissible gross
train weight also decreases by 10%
for every 1000 m of additional
altitude. The gross train weight does
not have to be reduced when driving
on roads with slight inclines (less than 8%, e.g. motorways).
The permissible gross train weight
must not be exceeded. This weight is
specified on the identification plate
3 231.
Vertical coupling load
The vertical coupling load is the load
exerted by the trailer on the coupling
ball. It can be varied by changing the
weight distribution when loading the
trailer.
The maximum permissible vertical
coupling load is specified on the
towing equipment identification plate
and in the vehicle documents. Always aim for the maximum load, especially in the case of heavy trailers. The
vertical coupling load should never
fall below 25 kg.
Page 180 of 271
178Driving and operatingIn the case of trailer loads of
1200 kg or more, the vertical coupling load should not be less than 50 kg.
Rear axle load When the trailer is coupled and the
towing vehicle fully loaded (including all occupants), the permissible rear
axle load (see identification plate or
vehicle documents) must not be
exceeded.
Towing equipmentCaution
When operating without a trailer,
remove the coupling ball bar.
Towing equipment audible
warning
For vehicles fitted with towing
equipment, when connected to a
trailer the pitch of the audible warning
changes upon operation of the turn
lights.
The pitch of the audible warning will
change if a turn light on the trailer or
the towing vehicle fails.
Trailer stability assist
If the system detects snaking
movements, engine power is reduced
and the vehicle/trailer combination is
selectively braked until the snaking ceases. While the system is working,keep steering wheel as still as
possible.
Trailer stability assist (TSA) is a
function of the Electronic Stability
Program (ESP) 3 162.Auxiliary features
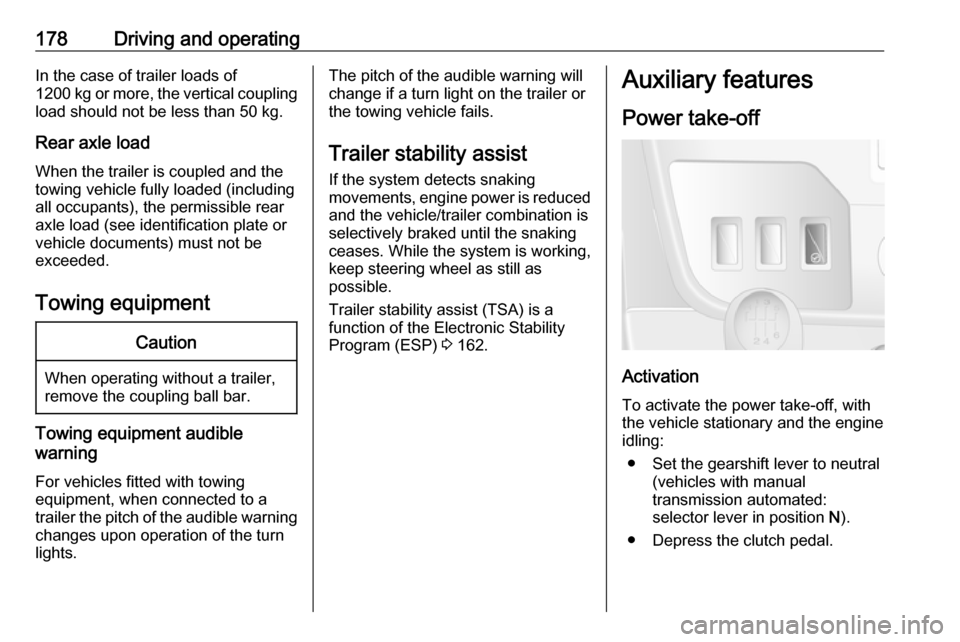
Power take-off
Activation
To activate the power take-off, with
the vehicle stationary and the engine
idling:
● Set the gearshift lever to neutral (vehicles with manual
transmission automated:
selector lever in position N).
● Depress the clutch pedal.
Page 182 of 271

180Vehicle careVehicle careGeneral Information...................181
Accessories and vehicle modifications .......................... 181
Vehicle storage ........................181
End-of-life vehicle recovery .....182
Vehicle checks ........................... 182
Performing work ......................182
Bonnet ..................................... 182
Engine oil ................................. 183
Engine coolant ......................... 185
Power steering fluid .................185
Washer fluid ............................ 186
Brakes ..................................... 187
Brake fluid ............................... 187
Vehicle battery ......................... 187
Diesel fuel filter ........................189
Diesel fuel system bleeding .....189
Wiper blade replacement ........190
Bulb replacement .......................191
Headlights ............................... 191
Fog lights ................................. 194
Front turn lights .......................194
Tail lights ................................. 195
Side turn lights ......................... 196Centre high-mounted brake
light ......................................... 197
Number plate light ...................198
Interior lights ............................ 198
Instrument panel illumination ...199
Electrical system ........................200
Fuses ....................................... 200
Engine compartment fuse box . 201
Instrument panel fuse box .......201
Load compartment fuse box ....202
Vehicle tools .............................. 204
Tools ........................................ 204
Wheels and tyres .......................205
Tyres ....................................... 205
Winter tyres ............................. 206
Tyre designations ....................206
Tyre pressure .......................... 206
Tyre pressure monitoring system .................................... 207
Tread depth ............................. 209
Changing tyre and wheel size . 210 Wheel covers ........................... 210
Tyre chains .............................. 210
Tyre repair kit .......................... 211
Wheel changing .......................214
Spare wheel ............................ 216
Jump starting ............................. 219Towing....................................... 221
Towing the vehicle ...................221
Towing another vehicle ...........222
Appearance care .......................223
Exterior care ............................ 223
Interior care ............................. 225
Page 192 of 271
190Vehicle careFill the tank with fuel and proceed asfollows:
1. Place a suitable container underneath the fuel filter vent
screw to collect fuel.
2. Loosen the vent screw (arrowed) by one turn.
3. Manually operate the in-line supply pump slowly and steadily
until fuel discharging from the
loosened vent screw is free of air
bubbles.
4. Retighten the vent screw.
In vehicles without an in-line supply
pump, fill the tank with fuel and
proceed as follows:Caution
Do not turn ignition key to position 3 before beginning the bleeding
procedure.
Ignition switch positions 3 138.
1. Turn ignition key to position 2 and
hold for 5 seconds.
2. Turn key back to position 1 and
wait for 3 seconds.
3. Repeat Step 1 and 2 multiple times.
4. Turn key to position 3, then return
to 0.
If the engine cannot be started after
several attempts to bleed the diesel
fuel system, seek the assistance of a
workshop.
Wiper blade replacement
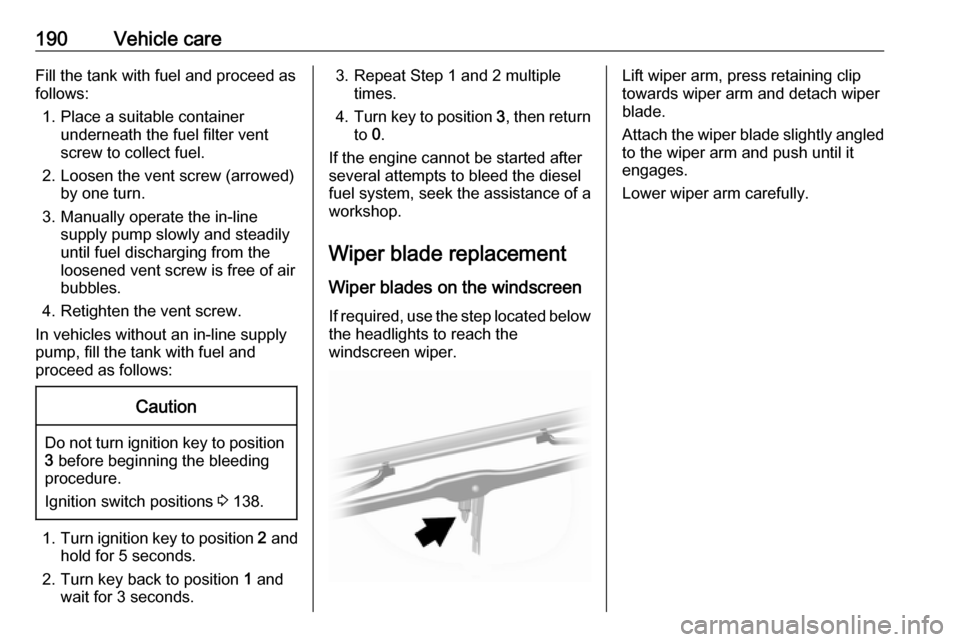
Wiper blades on the windscreen If required, use the step located below
the headlights to reach the
windscreen wiper.Lift wiper arm, press retaining clip
towards wiper arm and detach wiper
blade.
Attach the wiper blade slightly angled
to the wiper arm and push until it
engages.
Lower wiper arm carefully.
Page 206 of 271
204Vehicle careNo.Circuit1Stop-start2Power sliding door lock electro‐
magnet3Power sliding door lock chime4Speed 2: right-hand evaporator
fan5Speed 2: left-hand evaporator
fan6Speed 1: left-hand evaporator
fan7Left-hand heating8Speed 3: left-hand evaporator
fan9Condenser fan10Right-hand heating11Speed 3: right-hand evaporator
fan12Power sliding door13Corridor lightingNo.Circuit14Foot panel15Child safety warning chime16Speed 1: right-hand evaporator
fan
Some circuits may be protected by
several fuses.
Vehicle tools
Tools
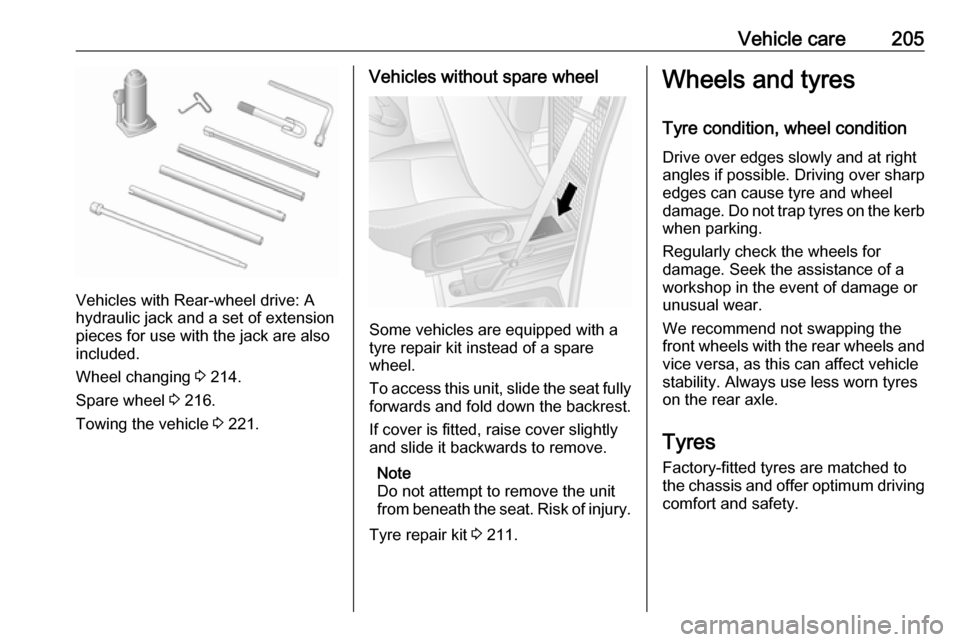
Vehicles with spare wheel
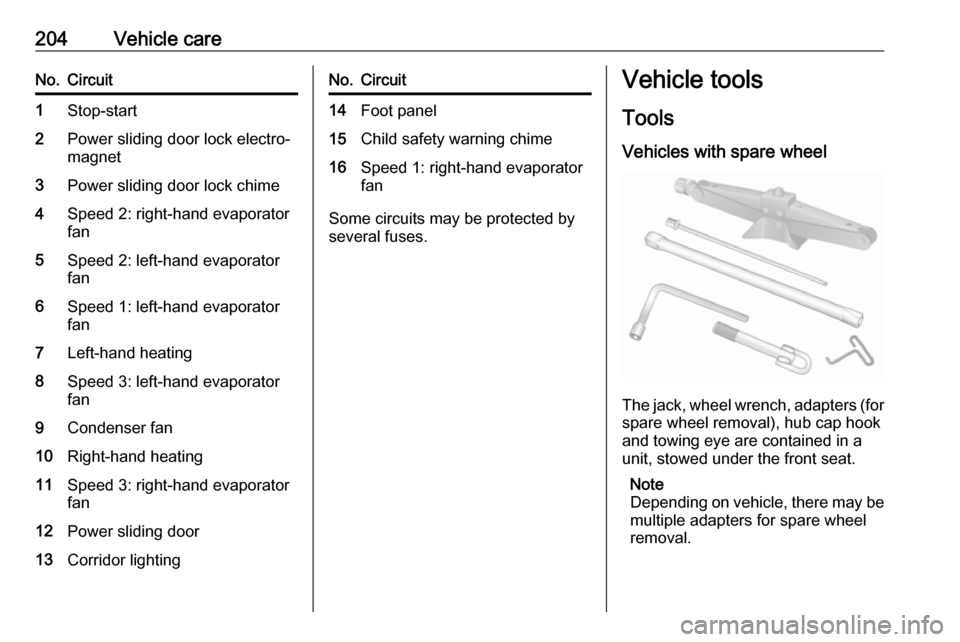
The jack, wheel wrench, adapters (for
spare wheel removal), hub cap hook
and towing eye are contained in a
unit, stowed under the front seat.
Note
Depending on vehicle, there may be
multiple adapters for spare wheel
removal.
Page 207 of 271
Vehicle care205
Vehicles with Rear-wheel drive: A
hydraulic jack and a set of extension
pieces for use with the jack are also
included.
Wheel changing 3 214.
Spare wheel 3 216.
Towing the vehicle 3 221.
Vehicles without spare wheel
Some vehicles are equipped with a
tyre repair kit instead of a spare
wheel.
To access this unit, slide the seat fully forwards and fold down the backrest.
If cover is fitted, raise cover slightly
and slide it backwards to remove.
Note
Do not attempt to remove the unit
from beneath the seat. Risk of injury.
Tyre repair kit 3 211.
Wheels and tyres
Tyre condition, wheel condition Drive over edges slowly and at right
angles if possible. Driving over sharp
edges can cause tyre and wheel
damage. Do not trap tyres on the kerb when parking.
Regularly check the wheels for
damage. Seek the assistance of a
workshop in the event of damage or
unusual wear.
We recommend not swapping the
front wheels with the rear wheels and
vice versa, as this can affect vehicle
stability. Always use less worn tyres
on the rear axle.
Tyres
Factory-fitted tyres are matched to the chassis and offer optimum driving comfort and safety.
Page 209 of 271
Vehicle care2079Warning
If the pressure is too low, this can
result in considerable tyre warm-
up and internal damage, leading to tread separation and even to tyre
blow-out at high speeds.
9 Warning
For specific tyres the
recommended tyre pressure as
shown in the tyre pressure table may exceed the maximum tyre
pressure as indicated on the tyre.
Never exceed the maximum tyre
pressure as indicated on the tyre.
Temperature dependency
Tyre pressure depends on the
temperature of the tyre. During
driving, tyre temperature and
pressure increase.
Tyre pressure values provided on the
tyre information label and tyre
pressure chart are valid for cold tyres, which means at 20 °C. The pressure
increases by nearly 10 kPa (0.1 bar)
for a 10 °C temperature increase.
This must be considered when warm
tyres are checked.
Trailer towing
When towing a trailer with a fully laden vehicle, the tyre pressure must
be increased by 20 kPa/0.2 bar
(3.0 psi) and the maximum speed
limited to 100 km/h.
Trailer towing 3 177.
Rear-wheel drive, with twin rear
wheels
When inflating the outer tyre, the
inflation tube should be passed
between the two wheels.
Tyre pressure monitoringsystem
The tyre pressure monitoring system
uses radio and sensor technology to
check tyre pressure levels.Caution
Tyre pressure monitoring system
warns only about low tyre pressure condition and does not replace
regular tyre maintenance by the
driver.
All wheels must be equipped with pressure sensors and the tyres must
have the prescribed pressure.
Note
In countries where the tyre pressure
monitoring system is legally
required, the use of wheels without
pressure sensors will invalidate the
vehicle operating permit.
The tyre pressure monitoring system
sensors monitor the air pressure in
the tyres and transmit tyre pressure
readings to a receiver located in the
vehicle.
Tyre pressure chart 3 252.