height OPEL MOVANO_B 2018.5 Manual user
[x] Cancel search | Manufacturer: OPEL, Model Year: 2018.5, Model line: MOVANO_B, Model: OPEL MOVANO_B 2018.5Pages: 271, PDF Size: 6.5 MB
Page 10 of 271
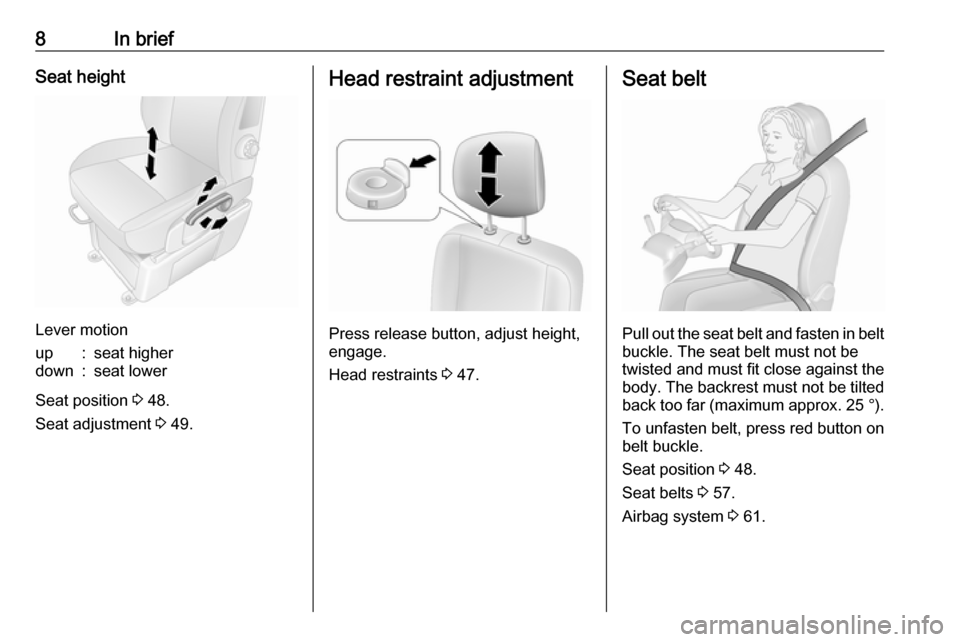
8In briefSeat height
Lever motion
up:seat higherdown:seat lower
Seat position 3 48.
Seat adjustment 3 49.
Head restraint adjustment
Press release button, adjust height,
engage.
Head restraints 3 47.
Seat belt
Pull out the seat belt and fasten in belt
buckle. The seat belt must not be
twisted and must fit close against the
body. The backrest must not be tilted back too far (maximum approx. 25 °).
To unfasten belt, press red button on belt buckle.
Seat position 3 48.
Seat belts 3 57.
Airbag system 3 61.
Page 51 of 271
Seats, restraints49
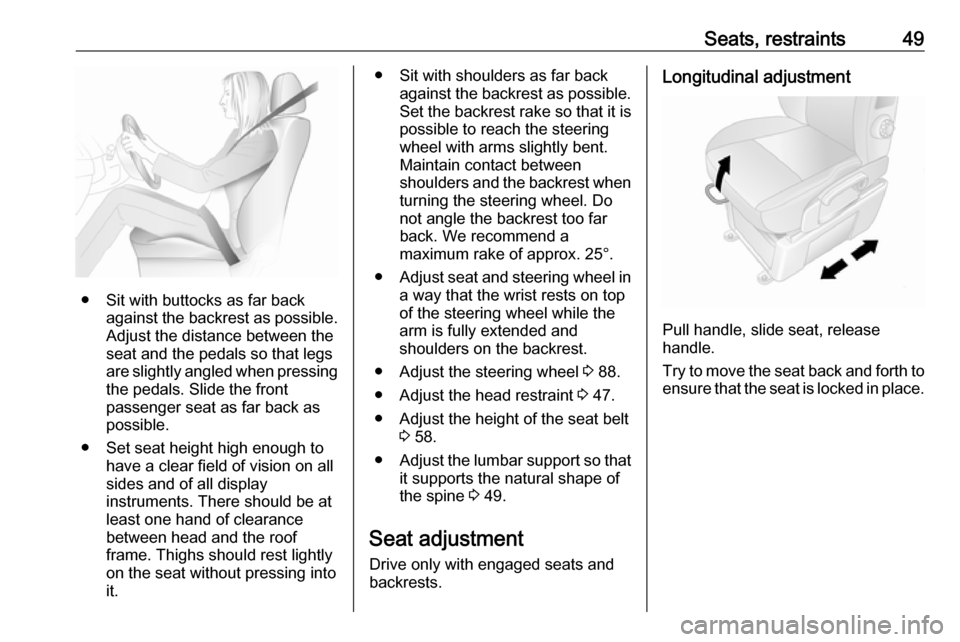
● Sit with buttocks as far backagainst the backrest as possible.
Adjust the distance between the
seat and the pedals so that legs
are slightly angled when pressing
the pedals. Slide the front
passenger seat as far back as
possible.
● Set seat height high enough to have a clear field of vision on allsides and of all display
instruments. There should be at
least one hand of clearance
between head and the roof
frame. Thighs should rest lightly
on the seat without pressing into
it.
● Sit with shoulders as far back against the backrest as possible.Set the backrest rake so that it is
possible to reach the steering
wheel with arms slightly bent.
Maintain contact between
shoulders and the backrest when turning the steering wheel. Do
not angle the backrest too far
back. We recommend a
maximum rake of approx. 25°.
● Adjust seat and steering wheel in
a way that the wrist rests on top
of the steering wheel while the
arm is fully extended and
shoulders on the backrest.
● Adjust the steering wheel 3 88.
● Adjust the head restraint 3 47.
● Adjust the height of the seat belt 3 58.
● Adjust the lumbar support so that
it supports the natural shape of
the spine 3 49.
Seat adjustment Drive only with engaged seats and
backrests.Longitudinal adjustment
Pull handle, slide seat, release
handle.
Try to move the seat back and forth to ensure that the seat is locked in place.
Page 53 of 271
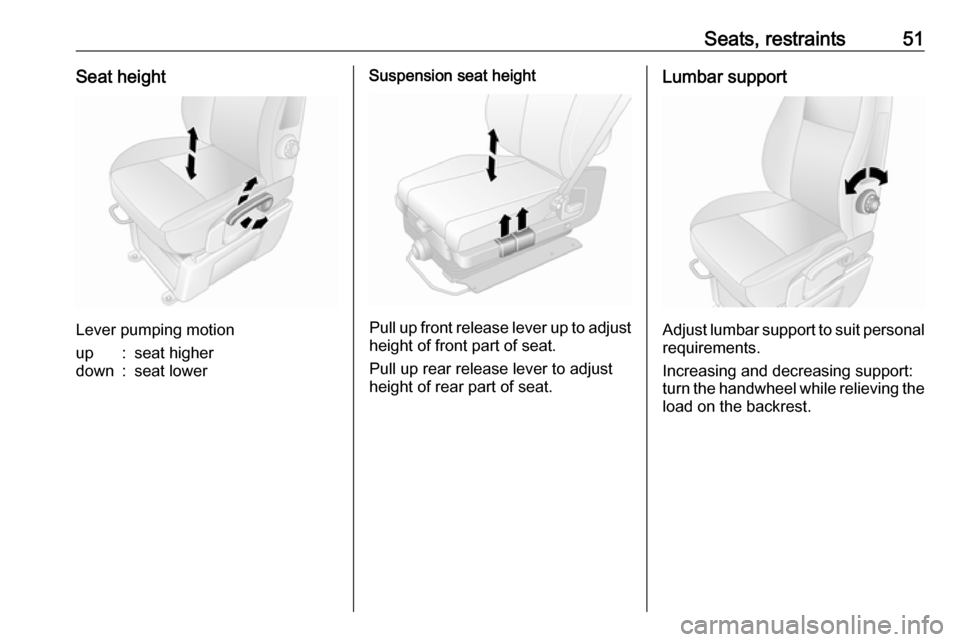
Seats, restraints51Seat height
Lever pumping motion
up:seat higherdown:seat lowerSuspension seat height
Pull up front release lever up to adjustheight of front part of seat.
Pull up rear release lever to adjust height of rear part of seat.
Lumbar support
Adjust lumbar support to suit personal requirements.
Increasing and decreasing support:
turn the handwheel while relieving the load on the backrest.
Page 55 of 271
Seats, restraints53Lumbar support
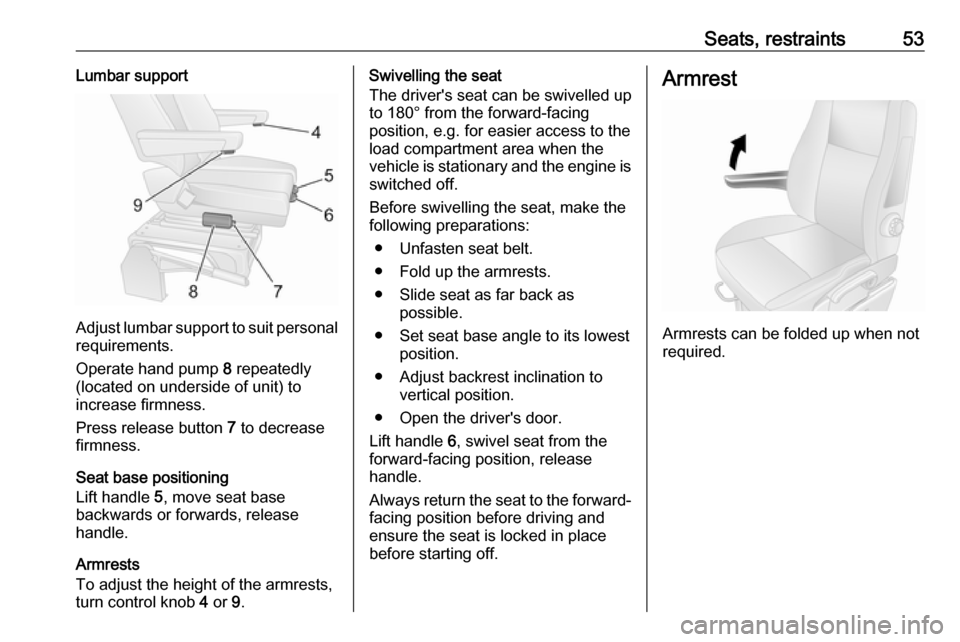
Adjust lumbar support to suit personalrequirements.
Operate hand pump 8 repeatedly
(located on underside of unit) to
increase firmness.
Press release button 7 to decrease
firmness.
Seat base positioning
Lift handle 5, move seat base
backwards or forwards, release handle.
Armrests
To adjust the height of the armrests, turn control knob 4 or 9.
Swivelling the seat
The driver's seat can be swivelled up
to 180° from the forward-facing
position, e.g. for easier access to the load compartment area when the
vehicle is stationary and the engine is
switched off.
Before swivelling the seat, make the
following preparations:
● Unfasten seat belt.
● Fold up the armrests.
● Slide seat as far back as possible.
● Set seat base angle to its lowest position.
● Adjust backrest inclination to vertical position.
● Open the driver's door.
Lift handle 6, swivel seat from the
forward-facing position, release
handle.
Always return the seat to the forward- facing position before driving and
ensure the seat is locked in place
before starting off.Armrest
Armrests can be folded up when not
required.
Page 61 of 271
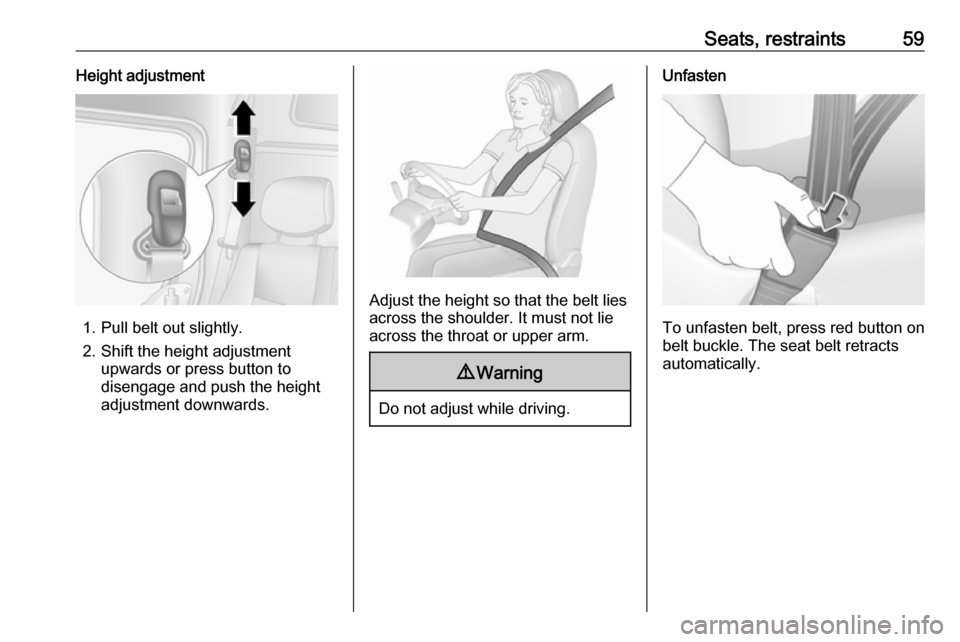
Seats, restraints59Height adjustment
1. Pull belt out slightly.
2. Shift the height adjustment upwards or press button to
disengage and push the height
adjustment downwards.
Adjust the height so that the belt lies across the shoulder. It must not lie
across the throat or upper arm.
9 Warning
Do not adjust while driving.
Unfasten
To unfasten belt, press red button on
belt buckle. The seat belt retracts automatically.
Page 63 of 271
Seats, restraints619Warning
The lap belt must be positioned as
low as possible across the pelvis
to prevent pressure on the
abdomen.
Airbag system
The airbag system consists of a
number of individual systems
depending on the scope of
equipment.
When triggered the airbags inflate
within milliseconds. They also deflate
so quickly that it is often unnoticeable
during the collision.9 Warning
As the airbag system deploys in an
explosive manner, repairs must be
performed by skilled personnel
only.
9 Warning
Adding accessories that change
the vehicle's frame, bumper
system, height, front end or side
sheet metal, may keep the airbag
system from working properly. The operation of the airbag system can
also be affected by changing any
parts of the front seats, seat belts,
airbag sensing and diagnostic
module, steering wheel,
instrument panel, inner door seals including the speakers, any of the
airbag modules, ceiling or pillar
trim, front sensors, side impact
sensors or airbag wiring.
Note
The airbag systems and belt
pretensioner control electronics are
located in the centre console area.
Do not put any magnetic objects in
this area.
Do not affix any objects onto the
airbag covers and do not cover them with other materials. Have damagedcovers replaced by a workshop.
Each airbag is triggered only once.
Have deployed airbags replaced by
a workshop. Furthermore, it may be
necessary to have the steering
wheel, the instrument panel, parts of
the panelling, the door seals,
handles and the seats replaced.
Page 74 of 271

72Seats, restraintsCombi - rear seatsWeight and age class2nd row seats3rd row seatsDriver side
outer seat
Centre seat
Passenger side
outer seatGroup 0: up to 10 kg
Group 0+: up to 13 kgU 3)
,
Move the front seat as far forward as possible to install a rear facing child seat, then move back the seat in front in accordance with
the child seat instructions.
4) Forward facing child seat; position the seatback of the child seat in contact with the seatback of the vehicle seat. Adjust the height
of the headrest or remove it if necessary; do not push the seat in front of the child more than halfway back on its runners and do not recline the seatback more than 25°.
Bus - rear seats
Weight and age classRear seatsGroup 0: up to 10 kg
Group 0+: up to 13 kgXGroup I: 9 to 18 kgXGroup II: 15 to 25 kg
Group III: 22 to 36 kgX
Page 146 of 271
144Driving and operating● Close the windows.
● Turn the ignition key to position
0 and remove it. Turn the
steering wheel until the
steering wheel lock is felt to
engage.
Lock the vehicle 3 26 and activate the
anti-theft locking system 3 37 and
anti-theft alarm system 3 38.
Air suspension
Operates automatically when the
vehicle is driven. The air suspension
system constantly adjusts the ride
height according to the vehicle load.
Caution
To ensure safe operation of the air
suspension system, do not exceed the maximum permissible gross
vehicle weight rating. Refer to
identification plate 3 231 or the
vehicle documents.
For further information on the air
suspension system, refer to the
operating instructions supplied.
Master switchCaution
The air suspension system must
be switched off when the vehicle is being towed, jump‐started, raised
off the ground or transported.
Do not switch off the air
suspension system when driving.
Jump starting 3 219.
Towing the vehicle 3 221.
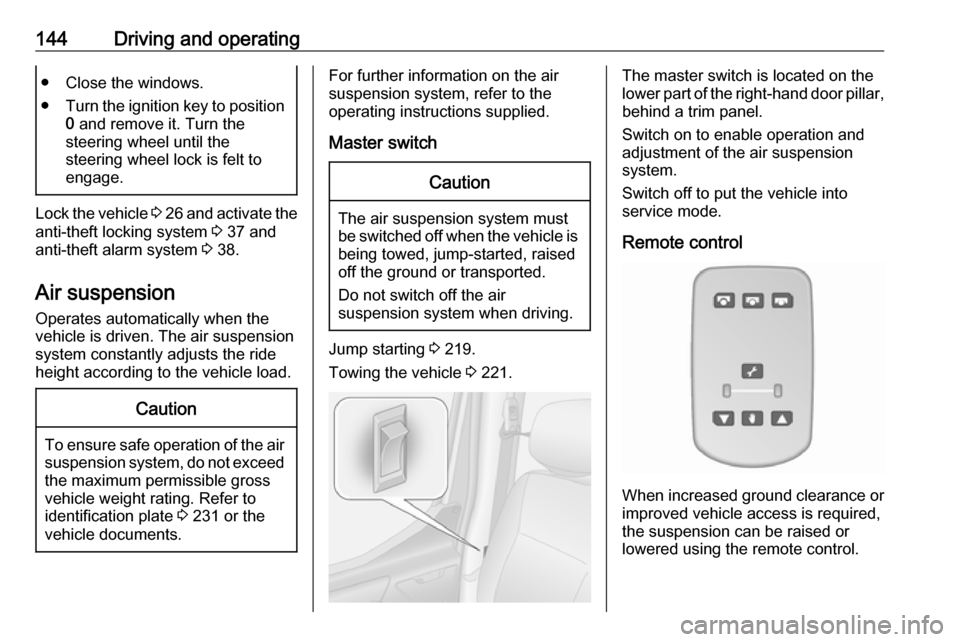
The master switch is located on the
lower part of the right-hand door pillar,
behind a trim panel.
Switch on to enable operation and
adjustment of the air suspension
system.
Switch off to put the vehicle into
service mode.
Remote control
When increased ground clearance or improved vehicle access is required,
the suspension can be raised or
lowered using the remote control.
Page 147 of 271
Driving and operating145Caution
Ensure there is adequate
clearance and that there are no
obstructions when adjusting the
suspension height.
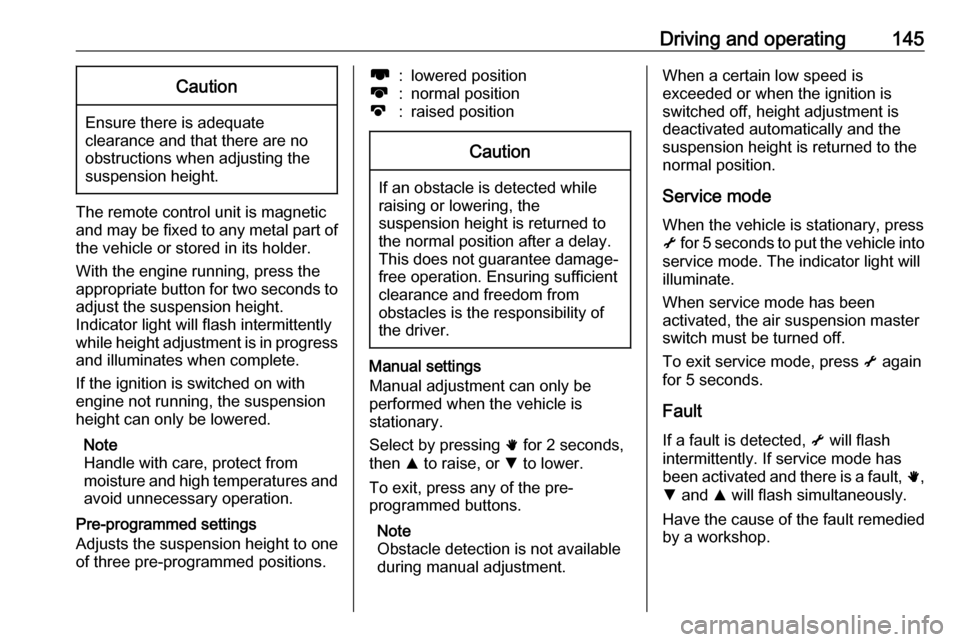
The remote control unit is magnetic
and may be fixed to any metal part of the vehicle or stored in its holder.
With the engine running, press the appropriate button for two seconds to
adjust the suspension height.
Indicator light will flash intermittently
while height adjustment is in progress
and illuminates when complete.
If the ignition is switched on with
engine not running, the suspension
height can only be lowered.
Note
Handle with care, protect from
moisture and high temperatures and
avoid unnecessary operation.
Pre-programmed settings
Adjusts the suspension height to one
of three pre-programmed positions.
l:lowered positionk:normal positionj:raised positionCaution
If an obstacle is detected while
raising or lowering, the
suspension height is returned to the normal position after a delay.
This does not guarantee damage- free operation. Ensuring sufficient
clearance and freedom from
obstacles is the responsibility of the driver.
Manual settings
Manual adjustment can only be
performed when the vehicle is
stationary.
Select by pressing h for 2 seconds,
then R to raise, or S to lower.
To exit, press any of the pre-
programmed buttons.
Note
Obstacle detection is not available
during manual adjustment.
When a certain low speed is
exceeded or when the ignition is
switched off, height adjustment is deactivated automatically and the
suspension height is returned to the
normal position.
Service mode
When the vehicle is stationary, press
i for 5 seconds to put the vehicle into
service mode. The indicator light will
illuminate.
When service mode has been
activated, the air suspension master
switch must be turned off.
To exit service mode, press i again
for 5 seconds.
Fault
If a fault is detected, i will flash
intermittently. If service mode has been activated and there is a fault, h,
S and R will flash simultaneously.
Have the cause of the fault remedied
by a workshop.
Page 185 of 271
Vehicle care183
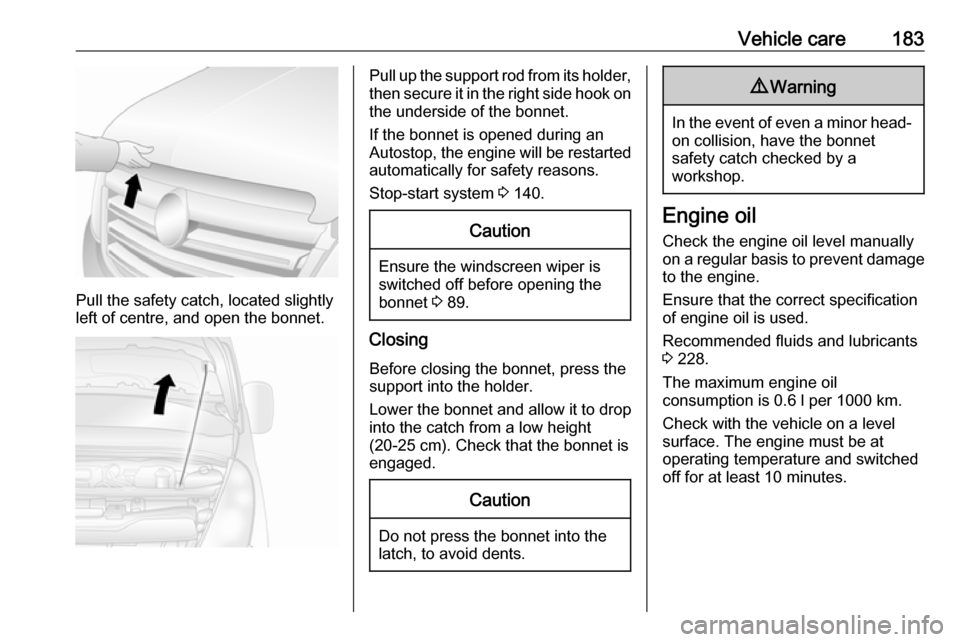
Pull the safety catch, located slightly
left of centre, and open the bonnet.
Pull up the support rod from its holder,
then secure it in the right side hook on the underside of the bonnet.
If the bonnet is opened during an Autostop, the engine will be restarted
automatically for safety reasons.
Stop-start system 3 140.Caution
Ensure the windscreen wiper is
switched off before opening the
bonnet 3 89.
Closing
Before closing the bonnet, press the
support into the holder.
Lower the bonnet and allow it to drop into the catch from a low height
(20-25 cm). Check that the bonnet is
engaged.
Caution
Do not press the bonnet into the
latch, to avoid dents.
9 Warning
In the event of even a minor head-
on collision, have the bonnet
safety catch checked by a
workshop.
Engine oil
Check the engine oil level manually on a regular basis to prevent damage
to the engine.
Ensure that the correct specification
of engine oil is used.
Recommended fluids and lubricants
3 228.
The maximum engine oil
consumption is 0.6 l per 1000 km.
Check with the vehicle on a level
surface. The engine must be at
operating temperature and switched
off for at least 10 minutes.