heater OPEL MOVANO_B 2020 Owner's Manual
[x] Cancel search | Manufacturer: OPEL, Model Year: 2020, Model line: MOVANO_B, Model: OPEL MOVANO_B 2020Pages: 353, PDF Size: 9.4 MB
Page 39 of 353
Keys, doors and windows37Electronic key
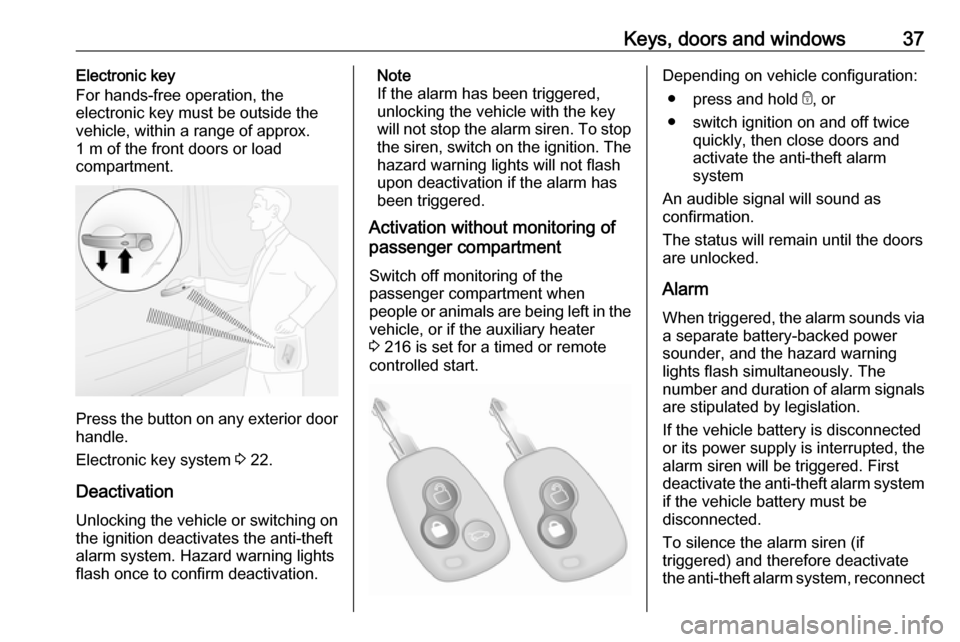
For hands-free operation, the
electronic key must be outside the
vehicle, within a range of approx.
1 m of the front doors or load
compartment.
Press the button on any exterior door
handle.
Electronic key system 3 22.
Deactivation
Unlocking the vehicle or switching on the ignition deactivates the anti-theft
alarm system. Hazard warning lights
flash once to confirm deactivation.
Note
If the alarm has been triggered,
unlocking the vehicle with the key
will not stop the alarm siren. To stop the siren, switch on the ignition. The
hazard warning lights will not flash
upon deactivation if the alarm has
been triggered.
Activation without monitoring of
passenger compartment
Switch off monitoring of the
passenger compartment when
people or animals are being left in the
vehicle, or if the auxiliary heater
3 216 is set for a timed or remote
controlled start.Depending on vehicle configuration:
● press and hold e, or
● switch ignition on and off twice quickly, then close doors and
activate the anti-theft alarm
system
An audible signal will sound as
confirmation.
The status will remain until the doors
are unlocked.
Alarm When triggered, the alarm sounds via a separate battery-backed power
sounder, and the hazard warning
lights flash simultaneously. The
number and duration of alarm signals
are stipulated by legislation.
If the vehicle battery is disconnected
or its power supply is interrupted, the
alarm siren will be triggered. First
deactivate the anti-theft alarm system if the vehicle battery must be
disconnected.
To silence the alarm siren (if
triggered) and therefore deactivate
the anti-theft alarm system, reconnect
Page 210 of 353
208Climate controlClimate controlClimate control systems.............208
Heating and ventilation system 208
Air conditioning system ...........209
Electronic climate control system .................................... 210
Rear heating system ...............213
Rear air conditioning system ...215
Auxiliary heater ........................216
Air vents ..................................... 221
Adjustable air vents .................221
Fixed air vents ......................... 222
Glovebox cooler ......................222
Maintenance .............................. 223
Air intake ................................. 223
Air conditioning regular operation ................................ 223
Service .................................... 223Climate control systems
Heating and ventilation system
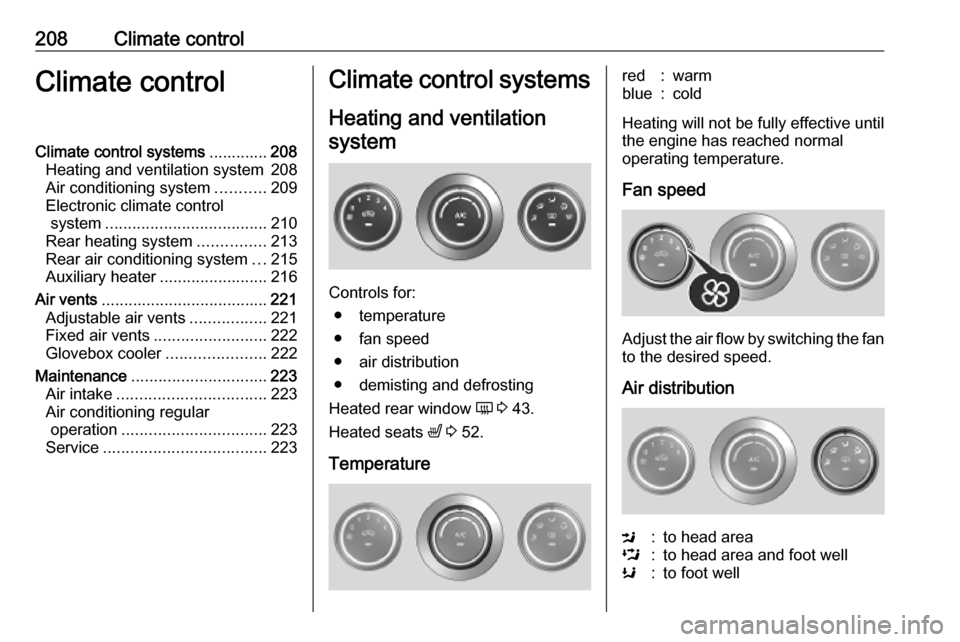
Controls for: ● temperature
● fan speed
● air distribution
● demisting and defrosting
Heated rear window Ü 3 43.
Heated seats ß 3 52.
Temperature
red:warmblue:cold
Heating will not be fully effective until
the engine has reached normal
operating temperature.
Fan speed
Adjust the air flow by switching the fan
to the desired speed.
Air distribution
M:to head areaL:to head area and foot wellK:to foot well
Page 216 of 353
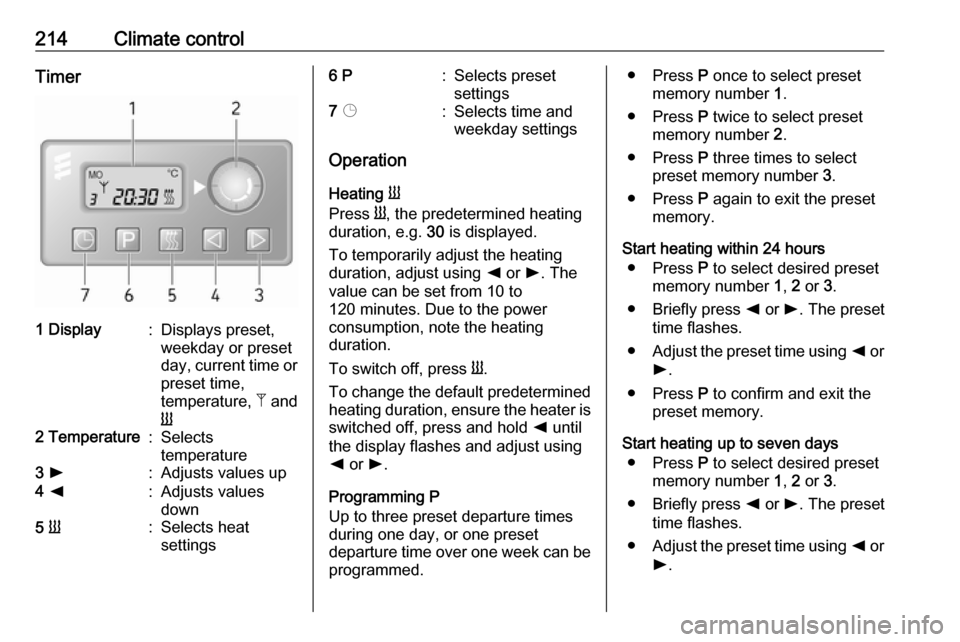
214Climate controlTimer1 Display:Displays preset,
weekday or preset
day, current time or preset time,
temperature, Z and
Y2 Temperature:Selects
temperature3 l:Adjusts values up4 k:Adjusts values
down5 Y:Selects heat
settings6 P:Selects preset
settings7 Þ:Selects time and
weekday settings
Operation
Heating Y
Press Y, the predetermined heating
duration, e.g. 30 is displayed.
To temporarily adjust the heating
duration, adjust using k or l. The
value can be set from 10 to
120 minutes. Due to the power
consumption, note the heating
duration.
To switch off, press Y.
To change the default predetermined heating duration, ensure the heater is switched off, press and hold k until
the display flashes and adjust using
k or l.
Programming P
Up to three preset departure times during one day, or one preset
departure time over one week can be programmed.
● Press P once to select preset
memory number 1.
● Press P twice to select preset
memory number 2.
● Press P three times to select
preset memory number 3.
● Press P again to exit the preset
memory.
Start heating within 24 hours ● Press P to select desired preset
memory number 1, 2 or 3.
● Briefly press k or l. The preset
time flashes.
● Adjust the preset time using k or
l .
● Press P to confirm and exit the
preset memory.
Start heating up to seven days ● Press P to select desired preset
memory number 1, 2 or 3.
● Briefly press k or l. The preset
time flashes.
● Adjust the preset time using k or
l .
Page 218 of 353
216Climate controlCombi
Additional air conditioning is supplied to the rear passenger compartment
via the air vents located above the
driver and front passenger
compartment.
With the front passenger
compartment air conditioning system
switched on, adjust the air flow to
select the desired speed.
Ensure the air vents are open when in use, to prevent ice forming in the
system due to lack of air movement.
Auxiliary heater Coolant heater
The engine-independent, fuel-
powered coolant heater provides rapid heating of the engine coolant to
enable heating of the vehicle interior
without the engine running.
Note
Depending on version, an additional
coolant heater may be switched on
automatically to speed up heating
when the ignition is on and the
outside temperature is below 5 ℃.9 Warning
Do not operate the system when
refuelling, when dust or
combustible vapours are present
or in enclosed spaces (e.g.
garage).
Before starting or programming the
system to start, turn the vehicle's
climate control system to heat, set the
air distribution to V and turn the fan
on.
Switch off when not required. Heating stops automatically after the
programmed runtime. It will also
cease to operate if the vehicle fuel
level drops too low.
During operation, power from the
vehicle battery is used. The driving
time should therefore be at least as
long as the heating time. For short
journey times, check the vehicle
battery regularly and recharge if
necessary.
To ensure efficient performance,
briefly operate the auxiliary heater
once a month.
Control units
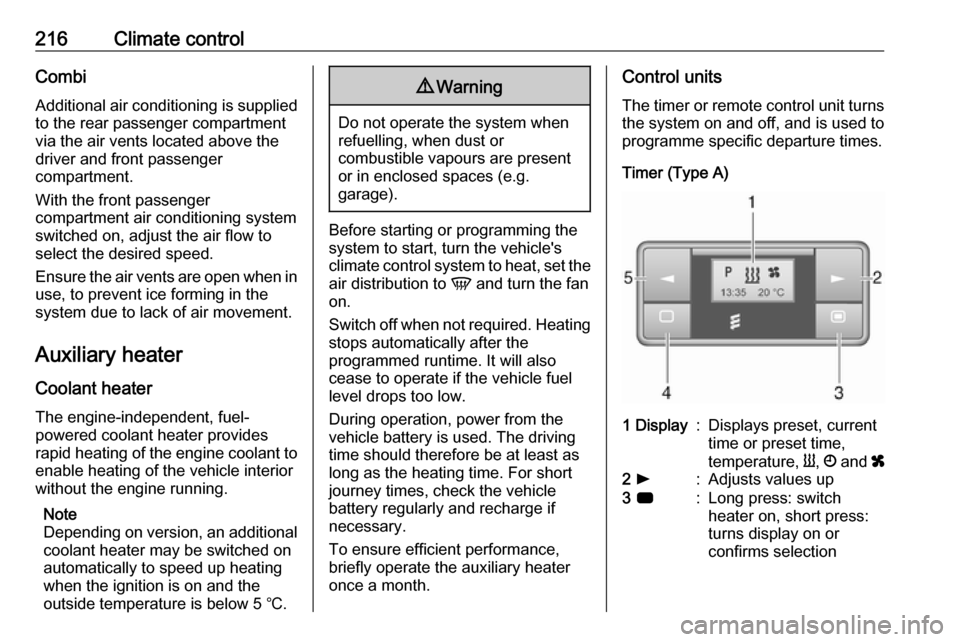
The timer or remote control unit turns the system on and off, and is used to
programme specific departure times.
Timer (Type A)1 Display:Displays preset, current
time or preset time,
temperature, Y, Ö and x2 l:Adjusts values up3 7:Long press: switch
heater on, short press:
turns display on or
confirms selection
Page 219 of 353
Climate control2174 k:Adjusts values down5 d:Long press: switch
heater off, short press:
turns display on or exit
menu
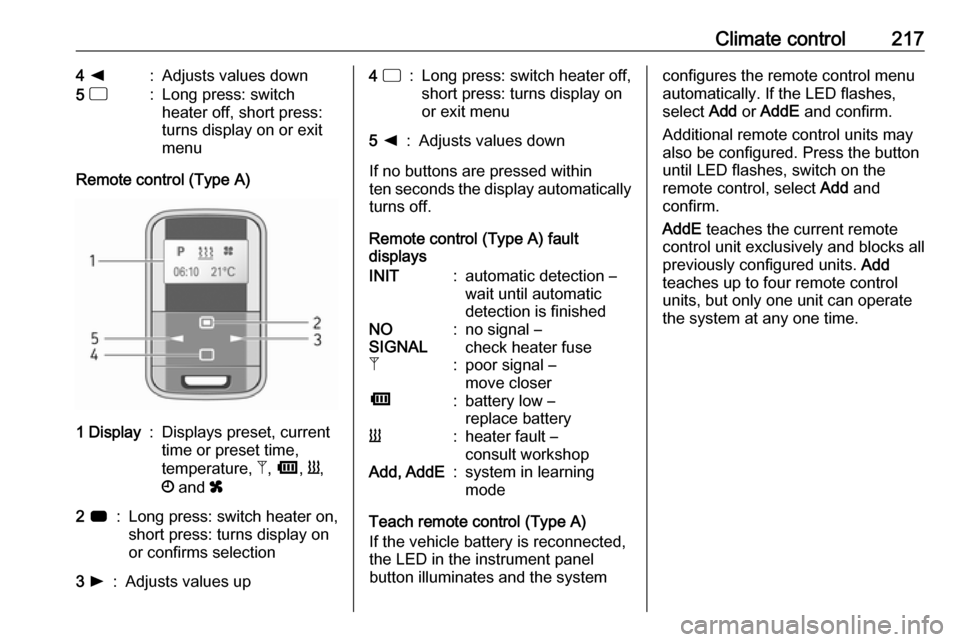
Remote control (Type A)
1 Display:Displays preset, current
time or preset time,
temperature, Z, Ü , Y ,
Ö and x2 7:Long press: switch heater on,
short press: turns display on
or confirms selection3 l:Adjusts values up4 d:Long press: switch heater off,
short press: turns display on
or exit menu5 k:Adjusts values down
If no buttons are pressed within
ten seconds the display automatically
turns off.
Remote control (Type A) fault
displays
INIT:automatic detection –
wait until automatic
detection is finishedNO
SIGNAL:no signal –
check heater fuseZ:poor signal –
move closerÜ:battery low –
replace batteryY:heater fault –
consult workshopAdd, AddE:system in learning
mode
Teach remote control (Type A)
If the vehicle battery is reconnected,
the LED in the instrument panel
button illuminates and the system
configures the remote control menu
automatically. If the LED flashes,
select Add or AddE and confirm.
Additional remote control units may
also be configured. Press the button
until LED flashes, switch on the
remote control, select Add and
confirm.
AddE teaches the current remote
control unit exclusively and blocks all
previously configured units. Add
teaches up to four remote control
units, but only one unit can operate
the system at any one time.
Page 220 of 353
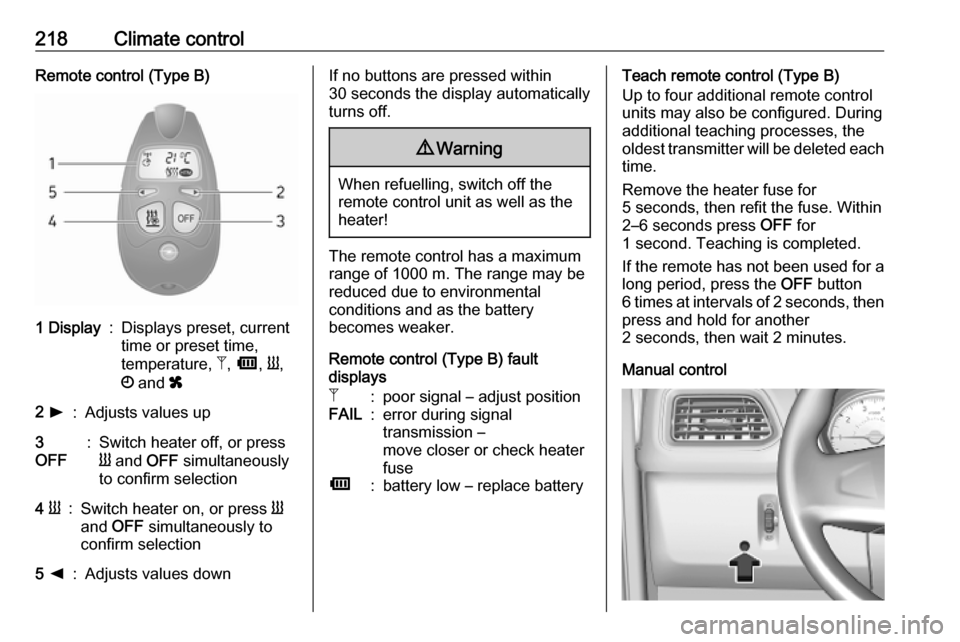
218Climate controlRemote control (Type B)1 Display:Displays preset, current
time or preset time,
temperature, Z, Ü , Y ,
Ö and x2 l:Adjusts values up3
OFF:Switch heater off, or press
Y and OFF simultaneously
to confirm selection4 Y:Switch heater on, or press Y
and OFF simultaneously to
confirm selection5 k:Adjusts values downIf no buttons are pressed within
30 seconds the display automatically
turns off.9 Warning
When refuelling, switch off the
remote control unit as well as the
heater!
The remote control has a maximum
range of 1000 m. The range may be
reduced due to environmental
conditions and as the battery
becomes weaker.
Remote control (Type B) fault
displays
Z:poor signal – adjust positionFAIL:error during signal
transmission –
move closer or check heater
fuseÜ:battery low – replace batteryTeach remote control (Type B)
Up to four additional remote control
units may also be configured. During
additional teaching processes, the
oldest transmitter will be deleted each
time.
Remove the heater fuse for
5 seconds, then refit the fuse. Within 2–6 seconds press OFF for
1 second. Teaching is completed.
If the remote has not been used for a long period, press the OFF button
6 times at intervals of 2 seconds, then
press and hold for another
2 seconds, then wait 2 minutes.
Manual control
Page 221 of 353

Climate control219Depending on version, the auxiliary
heater can also be switched on for the
last duration time or the default
duration 30 minutes, or cut-off
immediately, using the button on the
instrument panel. The LED in the
button confirms operation.
Battery replacement Replace the battery when the range
of the remote control is reduced or
when the battery charge symbol
flashes.
Open the cover and replace the
battery (Type A: CR 2430, Type B:
2CR 11108, or equivalent), ensuring
the new battery is correctly installed
with the positive ( <) side facing the
positive terminals. Replace the cover
securely.
Dispose of old batteries in
accordance with environmental
regulations.Batteries do not belong in household
waste. They must be disposed of at
an appropriate recycling collection
point.
Operation (Type A)
Heating Y
Select Y in the menu bar and press
G to confirm. The predetermined
heating duration, e.g. L 30, flashes in
the display. The factory setting is 30 minutes.
Adjust the heating duration using k
or l and confirm. The value can be
set from 10 to 120 minutes. Due to the
power consumption, note the heating duration.
To switch off, select Y in the menu bar
again and press d.
Ventilation x
Select x in the menu bar and press
G to confirm.
Adjust the ventilation duration using k or l and confirm. The value can
be set from 10 to 120 minutes. Due to the power consumption, note the
heating duration.To switch off, select x in the menu bar
again and press d.
Programming P
Up to three preset departure times
can be programmed, either during
one day or over one week.
● Select P in the menu bar and
press G to confirm.
● Select desired preset memory number P1, P2 or P3 and
confirm.
● Select F and confirm.
● Select weekday or weekday group and confirm.
● Select hour and confirm.
● Select minutes and confirm.
● Select Y or x and confirm.
● Select ECO or HIGH and confirm.
● Select duration and confirm.
● Press d to exit.
Repeat the procedure to programme
the other preset memory numbers if
required.
Page 223 of 353

Climate control221To switch off, press OFF.
Programming y
The system calculates the operating
time of the heater depending on the
temperature inside the vehicle.
● Press k twice.
● Press Y and OFF
simultaneously, y flashes.
● Adjust using k or l to select the
departure time.
● Press Y and OFF simultaneously
to confirm.
To switch on, press Y for one second ,
HTM is displayed.
Heating stops automatically after the
programmed departure time, or can
be manually switched off.
● Press k twice.
● Press OFF for 1 second, HTM
goes out.
Set time
If the vehicle battery is disconnected
or its voltage is too low, the time will
need to be reset.● Press l once.
● Press Y and OFF
simultaneously, Ö flashes.
● Adjust using k or l to set the
time.
● Press Y and OFF simultaneously
to confirm.
Heating level
The preferred heating level for
programmed departure times can be set to between C1 and C5.
● Press k three times.
● Press Y and OFF
simultaneously, Y flashes.
● Adjust using k or l to set the
heating level.
● Press Y and OFF simultaneously
to confirm.
To display the passenger
compartment temperature, press l
twice.Air vents
Adjustable air vents At least one air vent must be open
while cooling is on in order to prevent
the evaporator from icing up due to lack of air movement.
Centre air vents
Direct the flow of air by tilting and
swivelling the slats.
To close the vent, swivel the slat
towards the outside of the vehicle.
Page 237 of 353
Driving and operating235Caution
Avoid contact of the paintwork withAdBlue.
In case of contact, rinse off with water.
AdBlue freezes at a temperature of
approx. -11 °C. As the vehicle is
equipped with an AdBlue pre-heater,
the emissions reduction at low
temperatures is ensured. The AdBlue
pre-heater works automatically.
Level warnings
The AdBlue consumption is approx.
3.5 l per 1000 km and depends on the
driving behaviour.
AdBlue gauge 3 93.
Level warnings in the Driver
Information Centre
If the AdBlue level falls below a
certain value, a level warning will be
displayed in the Driver Information Centre 3 105.
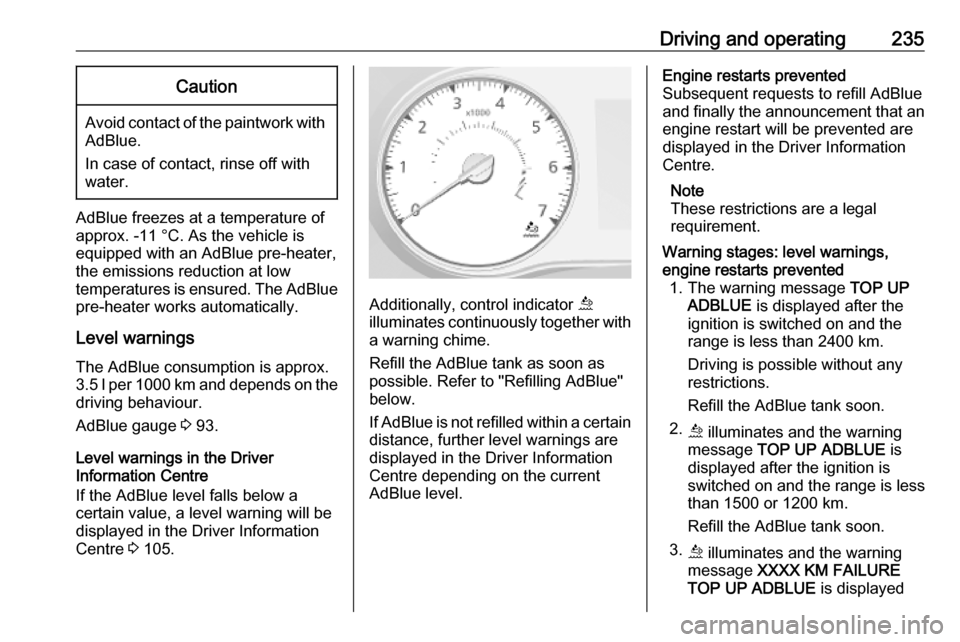
Additionally, control indicator ú
illuminates continuously together with a warning chime.
Refill the AdBlue tank as soon as
possible. Refer to "Refilling AdBlue"
below.
If AdBlue is not refilled within a certain distance, further level warnings are
displayed in the Driver Information
Centre depending on the current
AdBlue level.
Engine restarts prevented
Subsequent requests to refill AdBlue
and finally the announcement that an engine restart will be prevented are
displayed in the Driver Information
Centre.
Note
These restrictions are a legal
requirement.Warning stages: level warnings,
engine restarts prevented 1. The warning message TOP UP
ADBLUE is displayed after the
ignition is switched on and the
range is less than 2400 km.
Driving is possible without any
restrictions.
Refill the AdBlue tank soon.
2. ú illuminates and the warning
message TOP UP ADBLUE is
displayed after the ignition is
switched on and the range is less
than 1500 or 1200 km.
Refill the AdBlue tank soon.
3. ú illuminates and the warning
message XXXX KM FAILURE
TOP UP ADBLUE is displayed
Page 265 of 353
Driving and operating263Diesel fuel that meets standard
EN16734 mixed with a biofuel that
meets standard EN14214 (possibly
containing up to 10% Fatty Acid
Methyl Ester).
Paraffinic Diesel fuel that meets
standard EN15940 mixed with a
biofuel that meets standard
EN14214 (possibly containing up to
7% Fatty Acid Methyl Ester).
If travelling in countries outside the
European Union, occasional use of Euro-Diesel fuel with a sulphur
concentration below 50 ppm is
possible.
Caution
Frequent usage of diesel fuel containing more than 15 ppm
sulphur will cause severe engine
damage.
Caution
Use of fuel that does not comply to EN 590 or similar can lead to
engine powerloss, increased wear
or engine damage and may affect
your warranty.
Do not use marine diesel oils, heating
oils, Aquazole and similar diesel-
water emulsions. Diesel fuels must
not be diluted with fuels for petrol
engines. Do not use additives.
The flow and filterability of diesel fuels are temperature-dependent. When
temperatures are low, refuel with
diesel fuel with guaranteed winter
properties.
Diesel fuel system bleeding 3 276.
Low temperature operation
At temperatures below 0 °C, some
diesel products with biodiesel blends
may clog, freeze or gel, which may
affect the fuel supply system. Starting
and engine operation may not work
properly. Make sure to fill winter
grade diesel fuel at ambient
temperatures below 0 °C.
Arctic grade diesel fuel can be used
in extreme cold temperatures below
-20 °C. Using this fuel grade in warm
or hot climates is not recommended
and may cause engine stalling, poor starting or damage to the fuel
injection system.
Refuelling9 Danger
Before refuelling, switch off engine
and any external heaters with
combustion chambers. Switch off
any mobile phones.
Follow the operating and safety
instructions of the filling station
when refuelling.