lock OPEL VIVARO B 2018 Manual user
[x] Cancel search | Manufacturer: OPEL, Model Year: 2018, Model line: VIVARO B, Model: OPEL VIVARO B 2018Pages: 237, PDF Size: 5.57 MB
Page 55 of 237

Seats, restraints53
Lift and fold the seat assembly
forwards until it engages in the folded
forward position.
Press on the top of the seat and lock
it into position by pushing the locking
levers (arrowed). Ensure that the seat
is engaged securely.
Caution
For safety reasons, do not place
loads on the folded rear seats.
When returning the seat assembly to its original position, pull locking bars,
carefully lower seat assembly and
ensure the locking levers are correctly located and latched.
Note
Make sure that the anchor points are
clean before installing the seat. They should be free from grit or any other
item which may prevent the seat
from locking securely.
Raise the backrest, and if necessary,
replace the head restraints.
Removing rear seats
On some variants, the load
compartment area can be increased
by removing the 2nd row and
3rd row rear seats (where fitted).9 Warning
Never remove the rear seats while
driving as they could move
uncontrollably.
9 Warning
Removable seats are heavy! Do
not attempt to remove without
assistance.
If necessary, remove the head
restraints 3 46.
Release the seats by pressing down
and sliding forward the locking
catches located on the left and right-
hand seat mountings.
Page 56 of 237

54Seats, restraints
Raise the locking catches, then movethe seat unit towards the rear to
release from the rear floor anchor
points.
Raise the seat unit, then move it
towards the rear again to release from
the front floor anchor points. The seat unit can then be lifted out.
The seats must be removed through
the sliding side door only (not through
the rear doors / tailgate). The
2nd row seats must be removed from
the vehicle before the 3rd row seats.
Installing rear seats
When re-installing seats, always
ensure that the row with the folding
access seat B is positioned correctly
in front of the fixed seat row A.
The seats must be introduced
through the sliding side door only (not
through the rear doors / tailgate). The
3rd row seats must be introduced into the vehicle before the 2nd row seats.
Caution
The 2nd and 3rd row seats are not
interchangeable and must be fitted back into their original position.
Note
Make sure that the anchor points are
clean before installing the seat. They should be free from grit or any other
item which may prevent the seat
from locking securely.
Position the seat unit over the front
anchor points, then push the seat unit
until it sits over the rear anchor points.
Lower the locking catches and push
them until they are locked securely in place. Ensure that the visual markers
on the locking catches are correctly
aligned.
Page 57 of 237

Seats, restraints559Warning
When installing the seats, ensure
that the seats are properly located
on the anchor points and that the
locking catches are fully engaged.
Consult a workshop if the seats
cannot be locked securely in position.
Seat belts
The seat belts are locked during
heavy acceleration or deceleration of
the vehicle holding the occupants in
the sitting position. Therefore, the risk of injury is considerably reduced.
9 Warning
Fasten seat belt before each trip.
In the event of an accident, people
not wearing seat belts endanger their fellow occupants and
themselves.
Seat belts are only designed for use
by one person at a time.
Child restraint system 3 65.
Periodically check all parts of the belt system for damage and proper
functionality.
Have damaged components
replaced. After an accident, have the
belts and triggered belt tensioners
replaced by a workshop.
Note
Make sure that the belts are not
damaged by shoes or sharp-edged
objects or trapped. Prevent dirt from
getting into the belt retractors.
Seat belt reminder
Depending on version, both frontseats may be equipped with a seat
belt reminder, indicated by control
indicator X in the roof console
3 97.
Belt force limiters
On the front seats, stress on the body is reduced by the gradual release of
the belt during a collision.
Page 69 of 237

Seats, restraints67Children should travel facing
rearwards in the vehicle as long as
possible. This makes sure that the child's backbone, which is still very
weak, is under less strain in the event
of an accident.
Suitable are restraint systems that
comply with valid UN ECE
regulations. Check local laws and
regulations for mandatory use of child restraint systems.
Ensure that the child restraint system to be installed is compatible with the
vehicle type.
Ensure that the mounting location of
the child restraint system within the
vehicle is correct, see following
tables.
Allow children to enter and exit the
vehicle only on the side facing away
from the traffic.
When the child restraint system is not
in use, secure the seat with a seat belt or remove it from the vehicle.
Note
Do not affix anything on the child
restraint systems and do not cover
them with any other materials.A child restraint system which has
been subjected to stress in an
accident must be replaced.
Child locks 3 32.
Central locking system 3 26.
Page 76 of 237
74Storage
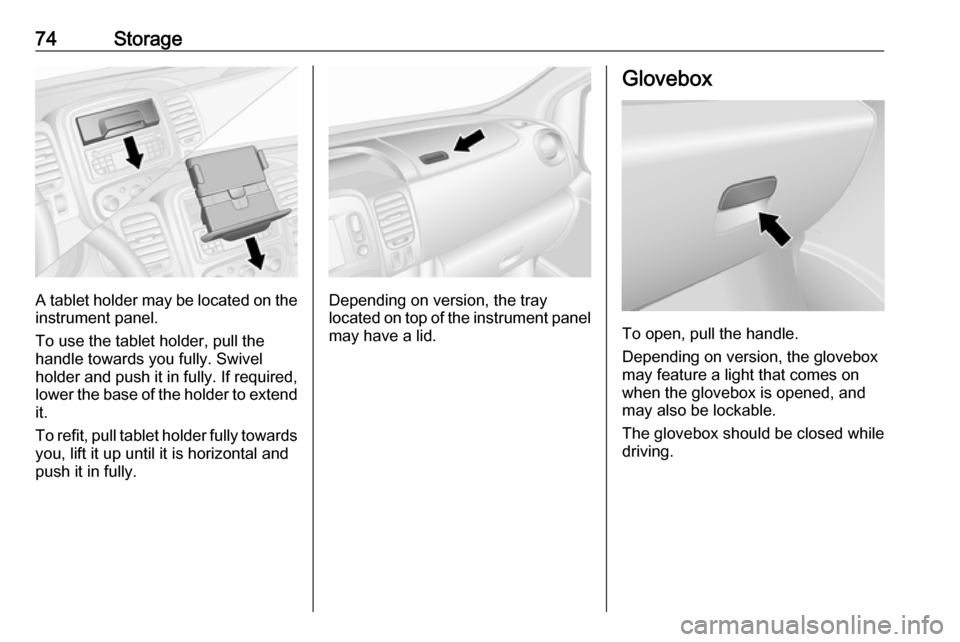
A tablet holder may be located on the
instrument panel.
To use the tablet holder, pull the
handle towards you fully. Swivel
holder and push it in fully. If required, lower the base of the holder to extend
it.
To refit, pull tablet holder fully towards you, lift it up until it is horizontal and
push it in fully.Depending on version, the tray
located on top of the instrument panel
may have a lid.
Glovebox
To open, pull the handle.
Depending on version, the glovebox
may feature a light that comes on
when the glovebox is opened, and
may also be lockable.
The glovebox should be closed while
driving.
Page 77 of 237
Storage75Cupholders
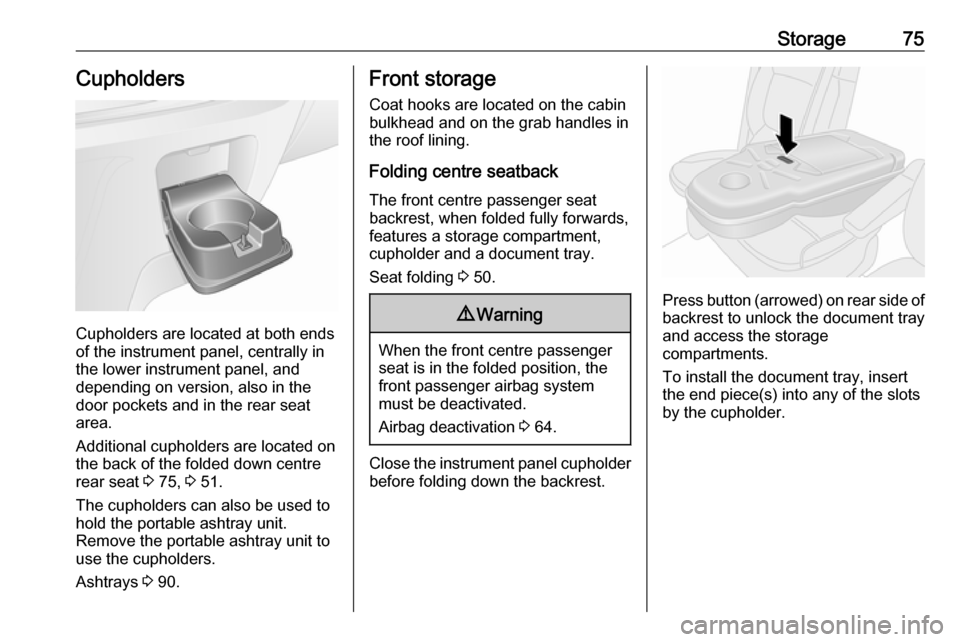
Cupholders are located at both ends
of the instrument panel, centrally in the lower instrument panel, and
depending on version, also in the
door pockets and in the rear seat
area.
Additional cupholders are located on
the back of the folded down centre
rear seat 3 75, 3 51.
The cupholders can also be used to hold the portable ashtray unit.
Remove the portable ashtray unit to
use the cupholders.
Ashtrays 3 90.
Front storage
Coat hooks are located on the cabin
bulkhead and on the grab handles in
the roof lining.
Folding centre seatback The front centre passenger seat
backrest, when folded fully forwards, features a storage compartment,
cupholder and a document tray.
Seat folding 3 50.9 Warning
When the front centre passenger
seat is in the folded position, the front passenger airbag system
must be deactivated.
Airbag deactivation 3 64.
Close the instrument panel cupholder
before folding down the backrest.
Press button (arrowed) on rear side of
backrest to unlock the document tray
and access the storage
compartments.
To install the document tray, insert
the end piece(s) into any of the slots
by the cupholder.
Page 86 of 237

84Instruments and controlsInstruments and
controlsControls ....................................... 85
Steering wheel adjustment ........85
Steering wheel controls .............85
Horn ........................................... 85
Steering column controls ...........85
Windscreen wiper/washer .........86
Rear window wiper/washer .......87
Outside temperature ..................87
Clock ......................................... 88
Power outlets ............................. 88
Cigarette lighter ......................... 90
Ashtrays .................................... 90
Warning lights, gauges and indi‐ cators ........................................... 91
Instrument cluster ......................91
Speedometer ............................. 91
Odometer .................................. 91
Trip odometer ............................ 91
Tachometer ............................... 92
Fuel gauge ................................ 92
Fuel economy gauge .................93
Service display .......................... 93
Control indicators ......................94
Turn signal ................................. 96Seat belt reminder.....................97
Airbag and belt tensioners .........97
Airbag deactivation ....................97
Charging system .......................98
Malfunction indicator light ..........98
Service vehicle soon .................98
Stop engine ............................... 98
Brake system ............................. 98
Antilock brake system (ABS) .....99
Upshift ....................................... 99
Electronic Stability Program ......99
Electronic Stability Program off ............................................. 99
Engine coolant temperature ......99
Preheating ............................... 100
AdBlue ..................................... 100
Tyre pressure monitoring system .................................... 100
Engine oil pressure ..................100
Fuel economy mode ................101
Low fuel ................................... 101
Stop-start system ....................101
Exterior light ............................ 101
High beam ............................... 101
Fog light ................................... 101
Rear fog light ........................... 101
Cruise control .......................... 102
Tachograph ............................. 102
Door open ................................ 102Information displays...................102
Driver Information Centre ........102
Info display .............................. 102
Vehicle messages ......................103
Warning chimes .......................104
Engine oil level ........................ 104
Trip computer ............................. 105
Tachograph ................................ 107
Page 87 of 237
Instruments and controls85Controls
Steering wheel adjustment
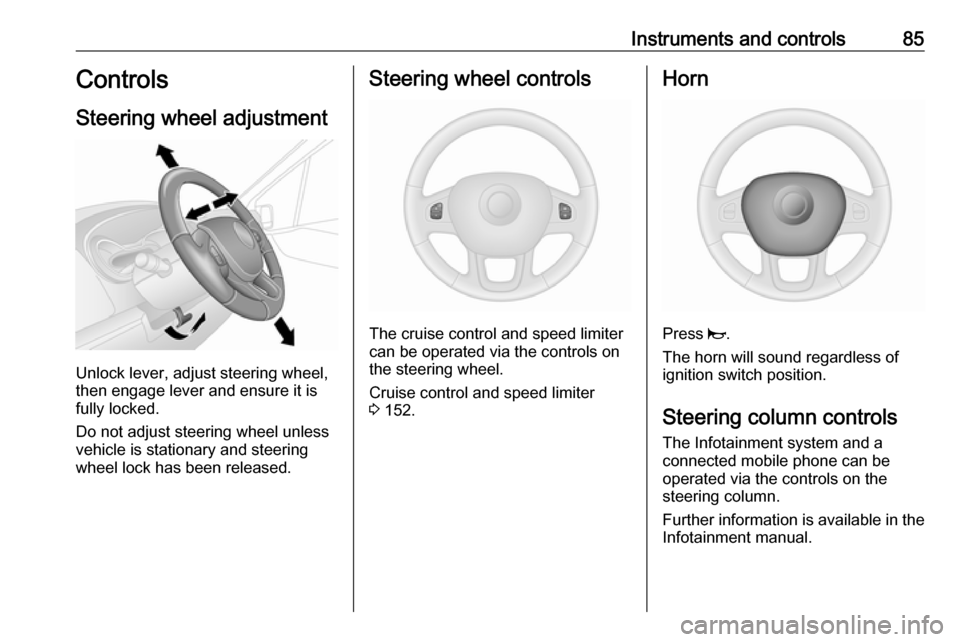
Unlock lever, adjust steering wheel,
then engage lever and ensure it is
fully locked.
Do not adjust steering wheel unless
vehicle is stationary and steering
wheel lock has been released.
Steering wheel controls
The cruise control and speed limiter
can be operated via the controls on
the steering wheel.
Cruise control and speed limiter
3 152.
Horn
Press j.
The horn will sound regardless of
ignition switch position.
Steering column controls The Infotainment system and a
connected mobile phone can be
operated via the controls on the
steering column.
Further information is available in the
Infotainment manual.
Page 90 of 237
88Instruments and controls9Warning
The road surface may already be
icy even though the display
indicates a few degrees above
0 °C.
Clock
Depending on vehicle, the current
time may appear in the central
information display and / or the Driver Information Centre.
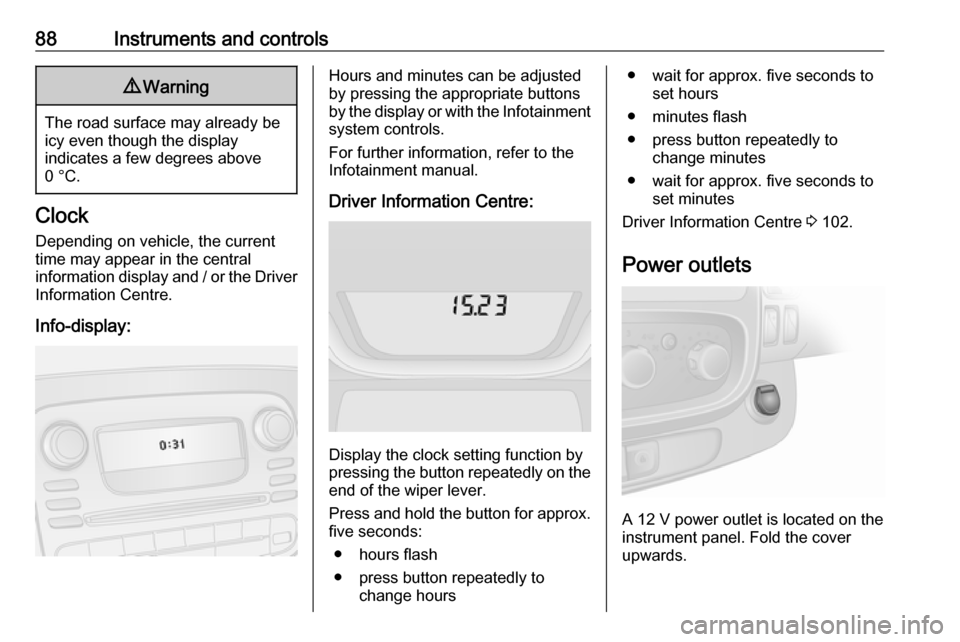
Info-display:
Hours and minutes can be adjusted
by pressing the appropriate buttons
by the display or with the Infotainment
system controls.
For further information, refer to the Infotainment manual.
Driver Information Centre:
Display the clock setting function by
pressing the button repeatedly on the end of the wiper lever.
Press and hold the button for approx.
five seconds:
● hours flash
● press button repeatedly to change hours
● wait for approx. five seconds toset hours
● minutes flash
● press button repeatedly to change minutes
● wait for approx. five seconds to set minutes
Driver Information Centre 3 102.
Power outlets
A 12 V power outlet is located on the
instrument panel. Fold the cover
upwards.
Page 98 of 237
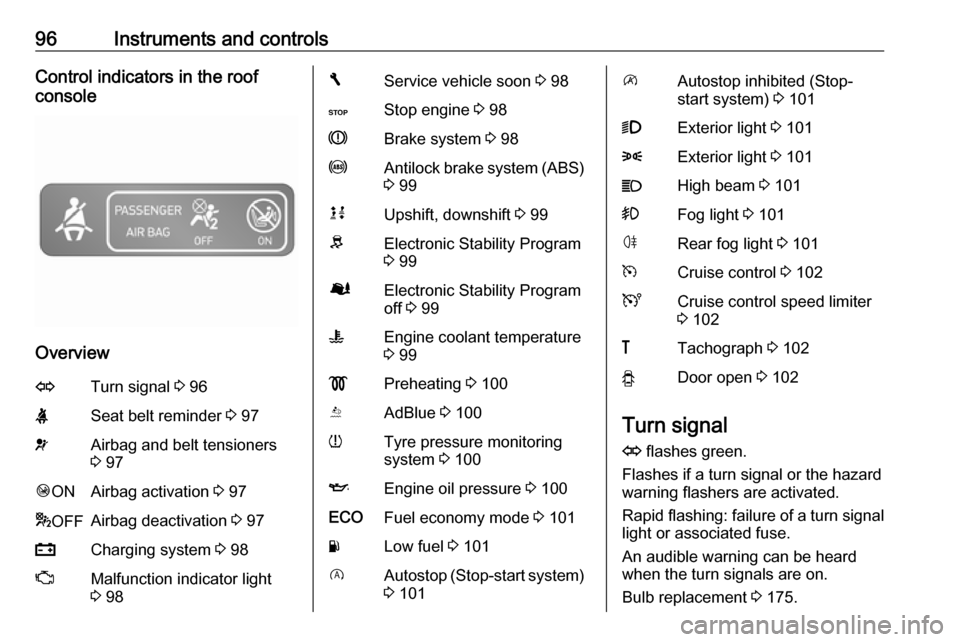
96Instruments and controlsControl indicators in the roof
console
Overview
OTurn signal 3 96XSeat belt reminder 3 97vAirbag and belt tensioners
3 97Ó ONAirbag activation 3 97* OFFAirbag deactivation 3 97pCharging system 3 98ZMalfunction indicator light
3 98FService vehicle soon 3 98CStop engine 3 98RBrake system 3 98uAntilock brake system (ABS)
3 99kjUpshift, downshift 3 99RElectronic Stability Program
3 99ØElectronic Stability Program
off 3 99WEngine coolant temperature
3 99!Preheating 3 100YAdBlue 3 100wTyre pressure monitoring
system 3 100IEngine oil pressure 3 100ECOFuel economy mode 3 101YLow fuel 3 101DAutostop (Stop-start system)
3 101\Autostop inhibited (Stop-
start system) 3 1019Exterior light 3 1018Exterior light 3 101CHigh beam 3 101>Fog light 3 101øRear fog light 3 101mCruise control 3 102UCruise control speed limiter
3 102&Tachograph 3 102yDoor open 3 102
Turn signal
O flashes green.
Flashes if a turn signal or the hazard
warning flashers are activated.
Rapid flashing: failure of a turn signal
light or associated fuse.
An audible warning can be heard
when the turn signals are on.
Bulb replacement 3 175.