ECO mode OPEL VIVARO B 2019 Manual user
[x] Cancel search | Manufacturer: OPEL, Model Year: 2019, Model line: VIVARO B, Model: OPEL VIVARO B 2019Pages: 235, PDF Size: 5.67 MB
Page 5 of 235

Introduction3Vehicle specific dataPlease enter your vehicle's data on
the previous page to keep it easily
accessible. This information is
available in the sections "Service and
maintenance" and "Technical data"
as well as on the identification plate.
Introduction
Your vehicle is a designed
combination of advanced technology, safety, environmental friendliness
and economy.
This Owner's Manual provides you
with all the necessary information to
enable you to drive your vehicle
safely and efficiently.
Make sure your passengers are
aware of the possible risk of accident
and injury which may result from
improper use of the vehicle.
You must always comply with the
specific laws and regulations of the
country that you are in. These laws
may differ from the information in this Owner's Manual.
Disregarding the description given in
this manual may affect your warranty.When this Owner's Manual refers to a
workshop visit, we recommend your
Opel Service Partner.
All Opel Service Partners provide
first-class service at reasonable
prices. Experienced mechanics
trained by Opel work according to
specific Opel instructions.
The customer literature pack should
always be kept ready to hand in the
vehicle.
Using this manual ● This manual describes all options
and features available for this
model. Certain descriptions,
including those for display and
menu functions, may not apply to
your vehicle due to model
variant, country specifications,
special equipment or
accessories.
● The "In brief" section will give you
an initial overview.
● The table of contents at the beginning of this manual and
within each section shows where the information is located.● The index will enable you to search for specific information.
● This Owner's Manual depicts left-
hand drive vehicles. Operation is similar for right-hand drive
vehicles.
● The Owner's Manual uses the factory engine designations. The
corresponding sales
designations can be found in the
section "Technical data".
● Directional data, e.g. left or right, or front or back, always relate to
the direction of travel.
● The vehicle display screens may not support your specific
language.
● Display messages and interior labelling are written in bold
letters.
Page 13 of 235

In brief111Side air vents ...................... 129
2 Ashtray .................................. 90
Cupholder ............................ 75
3 Light switch ........................ 110
Rear fog light ....................... 114
Front fog lights ...................113
Exit lighting .......................... 116
Turn lights ........................... 113
Sidelights ............................ 110
Headlight flash, low beam
and high beam ....................111
4 Instruments .......................... 91
Driver Information Centre .... 103
Trip computer .....................106
5 Horn ...................................... 85
Driver airbag ......................... 63
6 Windscreen wiper,
windscreen washer system ..86
Rear window wiper, rear
window washer system ........87
Trip computer .....................1067Card reader for electronic
key system ............................ 23
8 Steering column controls ......85
9 Centre air vents ................... 129
10 Power outlet .......................... 89
Cigarette lighter ..................... 90
Coin tray, USB slot ................ 73
11 Info Display ......................... 104
12 Front passenger airbag .........63
13 Glovebox .............................. 74
14 Heated exterior mirrors .........41
Heated rear window ..............45
Idle speed control ...............136
15 Power outlet .......................... 89
Cigarette lighter ..................... 90
16 Climate control system ........ 118
Electronic climate control
system ................................. 120
17 Ashtray .................................. 90
Cupholder ............................ 75
18 Hazard warning flashers .....113
Central locking system ..........2619Front parking assist ............ 156
20 Power button for electronic
key system .......................... 133
21 Eco button for fuel
economy mode ...................131
22 Stop-start system ................137
Cruise control ...................... 153
Speed limiter ....................... 155
23 Remote control on
steering wheel ......................85
Cruise control .....................153
24 Ignition switch with
steering wheel lock .............133
25 Steering wheel adjustment ...85
26 Bonnet release lever ...........168
27 Fuse box ............................. 184
28 Rear parking assist ............156
Electronic Stability Control ..151
Traction Control system ......150
Headlight range
adjustment ......................... 111
Instrument panel
illumination control ..............114
Page 68 of 235

66Seats, restraintsChild restraintsChild restraint systems9 Danger
If using a rear-facing child restraint
system on the front passenger
seat, the airbag system for the
front passenger seat must be
deactivated. This also applies to certain forward-facing child
restraint systems as indicated in
the table 3 68.
Airbag deactivation 3 64.
Airbag label 3 60.
We recommend a child restraint system which is tailored specifically to the vehicle. For further information,
contact your workshop.
When a child restraint system is being
used, pay attention to the following
usage and installation instructions
and also those supplied with the child
restraint system.
Always comply with local or national
regulations. In some countries, the
use of child restraint systems is
forbidden on certain seats.
Child restraint systems can be
fastened with:
● Three-point seat belt
● ISOFIX brackets
● Top-Tether
Three-point seat belt
Child restraint systems can be
fastened by using a three-point seat
belt 3 56.
Depending on the size of the used
child restraint systems and the model
variant, child restraint systems can be
attached to certain 2nd row and 3rd
row rear seats. After fastening the
child restraint system the seat belt
has to be tightened 3 68.
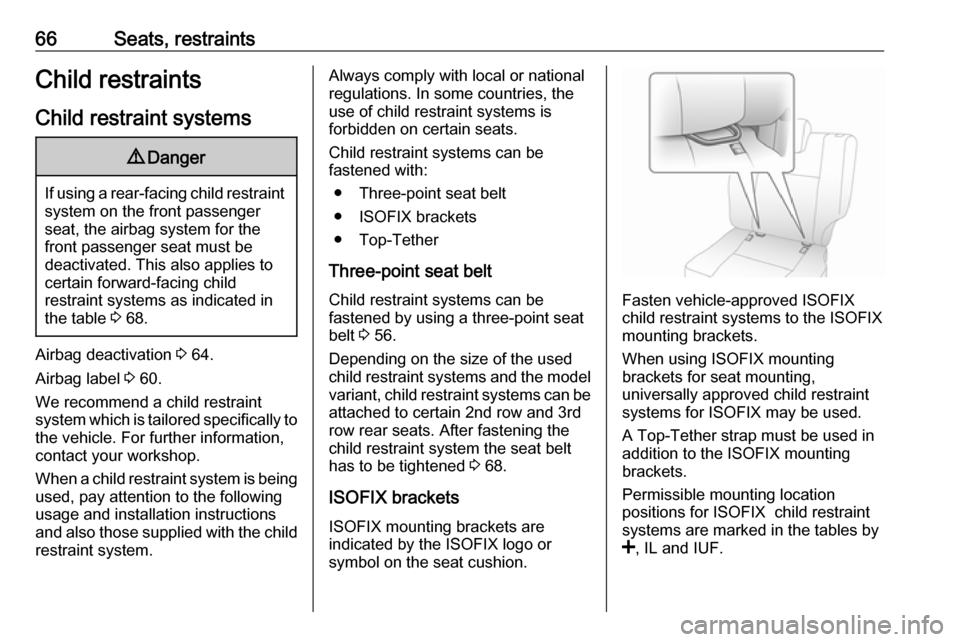
ISOFIX brackets ISOFIX mounting brackets are
indicated by the ISOFIX logo or
symbol on the seat cushion.
Fasten vehicle-approved ISOFIX
child restraint systems to the ISOFIX
mounting brackets.
When using ISOFIX mounting
brackets for seat mounting,
universally approved child restraint
systems for ISOFIX may be used.
A Top-Tether strap must be used in
addition to the ISOFIX mounting
brackets.
Permissible mounting location
positions for ISOFIX child restraint
systems are marked in the tables by
< , IL and IUF.
Page 86 of 235

84Instruments and controlsInstruments and
controlsControls ....................................... 85
Steering wheel adjustment ........85
Steering wheel controls .............85
Horn ........................................... 85
Steering column controls ...........85
Windscreen wiper and washer ..86
Rear window wiper and washer ...................................... 87
Outside temperature ..................87
Clock ......................................... 88
Power outlets ............................. 89
Cigarette lighter ......................... 90
Ashtrays .................................... 90
Warning lights, gauges and indi‐ cators ........................................... 91
Instrument cluster ......................91
Speedometer ............................. 91
Odometer .................................. 92
Trip odometer ............................ 92
Tachometer ............................... 92
Fuel gauge ................................ 92
Fuel economy gauge .................93
Service display .......................... 94
Control indicators ......................94Turn lights.................................. 97
Seat belt reminder .....................98
Airbag and belt tensioners .........98
Airbag deactivation ....................98
Charging system .......................99
Malfunction indicator light ..........99
Service vehicle soon .................99
Stop engine ............................... 99
Brake system ............................. 99
Antilock brake system (ABS) ...100
Gear shifting ............................ 100
Electronic Stability Control ......100
Electronic Stability Control off . 100
Engine coolant temperature ....100
Preheating ............................... 101
AdBlue ..................................... 101
Tyre pressure monitoring system .................................... 101
Engine oil pressure ..................101
Fuel economy mode ................102
Low fuel ................................... 102
Stop-start system ....................102
Exterior light ............................ 102
High beam ............................... 102
Front fog lights ......................... 103
Rear fog light ........................... 103
Cruise control .......................... 103
Speed limiter ........................... 103
Tachograph ............................. 103
Door open ................................ 103Displays..................................... 103
Driver Information Centre ........103
Info Display .............................. 104
Vehicle messages ......................104
Warning chimes .......................105
Engine oil level ........................ 106
Trip computer ............................. 106
Tachograph ................................ 108
Page 99 of 235

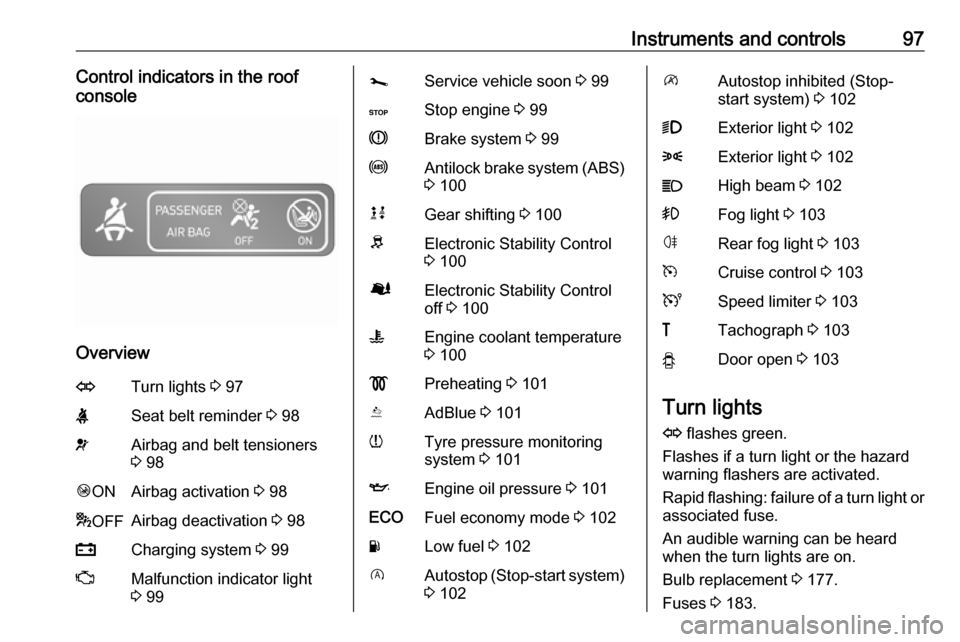
Instruments and controls97Control indicators in the roof
console
Overview
OTurn lights 3 97XSeat belt reminder 3 98vAirbag and belt tensioners
3 98Ó ONAirbag activation 3 98* OFFAirbag deactivation 3 98pCharging system 3 99ZMalfunction indicator light
3 99jService vehicle soon 3 99CStop engine 3 99RBrake system 3 99uAntilock brake system (ABS)
3 100kjGear shifting 3 100RElectronic Stability Control
3 100ØElectronic Stability Control
off 3 100WEngine coolant temperature
3 100!Preheating 3 101YAdBlue 3 101wTyre pressure monitoring
system 3 101IEngine oil pressure 3 101ECOFuel economy mode 3 102YLow fuel 3 102DAutostop (Stop-start system)
3 102\Autostop inhibited (Stop-
start system) 3 1029Exterior light 3 1028Exterior light 3 102CHigh beam 3 102>Fog light 3 103øRear fog light 3 103mCruise control 3 103USpeed limiter 3 103&Tachograph 3 103yDoor open 3 103
Turn lights
O flashes green.
Flashes if a turn light or the hazard
warning flashers are activated.
Rapid flashing: failure of a turn light or associated fuse.
An audible warning can be heard
when the turn lights are on.
Bulb replacement 3 177.
Fuses 3 183.
Page 104 of 235

102Instruments and controlsIlluminates when the engine is
running
If control indicator I illuminates
when the engine is running (together
with control indicator C and a
warning chime): Stop, switch off
engine.Caution
Engine lubrication may be
interrupted. This may result in
damage to the engine and / or
locking of the drive wheels.
1. Depress clutch.
2. Select neutral gear (or move selector lever to N).
3. Move out of the flow of traffic as quickly as possible without
impeding other vehicles.
4. Switch off ignition.
9 Warning
When the engine is off,
considerably more force is needed
to brake and steer.
Do not remove key until vehicle is stationary, otherwise the steeringwheel lock could engage
unexpectedly.
Keep engine turned off and let the
vehicle be towed to a workshop
3 169.
Fuel economy mode ECO illuminates green when ECO
mode is engaged to reduce fuel
consumption.
ECO mode, driving economically
3 131.
Low fuel Y illuminates yellow.
Illuminates briefly when the ignition is
switched on.
Illuminates when level in fuel tank is
low (range of approx. 50 km). Refuel immediately 3 162.
Catalytic converter 3 141.
Diesel fuel system bleeding 3 175.
Stop-start system D illuminates when engine is in an
Autostop.
\ illuminates when an Autostop is
inhibited when certain conditions are
not fulfilled.
Stop-start system 3 137.
Exterior light
9 illuminates green.
Illuminated when the headlights are
on.
8 illuminates green.
Illuminated when the sidelights are
on.
Lighting 3 110.
High beam
P illuminates blue.
Page 121 of 235

Climate control119● Open side air vents as requiredand direct them towards door
windows.
● For simultaneous warming of the
foot well, set air distribution
control to J.
Heated rear window 3 45.
Air conditioning system
In addition to the heating and
ventilation system, the air
conditioning system has controls for:A/C:cooling4:air recirculation
Heated seats 3 50.
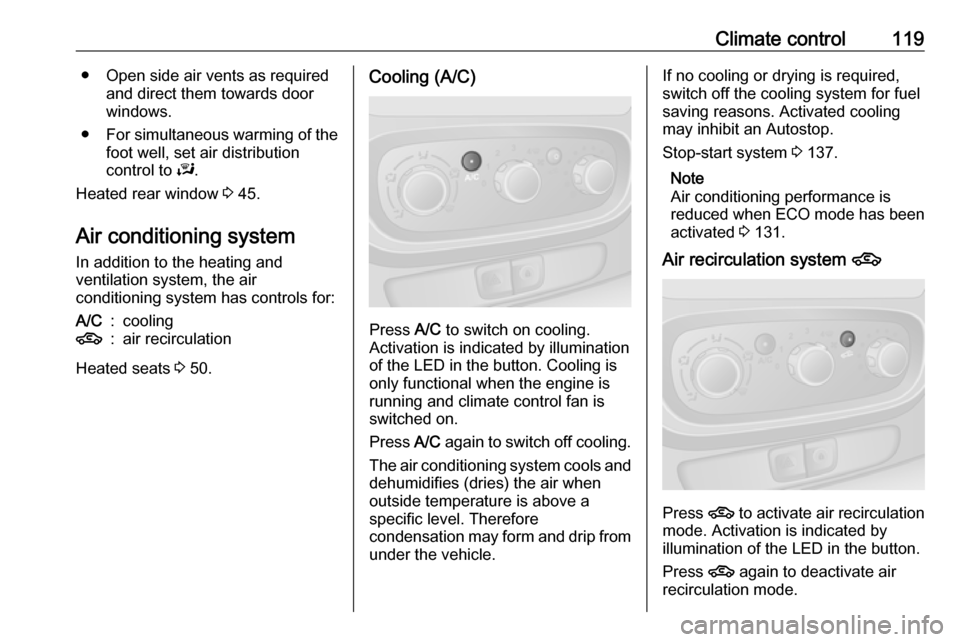
Cooling (A/C)
Press A/C to switch on cooling.
Activation is indicated by illumination
of the LED in the button. Cooling is
only functional when the engine is
running and climate control fan is switched on.
Press A/C again to switch off cooling.
The air conditioning system cools and
dehumidifies (dries) the air when
outside temperature is above a
specific level. Therefore
condensation may form and drip from under the vehicle.
If no cooling or drying is required,
switch off the cooling system for fuel
saving reasons. Activated cooling
may inhibit an Autostop.
Stop-start system 3 137.
Note
Air conditioning performance is
reduced when ECO mode has been
activated 3 131.
Air recirculation system 4
Press 4
to activate air recirculation
mode. Activation is indicated by
illumination of the LED in the button.
Press 4 again to deactivate air
recirculation mode.
Page 124 of 235

122Climate controlCooling A/C
The air conditioning system cools and
dehumidifies (dries) the air when
outside temperature is above a
specific level. Therefore
condensation may form and drip from under the vehicle.
Note
Air conditioning performance is
reduced when ECO mode has been
activated 3 131.
If no cooling or drying is required
press A/C OFF to switch the cooling
system off, thus saving fuel. LED
illuminates in the button.
To return to Automatic mode: Press
AUTO button.
Air recirculation mode u
Activate or deactivate manual air recirculation mode with u. LED
illuminates in the button when
activated.9 Warning
The exchange of fresh air is
reduced in air recirculation mode.
In operation without cooling the air humidity increases, so the
windows may mist up from inside.
The quality of the passenger
compartment air deteriorates,
which may cause the vehicle
occupants to feel drowsy.
To return to Automatic mode: Press
AUTO button.
Rear heating system
The rear passenger compartment
heating fan assists air flow to the rear
passenger compartment via the rear
air vents.
The rate of air flow is determined by
the fan. Air temperature is controlled
using the temperature control on the
instrument panel.
Page 127 of 235

Climate control125Remote control (Type A)1 Display:Displays preset, current
time or preset time,
temperature, Z, Ü , Y
and Ö2 7:Long press: switch heater on,
short press: turns display on
or confirms selection3 l:Adjusts values up4 d:Long press: switch heater off,
short press: turns display on
or exit menu5 k:Adjusts values downIf no buttons are pressed within
ten seconds the display automatically
turns off.
Remote control (Type A) fault
displaysINIT:automatic detection –
wait until automatic
detection is finishedNO
SIGNAL:no signal –
check heater fuseZ:poor signal –
move closerÜ:battery low –
replace batteryY:heater fault –
consult workshopAdd, AddE:system in learning
mode
Teach remote control (Type A)
If the vehicle battery is reconnected, the LED in the instrument panel
button illuminates and the system
configures the remote control menu
automatically. If the LED flashes,
select Add or AddE and confirm.
Additional remote control units may
also be configured. Press the button
until LED flashes, switch on the
remote control, select Add and
confirm.
AddE teaches the current remote
control unit exclusively and blocks all
previously configured units. Add
teaches up to four remote control
units, but only one unit can operate
the system at any one time.
Remote control (Type B)1 Display:Displays preset, current
time or preset time,
temperature, Z, Ü , Y
and Ö
Page 130 of 235

128Climate control● Select F in the menu bar and
confirm.
● Select Þ in the menu bar and
confirm.
● Adjust using k or l to change
the hour and confirm.
● Adjust using k or l to change
the minutes and confirm.
● Press d to exit.
● Select F in the menu bar and
confirm.
● Select Mo in the menu bar and
confirm.
● Adjust using k or l to change
the weekday and confirm.
● Press d to exit.
Heating level
The preferred heating level for
programmed departure times can be set to either ECO or HIGH.
● Select Y in the menu bar and
confirm.
● Select ECO or HIGH and confirm.
● Press d to exit.Operation (Type B)
Heating Y
Select the operating mode Y, if
necessary.
● Press l three times.
● Press Y and OFF
simultaneously, Y flashes.
● Adjust using k or l to select Y.
● Press Y and OFF simultaneously
to confirm.
To switch on, press Y for
one second. The predetermined
heating duration, e.g. 30, is
displayed. The factory setting is
30 minutes.
The heating duration can be set in
increments of ten minutes. Due to the
power consumption, note the heating duration.
● Press l four times.
● Press Y and OFF
simultaneously, Y flashes.
● Adjust using k or l to select the
desired heating duration.
● Press Y and OFF simultaneously
to confirm.To switch off, press OFF.
Programming y
The system calculates the operating
time of the heater depending on the
temperature inside the vehicle.
● Press k twice.
● Press Y and OFF
simultaneously, y flashes.
● Adjust using k or l to select the
departure time.
● Press Y and OFF simultaneously
to confirm.
To switch on, press Y for one second ,
HTM is displayed.
Heating stops automatically after the
programmed departure time, or can
be manually switched off.
● Press k twice.
● Press OFF for one second, HTM
goes out.
Set time
If the vehicle battery is disconnected
or its voltage is too low, the time will need to be reset.