headlights OPEL VIVARO B 2019 Manual user
[x] Cancel search | Manufacturer: OPEL, Model Year: 2019, Model line: VIVARO B, Model: OPEL VIVARO B 2019Pages: 235, PDF Size: 5.67 MB
Page 16 of 235

14In briefExterior lighting
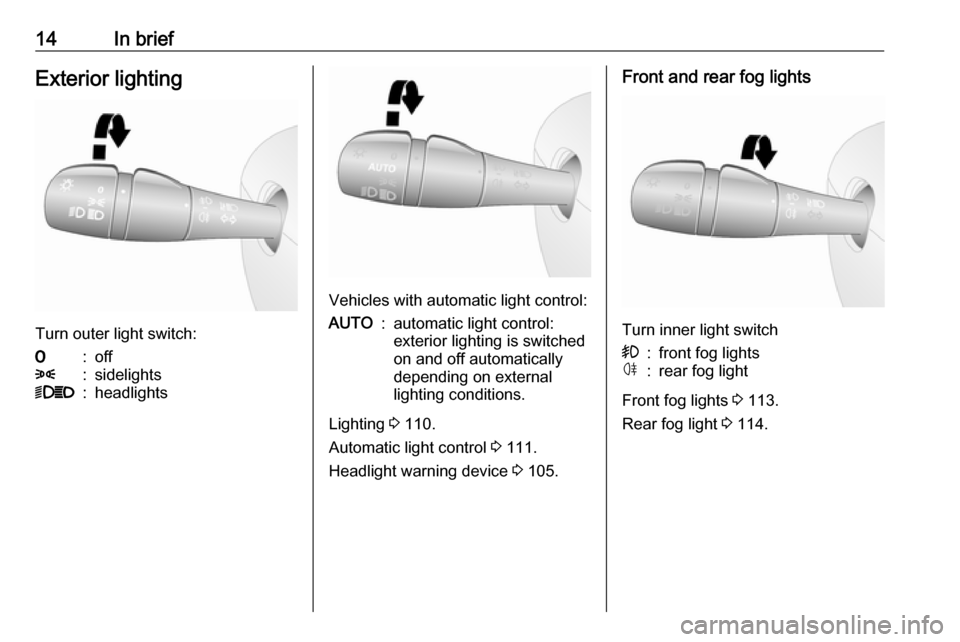
Turn outer light switch:
7:off8:sidelights9P:headlights
Vehicles with automatic light control:
AUTO:automatic light control:
exterior lighting is switched
on and off automatically
depending on external
lighting conditions.
Lighting 3 110.
Automatic light control 3 111.
Headlight warning device 3 105.
Front and rear fog lights
Turn inner light switch
>:front fog lightsø:rear fog light
Front fog lights 3 113.
Rear fog light 3 114.
Page 104 of 235

102Instruments and controlsIlluminates when the engine is
running
If control indicator I illuminates
when the engine is running (together
with control indicator C and a
warning chime): Stop, switch off
engine.Caution
Engine lubrication may be
interrupted. This may result in
damage to the engine and / or
locking of the drive wheels.
1. Depress clutch.
2. Select neutral gear (or move selector lever to N).
3. Move out of the flow of traffic as quickly as possible without
impeding other vehicles.
4. Switch off ignition.
9 Warning
When the engine is off,
considerably more force is needed
to brake and steer.
Do not remove key until vehicle is stationary, otherwise the steeringwheel lock could engage
unexpectedly.
Keep engine turned off and let the
vehicle be towed to a workshop
3 169.
Fuel economy mode ECO illuminates green when ECO
mode is engaged to reduce fuel
consumption.
ECO mode, driving economically
3 131.
Low fuel Y illuminates yellow.
Illuminates briefly when the ignition is
switched on.
Illuminates when level in fuel tank is
low (range of approx. 50 km). Refuel immediately 3 162.
Catalytic converter 3 141.
Diesel fuel system bleeding 3 175.
Stop-start system D illuminates when engine is in an
Autostop.
\ illuminates when an Autostop is
inhibited when certain conditions are
not fulfilled.
Stop-start system 3 137.
Exterior light
9 illuminates green.
Illuminated when the headlights are
on.
8 illuminates green.
Illuminated when the sidelights are
on.
Lighting 3 110.
High beam
P illuminates blue.
Page 112 of 235

110LightingLightingExterior lighting.......................... 110
Light switch .............................. 110
Automatic light control .............111
High beam ............................... 111
Headlight flash ......................... 111
Headlight range adjustment ....111
Headlights when driving abroad .................................... 112
Daytime running lights .............112
Cornering lights .......................112
Hazard warning flashers ..........113
Turn lights ................................ 113
Front fog lights ......................... 113
Rear fog light ........................... 114
Reversing lights .......................114
Misted light covers ...................114
Interior lighting ........................... 114
Instrument panel illumination control ..................................... 114
Interior lights ............................ 114
Load compartment lighting ......116
Reading lights .......................... 116
Glove box lighting ....................116
Lighting features ........................116
Entry lighting ............................ 116Exit lighting.............................. 116
Battery discharge protection ....117Exterior lighting
Light switch
Turn outer switch:
7:off8:sidelights9P:headlights
High beam control indicator P
3 102.
Low beam control indicator 9 3 102.
Note
If the headlights have been switched
on manually, a warning chime will
sound when the engine is switched
Page 113 of 235

Lighting111off and when the driver's door is
opened as a reminder that the lights
are still on.
Tail lights
Tail lights are illuminated together
with low beam and sidelights.
Automatic light controlAUTO:automatic light control
When the automatic light control
function is activated and the engine is
running, the system switches
between daytime running lights and headlights depending on the external lighting conditions.
For reasons of safety, it is advisable
to have the automatic light control
function activated.
Automatic headlight activation During poor lighting conditions the
headlights are switched on.
Additionally, headlights are switched
on if the windscreen wiper has been
activated for several wipes.
Daytime running lights 3 112.
High beam
To switch from low to high beam,
push stalk.
To switch back to low beam, push
stalk again or pull.
Headlight flash
To activate the headlight flash, pull
stalk.
Headlight range adjustment Manual headlight range
adjustment
Adapt headlight range to the vehicle
load to prevent dazzling of oncoming
traffic.
Page 114 of 235

112LightingTurn thumb wheel ? to required
position:0:only driver, no load2:with passengers and full load
Select another position depending on load condition.
Headlights when driving abroad
The asymmetrical headlight beam
extends visibility at the edge of the
road at the passenger side.
However, when driving in countries
where traffic drives on the opposite
side of the road, adjust the headlights to prevent dazzling of oncoming
traffic.
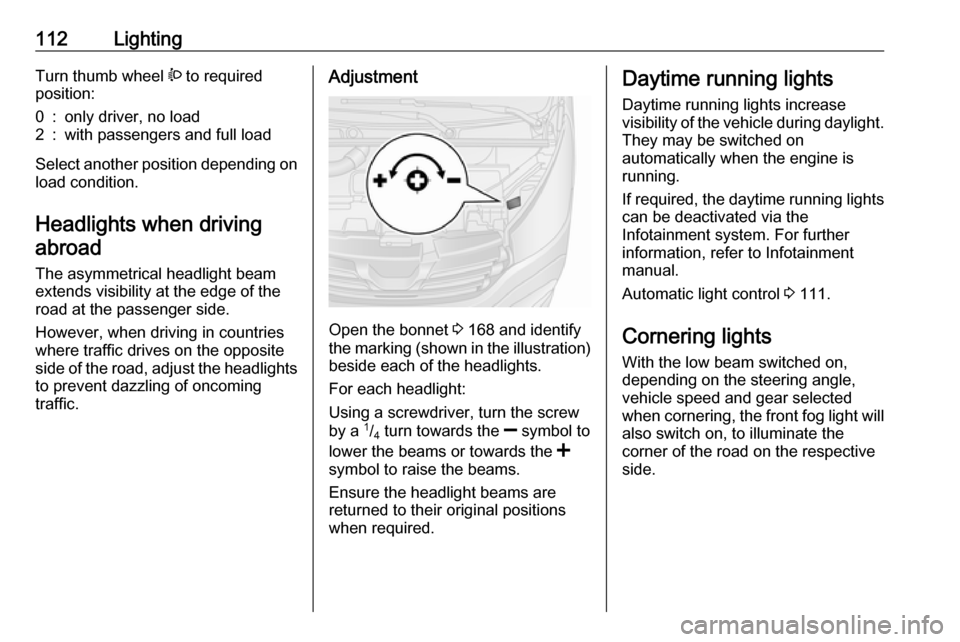
Adjustment
Open the bonnet 3 168 and identify
the marking (shown in the illustration)
beside each of the headlights.
For each headlight:
Using a screwdriver, turn the screw
by a 1
/4 turn towards the
] symbol to
lower the beams or towards the <
symbol to raise the beams.
Ensure the headlight beams are
returned to their original positions
when required.
Daytime running lights
Daytime running lights increase
visibility of the vehicle during daylight.
They may be switched on
automatically when the engine is
running.
If required, the daytime running lights can be deactivated via the
Infotainment system. For further
information, refer to Infotainment
manual.
Automatic light control 3 111.
Cornering lights
With the low beam switched on,
depending on the steering angle, vehicle speed and gear selected
when cornering, the front fog light will also switch on, to illuminate the
corner of the road on the respective
side.
Page 115 of 235

Lighting113Hazard warning flashers
Operated by pressing ¨.
In the event of hard braking, the
hazard warning flashers may turn on automatically. Switch off by pressing
¨ .
Turn lightsstalk up:right turn lightstalk down:left turn light
A resistance point can be felt when
moving the stalk.
Constant flashing is activated when
the stalk is being moved beyond the
resistance point. It is deactivated
when the steering wheel is moved in
the opposite direction or stalk is
manually moved back to its neutral
position.
Activate temporary flashing by
holding the stalk just before the
resistance point. Turn lights will flash
until stalk is being released.
To activate three flashes, tap the stalk
briefly without passing the resistance
point.
Front fog lights
Turn inner switch to position >
.
Control indicator > illuminates in the
instrument cluster.
Front fog lights will only operate when
the ignition and headlights are
switched on.
Page 116 of 235

114LightingRear fog light
Turn inner switch to position ø.
Control indicator ø illuminates in the
instrument cluster.
Rear fog light comes on together with front fog lights and will only operate
when the ignition and headlights are
switched on.
Reversing lights The reversing lights come on when
the ignition is on and reverse gear is
selected.
Misted light covers
The inside of the light covers may mist up briefly in poor, wet and cold
weather conditions, in heavy rain or
after washing. The mist disappears
quickly by itself. To help, switch on the headlights.Interior lighting
Instrument panel
illumination control
Brightness of the following lights can
be adjusted when the exterior lights
are on:
● instrument panel illumination
● Info Display
● illuminated switches and operation elements
Turn thumb wheel b until the desired
brightness is obtained.
Interior lights
Courtesy lights
During entry and exit of the vehicle,
depending on switch position the front and rear courtesy lights automaticallyswitch on, together with the foot well
lights, then switch off after a delay.
Front courtesy lights
Operate rocker switch:
press 7:offcentre posi‐
tion:automatic switching
on and offpress d:on
Page 118 of 235

116LightingLoad compartment lighting
The lower load compartment lights
come on when the load compartment is opened.
Reading lights Front reading light
Operate rocker switch:
press 7:offpress l:on
Glove box lighting
The glovebox light comes on when
the glovebox is opened.
Lighting features
Entry lighting
Welcome lighting
Vehicle lights are switched on for a
short time to facilitate locating the
vehicle when it is dark.
Remote control operation
Lights switch on when unlocking the
vehicle with the remote control.
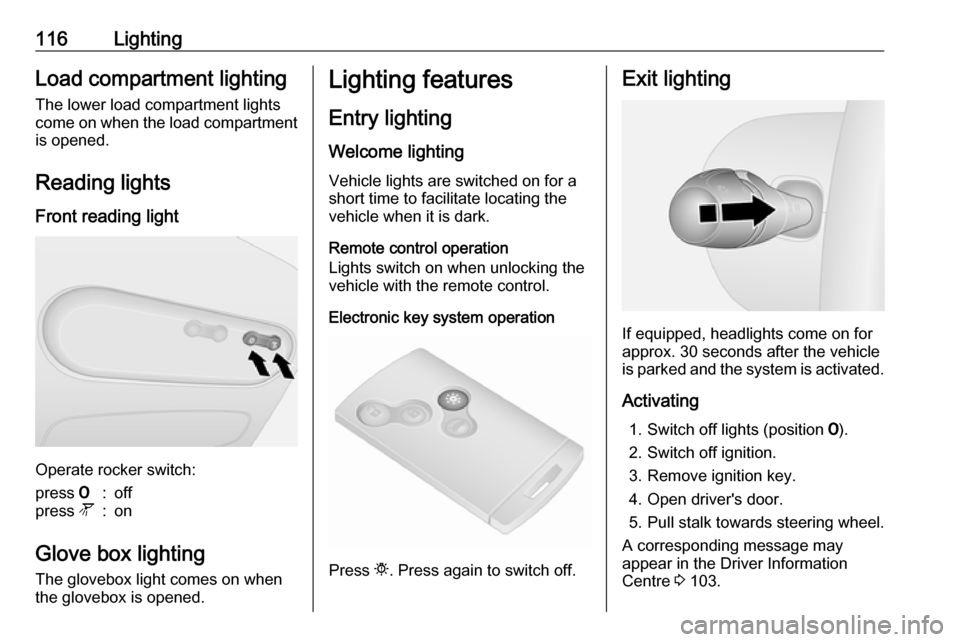
Electronic key system operation
Press t. Press again to switch off.
Exit lighting
If equipped, headlights come on for
approx. 30 seconds after the vehicle
is parked and the system is activated.
Activating 1. Switch off lights (position 7).
2. Switch off ignition.
3. Remove ignition key.
4. Open driver's door.
5. Pull stalk towards steering wheel.
A corresponding message may
appear in the Driver Information
Centre 3 103.
Page 163 of 235

Driving and operating161The guide line intervals are as
follows:3 (red):30 cm4 (yellow):70 cm5 (green):150 cmSettings
Settings, e.g. brightness, contrast and colours can be changed via the
Infotainment system. The feature
may also be switched off
permanently. Refer to Infotainment
manual for further information.
Deactivation
The camera is deactivated after a
delay if reverse gear is not engaged
for approx. 5 seconds.
Fault
The rear view camera may not
operate properly when:
● the surrounding is dark
● the sun or the beam of headlights
is shining directly into the camera
lens
● ice, snow, mud, or anything else covers the camera lens. Clean
the lens, rinse it with water, and
wipe it with a soft cloth
● the rear doors / tailgate are not closed correctly
● the vehicle had a rear-end accident
● there are extreme temperature changesFuel
Fuel for diesel engines The Diesel engines are compatible
with fuels that conform to current and future European standards and can
be obtained from filling stations:
Diesel fuel that meets standard
EN590 mixed with a biofuel that
meets standard EN14214 (possibly
containing up to 7 % Fatty Acid Methyl Ester).
Page 168 of 235

166Vehicle careVehicle careGeneral Information...................167
Accessories and vehicle modifications .......................... 167
Vehicle storage ........................167
End-of-life vehicle recovery .....168
Vehicle checks ........................... 168
Performing work ......................168
Bonnet ..................................... 168
Engine oil ................................. 169
Engine air filter ........................ 170
Engine coolant ......................... 171
Power steering fluid .................171
Washer fluid ............................ 172
Brakes ..................................... 172
Brake fluid ............................... 172
Vehicle battery ......................... 173
Diesel fuel filter ........................175
Diesel fuel system bleeding .....175
Wiper blade replacement ........176
Bulb replacement .......................177
Headlights ............................... 177
Front fog lights ......................... 178
Front turn lights .......................178
Tail lights ................................. 178
Side turn lights ......................... 179Centre high-mounted brake
light ......................................... 179
Reversing light ......................... 180
Number plate light ...................181
Fog tail light ............................. 181
Interior lights ............................ 182
Instrument panel illumination ...183
Electrical system ........................183
Fuses ....................................... 183
Instrument panel fuse box .......184
Vehicle tools .............................. 187
Tools ........................................ 187
Wheels and tyres .......................188
Tyres ....................................... 188
Winter tyres ............................. 188
Tyre designations ....................188
Tyre pressure .......................... 188
Tyre pressure monitoring system .................................... 190
Tread depth ............................. 191
Changing tyre and wheel size . 192
Wheel covers ........................... 192
Tyre chains .............................. 192
Tyre repair kit .......................... 193
Wheel changing .......................196
Spare wheel ............................ 197
Jump starting ............................. 199Towing....................................... 200
Towing the vehicle ...................200
Towing another vehicle ...........201
Appearance care .......................202
Exterior care ............................ 202
Interior care ............................. 204