ECU OPEL VIVARO C 2020.25 Manual user
[x] Cancel search | Manufacturer: OPEL, Model Year: 2020.25, Model line: VIVARO C, Model: OPEL VIVARO C 2020.25Pages: 287, PDF Size: 28.79 MB
Page 94 of 287

92Storage● Do not place any objects on therear luggage cover or the
instrument panel, and do not cover the sensor on top of the
instrument panel.
● The load must not obstruct the operation of the pedals, parking
brake and gear selector, or
hinder the freedom of movement
of the driver. Do not place any
unsecured objects in the interior.
● Do not drive with an open load compartment.9Warning
Always make sure that the load in
the vehicle is securely stowed.
Otherwise objects can be thrown
around inside the vehicle and
cause personal injury or damage
to the load or car.
● The payload is the difference between the permitted gross
vehicle weight (see identification
plate) and the EC kerb weight.
Identification plate 3 264.
To calculate the payload, enter
the data for your vehicle in the
weights table at the front of this
manual.
The EC kerb weight includes
weights for the driver (68 kg),
luggage (7 kg) and all fluids (fuel
tank 90% full).
Optional equipment and
accessories increase the kerb
weight.
● Driving with a roof load increases
the sensitivity of the vehicle to
cross-winds and has a
detrimental effect on vehicle
handling due to the vehicle's
higher centre of gravity.
Distribute the load evenly and secure it properly with retaining
straps. Adjust the tyre pressure
and vehicle speed according to
the load conditions. Check and
retighten the straps frequently.
Do not drive faster
than 120 km/h.
Page 111 of 287

Instruments and controls109Engine oil level monitor
The state of the engine oil level is
displayed in the Driver Information
Centre for a few seconds following
the service information after switching on the ignition.
A proper state of engine oil level is
confirmed.
If engine oil level is low, T flashes
and warning message is indicated in
the Driver Information Centre.
Depending on the version, D
flashes in the Driver Information
Centre. Confirm engine oil level by
using the oil dipstick and top up
engine oil respectively.
Engine oil 3 214.
A fault of measurement is indicated
by E or a message in the Driver
Information Centre together with
T . Check engine oil level manually
by using the dipstick.
Service display
The service system informs when to
change the engine oil and filter or a
vehicle service is required. Based ondriving conditions, the interval at
which an engine oil and filter change
is required can vary considerably.
Service information 3 259.
A required service due is displayed in the Driver Information Centre for
several seconds after switching on
the ignition.
If no service is required for the next
3000 km or more no service
information appears in the display.
If service is required within the next
3000 km, A illuminates temporary
as reminder. Simultaneously, the
remaining distance or time duration is
indicated for several seconds.
Depending on the version, the
distance travelled since the due date
is indicated in the Driver Information
Centre.
If service is required in less than
1000 km, A flashes and then
illuminates permanently. Remaining distance or time duration is indicated for several seconds. Simultaneously,
the remaining distance or time
duration is indicated for several
seconds. Depending on the version,the distance travelled since the due
date is indicated in the Driver
Information Centre.
Overdued service is indicated by a
message in the Driver Information
Centre which indicates the overdued
distance. A flashes and then
illuminates permanently until service
is executed. Additionally, the control
indicator C or SERVICE
illuminates.
Reset of service interval After each service, the service
indicator must be reset to ensure
proper functionality. It is
recommended to seek the assistance
of a workshop.
If service is executed by yourself,
operate as following:
● switch off ignition
● press and hold F, G
or CHECK
● switch on ignition, the distance indication begins a countdown
● when the display indicates =0,
release the button and
A disappears
Page 127 of 287
Instruments and controls125●Comfort
Ambient lighting : Adjusts the
brightness of the ambient
lighting.
Rear wiper in reverse gear :
Activates or deactivates
automatic switching on of the
rear window wiper when reverse
gear is engaged.
● Vehicle
Unlocking boot only : Activation /
deactivation.
Plip action : Driver / all doors.
● Security
Fatigue Detection system :
Activates or deactivates the
driver drowsiness system.
● Driving assistance
Speed recommendation :
Activates or deactivates the
function.Multimedia
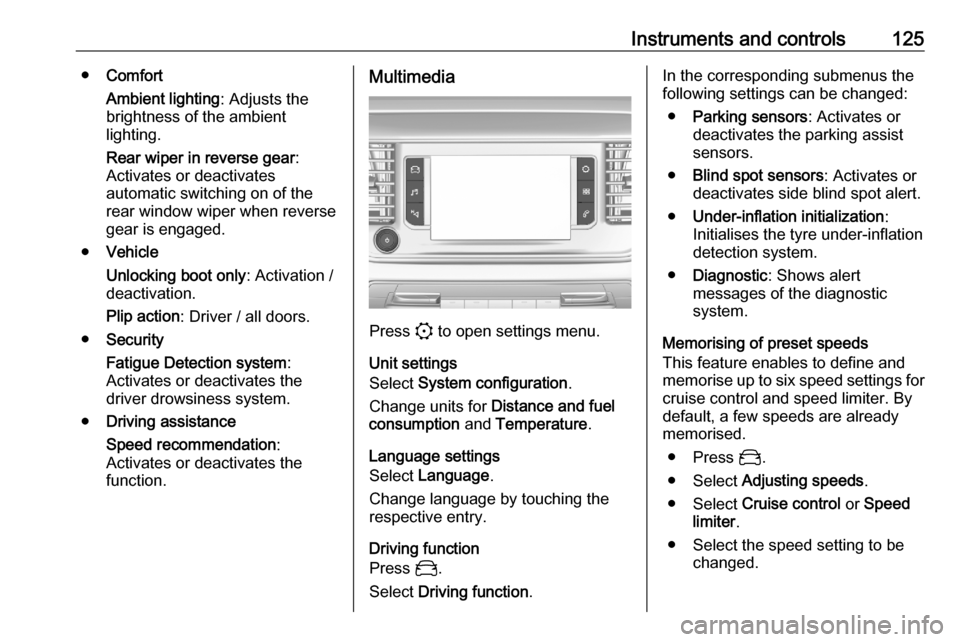
Press : to open settings menu.
Unit settings
Select System configuration .
Change units for Distance and fuel
consumption and Temperature .
Language settings
Select Language .
Change language by touching the
respective entry.
Driving function
Press _.
Select Driving function .
In the corresponding submenus the
following settings can be changed:
● Parking sensors : Activates or
deactivates the parking assist sensors.
● Blind spot sensors : Activates or
deactivates side blind spot alert.
● Under-inflation initialization :
Initialises the tyre under-inflation
detection system.
● Diagnostic : Shows alert
messages of the diagnostic
system.
Memorising of preset speeds
This feature enables to define and
memorise up to six speed settings for
cruise control and speed limiter. By
default, a few speeds are already
memorised.
● Press _.
● Select Adjusting speeds .
● Select Cruise control or Speed
limiter .
● Select the speed setting to be changed.
Page 130 of 287

128Instruments and controlsWelcome lighting: Activates or
deactivates the function and
adjusts its duration.
Directional headlamps : Activates
or deactivates the cornering
lights.
● Vehicle access
Hands-free auto locking :
Activates or deactivates the
function.
● Comfort
Mood lighting : Adjusts the
brightness of the ambient
lighting.
● Safety
Traffic Signs Recognition :
Activates or deactivates the
speed limit information by traffic sign recognition.
Active safety brake : Activates or
deactivates active emergency
braking, the alert distance for risk
of collision can be selected.
Mirror adaptation in reverse :
Adjusts the exterior mirrors if
reverse gear is engaged to
facilitate pavement visibility.Driver’s attention warning :
Activates or deactivates the
driver drowsiness system.Telematics services
Opel Connect
Opel Connect is a new way to stay
connected and secure on the road.
Features available with
Opel Connect are:
● emergency call function
● breakdown call function
When the vehicle is equipped with
Opel Connect, these features are
automatically activated. Terms and
Conditions apply.
Opel Connect is operated by the
buttons in the overhead console.
Note
Opel Connect is not available for all
markets. For further information,
contact your workshop.
Emergency call function
Vehicles featuring the emergency call
function are equipped with a red
SOS button in the overhead console.
The emergency call function will
establish a connection to the nearest
public safety answering point (PSAP).
Page 169 of 287

Driving and operating167R:reverse gear, engage only when
the vehicle is stationaryN:neutralA:automatic modeM:manual mode
The engine can only be started with the gear selector in position N. When
position N is selected, press the brake
pedal and start the engine.
Do not accelerate while engaging a
gear. Never depress the accelerator
pedal and brake pedal at the same
time.
When a gear is engaged, the vehicle
slowly begins to creep when the
brake is released.
Engine braking To utilise the engine braking effect,select a lower gear when driving
downhill.
Parking
Type A:
Apply the parking brake and select P.Type B
Apply the parking brake and select
N or leave the selected gear selector
position.
Manual mode 1. Activate manual mode a) Automatic transmission type A:Manual mode M can be activated
from position D in each driving
situation and speed.
Press button M.
b) Automatic transmission type B:
Move gear selector to position M
if vehicle is at a standstill.
2. Pull steering wheel paddles to select gears manually.
Pull right steering wheel paddle + to
shift to a higher gear.
Pull left steering wheel paddle - to
shift to a lower gear.
Multiple pulls allow gears to be
skipped.
The selected gear is indicated in the
instrument cluster.
If a higher gear is selected when
vehicle speed is too low, or a lower
gear when vehicle speed is too high,
the shift is not executed. This can
cause a message in the Driver
Information Centre.
Page 216 of 287
214Vehicle care9Danger
The ignition system uses
extremely high voltage. Do not
touch.
Bonnet
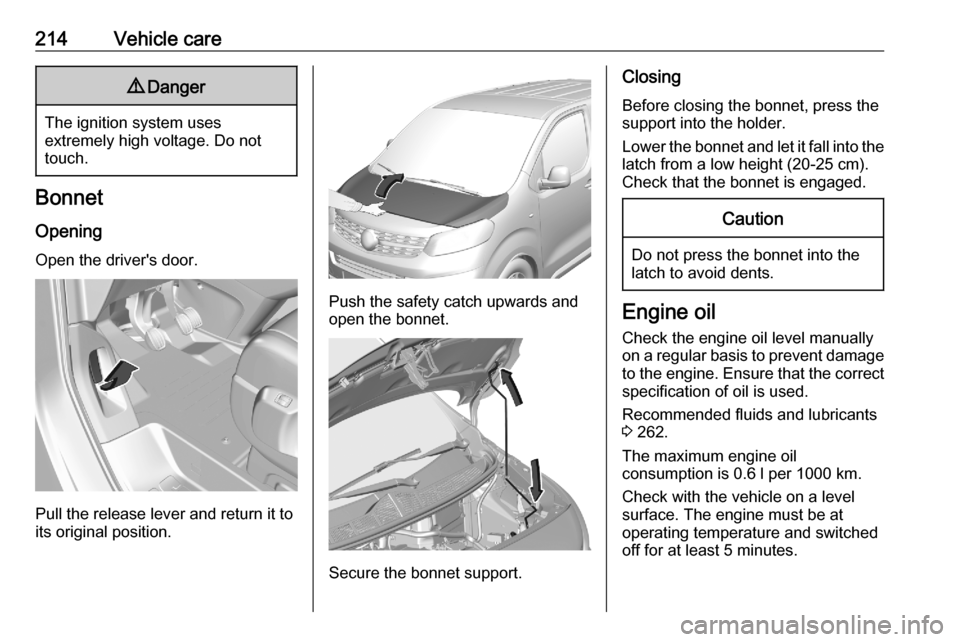
Opening
Open the driver's door.
Pull the release lever and return it to
its original position.
Push the safety catch upwards and
open the bonnet.
Secure the bonnet support.
Closing
Before closing the bonnet, press the
support into the holder.
Lower the bonnet and let it fall into the
latch from a low height (20-25 cm).
Check that the bonnet is engaged.Caution
Do not press the bonnet into the
latch to avoid dents.
Engine oil
Check the engine oil level manually
on a regular basis to prevent damage
to the engine. Ensure that the correct
specification of oil is used.
Recommended fluids and lubricants
3 262.
The maximum engine oil
consumption is 0.6 l per 1000 km.
Check with the vehicle on a level
surface. The engine must be at
operating temperature and switched
off for at least 5 minutes.
Page 237 of 287
Vehicle care235Opening of the box
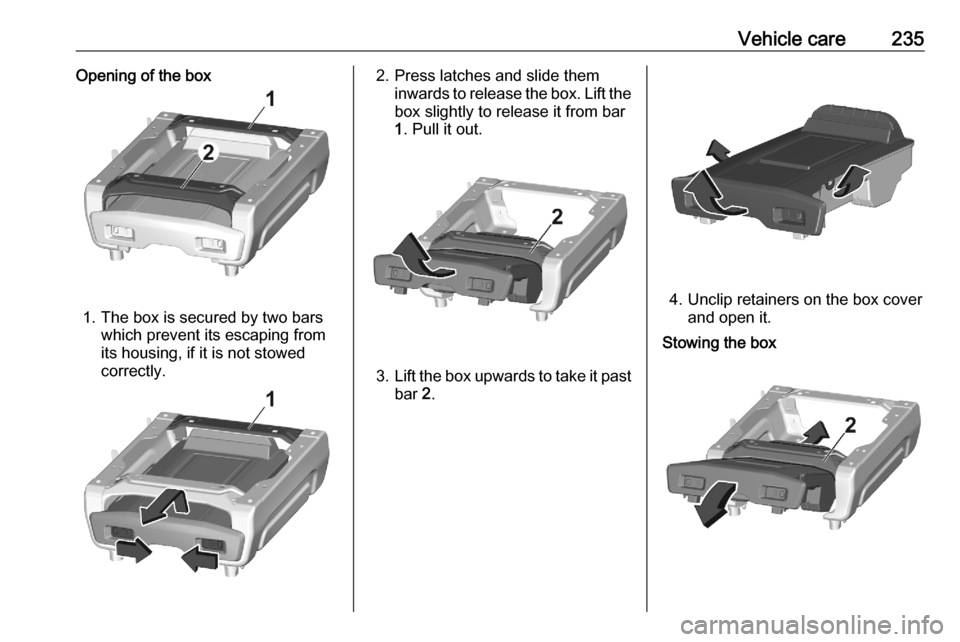
1. The box is secured by two barswhich prevent its escaping from
its housing, if it is not stowed
correctly.
2. Press latches and slide them inwards to release the box. Lift thebox slightly to release it from bar
1 . Pull it out.
3. Lift the box upwards to take it past
bar 2.
4. Unclip retainers on the box cover
and open it.
Stowing the box
Page 238 of 287
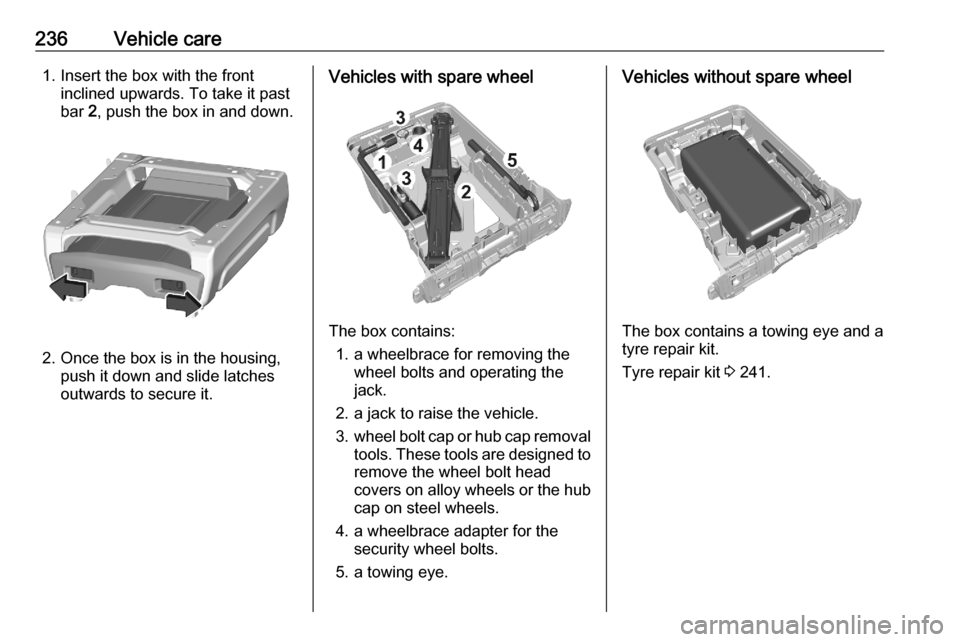
236Vehicle care1. Insert the box with the frontinclined upwards. To take it past
bar 2, push the box in and down.
2. Once the box is in the housing,
push it down and slide latches
outwards to secure it.
Vehicles with spare wheel
The box contains:
1. a wheelbrace for removing the wheel bolts and operating the
jack.
2. a jack to raise the vehicle.
3. wheel bolt cap or hub cap removal
tools. These tools are designed to
remove the wheel bolt head
covers on alloy wheels or the hub
cap on steel wheels.
4. a wheelbrace adapter for the security wheel bolts.
5. a towing eye.
Vehicles without spare wheel
The box contains a towing eye and a
tyre repair kit.
Tyre repair kit 3 241.
Page 250 of 287

248Vehicle care
● Note that the spare wheel issecured by the conical contact ofeach bolt if the wheel bolts for the
alloy wheels are used. In this
case, the washers do not come
into contact with the spare wheel.
1. Steel wheels with cover: Pull off the wheel cover with the
designated tool 3 234.
Alloy wheels: Disengage wheel
bolt caps with the designated tool
3 234.2. Attach the wheel wrench and
loosen each wheel bolt by half a
turn.
The wheels might be protected by security wheel bolts. To loosen
these specific bolts, attach the
adapter onto the head of the bolt
before installing the wheel
wrench. The adapter is located in
the tool box. 3 2343. Ensure the jack is correctly
positioned under the relevant
vehicle jacking point. Position it
directly below the jacking point in
a manner that prevents it from
slipping.
Page 251 of 287
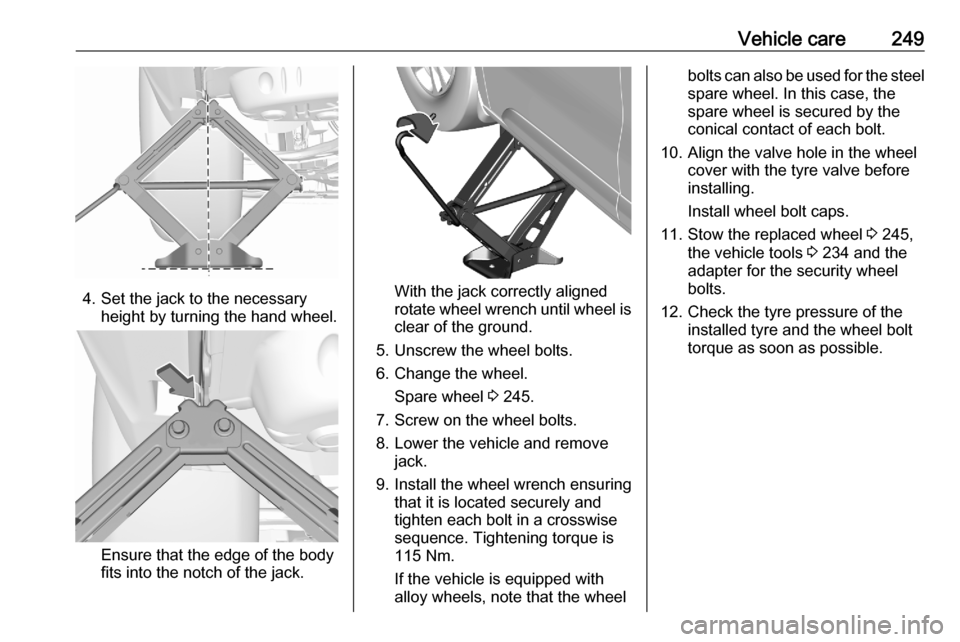
Vehicle care249
4. Set the jack to the necessaryheight by turning the hand wheel.
Ensure that the edge of the body
fits into the notch of the jack.
With the jack correctly aligned
rotate wheel wrench until wheel is
clear of the ground.
5. Unscrew the wheel bolts.
6. Change the wheel. Spare wheel 3 245.
7. Screw on the wheel bolts.
8. Lower the vehicle and remove jack.
9. Install the wheel wrench ensuring that it is located securely and
tighten each bolt in a crosswise
sequence. Tightening torque is
115 Nm.
If the vehicle is equipped with
alloy wheels, note that the wheel
bolts can also be used for the steel spare wheel. In this case, the
spare wheel is secured by the
conical contact of each bolt.
10. Align the valve hole in the wheel cover with the tyre valve before
installing.
Install wheel bolt caps.
11. Stow the replaced wheel 3 245,
the vehicle tools 3 234 and the
adapter for the security wheel
bolts.
12. Check the tyre pressure of the installed tyre and the wheel bolt
torque as soon as possible.