headlights OPEL VIVARO C 2020.25 Manual user
[x] Cancel search | Manufacturer: OPEL, Model Year: 2020.25, Model line: VIVARO C, Model: OPEL VIVARO C 2020.25Pages: 287, PDF Size: 28.79 MB
Page 137 of 287
Lighting135Turn the control wheel twice to
activate or deactivate the rear fog
light.
Light switch in position AUTO:
switching on rear fog light will switch
headlights on automatically.
Reversing lights The reversing light comes on when
the ignition is on and reverse gear is
selected.
Misted light covers
The inside of the light housing may
mist up briefly in poor, wet and cold weather conditions, in heavy rain orafter washing. The mist disappears
quickly by itself. To help, switch on the headlights.Interior lighting
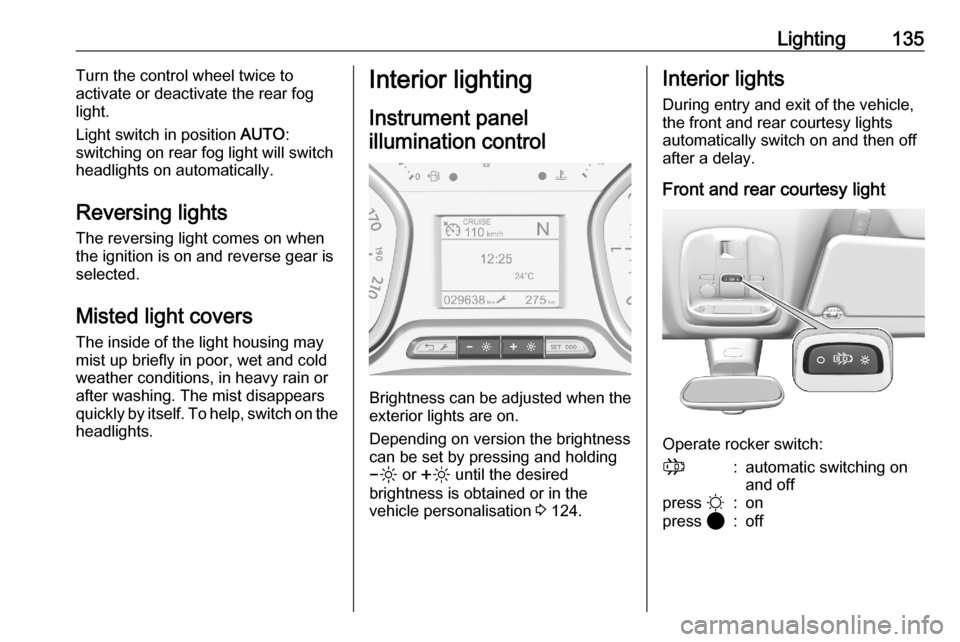
Instrument panel illumination control
Brightness can be adjusted when the exterior lights are on.
Depending on version the brightness
can be set by pressing and holding
0 or ß until the desired
brightness is obtained or in the
vehicle personalisation 3 124.
Interior lights
During entry and exit of the vehicle,
the front and rear courtesy lights
automatically switch on and then off
after a delay.
Front and rear courtesy light
Operate rocker switch:
;:automatic switching on
and offpress §:onpress 2:off
Page 139 of 287

Lighting137Illustration shows rear courtesy lights.
Sunvisor lights Illuminates when the cover is opened.Lighting features
Centre console lighting A spotlight integrated in the overheadconsole illuminates the centre
console when headlights are
switched off.
The brightness can be adjusted in the
vehicle personalisation 3 124.
Entry lighting
Welcome lighting
Some or all of the following lights are
switched on for a short time by
unlocking the vehicle with the radio
remote control:
● headlights
● tail lights
● interior lights
The number of activated lights
depends on the surrounding light
conditions.
The lighting switches off immediately
when the ignition is switched on.
Starting off 3 19.This function can be activated or
deactivated in the vehicle
personalisation 3 124.
The following lights will additionally
switch on when the driver's door is
opened:
● illumination of some switches
● Driver Information Centre
Exit lighting The following lights are switched on if
the key is removed from the ignition
switch:
● interior lights
● instrument panel light
They will switch off automatically after
a delay. This function works only in
the dark.
Path lighting Headlights, tail lights and number
plate lights illuminate the surrounding
area for an adjustable time after
leaving the vehicle.
Page 140 of 287
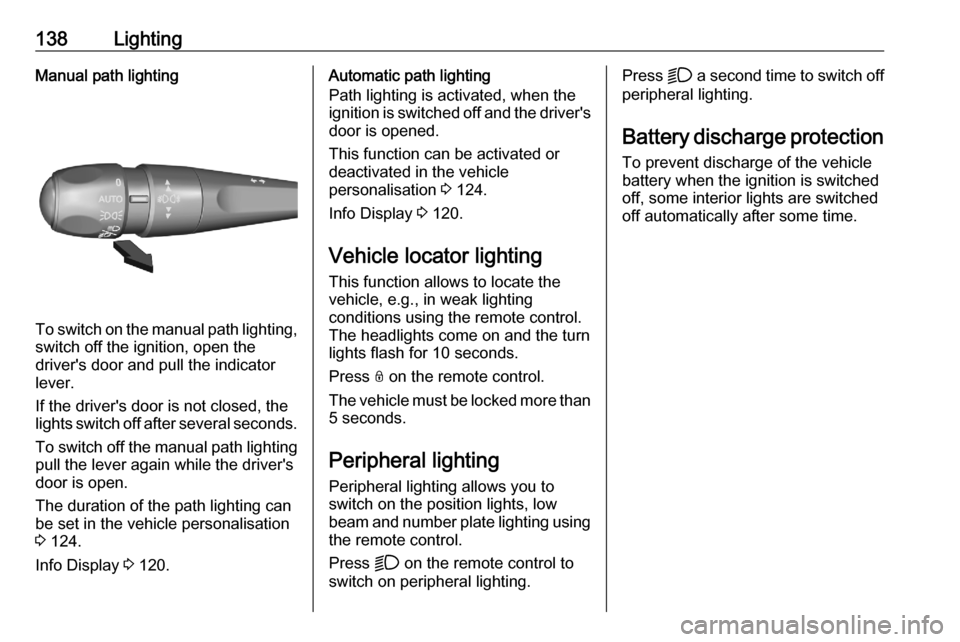
138LightingManual path lighting
To switch on the manual path lighting,switch off the ignition, open the
driver's door and pull the indicator
lever.
If the driver's door is not closed, the
lights switch off after several seconds.
To switch off the manual path lighting
pull the lever again while the driver's
door is open.
The duration of the path lighting can
be set in the vehicle personalisation
3 124.
Info Display 3 120.
Automatic path lighting
Path lighting is activated, when the
ignition is switched off and the driver's door is opened.
This function can be activated or
deactivated in the vehicle
personalisation 3 124.
Info Display 3 120.
Vehicle locator lighting This function allows to locate the
vehicle, e.g., in weak lighting
conditions using the remote control.
The headlights come on and the turn
lights flash for 10 seconds.
Press N on the remote control.
The vehicle must be locked more than
5 seconds.
Peripheral lighting Peripheral lighting allows you to
switch on the position lights, low
beam and number plate lighting using the remote control.
Press D on the remote control to
switch on peripheral lighting.Press D a second time to switch off
peripheral lighting.
Battery discharge protection To prevent discharge of the vehicle
battery when the ignition is switched
off, some interior lights are switched
off automatically after some time.
Page 201 of 287
Driving and operating199camera view area, e. g. below the
bumper, or underneath the
vehicle.
Do not drive or park the vehicle
using only the panoramic view
system.
Always check the surrounding of
the vehicle before driving.
Displayed images may be further
or closer than they appear. The
area displayed is limited and
objects that are close to either
edge of the bumper or under the
bumper are not displayed on the
screen.
System limitations
Caution
For optimal operation of the
system, it is important to keep the
lense of the camera in the tailgate between the number plate lightsalways clean. Rinse the lense with water and wipe with a soft cloth.
Do not clean the lense with a
steam-jet or high-pressure jet
cleaner.
The panoramic view system may not
operate properly when:
● The surrounding is dark.
● The sun or the beam of headlights is shining directly into
the camera lenses.
● During nighttime driving.
● Weather limits visibility, such as fog, rain, or snow.
● The camera lenses are blocked by snow, ice, slush, mud, dirt.
● The vehicle is towing a trailer.
● The vehicle had an accident.
● There are extreme temperature changes.
Rear view camera Depending on version, camera is
mounted above the license plate in
the tailgate / left rear door.
9 Warning
The rear view camera does not
replace driver vision. Note that
objects that are outside the
camera's field of view and the
parking assist sensors, e.g. below
the bumper or underneath the
vehicle, are not displayed.
Do not reverse or park the vehicle
using only the rear view camera.
Always check the surrounding of
the vehicle before driving.
The view of the camera is displayed
in the Info Display 3 120 or in the
interior mirror 3 41.
The area displayed by the camera is
limited. The distance of the image that
appears on the display differs from
the actual distance.
Switching on Rear view camera is automatically
activated when reverse gear is
engaged.
Page 202 of 287

200Driving and operatingSwitching off
The camera is switched off when a
forward gear is engaged.
Guidelines
The area behind the vehicle is
displayed in the screen. The vertical
lines represent the width of the
vehicle with mirrors unfolded.
The first horizontal line represents a
distance of about 30 cm beyond the
edge of vehicle's rear bumper. The
upper horizontal lines represent
distances of about 1 and 2 m beyond
the edge of the vehicle's rear bumper.The Guidelines can be deactivated in
the Vehicle personalisation 3 124.
System limitations The rear view camera may not
operate properly when:
● the surrounding is dark
● the beam of headlights is shining
directly into the camera lenses
● weather limits visibility such as fog, rain or snow
● the camera lenses are blocked by snow, ice, slush, mud, dirt.Clean the lense, rinse with water,
and wipe with a soft cloth
● the tailgate will be opened
● the vehicle is towing an electrically connected trailer,bicycle carrier etc.
● the vehicle had a rear end accident
● there are extreme temperature changesLane departure warning
The lane departure warning system
observes the lane markings between
which the vehicle is driving via a front camera. The system detects lane
changes and warns the driver in the
event of an unintended lane change
via visual and acoustic signals.
Criteria for the detection of an
unintended lane change are:
● no operation of turn lights
● no brake pedal operation
● no active acceleration
If the driver is active, no warning will
be issued.
Page 213 of 287

Vehicle care211Vehicle careGeneral Information...................212
Accessories and vehicle modifications .......................... 212
Vehicle storage ........................212
End-of-life vehicle recovery .....213
Vehicle checks ........................... 213
Performing work ......................213
Bonnet ..................................... 214
Engine oil ................................. 214
Engine coolant ......................... 215
Washer fluid ............................ 216
Brakes ..................................... 216
Brake fluid ............................... 216
Vehicle battery ......................... 217
Diesel fuel system bleeding .....219
Wiper blade replacement ........219
Bulb replacement .......................220
Halogen headlights ..................220
Xenon headlights .....................223
Front fog lights ......................... 224
Front turn lights .......................225
Tail lights ................................. 226
Side turn lights ......................... 228
Centre high-mounted brake light ......................................... 229Number plate light...................230
Interior lights ............................ 230
Electrical system ........................231
Fuses ....................................... 231
Engine compartment fuse box . 232
Instrument panel fuse box .......232
Vehicle tools .............................. 234
Tools ........................................ 234
Wheels and tyres .......................237
Winter tyres ............................. 237
Tyre designations ....................237
Tyre pressure .......................... 237
Tyre deflation detection
system .................................... 238
Tread depth ............................. 239
Changing tyre and wheel size . 240
Wheel covers ........................... 240
Tyre chains .............................. 240
Tyre repair kit .......................... 241
Wheel changing .......................244
Spare wheel ............................ 245
Jump starting ............................. 250
Towing ....................................... 251
Towing the vehicle ...................251
Towing another vehicle ...........252
Appearance care .......................253
Exterior care ............................ 253Interior care............................. 255
Floor mats ............................... 256
Page 220 of 287
218Vehicle careDischarge protection
Battery voltage
When the vehicle battery voltage is
running low, a warning message will
appear in the Driver Information
Centre.
When the vehicle is being driven, the
load reduction function temporarily
deactivates certain functions, such as
the air conditioning, the heated rear
window, heated steering wheel, etc.
The deactivated functions are
reactivated automatically as soon as
conditions permit.
Idle boost
If charging of the vehicle battery is
required due to battery condition, the
power output of the generator must be increased. This will be achieved by
an idle boost which may be audible.
A message appears in the Driver
Information Centre.
Power outlet
The power outlets are deactivated in
the event of low vehicle battery
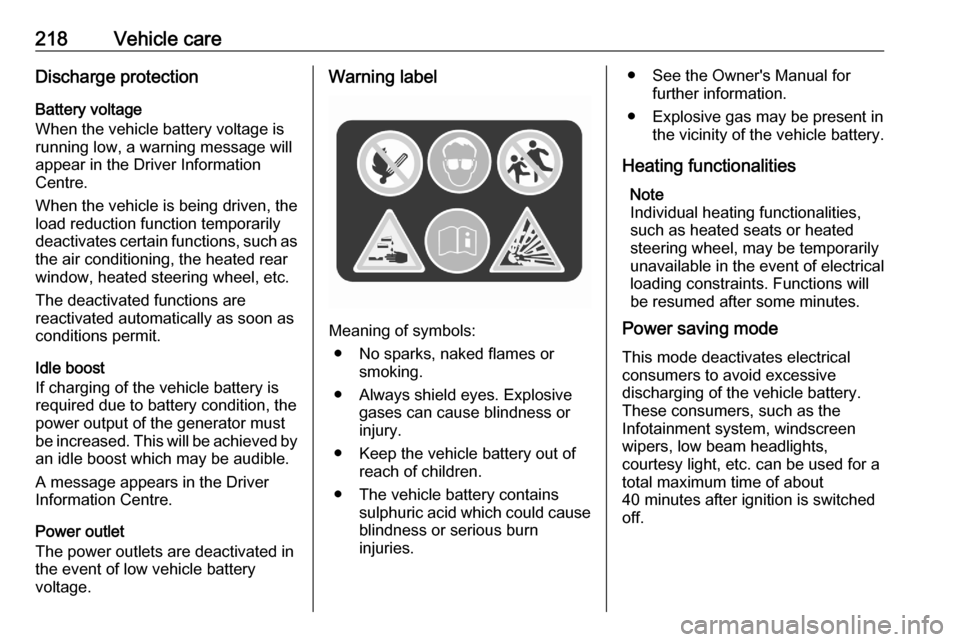
voltage.Warning label
Meaning of symbols:
● No sparks, naked flames or smoking.
● Always shield eyes. Explosive gases can cause blindness or
injury.
● Keep the vehicle battery out of reach of children.
● The vehicle battery contains sulphuric acid which could cause
blindness or serious burn
injuries.
● See the Owner's Manual for further information.
● Explosive gas may be present in the vicinity of the vehicle battery.
Heating functionalities Note
Individual heating functionalities,
such as heated seats or heated
steering wheel, may be temporarily
unavailable in the event of electrical
loading constraints. Functions will
be resumed after some minutes.
Power saving mode
This mode deactivates electrical
consumers to avoid excessive
discharging of the vehicle battery.
These consumers, such as the
Infotainment system, windscreen
wipers, low beam headlights,
courtesy light, etc. can be used for a
total maximum time of about
40 minutes after ignition is switched
off.
Page 222 of 287

220Vehicle careLower the wiper arm carefully.Rear window
Lift the wiper arm. Disengage the
wiper blade as shown in the
illustration and remove.
Attach the wiper blade slightly angled
to the wiper arm and push until it
engages.
Lower the wiper arm carefully.
Bulb replacement
Switch off the ignition and switch off
the relevant switch or close the doors.
Only hold a new bulb at the base. Do not touch the bulb glass with bare
hands.
Use only the same bulb type for
replacement.
Replace headlight bulbs from within
the engine compartment.
Bulb check
After a bulb replacement switch on
the ignition, operate and check the
lights.
Halogen headlights Front turn lights 3 225.
Illustrations show the right headlight
unit.
Low beam bulb sits in outer chamber
( 2 )
High beam bulb sits in inner chamber
( 1 )
Parking light bulb sits in inner
chamber ( 1)
Daytime running light bulb sits in outer chamber ( 2)
Page 225 of 287

Vehicle care223Daytime running light
1. Remove the protective cover.
2.Press the clips on the bulb socket
to disengage and withdraw socket
from the reflector.
3. Remove the bulb from the socket by pulling.
4. Replace and insert the new bulb into the socket.
5. Insert the bulb socket into the housing.
Daytime running light with LEDs The daytime running light unit in the
lower bumper area is designed with
LEDs. In case of defective LEDs,
have them replaced by a workshop.
Xenon headlights
Front turn lights 3 225.
Illustrations show the right headlight
unit.
Low beam bulb sits in outer chamber
( 2 )
High beam bulb sits in inner chamber
( 1 )
Page 226 of 287
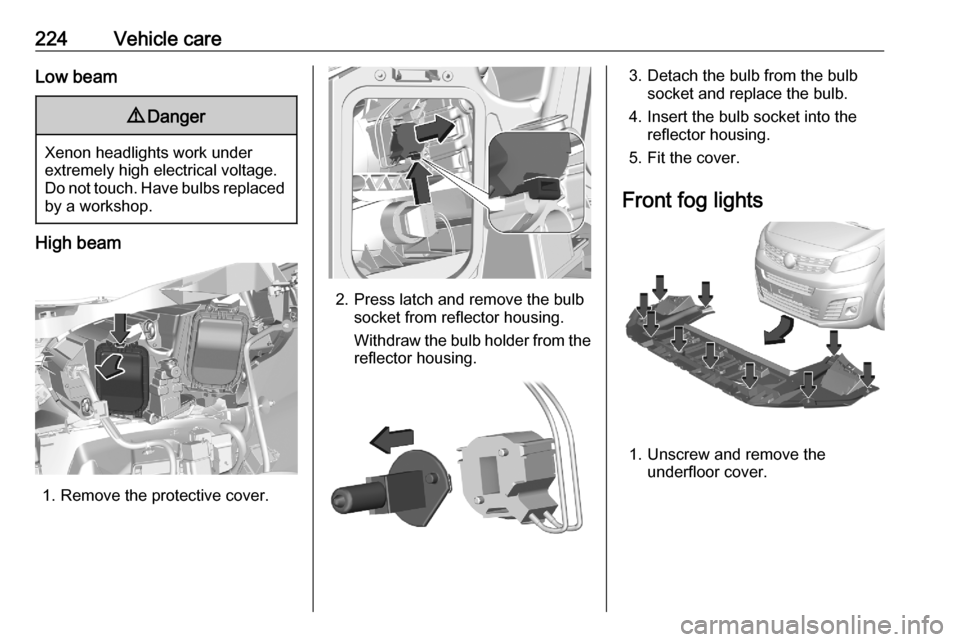
224Vehicle careLow beam9Danger
Xenon headlights work under
extremely high electrical voltage.
Do not touch. Have bulbs replaced by a workshop.
High beam
1. Remove the protective cover.
2. Press latch and remove the bulb socket from reflector housing.
Withdraw the bulb holder from the
reflector housing.
3. Detach the bulb from the bulb socket and replace the bulb.
4. Insert the bulb socket into the reflector housing.
5. Fit the cover.
Front fog lights
1. Unscrew and remove the underfloor cover.