window OPEL VIVARO C 2020.25 Manual user
[x] Cancel search | Manufacturer: OPEL, Model Year: 2020.25, Model line: VIVARO C, Model: OPEL VIVARO C 2020.25Pages: 287, PDF Size: 28.79 MB
Page 215 of 287
Vehicle care213● Open the bonnet, close all doorsand lock the vehicle.
● Disconnect the clamp from the negative terminal of the vehicle
battery. Note that all systems are
not functional, e.g. anti-theft
alarm system.
Putting back into operation
When the vehicle is to be put back into
operation:
● Connect the clamp to the negative terminal of the vehicle
battery. Initialize the power
windows 3 42.
● Check tyre pressure.
● Fill up the washer fluid reservoir.
● Check the engine oil level.
● Check the coolant level.
● Fit the number plates if necessary.End-of-life vehicle recovery
Information on end-of-life vehicle
recovery centres and the recycling of
end-of-life vehicles is available on our website, where legally required. Only
entrust this work to an authorised
recycling centre.Vehicle checks
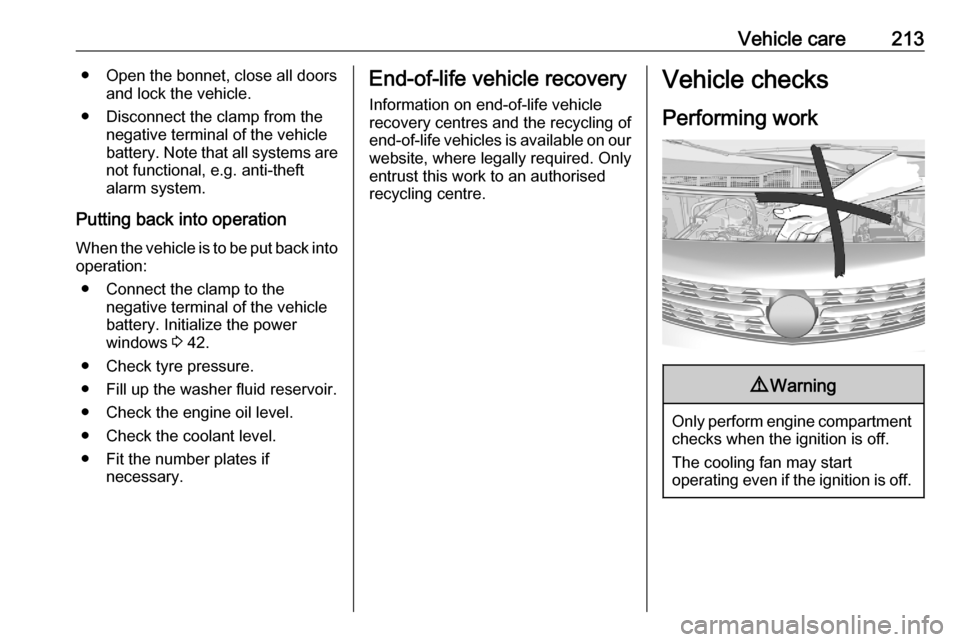
Performing work9 Warning
Only perform engine compartment
checks when the ignition is off.
The cooling fan may start
operating even if the ignition is off.
Page 220 of 287
218Vehicle careDischarge protection
Battery voltage
When the vehicle battery voltage is
running low, a warning message will
appear in the Driver Information
Centre.
When the vehicle is being driven, the
load reduction function temporarily
deactivates certain functions, such as
the air conditioning, the heated rear
window, heated steering wheel, etc.
The deactivated functions are
reactivated automatically as soon as
conditions permit.
Idle boost
If charging of the vehicle battery is
required due to battery condition, the
power output of the generator must be increased. This will be achieved by
an idle boost which may be audible.
A message appears in the Driver
Information Centre.
Power outlet
The power outlets are deactivated in
the event of low vehicle battery
voltage.Warning label
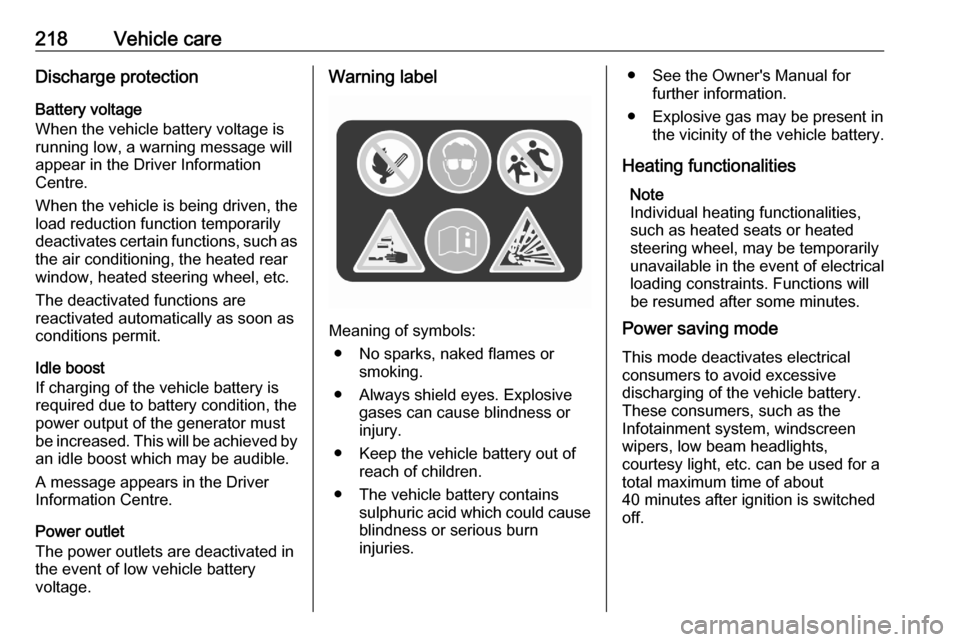
Meaning of symbols:
● No sparks, naked flames or smoking.
● Always shield eyes. Explosive gases can cause blindness or
injury.
● Keep the vehicle battery out of reach of children.
● The vehicle battery contains sulphuric acid which could cause
blindness or serious burn
injuries.
● See the Owner's Manual for further information.
● Explosive gas may be present in the vicinity of the vehicle battery.
Heating functionalities Note
Individual heating functionalities,
such as heated seats or heated
steering wheel, may be temporarily
unavailable in the event of electrical
loading constraints. Functions will
be resumed after some minutes.
Power saving mode
This mode deactivates electrical
consumers to avoid excessive
discharging of the vehicle battery.
These consumers, such as the
Infotainment system, windscreen
wipers, low beam headlights,
courtesy light, etc. can be used for a
total maximum time of about
40 minutes after ignition is switched
off.
Page 222 of 287

220Vehicle careLower the wiper arm carefully.Rear window
Lift the wiper arm. Disengage the
wiper blade as shown in the
illustration and remove.
Attach the wiper blade slightly angled
to the wiper arm and push until it
engages.
Lower the wiper arm carefully.
Bulb replacement
Switch off the ignition and switch off
the relevant switch or close the doors.
Only hold a new bulb at the base. Do not touch the bulb glass with bare
hands.
Use only the same bulb type for
replacement.
Replace headlight bulbs from within
the engine compartment.
Bulb check
After a bulb replacement switch on
the ignition, operate and check the
lights.
Halogen headlights Front turn lights 3 225.
Illustrations show the right headlight
unit.
Low beam bulb sits in outer chamber
( 2 )
High beam bulb sits in inner chamber
( 1 )
Parking light bulb sits in inner
chamber ( 1)
Daytime running light bulb sits in outer chamber ( 2)
Page 235 of 287
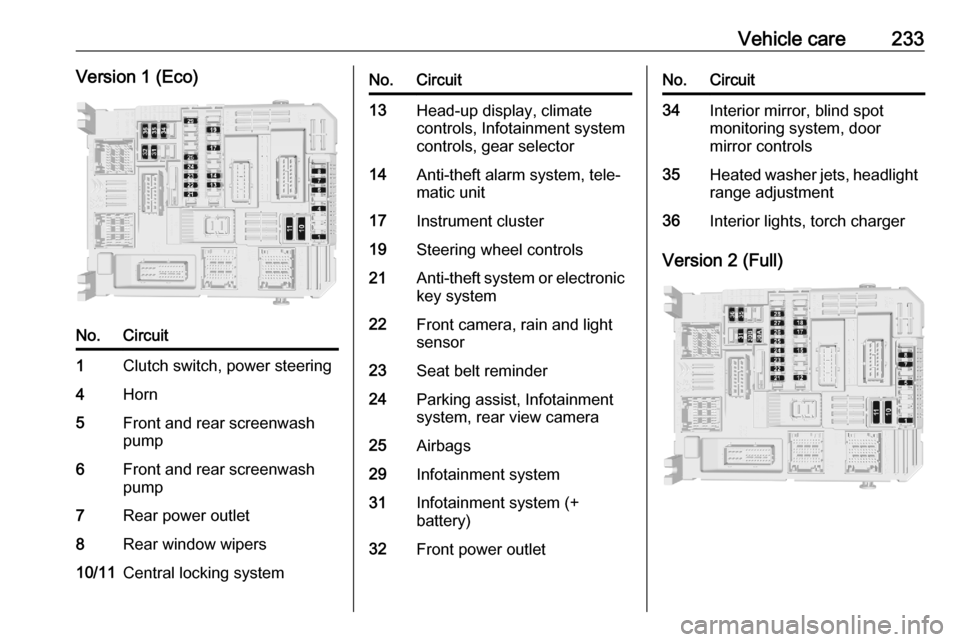
Vehicle care233Version 1 (Eco)No.Circuit1Clutch switch, power steering4Horn5Front and rear screenwash
pump6Front and rear screenwash
pump7Rear power outlet8Rear window wipers10/11Central locking systemNo.Circuit13Head-up display, climate
controls, Infotainment system
controls, gear selector14Anti-theft alarm system, tele‐
matic unit17Instrument cluster19Steering wheel controls21Anti-theft system or electronic key system22Front camera, rain and light
sensor23Seat belt reminder24Parking assist, Infotainment
system, rear view camera25Airbags29Infotainment system31Infotainment system (+
battery)32Front power outletNo.Circuit34Interior mirror, blind spot
monitoring system, door
mirror controls35Heated washer jets, headlight
range adjustment36Interior lights, torch charger
Version 2 (Full)
Page 236 of 287

234Vehicle careNo.Circuit1Anti-theft system or
electronic key system5Parking assist, Infotain‐
ment system, rear view
camera7Rear climate controls,
audio system amplifier8Rear window wipers10/11Central locking system12Anti-theft alarm system17Rear power outlet18Telematic unit21Interior lights, torch
charger22Interior lights, glovebox
light23Blind spot monitoring
system, door mirror
controls24Steering wheel controlsNo.Circuit25Headlight range adjust‐
ment26Seat belt reminder27Front camera, rain and
light sensor28Head-up display, front
climate controls, Info‐
tainment system
controls, gear selector30A or 30BAudio system (+
battery)31Airbag33Front power outlet35Instrument cluster36Infotainment systemVehicle tools
Tools
The tools are located in the box
underneath the left front seat.
Page 253 of 287

Vehicle care2513. Connect the black lead to thenegative terminal of the booster
battery.
4. Connect the other end of the black
lead to a vehicle grounding point
of your vehicle in the engine
compartment.
Route the leads so that they cannot
catch on rotating parts in the engine
compartment.
To start the engine: 1. Start the engine of the vehicle providing the jump.
2. After 5 minutes, start the other engine. Start attempts should be
made for no longer than 15
seconds at an interval of 1 minute.
3. Allow both engines to idle for approx. three minutes with the
leads connected.
4. Switch on electrical consumers e.g. headlights, heated rear
window of the vehicle receiving
the jump start.
5. Reverse above sequence exactly when removing leads.Towing
Towing the vehicle
Press in the middle of the cover plate
and slide to the upper left corner to
unclip it.
The towing eye is stowed with the vehicle tools 3 234.
Screw in the towing eye clockwise as
far as it will go until it stops in a
horizontal position.
Attach a tow rope – or better a tow rod
– to the towing eye.
The towing eye must only be used for
towing and not for recovering the
vehicle.
Switch on ignition to release steering
wheel lock and to permit operation of
brake lights, horn and windscreen
wiper.
Page 254 of 287
252Vehicle careCaution
Deactivate the driver assistance
systems like active emergency
braking 3 188, otherwise the
vehicle may automatically brake during towing.
Switch the selector lever to neutral.
Release the parking brake.
Caution
Never tow a vehicle equipped with All Wheel Drive (AWD) with the
front or rear tyres on the road. If
you tow a vehicle equipped with
AWD while the front or rear tyres
are rolling on the road, the drive
system in the vehicle could be
severely damaged. When towing
vehicles equipped with AWD, all
four tyres must not be in contact
with the road.
Caution
Drive slowly. Do not drive jerkily.
Excessive tractive force can
damage the vehicle.
When the engine is not running,
considerably more force is needed to
brake and steer.
To prevent the entry of exhaust gases from the towing vehicle, switch on the
air recirculation and close the
windows.
Vehicles with automatic transmission: The vehicle must be towed facing
forwards, not faster than 80 km/h nor further than 100 km. In all other cases
and when the transmission is
defective, the front axle must be
raised off the ground.
Seek the assistance of a workshop.
After towing, unscrew the towing eye.
Insert cap with the flange into the
recess and fix cap by pushing.
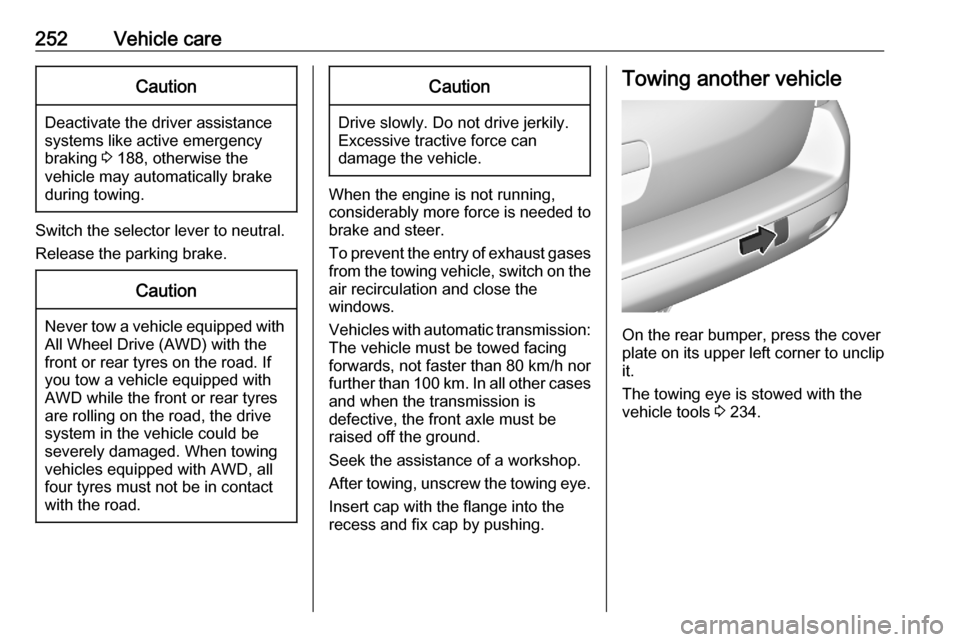
Towing another vehicle
On the rear bumper, press the cover
plate on its upper left corner to unclip it.
The towing eye is stowed with the
vehicle tools 3 234.
Page 256 of 287

254Vehicle careIf using a vehicle wash, comply with
the vehicle wash manufacturer's
instructions. The windscreen wiper and rear window wiper must be
switched off. Remove antenna and
external accessories such as roof
racks etc.
If you wash your vehicle by hand,
make sure that the insides of the
wheel housings are also thoroughly
rinsed out.
Wax painted parts of the vehicle
regularly.
Clean edges and folds on opened
doors and the bonnet as well as the
areas they cover.
Clean bright metal mouldings with a
cleaning solution approved for
aluminium to avoid damages.Caution
Always use a cleaning agent with
a pH value of 4 to 9.
Do not use cleaning agents on hot surfaces.
Do not clean the engine compartmentwith a steam-jet or high-pressure jet
cleaner.
Thoroughly rinse and leather-off the vehicle. Rinse leather frequently. Use
separate leathers for painted and
glass surfaces: remnants of wax on
the windows will impair vision.
Have the door hinges of all doors
greased by a workshop.
Do not use hard objects to remove
spots of tar. Use tar removal spray on
painted surfaces.
Exterior lights
Headlight and other light covers are
made of plastic. Do not use any
abrasive or caustic agents, do not use an ice scraper, and do not clean them
dry.
Polishing and waxing
Wax the vehicle regularly at the latest when water no longer beads.
Otherwise, the paintwork will dry out.
Polishing is necessary only if the paint
has become dull or if solid deposits
have become attached to it.Paintwork polish with silicone forms a
protective film, making waxing
unnecessary.
Plastic body parts must not be treated
with wax or polishing agents.
Windows and wiper blades
Switch off wipers before handling in their areas.
Use a soft lint-free cloth or chamois
leather together with window cleaner
and insect remover.
When cleaning the rear window from
inside, always wipe in parallel to the
heating element to prevent damage.
For mechanical removal of ice, use a
sharp-edged ice scraper. Press the
scraper firmly against the glass so
that no dirt can get under it and
scratch the glass.
Clean smearing wiper blades with a
soft cloth and window cleaner. Also
make sure to remove any residues
such as wax, insect residues and
similar from the window.
Ice residues, pollution and continuous wiping on dry windows will damage or
even destroy the wiper blades.
Page 257 of 287
Vehicle care255Glass panelUse a soft lint-free cloth or chamoisleather together with window cleaner
to clean the glass panel.
Wheels and tyres Do not use high-pressure jet
cleaners.
Clean rims with a pH-neutral wheel
cleaner.
Rims are painted and can be treated
with the same agents as the body.
Paintwork damage Rectify minor paintwork damage witha touch-up pen before rust forms.
Have more extensive damage or rust areas repaired by a workshop.
Underbody
Some areas of the vehicle underbody
have a PVC undercoating while other critical areas have a durable
protective wax coating.
After the underbody is washed, check
the underbody and have it waxed if
necessary.Bitumen / rubber materials could
damage the PVC coating. Have
underbody work carried out by a
workshop.
Before and after winter, wash the
underbody and have the protective
wax coating checked.
Liquid gas system9 Danger
Liquid gas is heavier than air and
can collect in sink points.
Take care when performing work
at the underbody in a pit.
For painting work and when using a
drying booth at a temperature above
60 °C, the liquid gas tank must be
removed.
Do not make any modifications to the
liquid gas system.
Towing equipment
Do not clean the coupling ball bar with a steam-jet or high-pressure jet
cleaner.
Interior care
Interior and upholstery
Only clean the vehicle interior,
including the instrument panel fascia
and panelling, with a dry cloth or
interior cleaner.
Clean the leather upholstery with
clear water and a soft cloth. In case of heavy soiling, use leather care.
The instrument cluster and the
displays should only be cleaned using
a soft damp cloth. If necessary use a
weak soap solution.
Clean fabric upholstery with a
vacuum cleaner and brush. Remove
stains with an upholstery cleaner.
Clothing fabrics may not be
colourfast. This could cause visible
discolourations, especially on light-
coloured upholstery. Removable
stains and discolourations should be
cleaned as soon as possible.
Clean seat belts with lukewarm water or interior cleaner.
Page 284 of 287

282Headlight flash ........................... 132
Headlight range adjustment ......132
Headlights................................... 130 Headlights when driving abroad 133
Head restraint adjustment .............8
Head restraints ............................ 47
Head-up display.......................... 121 Heated mirrors ............................. 40
Heated rear window ..................... 44
Heated windscreen .......................45
Heating ........................................ 52
Heating and ventilation system . 139
High beam ......................... 115, 131
High beam assist ................115, 131
Hill start assist ........................... 171
Hinged doors ................................ 33
Horn ....................................... 14, 95
I
Identification plate .....................264
Ignition switch positions .............153
Immobiliser .................................. 39
Indicators .................................... 105
Info Display ................................. 120
Instrument cluster ......................101
Instrument panel fuse box .........232
Instrument panel illumination control .................................... 135
Instrument panel overview ........... 10
Interior care ............................... 255Interior lighting............................ 135
Interior lights ...................... 135, 230
Interior mirror Rear view camera display .......199
Interior mirrors .............................. 41
Introduction .................................... 3
J Jump starting ............................. 250
K Keys ............................................. 22
Keys, locks ................................... 22
L
Lane departure warning .....113, 200
Lashing eyes ............................... 82
LED headlights ........................... 115
Lighting features .........................137
Light switch ................................ 130
load compartment .......................135
Load compartment ................33, 81
Load compartment cover .............81
load compartment lighting ..........135
Loading ......................................... 51
Loading information .....................91
Low beam ................................... 115
Low fuel ..................................... 114M
Malfunction indicator light ..........111
Manual anti-dazzle ......................41
Manual mode ............................. 167
Manual seat adjustment ...............48
Manual transmission .................. 168
Massage ....................................... 53
mechanical child lock.................... 43 Mirror adjustment ........................... 9
Misted light covers .....................135
Multimedia .................................. 124
Multimedia Navi .......................... 124
N
New vehicle running-in ..............153
Number plate light .....................230
O Object detection systems ...........192
Odometer ................................... 106
Oil, engine .......................... 262, 266
Opel Connect.............................. 128
Outside temperature ....................97
Overrun cut-off ........................... 157
P Panoramic roof ............................. 46
Panoramic view system ..............196
Parking ................................ 21, 160
Parking assist ............................ 192
Parking brake ..................... 112, 170