trailer OPEL VIVARO C 2020.25 Owner's Manual
[x] Cancel search | Manufacturer: OPEL, Model Year: 2020.25, Model line: VIVARO C, Model: OPEL VIVARO C 2020.25Pages: 287, PDF Size: 28.79 MB
Page 112 of 287

110Instruments and controlsRetrieving service informationTo retrieve the status of the service
information at any time press
F , G or CHECK .
The service information is displayed
for a few seconds.
Instrument cluster 3 101.
Service information 3 259.
Control indicators The control indicators described are
not present in all vehicles. The
description applies to all instrument
versions. Depending on the
equipment, the position of the control indicators may vary. When the
ignition is switched on, most control
indicators will illuminate briefly as a
functionality test.
The control indicator colours mean:red:danger, important reminderyellow:warning, information, faultgreen:confirmation of activationblue:confirmation of activationwhite:confirmation of activationSee all control indicators on different
instrument clusters 3 101.
Turn lights
1 flash green.
Flash Turn lights or the hazard warning
flashers are activated.
Rapid flashing: failure of a turn light or associated fuse, failure of turn light on
trailer.
Bulb replacement 3 220.
Turn lights 3 134.
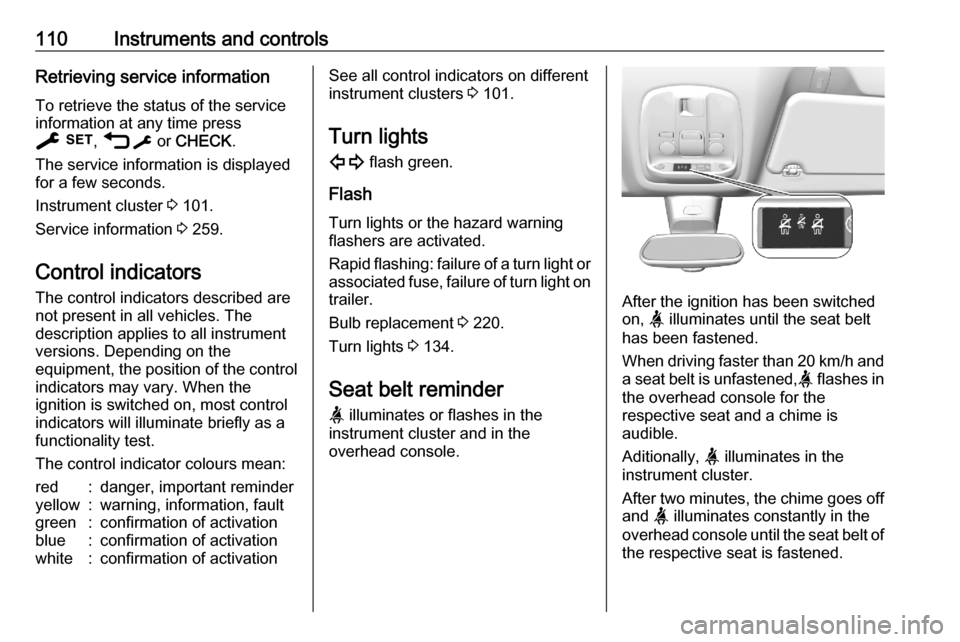
Seat belt reminder
a illuminates or flashes in the
instrument cluster and in the
overhead console.
After the ignition has been switched
on, a illuminates until the seat belt
has been fastened.
When driving faster than 20 km/h and
a seat belt is unfastened, a flashes in
the overhead console for the
respective seat and a chime is
audible.
Aditionally, a illuminates in the
instrument cluster.
After two minutes, the chime goes off
and a illuminates constantly in the
overhead console until the seat belt of the respective seat is fastened.
Page 154 of 287

152Driving and operatingDriving and
operatingDriving hints ............................... 153
Control of the vehicle ...............153
Steering ................................... 153
Starting and operating ...............153
New vehicle running-in ............153
Ignition switch positions ...........153
Power button ........................... 154
Starting the engine ..................155
Overrun cut-off ........................ 157
Stop-start system ....................157
Parking .................................... 160
Engine exhaust .......................... 161
Exhaust filter ............................ 161
Catalytic converter ...................161
AdBlue ..................................... 162
Automatic transmission ..............165
Transmission display ...............166
Gear selection ......................... 166
Manual mode ........................... 167
Electronic driving programmes 168
Fault ........................................ 168
Manual transmission ..................168Brakes........................................ 169
Antilock brake system .............169
Parking brake .......................... 170
Brake assist ............................. 171
Hill start assist ......................... 171
Ride control systems .................171
Electronic Stability Control and Traction Control system .........171
Selective ride control ...............172
Driver assistance systems .........174
Cruise control .......................... 174
Speed limiter ........................... 177
Adaptive cruise control ............180
Forward collision alert .............187
Active emergency braking .......188
Front pedestrian protection .....191
Parking assist .......................... 192
Side blind spot alert .................194
Panoramic view system ...........196
Rear view camera ...................199
Lane departure warning ..........200
Driver alert ............................... 201
Fuel ............................................ 203
Fuel for diesel engines ............203
Refuelling ................................ 204
Trailer hitch ................................ 205
General information .................205
Driving characteristics and towing tips .............................. 205Trailer towing........................... 206
Towing equipment ...................207
Trailer stability assist ...............210
Page 187 of 287

Driving and operating185Switching off the system
Turn to 0 to switch off the system. The
symbol 5 and a message are
displayed in the Driver Information
Centre.
Switching off the ignition deletes the
stored set speed.
Driver's attention ● Use the adaptive cruise control carefully on bends or mountain
roads, as it can lose the vehicle
ahead and needs time to detect it again.
● Do not use the system on slippery roads as it can create
rapid changes in tyre traction
(wheel spinning), so that the
control of the vehicle can be lost.
● Do not use the system when the spare wheel is in use.
System limits9 Warning
The system's automatic brake
force does not permit hard braking and the braking level may not be
sufficient to avoid a collision.
● The control range is limited to a maximum deviation of 30 km/h
between the set speed and the
speed of the vehicle ahead.
● After a sudden lane change, the system needs a certain time to
detect the next preceding
vehicle. So if a new vehicle is
detected, the system may
accelerate instead of braking.
● The adaptive cruise control does ignore the oncoming traffic.
● The adaptive cruise control does not consider pedestrians and
animals for braking and driving
off.
● The adaptive cruise control considers stopped vehicles onlyat low speed.
● Do not use the adaptive cruise control when towing a trailer.
● Do not use the adaptive cruise control on roads with an incline ofmore than 10%.
Bends
The adaptive cruise control calculates
a predicted path based on the
centrifugal force. This predicted path
considers the current bend
characteristic, but cannot consider a
future bend change. The system may lose the current vehicle ahead or
consider a vehicle which is not in the
Page 192 of 287

190Driving and operatingEmergency automatic braking may
slow the vehicle to a complete stop to
try to avoid a potential crash. If the
vehicle comes to a complete stop,
automatic braking is maintained for
up to 2 seconds.
● Automatic transmission: If the vehicle comes to a completestop, keep the brake pedal
depressed to prevent the vehicle
from starting off again.
● Manual transmission: If the vehicle comes to a complete
stop, the engine may stall.
Operation of the function may be felt
by a slight vibration in the brake
pedal.9 Warning
Emergency automatic braking is
an emergency crash preparation
feature and is not designed to
avoid crashes. Do not rely on the
system to brake the vehicle.
Emergency automatic braking will
not brake outside of its operating
speed range and only responds to
detected vehicles and
pedestrians.
System limitations
In some cases, the active emergencybraking system may provide an
automatic braking in situations that
seem to be unnecessary, for instance
in parking garages, due to traffic signs
in a curve or due to vehicles in
another lane. This is normal
operation, the vehicle does not need
service. Firmly apply the accelerator
pedal to override the automatic
braking if the situation and the
surroundings permit.
In the following cases, active
emergency braking performance is
limited:
● Driving on winding or hilly roads.
● Detecting all vehicles, especially vehicles with a trailer, tractors,
muddy vehicles, etc.
● Detecting a vehicle when weather limits visibility, such as infog, rain, or snow.
● Driving during nighttime.
● The windscreen is damaged or affected by foreign items, e.g.
stickers.
Complete attention is always required
while driving, and the driver should be ready to take action and apply the
brakes and / or steer the vehicle to
avoid crashes.
We recommend to deactivate the
system in the vehicle personalisation
in the following cases:
● when towing a trailer or caravan
● when carrying long objects on roof bars or a roof rack
● when the vehicle is being towed with the engine running
● when tyre chains are fitted
● when a spare wheel is fitted that is smaller than the other wheels
● before using an automatic car wash with the engine running
● before placing the vehicle on a rolling road in a workshop
● if the windscreen has been damaged close to the camera
Page 194 of 287

192Driving and operating● the sensor in the windscreen isblocked by snow, ice, slush, mud,dirt etc.
● the windscreen is damaged or affected by foreign objects, e.g.
stickers
Parking assist
General information
When attaching a trailer or bicycle
carrier to the trailer hitch, the parking
assist is deactivated.9 Warning
The driver bears full responsibility
for the parking manoeuvre.
Always check the surrounding
area when driving backwards or
forwards while using parking
assist system.
Rear parking assist
The system warns the driver with
acoustic signals against potentially
hazardous obstacles behind the
vehicle in a distance range up to
50 cm while reverse gear is engaged.
The system operates with ultrasonic
parking assist sensors in the rear
bumper.
Activation
Rear parking assist is activated when
reverse gear is engaged and ignition
is switched on. This is confirmed by a chime.Info Display without touchscreen
The system is ready to operate when
the LED in the parking assist button
é is not illuminated.Info Display with touchscreen
Activate the parking assist in the
vehicle personalisation 3 124.
Indication
Depending on which side of the
vehicle is closer to an obstacle,
acoustic warning signals in the
vehicle sound on the respective side.
The interval between the sounds
becomes shorter as the vehicle gets
closer to that obstacle. When the
distance is less than approx. 30 cm,
the sound is continuous.
Page 198 of 287

196Driving and operatingOperation conditions
The following conditions must be
fulfilled for proper operation:
● all vehicles are moving in the same direction and in adjacent
lanes
● the speed of your vehicle is between 12 and 140 km/h
● passing a vehicle with a speed difference of less than 10 km/h
● another vehicle is passing with a speed difference of less than
25 km/h
● the traffic flow is normal
● driving on a straight or slightly curved road
● the vehicle is not pulling a trailer
● the sensors are not covered by mud, ice or snow
● the warning zones in the exterior mirrors or the detection zones on
front and rear bumper ar not
coveredNo alert will be given in the following
situations:
● in the presence of non-moving objects, e.g. parked vehicles,
barriers, street lamps, road signs
● with vehicles moving in the opposite direction
● driving on a winding road or a sharp corner
● when passing or being passed by
a very long vehicle, e.g. lorry,
coach, which is at the same time
detected at the rear in the blind
spot angle and present in the
driver's forward field of vision
● in very heavy traffic, vehicles detected in front and behind are
confused with a lorry or a
stationary object
● when passing too quickly
DeactivationInfo Display without touchscreen
Press B.Info Display with touchscreen
The system is deactivated in the
vehicle personalisation 3 124.T extinguishes in the instrument
cluster. Additionally, an acoustic
signal sounds.
The state of the system is stored
when switching off the ignition.
The system is automatically
deactivated when connecting a trailer
or bike carrier.
Due to adverse weather conditions
such as heavy rain, false detections
may occur.
Fault
In the event of a fault, T flashes for a
few moments in the instrument
cluster, accompanied by R and a
display message. Have the cause of
the fault remedied by a workshop.
Panoramic view system
This system allows views of the
vehicle's surroundings to be
displayed as a nearly 180° picture in
the Info display, like a bird's eye view.
Page 200 of 287

198Driving and operatingRear zoom view / Zoom view
The camera records the vehicle's
surroundings during the manoeuvre in order to reconstruct a view fromabove the rear of the vehicle in its
near surroundings, allowing the
vehicle to be manoeuvred around
obstacles nearby. This view is
available with AUTO Mode or in the
view selection menu.
Rear side view / 180° view
The 180° view facilitates reversing
out of a parking bay, making it
possible to see the approach of
vehicles, pedestrians and cyclists.
This view is not recommended for
carrying out a complete manoeuvre.
It is made up of three areas: left 1,
centre 2 and right 3. This view is
available from the view selection menu only.
Deactivation
Panoramic view system is
deactivated when:
● driving faster than 10 km/h
● seven seconds after disengaging
reverse gear
● by pressing the icon 3 in the
left upper corner of the touch
screen and then &
● opening the tailgate ● connecting a trailer or a bike carrier
General information9 Warning
The panoramic view system does
not replace driver vision. It will not display children, pedestrians,
cyclists, crossing traffic, animals,
or any other objects outside of the
Page 201 of 287

Driving and operating199camera view area, e. g. below the
bumper, or underneath the
vehicle.
Do not drive or park the vehicle
using only the panoramic view
system.
Always check the surrounding of
the vehicle before driving.
Displayed images may be further
or closer than they appear. The
area displayed is limited and
objects that are close to either
edge of the bumper or under the
bumper are not displayed on the
screen.
System limitations
Caution
For optimal operation of the
system, it is important to keep the
lense of the camera in the tailgate between the number plate lightsalways clean. Rinse the lense with water and wipe with a soft cloth.
Do not clean the lense with a
steam-jet or high-pressure jet
cleaner.
The panoramic view system may not
operate properly when:
● The surrounding is dark.
● The sun or the beam of headlights is shining directly into
the camera lenses.
● During nighttime driving.
● Weather limits visibility, such as fog, rain, or snow.
● The camera lenses are blocked by snow, ice, slush, mud, dirt.
● The vehicle is towing a trailer.
● The vehicle had an accident.
● There are extreme temperature changes.
Rear view camera Depending on version, camera is
mounted above the license plate in
the tailgate / left rear door.
9 Warning
The rear view camera does not
replace driver vision. Note that
objects that are outside the
camera's field of view and the
parking assist sensors, e.g. below
the bumper or underneath the
vehicle, are not displayed.
Do not reverse or park the vehicle
using only the rear view camera.
Always check the surrounding of
the vehicle before driving.
The view of the camera is displayed
in the Info Display 3 120 or in the
interior mirror 3 41.
The area displayed by the camera is
limited. The distance of the image that
appears on the display differs from
the actual distance.
Switching on Rear view camera is automatically
activated when reverse gear is
engaged.
Page 202 of 287

200Driving and operatingSwitching off
The camera is switched off when a
forward gear is engaged.
Guidelines
The area behind the vehicle is
displayed in the screen. The vertical
lines represent the width of the
vehicle with mirrors unfolded.
The first horizontal line represents a
distance of about 30 cm beyond the
edge of vehicle's rear bumper. The
upper horizontal lines represent
distances of about 1 and 2 m beyond
the edge of the vehicle's rear bumper.The Guidelines can be deactivated in
the Vehicle personalisation 3 124.
System limitations The rear view camera may not
operate properly when:
● the surrounding is dark
● the beam of headlights is shining
directly into the camera lenses
● weather limits visibility such as fog, rain or snow
● the camera lenses are blocked by snow, ice, slush, mud, dirt.Clean the lense, rinse with water,
and wipe with a soft cloth
● the tailgate will be opened
● the vehicle is towing an electrically connected trailer,bicycle carrier etc.
● the vehicle had a rear end accident
● there are extreme temperature changesLane departure warning
The lane departure warning system
observes the lane markings between
which the vehicle is driving via a front camera. The system detects lane
changes and warns the driver in the
event of an unintended lane change
via visual and acoustic signals.
Criteria for the detection of an
unintended lane change are:
● no operation of turn lights
● no brake pedal operation
● no active acceleration
If the driver is active, no warning will
be issued.
Page 207 of 287

Driving and operating205version, release the fuel filler flap by
pushing the flap or pulling at the right bottom corner.
Depending on the version, place the
key in the lock and unlock the cap.
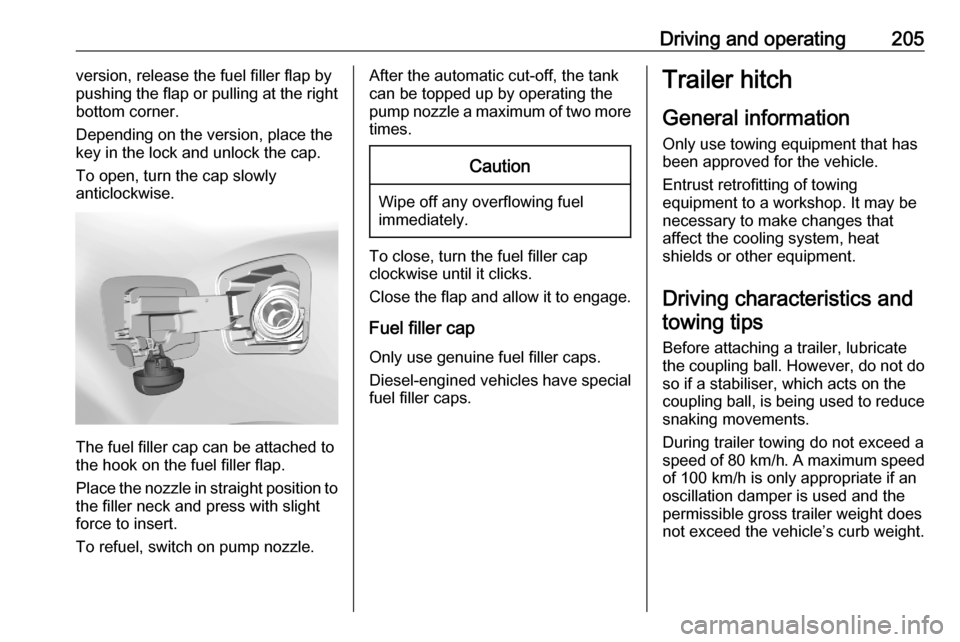
To open, turn the cap slowly
anticlockwise.
The fuel filler cap can be attached to
the hook on the fuel filler flap.
Place the nozzle in straight position to the filler neck and press with slight
force to insert.
To refuel, switch on pump nozzle.
After the automatic cut-off, the tank can be topped up by operating the
pump nozzle a maximum of two more
times.Caution
Wipe off any overflowing fuel
immediately.
To close, turn the fuel filler cap
clockwise until it clicks.
Close the flap and allow it to engage.
Fuel filler cap
Only use genuine fuel filler caps.
Diesel-engined vehicles have special fuel filler caps.
Trailer hitch
General information
Only use towing equipment that has
been approved for the vehicle.
Entrust retrofitting of towing
equipment to a workshop. It may be
necessary to make changes that
affect the cooling system, heat
shields or other equipment.
Driving characteristics and towing tips
Before attaching a trailer, lubricate
the coupling ball. However, do not do so if a stabiliser, which acts on thecoupling ball, is being used to reduce
snaking movements.
During trailer towing do not exceed a
speed of 80 km/h. A maximum speed
of 100 km/h is only appropriate if an
oscillation damper is used and the
permissible gross trailer weight does
not exceed the vehicle’s curb weight.