seat adjustment OPEL ZAFIRA 2009 Owners Manual
[x] Cancel search | Manufacturer: OPEL, Model Year: 2009, Model line: ZAFIRA, Model: OPEL ZAFIRA 2009Pages: 228, PDF Size: 7.3 MB
Page 7 of 228

In brief 7
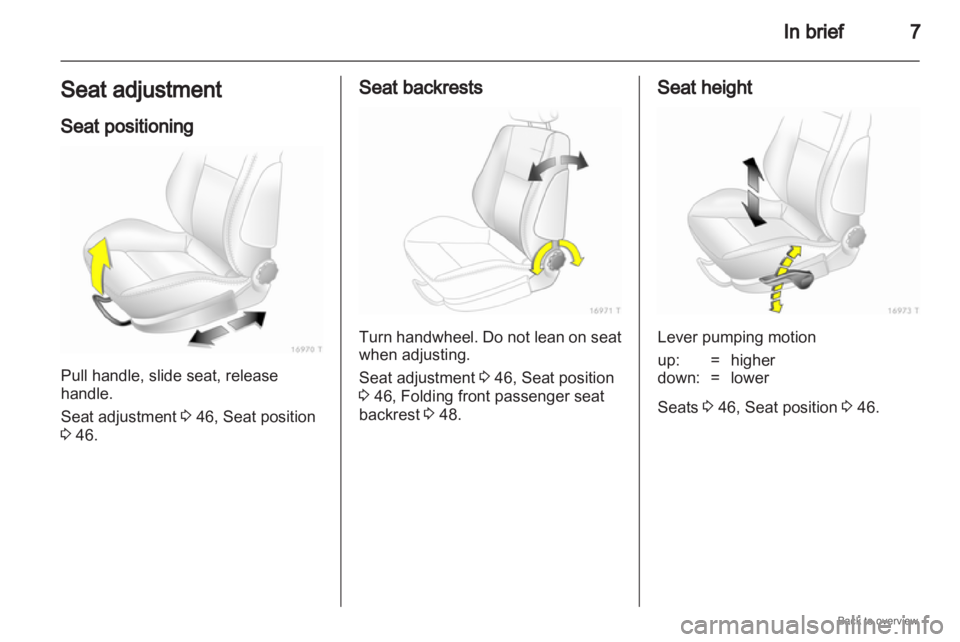
Seat adjustment
Seat positioning Pull handle, slide seat, release
handle.
Seat adjustment 3 46, Seat position
3 46. Seat backrests
Turn handwheel. Do not lean on seat
when adjusting.
Seat adjustment 3 46, Seat position
3 46, Folding front passenger seat
backrest 3 48. Seat height
Lever pumping motion
up: = higher
down: = lower
Seats 3 46, Seat position 3 46.
Page 8 of 228

8
In brief
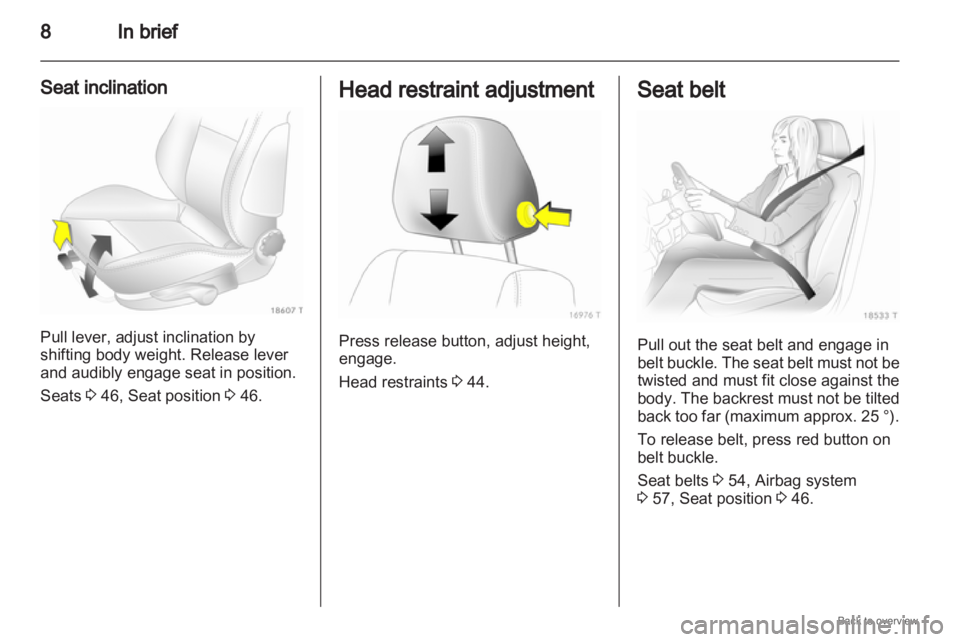
Seat inclination Pull lever, adjust inclination by
shifting body weight. Release lever
and audibly engage seat in position.
Seats 3 46, Seat position 3 46. Head restraint adjustment
Press release button, adjust height,
engage.
Head restraints
3 44. Seat belt
Pull out the seat belt and engage in
belt
buckle. The seat belt must not be
twisted and must fit close against the
body. The backrest must not be tilted
back too far (maximum approx. 25 °).
To release belt, press red button on
belt buckle.
Seat belts 3 54, Airbag system
3 57, Seat position 3 46.
Page 11 of 228

In brief
11
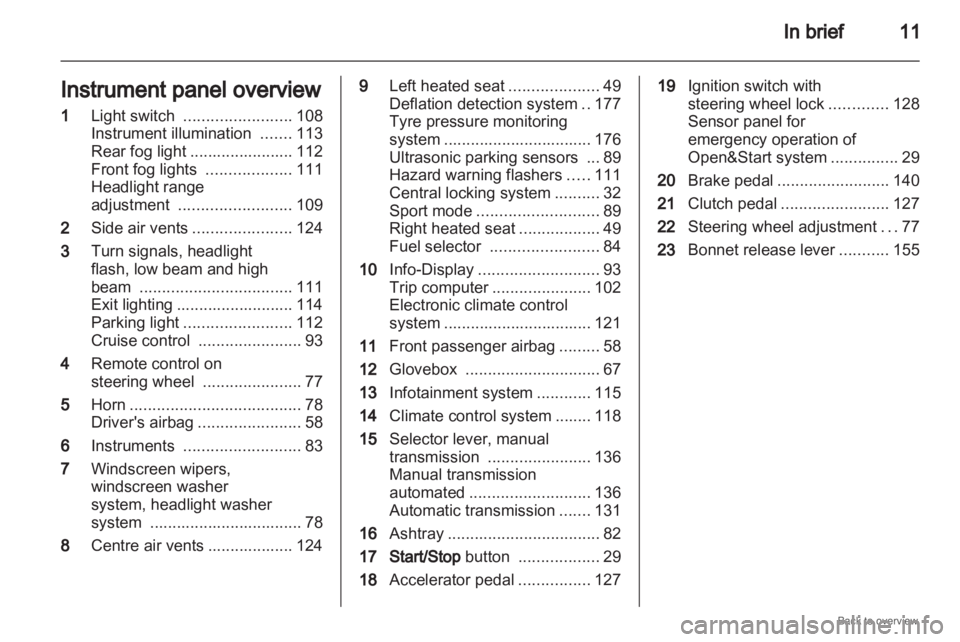
Instrument panel overview
1 Light switch ........................ 108
Instrument illumination .......113
Rear fog light
....................... 112
Front fog lights ...................111
Headlight range
adjustment ......................... 109
2 Side air vents ...................... 124
3 Turn signals, headlight
flash, low beam and high
beam .................................. 111
Exit lighting .......................... 114
Parking light ........................ 112
Cruise control ....................... 93
4 Remote control on
steering wheel ......................77
5 Horn ...................................... 78
Driver's airbag ....................... 58
6 Instruments .......................... 83
7 Windscreen wipers,
windscreen washer
system, headlight washer
system .................................. 78
8 Centre air vents ................... 124 9
Left heated seat ....................49
Deflation detection system ..177
Tyre pressure monitoring
system
................................. 176
Ultrasonic parking sensors ... 89
Hazard warning flashers .....111
Central locking system ..........32
Sport mode ........................... 89
Right heated seat ..................49
Fuel selector ........................ 84
10 Info-Display ........................... 93
Trip computer ...................... 102
Electronic climate control
system ................................. 121
11 Front passenger airbag .........58
12 Glovebox .............................. 67
13 Infotainment system ............115
14 Climate control system ........ 118
15 Selector lever, manual
transmission ....................... 136
Manual transmission
automated ........................... 136
Automatic transmission .......131
16 Ashtray .................................. 82
17 Start/Stop button ..................29
18 Accelerator pedal ................127 19
Ignition switch with
steering wheel lock .............128
Sensor panel for
emergency operation of
Open&Start system ...............29
20 Brake pedal ......................... 140
21 Clutch pedal ........................ 127
22 Steering wheel adjustment ...77
23 Bonnet release lever ...........155
Page 44 of 228

44
Seats, restraints
Seats, restraints
Head restraints ............................ 44
Front seats ................................... 46
Rear seats ................................... 49
Seat belts ..................................... 54
Airbag system .............................. 57
Child restraints ............................. 62 Head restraints
Position
9
Warning Only drive with the head restraint
set to the proper position.
The middle of the head restraint
should be at eye level. If this is not
possible for extremely tall persons,
set to highest position, and set to
lowest position for small persons. Adjustment
Head restraints with release button
Press the button, adjust height and
engage.
Page 46 of 228

46
Seats, restraints
Front seats
Seat position 9
Warning Only drive with the seat correctly
adjusted.
■ Sit with your buttocks as far back
against the backrest as possible.
Adjust the distance between the
seat and the pedals so that your
legs are slightly angled when tromping the pedals. Slide the
passenger seat as far back as
possible.
■
Sit with your shoulders as far back against the backrest as possible.
Set the backrest rake so that you
can easily reach the steering wheel
with your arms slightly bent.
Maintain contact between your
shoulders and the backrest when
turning the steering wheel. Do not
angle the backrest too far back. We
recommend a maximum rake of
approx. 25 °.
■ Adjust the steering wheel 3 77.
■ Set seat height high enough to have a clear field of vision on all
sides and of all display instruments.
There should be at least one hand
of clearance between your head
and the headlining. Your thighs
should rest lightly on the seat
without pressing into it.
■ Adjust the head restraint 3 44.
■ Adjust the height of the seat belt 3 55. ■ Adjust the thigh support so that
there is a space about two fingers
wide between the edge of the seat
and the hollow of the knee.
■ Adjust
the lumbar support so that it
supports the natural shape of the
spine.
Seat adjustment 9
Warning Never adjust seats while driving as
they could move uncontrollably.
Seat positioning
Page 55 of 228

Seats, restraints
55
Triggered belt tensioners must be
replaced by a workshop. Belt
tensioners can only be triggered
once. Note
Do not affix or install accessories or
other objects that may interfere with
the operation of the belt tensioners.
Do not make any modifications to
belt tensioner components as this
will invalidate the vehicle type
approval.
Three-point seat belt
Fitting Withdraw belt from reel, guide it
untwisted across the body and
engage the latch plate in the buckle.
Tension the lap belt regularly whilst
driving by tugging the shoulder belt.
Loose or bulky clothing prevents the
belt from fitting snugly. Do not place
objects such as handbags or mobile
phones between the belt and your
body.
9
Warning The belt must not rest against hard
or fragile objects in the pockets of
your clothing. Height adjustment
1. Pull belt out slightly.
2.
Press button.
3. Adjust height and engage.
Adjust the height so that the belt lies
across the shoulder. It must not lie
across the throat or upper arm.
Do not adjust while driving.
Page 63 of 228

Seats, restraints
63
Child restraint installation locations
Permissible options for fitting a child safety seat
Weight and age class 1) On front passenger
seat On outboard
seats in the
second row On centre seat
in the second
row On the seats
in the third
row
Group 0: up to 10 kg or approx. 10 months
Group 0+: up to 13 kg or approx. 2 years
B
1
, + U, + U X
Group I: 9 to 18 kg or approx. 8 months to 4 years
B
2
, + U, +, ++ U UF
Group II: 15 to 25 kg or approx. 3 to 7 years
Group III: 22 to 36 kg or approx. 6 to 12 years
X U U UF
B
1
= Limited, only with seat occupancy recognition and Opel child restraint system with transponders.
If the child restraint system is being secured using a three-point seat belt, move seat height adjustment to uppermost
position. Move front passenger seat as far back as possible and move front passenger seat belt anchorage point to
lowest position.
B 2
= Limited, only with seat occupancy recognition and Opel child restraint system with transponders.
If
the child restraint system is being secured using a three-point seat belt, move seat height adjustment to uppermost
position. Move front passenger seat as far back as possible so that vehicle safety belt runs from anchorage point
towards the front.
U = Universal suitability in conjunction with three-point seat belt.
UF = Can be used universally for child restraint systems facing the front in combination with a three-point seat belt.
+ = Vehicle seat available with ISOFIX attachments. When attaching using ISOFIX, only the ISOFIX child restraint systems permitted for the vehicle may be used.
1) We recommend the use of each system until the child reaches the upper weight limit.
Page 109 of 228

Lighting
109
High beam To switch from dipped to high beam,
push lever.
To
switch to dipped beam, push lever
again or pull.
Headlight flash
To activate the headlight flash, pull
lever. Headlight range
adjustment
Manual headlight range
adjustment
To adapt headlight range to the
vehicle load to prevent dazzling:
Press knob to disengage and turn to
required position.
Vehicles without automatic level
control system
0 =
Front seats occupied
1 = All seats occupied 2 = All seats occupied and luggage
compartment load
3 = Driver's seat occupied and luggage compartment load
Vehicles with automatic level control
system
0 = Front seats occupied
1 = All seats occupied
1 = All seats occupied and luggage compartment load
2 = Driver's seat occupied and luggage compartment load
Automatic headlight range
adjustment
Headlight range is automatically
adjusted based on vehicle load.
Headlights when driving
abroad
The assymetrical headlight beam
extends visibility at the edge of the
road at the passenger side.
However, when driving in countries
where traffic drives on the opposite
side
of the road, adjust the headlights
to prevent dazzling.
Page 227 of 228

227
Rear seat audio system .......24, 116
Rear window wiper/washer .......... 79
Recommended fluids and lubricants ................................ 204
Refuelling ................................... 147
Reversing lights .........................112
Roof panelling .............................. 68
Roof rack ..................................... 74
Run-flat tyres ............................. 174
S
Safety net .................................... 72
Seat adjustment ....................... 7, 46
Seat belt ........................................ 8
Seat belt reminder .......................87
Seat belts ..................................... 54
Seat folding .................................. 48
Seat occupancy recognition ..61, 87
Seat position ................................ 46
Seats in second row ....................20
Seats in third row ......................... 21
Second row seats ........................49
Selector lever ..................... 132, 137
Service ............................... 126, 192
Service display ............................ 85
Service information ....................192
Service schedules ......................194
Service vehicle soon .................... 88
Side airbag system ......................59
Side turn signal lights ................165 Spare wheel ............................... 183
Speedometer
............................... 83
Sport mode .................... 24, 89, 143
Starting off ................................... 17
Starting the engine ............128, 137
Steering wheel adjustment ......9, 77
Steering wheel controls ...............77
Stop watch ................................. 106
Sunglasses storage .....................68
Sunvisor lights ........................... 114
Sun visors .................................... 43
Symbols ......................................... 4
T
Tachometer ................................. 83
Tail lights ................................... 164
Third row seats ............................ 51
Three-point seat belt ....................
55
Tools .......................................... 173
Top-tether child restraint systems .................................... 65
Towing another vehicle .............188
Towing equipment .....................150
Towing hitch installation dimensions ............................. 223
Towing the vehicle .....................187
Trailer stability assist .................153
Trailer towing ............................. 150
Transmission ............................... 16
Transmission display .........131, 136 Tread depth ...............................
177
Trip computer .............................. 23
Trip computer in Board-Info- Display ................................... 102
Trip computer in Graphic-Info- Display or Colour-Info-
Display ................................... 104
Triple-Info-Display .......................93
Trip odometer .............................. 83
Turn and lane-change signals ...111
Turn signal ................................... 87
Tyre chains ................................ 178
Tyre deflation detection system. .......................................... 25, 177
Tyre designations ......................175
Tyre pressure .................... 101, 175
Tyre pressure monitoring system .............................. 25, 176
Tyre pressures ...................
107, 220
Tyre repair kit ............................. 179
Tyres .......................................... 174
U
Ultrasonic parking assist .............. 89
Underseat storage .......................68
Using this manual .......................... 3
V
Vehicle dimensions .................... 218
Vehicle Identification Number ....207