remove seats OPEL ZAFIRA C 2014 Manual user
[x] Cancel search | Manufacturer: OPEL, Model Year: 2014, Model line: ZAFIRA C, Model: OPEL ZAFIRA C 2014Pages: 299, PDF Size: 9.03 MB
Page 40 of 299

38Seats, restraints
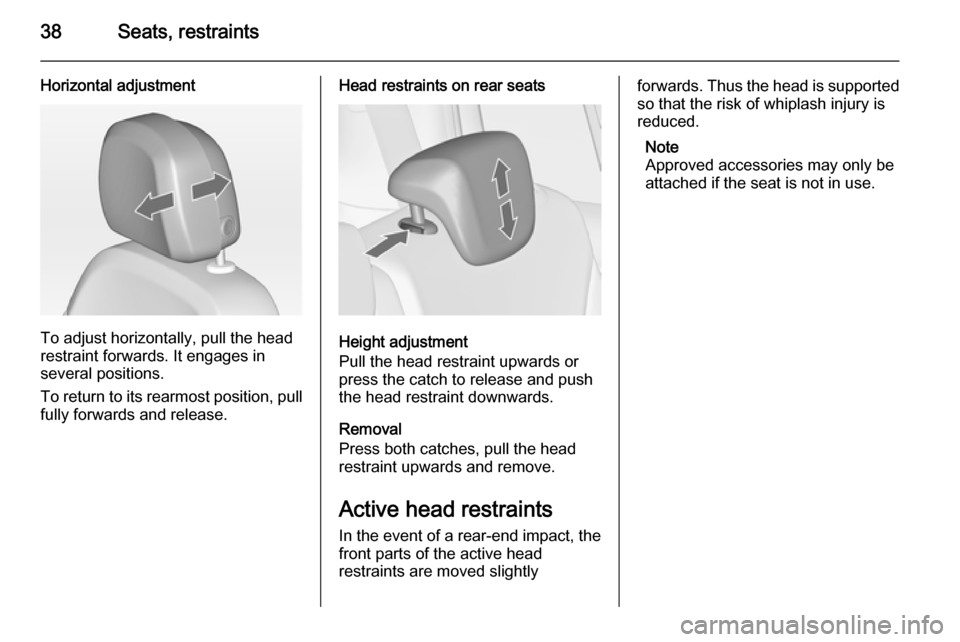
Horizontal adjustment
To adjust horizontally, pull the head
restraint forwards. It engages in
several positions.
To return to its rearmost position, pull fully forwards and release.
Head restraints on rear seats
Height adjustment
Pull the head restraint upwards or
press the catch to release and push the head restraint downwards.
Removal
Press both catches, pull the head restraint upwards and remove.
Active head restraints In the event of a rear-end impact, the front parts of the active head
restraints are moved slightly
forwards. Thus the head is supported
so that the risk of whiplash injury is
reduced.
Note
Approved accessories may only be
attached if the seat is not in use.
Page 46 of 299

44Seats, restraintsArmrest
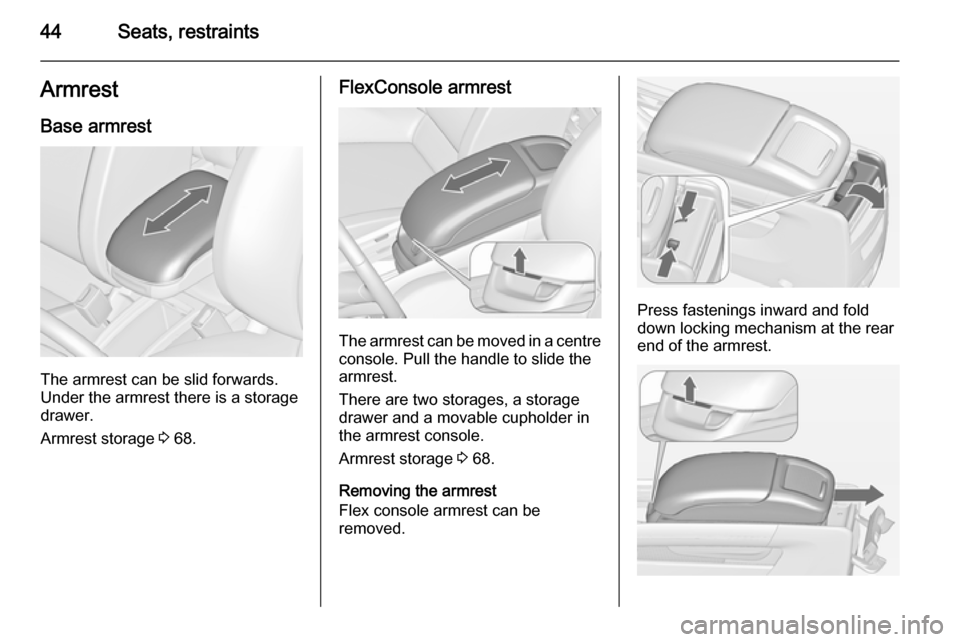
Base armrest
The armrest can be slid forwards.
Under the armrest there is a storage
drawer.
Armrest storage 3 68.
FlexConsole armrest
The armrest can be moved in a centre
console. Pull the handle to slide the
armrest.
There are two storages, a storage
drawer and a movable cupholder in
the armrest console.
Armrest storage 3 68.
Removing the armrest
Flex console armrest can be
removed.
Press fastenings inward and fold down locking mechanism at the rear
end of the armrest.
Page 52 of 299

50Seats, restraintsNever adjust seats while driving asthey could move uncontrollably.
Drive only with engaged seats and
backrests.Caution
Before setting up or folding down
seats, all components must be
removed from the side rails and
from the lashing eyes.
Lashing eyes must be in stored
position.
The seats in the third row can be folded down to the vehicle floor if they are not required, or for increasing the
size of the load compartment.
The seats in the third row can only be
used if the second seat row is not in
the lounge position.
Setting up the seats ■ Fold in interior protection mat 3 83 and remove load
compartment cover 3 81.
■ Insert the latch plate of the seat belt
on each side into the pocket that is
mounted at the belt.
■ Pull up the seat by the upper strap,
fold out and allow seat to engage inupright position.
Folding down the seats in the
vehicle floor ■ Push down head restraint by pressing the catch 3 37.
■ Insert the latch plate of the seat belt
on each side into the pocket that is
mounted at the belt.
Page 56 of 299

54Seats, restraints
Remove lower latch plate from
retainer and click it into left-hand
buckle ( 1) at the centre seat. Guide
the upper latch plate with the belt over
the lap area and the shoulder (do not twist) and click into right-hand buckle
( 2 ) at centre seat.
To remove the seat belt, first press
the button on the right-hand buckle
( 2 ) and remove upper latch plate.
Then press the button on the left-
hand buckle ( 1) and remove lower
latch plate. The seat belt retracts
automatically.Push the top latch plate into the
retainer. Fold over locked together latch plates against the seat belt.
Insert in the seat belt holder in the roof
with the lower latch plate pointing
forward.
Seat belts on the third seat row
The seat belts on the third seat row
are equipped with three point seat
belts.
When seat belts are not used or when
folding the seats, insert the latch plate of the seat belt on each side into the
pocket that is mounted at the belt.
If the centre seat of the second seat
row is occupied and the seat belt is
fastened, only persons with a body
Page 62 of 299

60Seats, restraints
Allow children to enter and exit the
vehicle only on the side facing away
from the traffic.
When the child restraint system is not in use, secure the seat with a seat beltor remove it from the vehicle.
Note
Do not affix anything on the child
restraint systems and do not cover
them with any other materials.
A child restraint system which has
been subjected to stress in an
accident must be replaced.
Page 68 of 299

66StorageCupholders
Front cupholder
Cupholders are located in the centre
console between the front seats.
Slidable cupholder in
FlexConsole armrest
The cupholder can be moved in guide rails in the FlexConsole armrest or
completely removed.
Push the handle in front of cupholder
to slide.
Armrest 3 44.
Remove cupholder
Pull the handle in front of cupholder
and remove it vertically out of the
console.
Installation in reverse order.
Note
Install the cupholder in the direction as shown in the illustration.
Otherwise the cupholder may not engage properly.
Page 81 of 299

Storage79Caution
Before setting up or folding down
seats, all components must be
removed from the side rails and
from the lashing eyes.
Lashing eyes must be in stored
position.
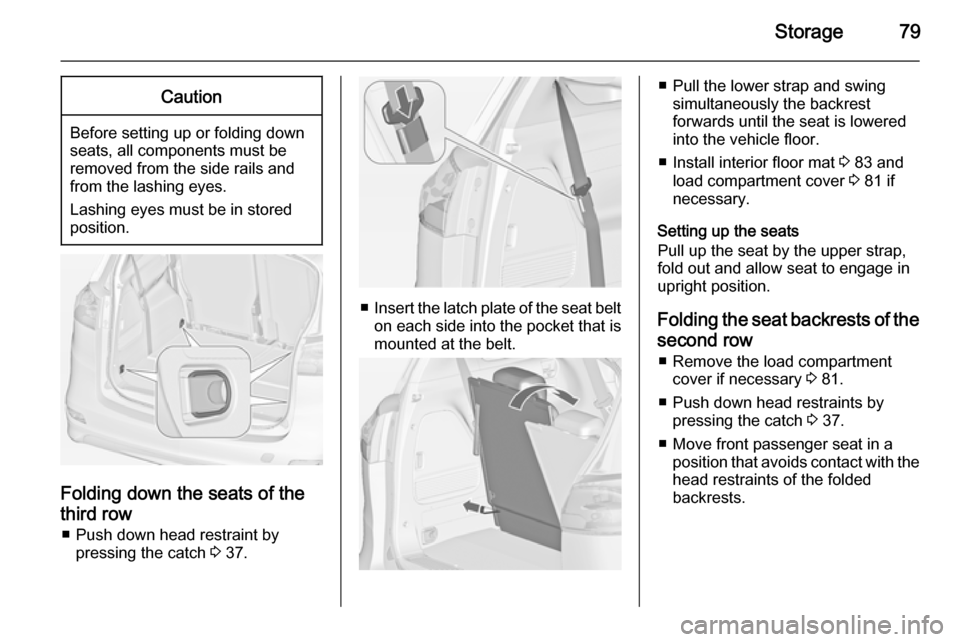
Folding down the seats of the
third row ■ Push down head restraint by pressing the catch 3 37.
■ Insert the latch plate of the seat belt
on each side into the pocket that is
mounted at the belt.
■ Pull the lower strap and swing simultaneously the backrest
forwards until the seat is lowered
into the vehicle floor.
■ Install interior floor mat 3 83 and
load compartment cover 3 81 if
necessary.
Setting up the seats
Pull up the seat by the upper strap,
fold out and allow seat to engage in
upright position.
Folding the seat backrests of the second row ■ Remove the load compartment cover if necessary 3 81.
■ Push down head restraints by pressing the catch 3 37.
■ Move front passenger seat in a position that avoids contact with the
head restraints of the folded
backrests.
Page 86 of 299

84Storage
On versions without third seat row,
there are storage boxes under the
floor cover. To open lift up the cover
and fold it upright behind rear seats.
Interior protection mat
Interior protection mat is a covering
and protection feature for the load
compartment to be used when all or
single seats/backrests are folded
down.
By folding and expanding the mat
there are a lot of individual
applications possible.
The interior protection mat is
available in two versions:
■ Standard protection mat covers the
area between tailgate and second
seat row, when third row is
complete or one seat folded down.
■ Flex cover interior protection mat is
double size of standard protection
mat, connected by a zipper. It
covers the load compartment fully, when all or single seats of third and
second row are folded down.Protection mat is longitudinal foldable in 4 parts (standard) rsp. 8 parts (Flexcover) with a zipper central and
transversely foldable in 4 parts.
Following only a few examples of
using the mats are described.
Before folding and expanding the
mat, all components must be
removed from the side rails and from
the lashing eyes. Lashing eyes must
be in stored position.
Covering the load compartment
between tailgate and second seat row
possible with both Standard
protection mat or Flex cover interior
protection mat being folded at the
zipper to half size (double layer).
Mat is located fourfold flapped behind
the raised up seats of the third row.
■ Fold down third row seats.
Page 92 of 299

90Storage
Installation of hooks in the rails
Insert the hook in the desired positionfirst in the upper groove of the rail and
then press in the lower groove. To
remove, first pull out of the upper
groove.
Partitioning net in front of
tailgate
Install directly in front of the tailgate.
Before installation push in the four
end pieces of the net rod by rotating
each end piece anticlockwise.
To install, push the net rods together
and insert into the openings of the
tailgate frame. The longer rod must
be inserted at the top.
To remove, push the net rods
together and remove.
Safety net
The safety net can be installed behind the seats of the second row or the
front seats.
Passengers must not be transported
behind the safety net.
Installation behind second row
seats
■ There are installation openings on both sides in the roof frame above
second row seats: suspend and
engage rod of net at one side,
compress rod and suspend and
engage at the other side.
Page 159 of 299

Climate control157
To close the vent, turn the adjuster
wheel to 7.
Air vents for rear passenger are left
and right side behind the front seats.
9 Warning
Do not attach any objects to the
slats of the air vents. Risk of
damage and injury in case of an
accident.
Fixed air vents
Additional air vents are located
beneath the windscreen and door windows and in the foot wells.Maintenance
Air intake
The air intake in front of the
windscreen in the engine
compartment must be kept clear to
allow air intake. Remove any leaves,
dirt or snow.
Pollen filter
The pollen filter cleans dust, soot,
pollen and spores from the air
entering the vehicle through the air
intake.