steering OPEL ZAFIRA C 2017 Manual user
[x] Cancel search | Manufacturer: OPEL, Model Year: 2017, Model line: ZAFIRA C, Model: OPEL ZAFIRA C 2017Pages: 289, PDF Size: 9.02 MB
Page 154 of 289

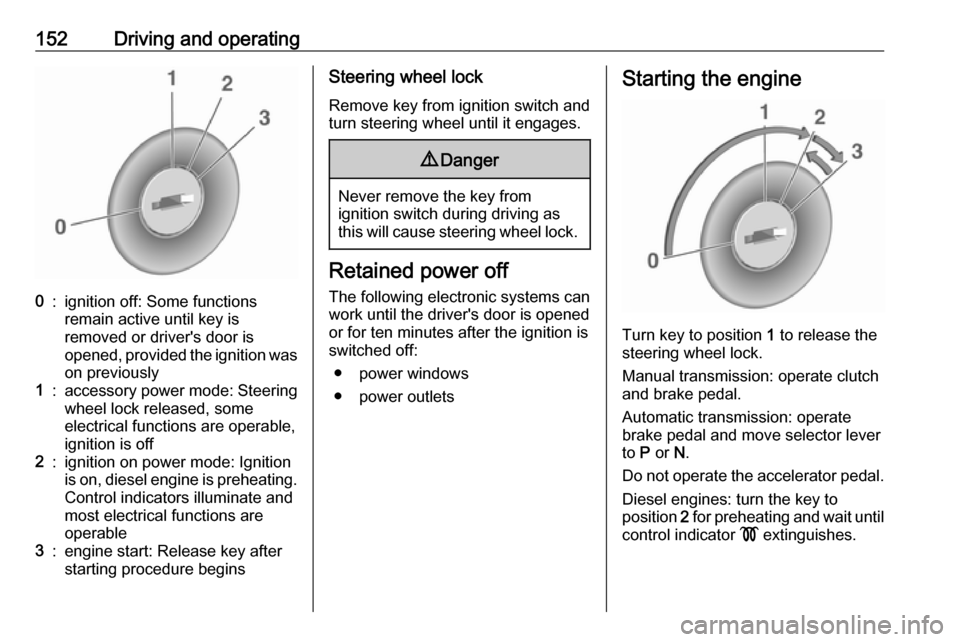
152Driving and operating0:ignition off: Some functions
remain active until key is
removed or driver's door is
opened, provided the ignition was
on previously1:accessory power mode: Steering wheel lock released, some
electrical functions are operable,
ignition is off2:ignition on power mode: Ignition
is on, diesel engine is preheating.
Control indicators illuminate and
most electrical functions are
operable3:engine start: Release key after
starting procedure beginsSteering wheel lock
Remove key from ignition switch and
turn steering wheel until it engages.9 Danger
Never remove the key from
ignition switch during driving as
this will cause steering wheel lock.
Retained power off
The following electronic systems can
work until the driver's door is opened
or for ten minutes after the ignition is
switched off:
● power windows
● power outlets
Starting the engine
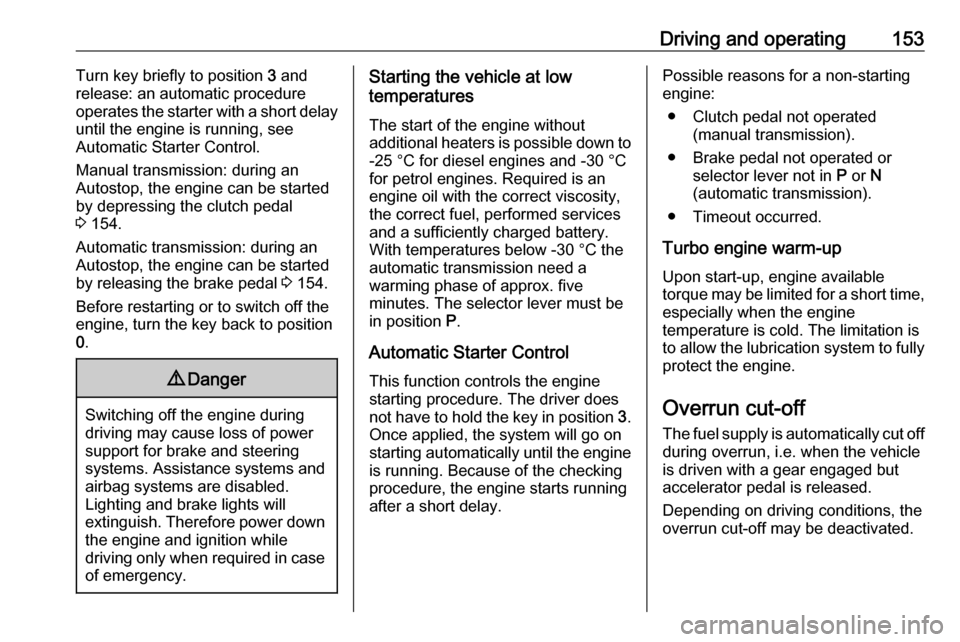
Turn key to position 1 to release the
steering wheel lock.
Manual transmission: operate clutch
and brake pedal.
Automatic transmission: operate
brake pedal and move selector lever
to P or N.
Do not operate the accelerator pedal. Diesel engines: turn the key to
position 2 for preheating and wait until
control indicator ! extinguishes.
Page 155 of 289

Driving and operating153Turn key briefly to position 3 and
release: an automatic procedure
operates the starter with a short delay
until the engine is running, see
Automatic Starter Control.
Manual transmission: during an
Autostop, the engine can be started
by depressing the clutch pedal
3 154.
Automatic transmission: during an
Autostop, the engine can be started
by releasing the brake pedal 3 154.
Before restarting or to switch off the
engine, turn the key back to position
0 .9 Danger
Switching off the engine during
driving may cause loss of power
support for brake and steering
systems. Assistance systems and
airbag systems are disabled.
Lighting and brake lights will
extinguish. Therefore power down
the engine and ignition while
driving only when required in case of emergency.
Starting the vehicle at low
temperatures
The start of the engine without
additional heaters is possible down to -25 °С for diesel engines and -30 °C
for petrol engines. Required is an engine oil with the correct viscosity,
the correct fuel, performed services
and a sufficiently charged battery.
With temperatures below -30 °C the
automatic transmission need a
warming phase of approx. five
minutes. The selector lever must be
in position P.
Automatic Starter Control This function controls the engine
starting procedure. The driver does
not have to hold the key in position 3.
Once applied, the system will go on
starting automatically until the engine
is running. Because of the checking
procedure, the engine starts running
after a short delay.Possible reasons for a non-starting
engine:
● Clutch pedal not operated (manual transmission).
● Brake pedal not operated or selector lever not in P or N
(automatic transmission).
● Timeout occurred.
Turbo engine warm-up
Upon start-up, engine available
torque may be limited for a short time,
especially when the engine
temperature is cold. The limitation is
to allow the lubrication system to fully protect the engine.
Overrun cut-off The fuel supply is automatically cut off
during overrun, i.e. when the vehicle
is driven with a gear engaged but accelerator pedal is released.
Depending on driving conditions, the
overrun cut-off may be deactivated.
Page 158 of 289

156Driving and operating● The vehicle is driven at least atwalking speed.
● The climate control system requests an engine start.
● The air conditioning is manually switched on.
If the bonnet is not fully closed, a
warning message is displayed in the
Driver Information Centre.
If an electrical accessory, e.g. a
portable CD player, is connected to
the power outlet, a brief power drop during engine restart may be
noticeable.
Parking9 Warning
● Do not park the vehicle on an
easily ignitable surface. The
high temperature of the
exhaust system could ignite the
surface.
● Always apply the parking brake. Activate the manual
parking brake without pressing
the release button. Apply as
firmly as possible on a downhill slope or uphill slope. Depress
brake pedal at the same time to
reduce operating force.
For vehicles with electric
parking brake, pull switch m for
a minimum of one second until
control indicator m illuminates
constantly and electric parking
brake is applied 3 112.
● Switch off the engine. ● If the vehicle is on a level surface or uphill slope, engage
first gear or set the selector
lever to position P before
removing the ignition key. On
an uphill slope, turn the front
wheels away from the kerb.
If the vehicle is on a downhill
slope, engage reverse gear or
set the selector lever to position
P before removing the ignition
key. Turn the front wheels
towards the kerb.● Close the windows.
● Remove the ignition key from the ignition switch. Turn the
steering wheel until the
steering wheel lock is felt to
engage.
For vehicles with automatic
transmission, the key can only
be removed when the selector
lever is in position P.
● Lock the vehicle.
● Activate the anti-theft alarm system.
● The engine cooling fans may run
after the engine has been
switched off 3 215.
Caution
After running at high engine
speeds or with high engine loads,
operate the engine briefly at a low load or run in neutral for
approx. 30 seconds before
switching off, in order to protect
the turbocharger.
Page 173 of 289

Driving and operating171Fault
If there is a fault in the system the
control indicator b illuminates
continuously and a message appears in the Driver Information Centre. The
system is not operational.
Have the cause of the fault remedied
by a workshop.
Interactive driving system Flex RideFlex Ride driving system allows the
driver to select between three driving
modes:
● SPORT mode: press SPORT,
LED illuminates.
● TOUR mode: press TOUR, LED
illuminates.
● Normal mode: neither SPORT or
TOUR are pressed, no LED
illuminates.
Deactivate SPORT mode and TOUR
mode by pressing the corresponding
button once more.In each driving mode Flex Ride
networks the following electronic
systems:
● Continuous Damping Control
● Accelerator Pedal Control
● Steering Control
● Automatic transmission
SPORT modeThe settings of the systems are
adapted to a sportier driving style:
● Damping of shock absorbers reacts more stiffly to providebetter contact with the road
surface.
● The engine reacts more quickly to the accelerator pedal.
● Steering support is reduced.
● Shift points of automatic transmission occur later.
TOUR mode
Page 174 of 289

172Driving and operatingThe settings of the systems are
adapted to a comfort driving style:
● Damping of shock absorbers reacts more softly.
● Accelerator pedal reacts with standard settings.
● Steering support is in standard mode.
● Shift points of automatic transmission occur in a comfort
mode.
Normal mode
All settings of the systems are
adapted to standard values.
Drive mode control Within each manual selected driving
mode SPORT, TOUR or Normal, the
Drive Mode Control (DMC) detects
and analyses continuously the real
driving characteristics, responses by
the driver, and the active dynamic
state of the vehicle. If necessary, the
control unit of DMC automatically
changes the settings within the
selected driving mode or, whenrecognising greater variations, the
driving mode is changed for the
length of variation.
If, for example, Normal mode is
selected and DMC detects a sporty
driving behaviour, DMC changes
several settings of the Normal mode
into sporty settings. The DMC
changes to SPORT mode in case of
very sporty driving behaviour.
If, for example, TOUR mode is
selected and whilst driving on a
winding road a sudden hard brake is
necessary, DMC will detect the
dynamic vehicle condition and
changes the settings for suspension
to SPORT mode to increase vehicle
stability.
When the driving characteristic or the
dynamic vehicle state returns to
former state, DMC will change the
settings to the preselected driving
mode.
Personalised settings in the Sport mode
The driver can select the functions of the SPORT mode when SPORT is
pressed.Select the relevant settings in
Settings in the Info-Display.
Info-Display 3 121.
Vehicle personalisation 3 125.
Page 188 of 289

186Driving and operatingdepending on the vehicle equipment,
either the radar behind the radiator
grille or the front camera in the
windscreen to detect the distance of
a vehicle directly ahead in your path. It is active at speeds above 40 km/h.
When a preceding vehicle is detected
ahead, the distance is indicated in
seconds, displayed on a page in the
Driver Information Centre 3 117.
Press MENU on the turn signal lever
to select Vehicle Information
Menu ? and turn the adjuster
wheel to choose following distance
indication page.
The minimum indicated distance is
0.5 s.
If there is no vehicle ahead or the vehicle ahead is out of range, two
dashes will be displayed: -.- s.
If Adaptive cruise control is active,
this page shows the alert sensitivity
setting instead of following distance setting. 3 176.
Active Emergency Braking
Active emergency braking can help to reduce the damage and injury from
crashes with vehicles and obstacles
directly ahead, when a collision can no longer be avoided either by
manual braking or by steering. Before
the active emergency braking
applies, the driver is warned by the forward collision alert 3 182.
The feature uses various inputs (e.g.
radar sensor, brake pressure, vehicle speed) to calculate the probability of
a frontal collision.
Active emergency braking operates automatically above walking speed,
provided that Auto collision
preparation setting is not deactivated
in the vehicle personalisation menu
3 125.
The system includes: ● brake preparation system
● emergency automatic braking
● forward looking brake assist9Warning
This system is not intended to
replace the driver responsibility of driving the vehicle and looking
ahead. Its function is limited to
supplemental use only. The driver shall continue to apply the brake
pedal as the driving situation
dictates.
Page 195 of 289

Driving and operating193Due to the high position of the
camera, the rear bumper can be seen
on the display as a guide to position.
The area displayed by the camera is
limited. The distance of the image that
appears on the display differs from
the actual distance.
Guiding lines
Dynamic guiding lines are horizontal
lines at one metre intervals projected
on the picture to define the distance
to displayed objects.
Trajectory lane of the vehicle is
shown in accordance with the
steering angle.
Warning symbols
Warning symbols are indicated as
triangles 9 on the picture which
shows obstacles detected by the rear
sensors of the parking assist.
Additionally 9 appears on the top line
of the Info-Display with the warning to
check the vehicle surrounding.
Deactivation
The camera is switched off when a
certain forward speed is exceeded or
if reverse gear is not engaged for
approx. 15 seconds. Rear view
camera can be manually deactivated
in the vehicle personalisation menu in the Info-Display. Select the relevant
setting in Settings .
Vehicle personalisation 3 125.Deactivation of guiding lines and
warning symbols
7'' R 4.0 IntelliLink Activation or
deactivation of the visual guiding lines and the warning symbols can be
changed via touch buttons in the
lower zone of the display.
7'' Navi 950 Activation or deactivation
of the visual guiding lines and the
warning symbols can be changed in
the Settings menu in the
Info-Display. Select the relevant
setting in Settings, I Vehicle .
Info-Display 3 121.
Vehicle personalisation 3 125.
Page 199 of 289

Driving and operating197Reasons for signs being cleared:● A predefined distance was driven
or time has elapsed (differs for
each sign type)
● Vehicle drives through a turn
● The speed becomes slower than 52 km/h (city entry detection)
Fault
The traffic sign assistant system may
not operate correctly if:
● The area of the windscreen, where the front camera is
located, is not clean or affected
by foreign items, e.g. stickers.
● Traffic signs are completely or partially covered or difficult to
discern.
● There are adverse environmental
conditions, e.g. heavy rain, snow,direct sunlight or shadows.
● Traffic signs are incorrectly mounted or damaged.
● Traffic signs do not comply with the Vienna Convention on traffic
signs (Wiener Übereinkommen
über Straßenverkehrszeichen).Caution
The system is intended to help the driver within a defined speed
range to discern certain traffic
signs. Do not ignore traffic signs
which are not displayed by the
system.
The system does not discern any other than the conventional traffic
signs that might give or end a
speed limit.
Do not let this special feature
tempt you into taking risks when
driving.
Always adapt speed to the road
conditions.
The driver assistance systems do not relieve the driver from full
responsibility for vehicle
operation.
Lane departure warning
The lane departure warning system
observes the lane markings between
which the vehicle is driving via a front camera. The system detects lane
changes and warns the driver in the
event of an unintended lane change
via visual and acoustic signals.
Criteria for the detection of an
unintended lane change are:
● No operation of turn signals.
● No brake pedal operation.
● No active accelerator operation or speeding-up.
● No active steering.
If the driver is active, no warning will
be issued.
Activation
Page 210 of 289

208Driving and operatingNatural gas
The fuel consumption information
was obtained using reference fuel
G20 (methane proportion
99 - 100 mol%) under prescribed
driving conditions. When using
natural gas with a lower proportion of
methane, the fuel consumption can
differ from the specified values.Trailer hitch
General information
Only use towing equipment that has
been approved for your vehicle.
Vehicles with natural gas engines
require special towing equipment.
Entrust retrofitting of towing
equipment to a workshop. It may be
necessary to make changes that
affect the cooling system, heat
shields or other equipment.
The bulb outage detection function for trailer brake light cannot detect a
partial bulb outage. E.g. in case of
4x 5 Watt bulbs, the function only
detects lamp outage when only a
single 5 Watt lamp remains or none
remain.
Fitting of towing equipment could
cover the opening of the towing eye. If this is the case use the coupling ball
bar for towing. Always keep the
coupling ball bar in the vehicle.Driving characteristics and
towing tips
Before attaching a trailer, lubricate
the coupling ball. However, do not do
so if a stabiliser, which acts on the coupling ball, is being used to reduce
snaking movements.
For trailers with low driving stability
and caravan trailers with a permitted
gross vehicle weight of more than
1300 kg the use of a stabiliser is
strongly recommended when driving
above 80 km/h.
If the trailer starts snaking, drive more slowly, do not attempt to correct the
steering and brake sharply if
necessary.
When driving downhill, drive in the
same gear as if driving uphill and
drive at a similar speed.
Adjust tyre pressure to the value
specified for full load 3 273.
Page 214 of 289

212Driving and operatingDismounting the coupling ball bar
Open the protective flap and turn the
key to position c to unlock the
coupling ball bar.
Pull out rotary handle and turn
clockwise as far as it will go. Pull out coupling ball bar downwards.
Insert sealing plug in opening. Fold away socket.
Trailer stability assist
If the system detects snaking
movements, engine power is reduced
and the vehicle/trailer combination is
selectively braked until the snaking ceases. While system is working keep steering wheel as still as possible.
Trailer stability assist (TSA) is a
function of the Electronic Stability
Control 3 170.