light OPEL ZAFIRA C 2018.5 Manual user
[x] Cancel search | Manufacturer: OPEL, Model Year: 2018.5, Model line: ZAFIRA C, Model: OPEL ZAFIRA C 2018.5Pages: 341, PDF Size: 10.22 MB
Page 39 of 341
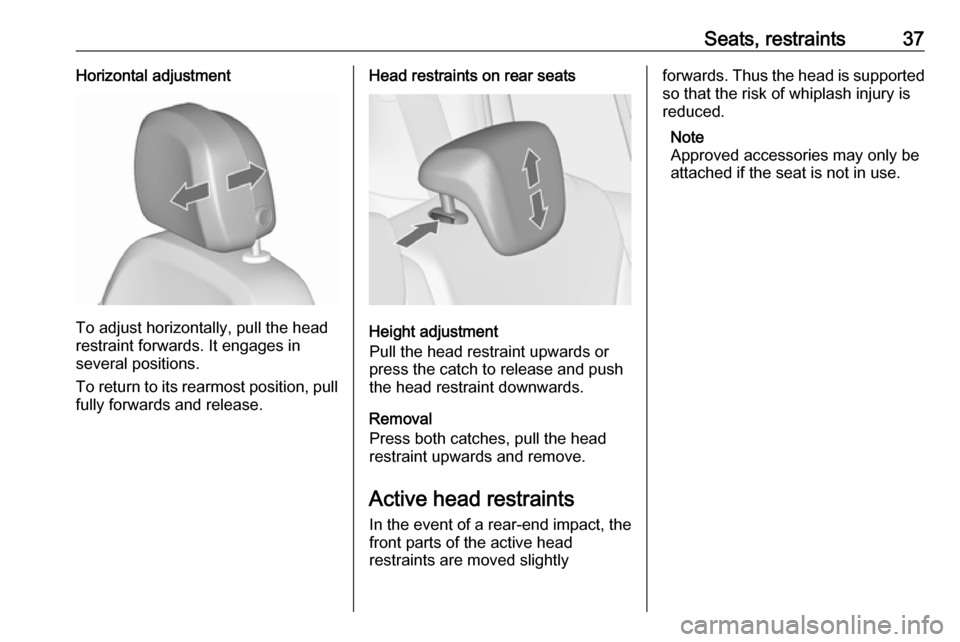
Seats, restraints37Horizontal adjustment
To adjust horizontally, pull the head
restraint forwards. It engages in
several positions.
To return to its rearmost position, pull fully forwards and release.
Head restraints on rear seats
Height adjustment
Pull the head restraint upwards or
press the catch to release and push the head restraint downwards.
Removal
Press both catches, pull the head restraint upwards and remove.
Active head restraints
In the event of a rear-end impact, the front parts of the active head
restraints are moved slightly
forwards. Thus the head is supported
so that the risk of whiplash injury is
reduced.
Note
Approved accessories may only be attached if the seat is not in use.
Page 40 of 341
38Seats, restraintsFront seatsSeat position9 Warning
Only drive with the seat correctly
adjusted.
9 Warning
Never adjust seats while driving as
they could move uncontrollably.
9 Danger
Do not sit closer than 25 cm to the
steering wheel, to permit safe
airbag deployment.
9 Warning
Never store any objects under the
seats.
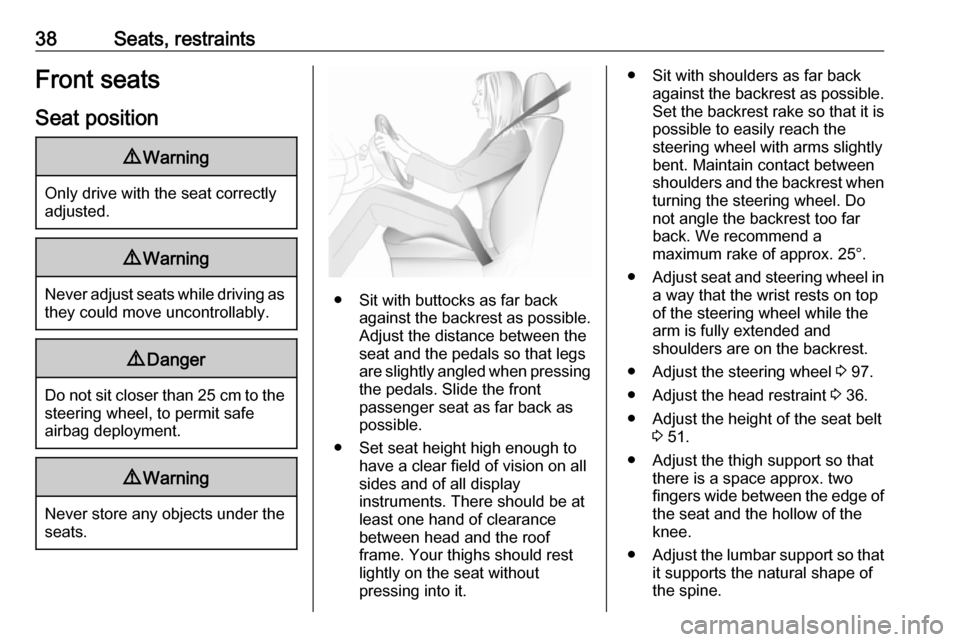
● Sit with buttocks as far back against the backrest as possible.
Adjust the distance between the
seat and the pedals so that legs
are slightly angled when pressing the pedals. Slide the front
passenger seat as far back as
possible.
● Set seat height high enough to have a clear field of vision on allsides and of all display
instruments. There should be at
least one hand of clearance
between head and the roof
frame. Your thighs should rest
lightly on the seat without
pressing into it.
● Sit with shoulders as far back against the backrest as possible.
Set the backrest rake so that it is
possible to easily reach the
steering wheel with arms slightly
bent. Maintain contact between
shoulders and the backrest when turning the steering wheel. Do
not angle the backrest too far
back. We recommend a
maximum rake of approx. 25°.
● Adjust seat and steering wheel in
a way that the wrist rests on top
of the steering wheel while the
arm is fully extended and
shoulders are on the backrest.
● Adjust the steering wheel 3 97.
● Adjust the head restraint 3 36.
● Adjust the height of the seat belt 3 51.
● Adjust the thigh support so that there is a space approx. two
fingers wide between the edge of
the seat and the hollow of the
knee.
● Adjust the lumbar support so that
it supports the natural shape of
the spine.
Page 53 of 341
Seats, restraints51Three-point seat beltFasten
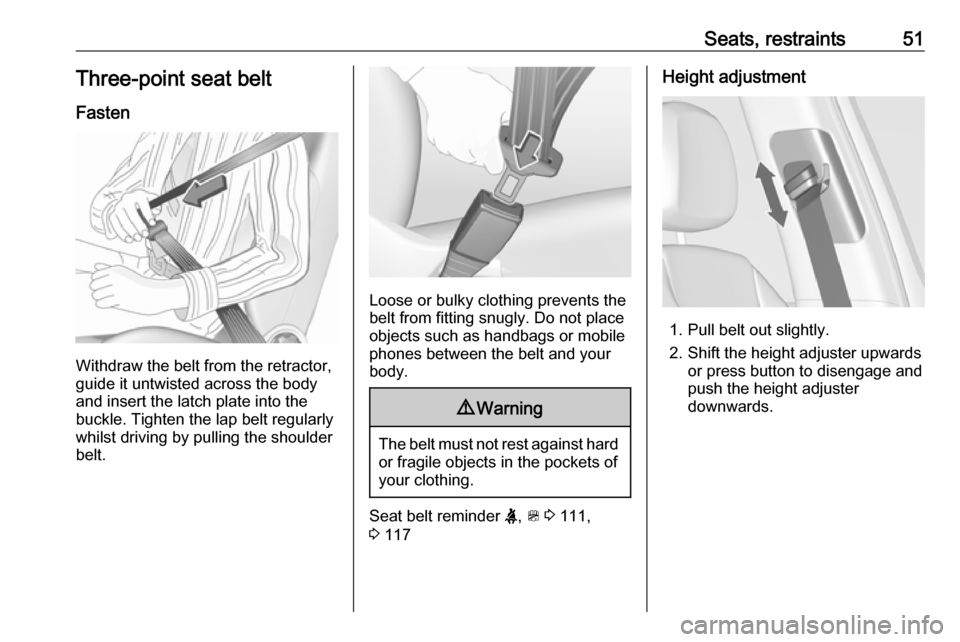
Withdraw the belt from the retractor,
guide it untwisted across the body
and insert the latch plate into the
buckle. Tighten the lap belt regularly
whilst driving by pulling the shoulder
belt.
Loose or bulky clothing prevents the
belt from fitting snugly. Do not place
objects such as handbags or mobile
phones between the belt and your body.
9 Warning
The belt must not rest against hard
or fragile objects in the pockets of
your clothing.
Seat belt reminder X, > 3 111,
3 117
Height adjustment
1. Pull belt out slightly.
2. Shift the height adjuster upwards or press button to disengage and
push the height adjuster
downwards.
Page 61 of 341
Seats, restraints599Warning
Keep the area in which the airbag
inflates clear of obstructions.
The hooks on the handles in the
roof frame are only suitable for
hanging up light articles of
clothing, without coat hangers. Do not keep any items in these
clothes.
Airbag deactivation
The front passenger airbag system has to be deactivated if a child
restraint system is to be fitted on this
seat. The side airbag and curtain
airbag systems, the belt
pretensioners and all driver airbag
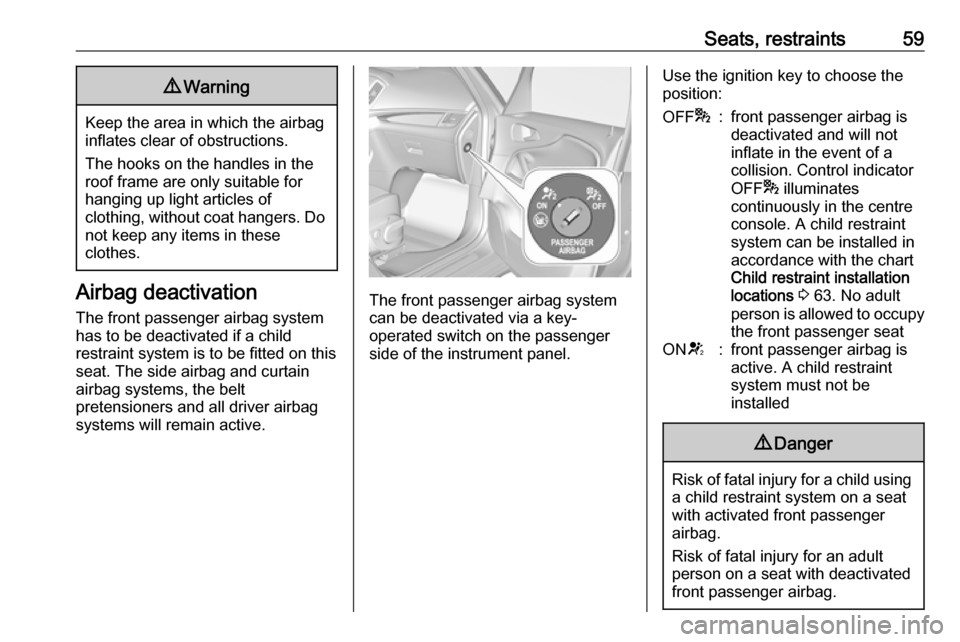
systems will remain active.The front passenger airbag system
can be deactivated via a key-
operated switch on the passenger
side of the instrument panel.
Use the ignition key to choose the
position:OFF *:front passenger airbag is
deactivated and will not
inflate in the event of a
collision. Control indicator
OFF * illuminates
continuously in the centre console. A child restraint
system can be installed in
accordance with the chart
Child restraint installation
locations 3 63. No adult
person is allowed to occupy
the front passenger seatON V:front passenger airbag is
active. A child restraint
system must not be
installed9 Danger
Risk of fatal injury for a child using
a child restraint system on a seat
with activated front passenger
airbag.
Risk of fatal injury for an adult
person on a seat with deactivated
front passenger airbag.
Page 73 of 341

Storage71Caution
Consult your bicycle dealer before
attaching bicycles with carbon
frames. The bicycles might get
damaged.
Note
The tail lights of the vehicle will be
deactivated if the tail lights of the rear carrier system are installed.
Extending
Open the tailgate.
9 Warning
No-one should be in the extension
zone of the rear carrier system,
risk of injury.
Pull release lever up. The rear carrier system disengages and travels
quickly out of the rear bumper.
Completely pull out the rear carrier
system until you hear it engage.
Ensure that it is not possible to push in the rear carrier system without
pulling the release lever again.9 Warning
It is only permissible to fit objects
to the rear carrier system if the
system has been correctly
engaged. If the rear carrier system
will not engage correctly, do not fit
objects to the system and slide the system back. Seek the assistance
of a workshop.
Page 78 of 341

76Storage● Without attached adapter:
Push the lever (1) to disengage
and hold.
Pull the rack (2) backwards to
fold the rear carrier system.
● With attached adapter:
9 Warning
Take care when disengaging the
rear carrier system as it will tilt
backwards. Risk of injury.
Hold frame (1) of rearmost
bicycle with one hand and pull the
loop (2) to disengage.
Hold rearmost bicycle with both
hands and fold the rear carrier
system backwards.
To increase visibility, the tail lights of
the vehicle are activated when the
rear carrier system is folded back.
9 Warning
When folding the rear carrier
system forwards again, take care
that the system is engaged
securely.
Removing bicycles
Undo strap retainers on bicycle tyres.
Turn knob anti-clockwise and remove
mounting brackets.
Detaching adapter
Detach the adapter before removing
the last bicycle remaining on the rear
carrier system.
1. Fold in wheel recesses.
2. Unbutton the strap.
Page 80 of 341
78Storage
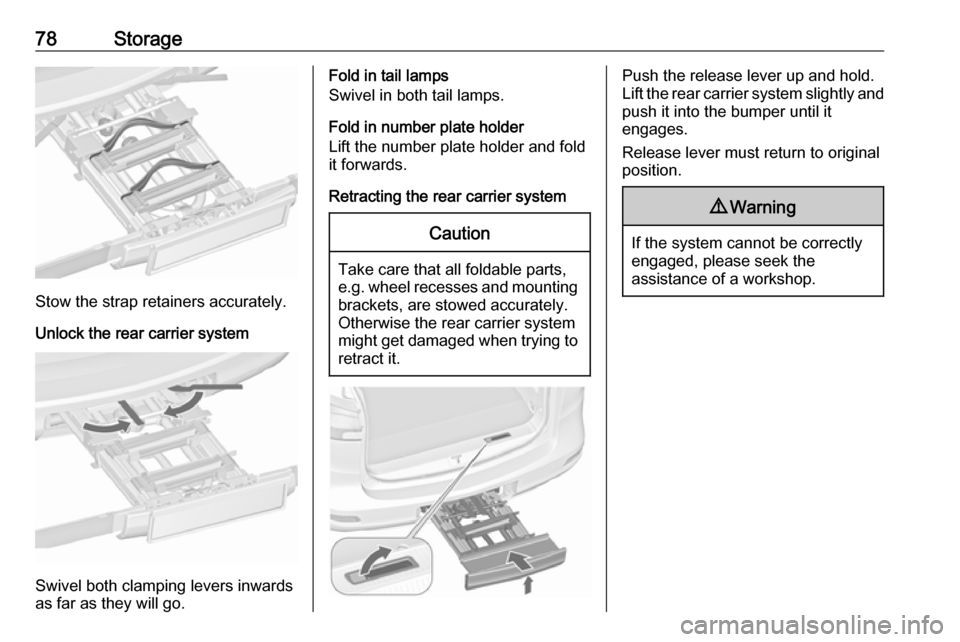
Stow the strap retainers accurately.
Unlock the rear carrier system
Swivel both clamping levers inwards
as far as they will go.
Fold in tail lamps
Swivel in both tail lamps.
Fold in number plate holder
Lift the number plate holder and fold
it forwards.
Retracting the rear carrier systemCaution
Take care that all foldable parts,
e.g. wheel recesses and mounting brackets, are stowed accurately.
Otherwise the rear carrier system might get damaged when trying to retract it.
Push the release lever up and hold.
Lift the rear carrier system slightly and
push it into the bumper until it
engages.
Release lever must return to original
position.9 Warning
If the system cannot be correctly
engaged, please seek the
assistance of a workshop.
Page 98 of 341

96Instruments and controlsInstruments and
controlsControls ....................................... 97
Steering wheel adjustment ........97
Steering wheel controls .............97
Heated steering wheel ...............97
Horn ........................................... 98
Windscreen wiper and washer ..98
Rear window wiper and washer ...................................... 99
Outside temperature ................100
Clock ....................................... 100
Power outlets ........................... 101
Cigarette lighter .......................102
Ashtrays .................................. 102
Warning lights, gauges and indi‐ cators ......................................... 103
Instrument cluster ....................103
Speedometer ........................... 103
Odometer ................................ 103
Trip odometer .......................... 103
Tachometer ............................. 104
Fuel gauge .............................. 104
Fuel selector ............................ 105
Engine coolant temperature gauge ..................................... 107Service display........................ 107
Control indicators ....................108
Turn lights ................................ 110
Seat belt reminder ...................111
Airbag and belt tensioners .......111
Airbag deactivation ..................112
Charging system .....................112
Malfunction indicator light ........112
Brake and clutch system .........112
Operate pedal .......................... 113
Electric parking brake ..............113
Electric parking brake fault ......113
Antilock brake system (ABS) ...113
Gear shifting ............................ 114
Power steering ........................ 114
Following distance ...................114
Lane departure warning ..........114
Electronic Stability Control off . 114
Electronic Stability Control and Traction Control system .........114
Traction Control system off .....114
Preheating ............................... 115
Exhaust filter ............................ 115
AdBlue ..................................... 115
Tyre pressure monitoring system .................................... 115
Engine oil pressure ..................115
Low fuel ................................... 116
Immobiliser .............................. 116
Exterior light ............................ 116High beam............................... 116
High beam assist .....................116
LED headlights ........................ 116
Fog light ................................... 116
Rear fog light ........................... 116
Cruise control .......................... 116
Adaptive cruise control ............117
Vehicle detected ahead ...........117
Speed limiter ........................... 117
Traffic sign assistant ................117
Door open ................................ 117
Displays ..................................... 117
Driver Information Centre ........117
Info Display .............................. 121
Vehicle messages ......................122
Warning chimes .......................123
Battery voltage ........................ 123
Vehicle personalisation ..............124
Telematics service .....................125
OnStar ..................................... 125
Page 101 of 341

Instruments and controls99Adjustable sensitivity of the rain
sensor
Wiper lever in position INT.
Turn the adjuster wheel to adjust the
sensitivity of the rain sensor.
The rain sensor detects the amount of water on the windscreen and
automatically regulates the wiping
frequency and speed.
After 20 seconds without wiping
activity, the wiper arms move slightly
down to park position.
Keep the sensor free from dust, dirt
and ice.
Windscreen washer
Pull lever. Washer fluid is sprayed
onto the windscreen and the wiper
wipes a few times.
Washer fluid 3 264
Rear window wiper and washer
Press the rocker switch to activate the
rear window wiper:
upper position:continuous
operationlower position:intermittent
operationmiddle position:off
Page 104 of 341
102Instruments and controlsDo not exceed the maximum power
consumption of 120 watts.
With ignition off, the power outlets are
deactivated. Additionally the power
outlets are deactivated in the event of
low vehicle battery voltage.
Electrical accessories that are
connected must comply with the
electromagnetic compatibility
requirements laid down in
DIN VDE 40 839.
Do not connect any current-delivering
accessories, e.g. electrical charging devices or batteries.
Do not damage the outlet by using
unsuitable plugs.
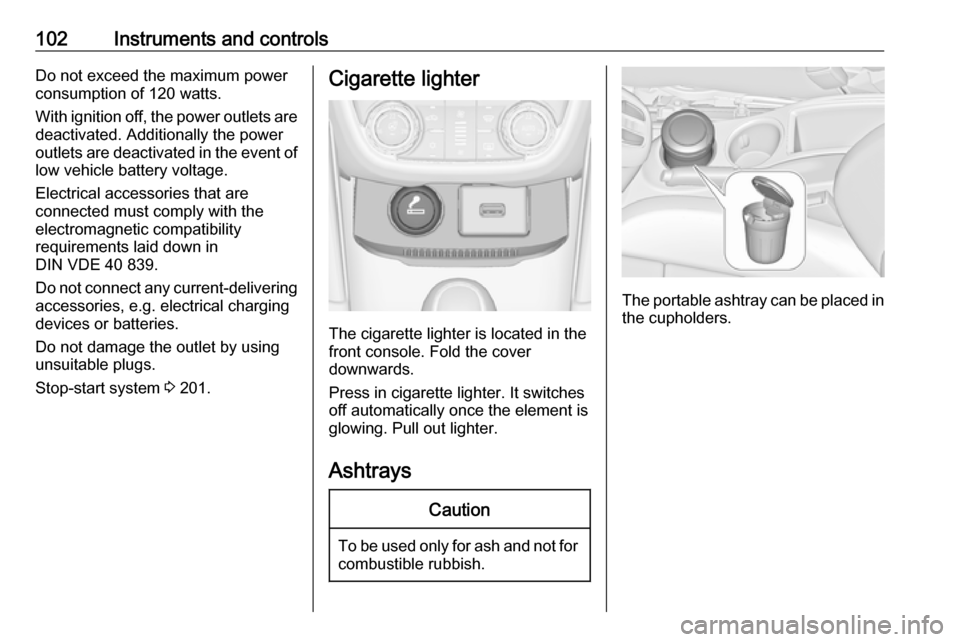
Stop-start system 3 201.Cigarette lighter
The cigarette lighter is located in the
front console. Fold the cover
downwards.
Press in cigarette lighter. It switches off automatically once the element is
glowing. Pull out lighter.
Ashtrays
Caution
To be used only for ash and not for combustible rubbish.
The portable ashtray can be placed inthe cupholders.