reset OPEL ZAFIRA C 2018.5 Manual user
[x] Cancel search | Manufacturer: OPEL, Model Year: 2018.5, Model line: ZAFIRA C, Model: OPEL ZAFIRA C 2018.5Pages: 341, PDF Size: 10.22 MB
Page 105 of 341

Instruments and controls103Warning lights, gauges
and indicators
Instrument cluster
In some versions, the needles of the
instruments briefly rotate to the end
position when the ignition is switched on.
Speedometer
Indicates vehicle speed.
Odometer
The total recorded distance is
displayed in km.
Trip odometer The recorded distance is displayed
since the last reset.
Trip odometer counts up to 9999 km
and then restarts at 0.
Two trip odometer pages are
selectable for different trips.
Select ; by pressing Menu on the
turn signal lever. Turn adjuster wheel
on turn signal lever and select ;1
or ; 2. Each trip odometer page can
be reset separately by pressing
SET/CLR on the turn signal lever for
a few seconds on the respective
menu.
Page 110 of 341

108Instruments and controlsThis can be an additional engine oil
and filter change or part of a regular
service.
The remaining oil life duration menu
is displayed in the Driver Information Centre 3 117.
Select Vehicle Information
Menu ? by pressing MENU on the
turn signal lever. Turn the adjuster wheel to select Remaining Oil Life .
Remaining oil life duration is indicated
in percentage.
ResetPress SET/CLR on turn signal lever
for several seconds to reset. The
ignition must be switched on but
engine not running.
The system must be reset every time
the engine oil is changed to ensure
proper functionality. Seek the
assistance of a workshop.
Next service
A message appears in the Driver
Information Centre, when
maintenance of the vehicle is
required. Have maintenance work
carried out by a workshop within one
week or 500 km, whichever occurs
first.
Service information 3 303.
Control indicators
The control indicators described are
not present in all vehicles. The
description applies to all instrument
versions. Depending on the
equipment, the position of the control indicators may vary. When the
ignition is switched on, most control
indicators will illuminate briefly as a
functionality test.
The control indicator colours mean:red:danger, important reminderyellow:warning, information, faultgreen:confirmation of activationblue:confirmation of activationwhite:confirmation of activation
Page 115 of 341

Instruments and controls1139Warning
Stop. Do not continue your
journey. Consult a workshop.
Illuminates when the manual parking
brake is applied and ignition is
switched on 3 213.
Operate pedal - illuminates or flashes yellow.
Illuminates
Brake pedal must be depressed to release the electric parking brake
3 213
Clutch pedal must be depressed to
start the engine in Autostop mode.
Stop-start system 3 201.
Flashes
Clutch pedal must to be depressed to start the engine with the key 3 17,
3 199.
On some versions, the message to
operate the clutch pedal is indicated
in the Driver Information Centre
3 122.
Electric parking brake
m illuminates or flashes red.
Illuminates
Electric parking brake is applied
3 213.
Flashes
Electric parking brake is not fully
applied or released. Switch on
ignition, depress brake pedal and
attempt to reset the system by first
releasing and then applying the
electric parking brake. If m remains
flashing, do not drive and seek the
assistance of a workshop.
Electric parking brake fault
j illuminates or flashes yellow.Illuminates
Electric parking brake is operating
with degraded performance 3 213.
Flashes
Electric parking brake is in service
mode. Stop vehicle, apply and
release the electric parking brake to
reset.9 Warning
Have the cause of the fault
remedied immediately by a
workshop.
Antilock brake system
(ABS)
u illuminates yellow.
Illuminates for a few seconds after the ignition is switched on. The system is
ready for operation when the control
indicator extinguishes.
If the control indicator does not
extinguish after a few seconds, or if it illuminates while driving, there is a
Page 121 of 341

Instruments and controls119● average fuel economy
● average vehicle speed
● instantaneous fuel economy
● fuel range
● fuel range, bi-fuel engine
● fuel level, bi-fuel engine
● timer
Digital vehicle speed
Digital display of the instantaneous
speed.
Trip odometer
Trip odometer displays the current
distance since a certain reset.
Trip odometer counts up to 9999 km
and then restarts at 0.
Turn the adjuster wheel to select
between trip page 1 and 2.
To reset, press SET/CLR for a few
seconds while viewing this page.
The information of trip page 1 and 2 can be reset separately while the
respective display is active.Average fuel economy
Display of average consumption. The
measurement can be reset at any
time and starts with a default value.
To reset, press SET/CLR for a few
seconds while viewing this page.
The information of trip page 1 and 2
can be reset separately while the
respective display is active.
On vehicles with bi-fuel engines:
Average consumption is indicated for
the currently selected mode, LPG,
CNG or petrol.
Average vehicle speed
Display of average speed. The
measurement can be reset at any
time.
To reset, press SET/CLR for a few
seconds while viewing this page.
The information of trip page 1 and 2
can be reset separately while the
respective display is active.
Instantaneous fuel economy
Display of the instantaneous
consumption.On vehicles with bi-fuel engines:
Instantaneous consumption is
indicated for the currently selected
mode, LPG, CNG or petrol.
Fuel range
Range is calculated from current fuel
tank level and current consumption.
The display shows average values.
After refuelling, the range is updated
automatically after a brief delay.
When the fuel level in the tank is low, a message appears on the display
and control indicator Y in the fuel
gauge illuminates.
When the tank must be refuelled
immediately, a warning message
appears and remains on the display.
Additionally, control indicator Y
flashes in the fuel gauge 3 116.
Page 123 of 341
Instruments and controls121Remaining oil life
Indicates an estimate of the oil's
useful life. The number in percentage
means the current remaining oil life
and indicates when to change the
engine oil and filter 3 107.
Tyre pressure
Tyre pressures of all wheels are
displayed on this page during driving
3 283.
Tyre load
The tyre pressure category according to the actual tyre inflation pressure
can be selected 3 283.
Following distance
Displays the distance in seconds to a preceding moving vehicle 3 232. If
Adaptive cruise control is active this
page shows the following distance
setting instead.
Traffic sign assistant
Displays the detected traffic signs for
the current route section 3 240.Economy information menu @
Possible pages are: ● economy trend
● economy index
● top consumers
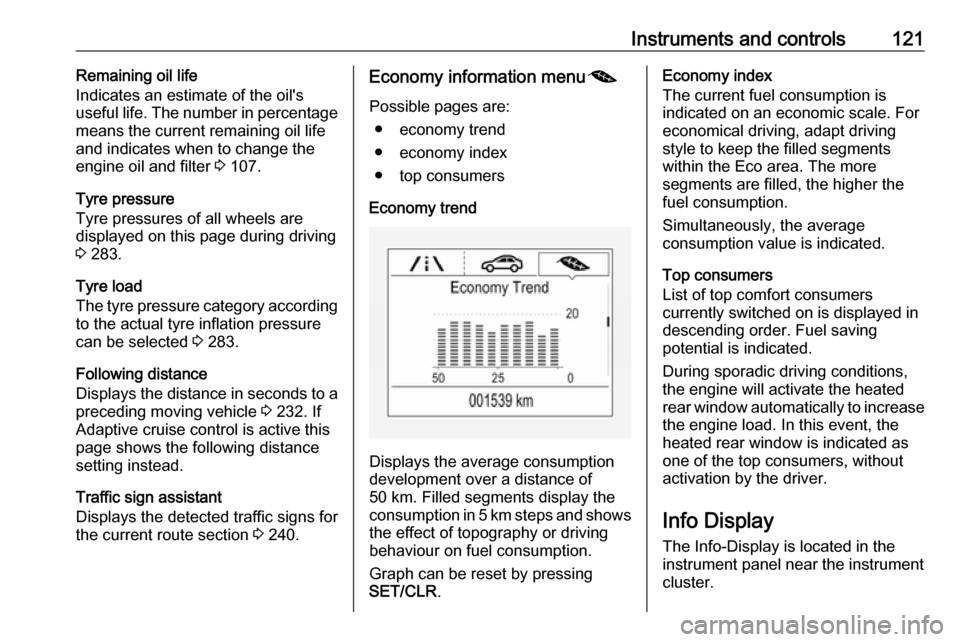
Economy trend
Displays the average consumption
development over a distance of
50 km. Filled segments display the
consumption in 5 km steps and shows the effect of topography or driving
behaviour on fuel consumption.
Graph can be reset by pressing
SET/CLR .
Economy index
The current fuel consumption is
indicated on an economic scale. For
economical driving, adapt driving
style to keep the filled segments
within the Eco area. The more
segments are filled, the higher the
fuel consumption.
Simultaneously, the average
consumption value is indicated.
Top consumers
List of top comfort consumers
currently switched on is displayed in descending order. Fuel saving
potential is indicated.
During sporadic driving conditions,
the engine will activate the heated
rear window automatically to increase
the engine load. In this event, the
heated rear window is indicated as
one of the top consumers, without
activation by the driver.
Info Display The Info-Display is located in the
instrument panel near the instrument
cluster.
Page 135 of 341
Lighting133Headlights when driving
abroad
The asymmetrical headlight beam
extends visibility at the edge of the
road at the passenger side.
However, when driving in countries
where traffic drives on the opposite
side of the road, adjust the headlights to prevent dazzling of oncoming
traffic.
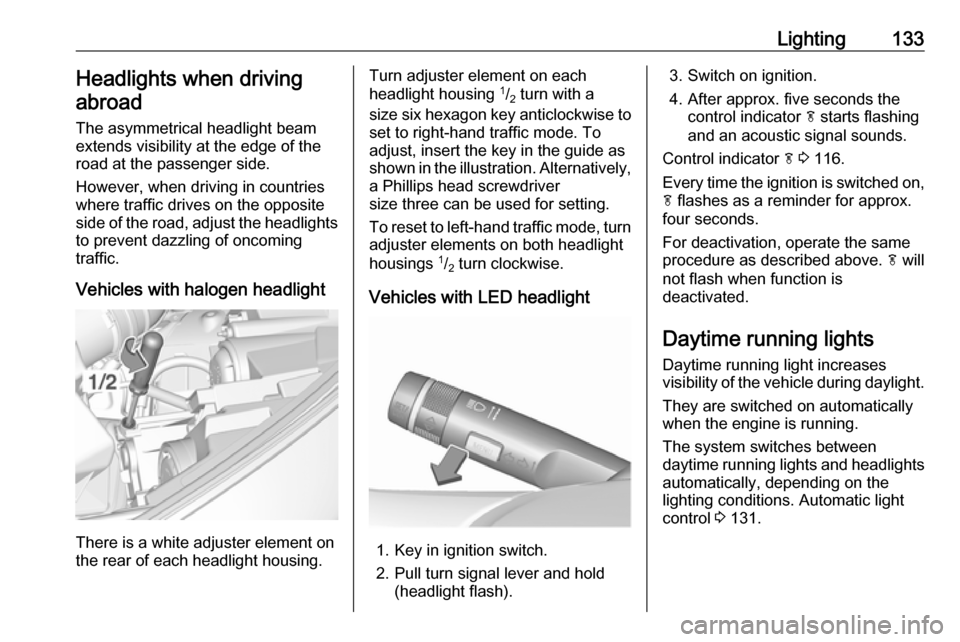
Vehicles with halogen headlight
There is a white adjuster element on
the rear of each headlight housing.
Turn adjuster element on each
headlight housing 1
/2 turn with a
size six hexagon key anticlockwise to set to right-hand traffic mode. To
adjust, insert the key in the guide as
shown in the illustration. Alternatively,
a Phillips head screwdriver
size three can be used for setting.
To reset to left-hand traffic mode, turn
adjuster elements on both headlight
housings 1
/2 turn clockwise.
Vehicles with LED headlight
1. Key in ignition switch.
2. Pull turn signal lever and hold (headlight flash).
3. Switch on ignition.
4. After approx. five seconds the control indicator f starts flashing
and an acoustic signal sounds.
Control indicator f 3 116.
Every time the ignition is switched on,
f flashes as a reminder for approx.
four seconds.
For deactivation, operate the same
procedure as described above. f will
not flash when function is
deactivated.
Daytime running lights Daytime running light increases
visibility of the vehicle during daylight.
They are switched on automatically
when the engine is running.
The system switches between
daytime running lights and headlights automatically, depending on the
lighting conditions. Automatic light
control 3 131.
Page 146 of 341
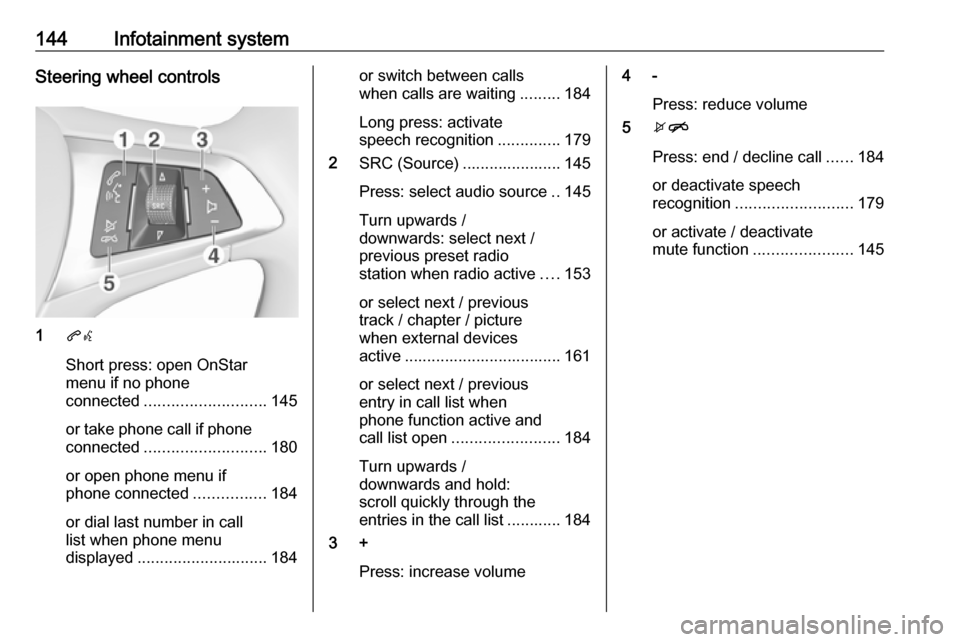
144Infotainment systemSteering wheel controls
1qw
Short press: open OnStar
menu if no phone
connected ........................... 145
or take phone call if phone connected ........................... 180
or open phone menu if
phone connected ................184
or dial last number in call
list when phone menu
displayed ............................. 184
or switch between calls
when calls are waiting .........184
Long press: activate
speech recognition ..............179
2 SRC (Source) ...................... 145
Press: select audio source ..145
Turn upwards /
downwards: select next /
previous preset radio
station when radio active ....153
or select next / previous
track / chapter / picture
when external devices
active ................................... 161
or select next / previous
entry in call list when
phone function active and
call list open ........................ 184
Turn upwards /
downwards and hold:
scroll quickly through the
entries in the call list ............ 184
3 +
Press: increase volume4 -Press: reduce volume
5 xn
Press: end / decline call ......184
or deactivate speech
recognition .......................... 179
or activate / deactivate
mute function ...................... 145
Page 154 of 341
152Infotainment systemFor time and date to be set manually,
select Off - Manual . If Auto Set is set
to Off - Manual , the submenu items
Set Time and Set Date become
available.
Set time and date
To adjust the time and date settings,
select Set Time or Set Date .
Touch + or - to adjust the settings.
Language settings
Press ; and then select Settings.
Select Language to display the
respective menu.
To adjust the language for the menu texts, touch the desired language.
Text scroll function If long text is displayed on the screen
e.g. song titles or station names, the
text may either be scrolled continually or it may be scrolled once and
displayed in truncated form.
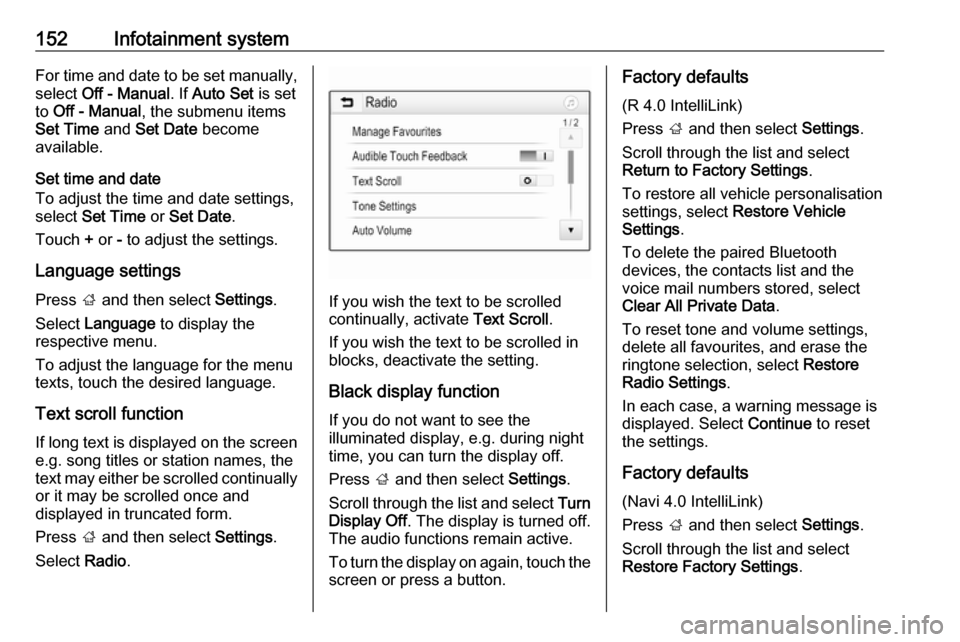
Press ; and then select Settings.
Select Radio.
If you wish the text to be scrolled
continually, activate Text Scroll.
If you wish the text to be scrolled in
blocks, deactivate the setting.
Black display function
If you do not want to see the
illuminated display, e.g. during night
time, you can turn the display off.
Press ; and then select Settings.
Scroll through the list and select Turn
Display Off . The display is turned off.
The audio functions remain active.
To turn the display on again, touch the
screen or press a button.
Factory defaults
(R 4.0 IntelliLink)
Press ; and then select Settings.
Scroll through the list and select
Return to Factory Settings .
To restore all vehicle personalisation
settings, select Restore Vehicle
Settings .
To delete the paired Bluetooth
devices, the contacts list and the
voice mail numbers stored, select Clear All Private Data .
To reset tone and volume settings,
delete all favourites, and erase the
ringtone selection, select Restore
Radio Settings .
In each case, a warning message is
displayed. Select Continue to reset
the settings.
Factory defaults
(Navi 4.0 IntelliLink)
Press ; and then select Settings.
Scroll through the list and select
Restore Factory Settings .
Page 155 of 341
Infotainment system153Vehicle settings
To restore all vehicle personalisation
settings, select Reset Vehicle
Settings .
A pop-up is displayed. Confirm the
pop-up message.
Phone information
To delete the paired Bluetooth
devices, the contacts list and the
voice mail numbers stored, select
Clear all phone information .
A pop-up is displayed. Confirm the pop-up message.
Radio settings
To reset tone and volume settings
and delete all favourites, select
Restore Radio Settings .
A pop-up is displayed. Confirm the
pop-up message.
Navigation settings
To reset all navigation parameters
and navigation system settings,
select Restore Navigation Settings . A
submenu is displayed.Depending on which set of
parameters you want to reset, select
Clear navigation history (recent
destinations), Clear navigation
favourites (favourites) or Reset
navigation options and settings (e.g.
settings concerning map display,
voice output or route options).
A pop-up is displayed. Confirm the
pop-up message.
System version
Press ; and then select Settings.
Scroll through the list and select
Software Information .
If a USB device is connected, you
may save the vehicle information to
this USB device.
Select System Update and then Save
Vehicle Info to USB .
For a system update, contact your
workshop.
Vehicle settingsVehicle settings are described in the
Owner's Manual.Radio
Usage
Activating radio
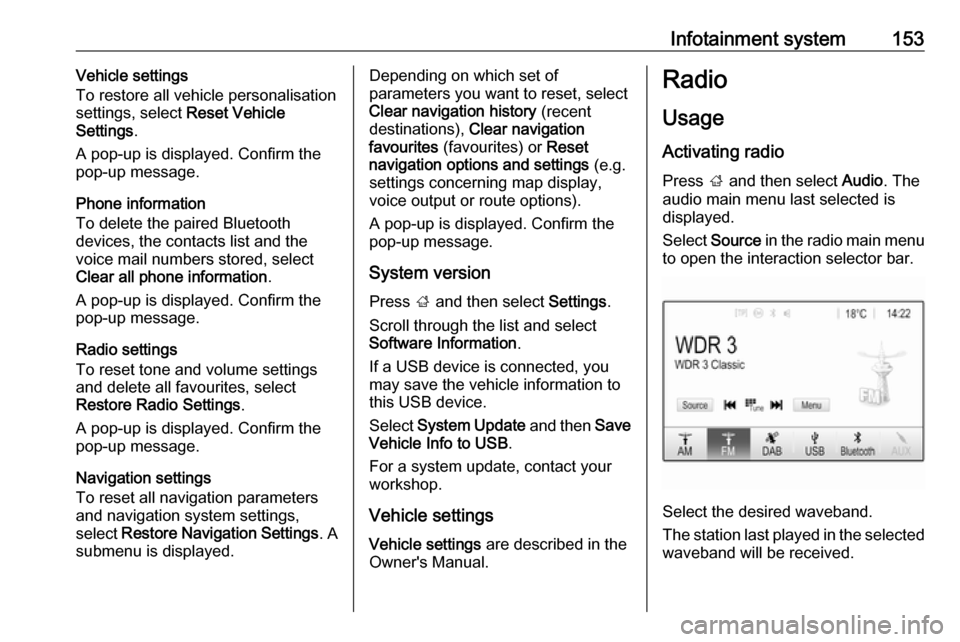
Press ; and then select Audio. The
audio main menu last selected is displayed.
Select Source in the radio main menu
to open the interaction selector bar.
Select the desired waveband.
The station last played in the selected waveband will be received.
Page 223 of 341

Driving and operating221Deactivation of the functionalityPress y, control indicator m in
instrument cluster illuminates white.
Cruise control is deactivated, but not
switched off. Last stored speed
remains in memory for later speed
resume.
Automatic deactivation: ● Vehicle speed is below approx. 30 km/h.
● Vehicle speed drops more than 25 km/h below the set speed.
● The brake pedal is depressed.
● The clutch pedal is depressed for
a few seconds.
● Selector lever is in N.
● Engine speed is in a very low range.
● The Traction Control system or Electronic Stability Control is
operating.
● Parking brake is applied.
● Simultaneous pressing RES/+
and brake pedal deactivates
cruise control and will delete stored speed.Resume stored speed
Turn thumb wheel to RES/+ at a
speed above 30 km/h. The stored
speed will be obtained.
Switching off the system
Press m, control indicator m in
instrument cluster extinguishes. The
stored speed is deleted.
Pressing L to activate the speed
limiter or switching off the ignition also switches off cruise control and
deletes the stored speed.
Speed limiter
The speed limiter prevents the
vehicle exceeding a preset maximum speed.
The maximum speed can be set at
speeds above 25 km/h up to
200 km/h.
The driver can only accelerate up to
the preset speed. Deviations from the
limited speed may occur when driving
downhill.The preset speed limit is displayed in
the Driver Information Centre when
the system is active.
Activation of the functionality
Press L. Symbol Lilluminates in the
Driver Information Centre.
If cruise control or adaptive cruise control has been activated before, it
is switched off when speed limiter is
activated and the control indicator m
extinguishes.