clock OPEL ZAFIRA C 2018 Manual user
[x] Cancel search | Manufacturer: OPEL, Model Year: 2018, Model line: ZAFIRA C, Model: OPEL ZAFIRA C 2018Pages: 341, PDF Size: 9.99 MB
Page 252 of 341

250Driving and operatingVehicles with misfuel inhibitor9Warning
Do not try to open the flap of the
fuel filler neck manually on
vehicles with misfuel inhibitor.
Disregarding this could lead to
trapping of the fingers.
Vehicles with a selective catalytic
reduction system are equipped with a
misfuel inhibitor.
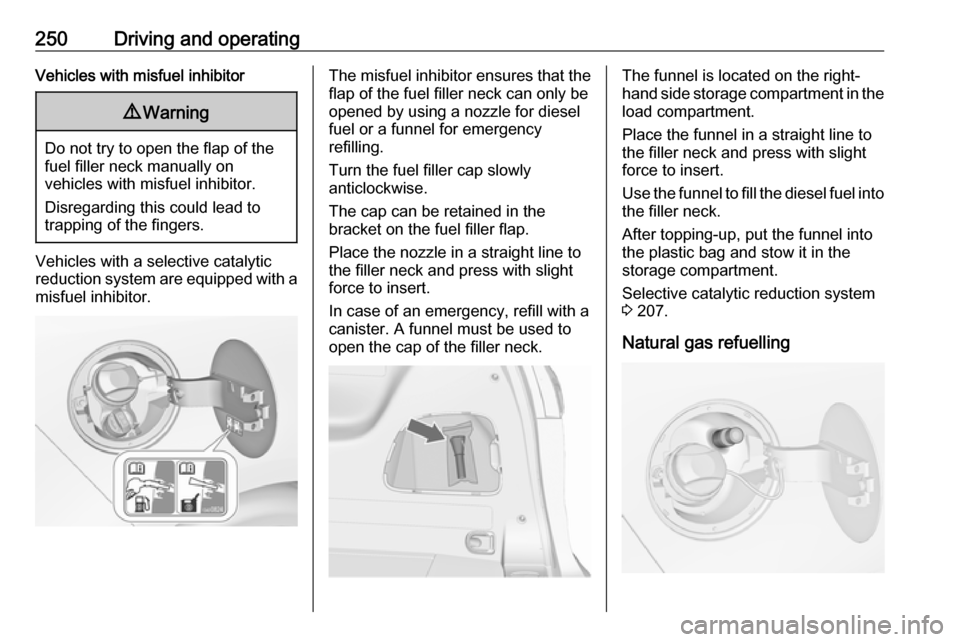
The misfuel inhibitor ensures that the flap of the fuel filler neck can only be
opened by using a nozzle for diesel
fuel or a funnel for emergency
refilling.
Turn the fuel filler cap slowly
anticlockwise.
The cap can be retained in the
bracket on the fuel filler flap.
Place the nozzle in a straight line to the filler neck and press with slight
force to insert.
In case of an emergency, refill with a
canister. A funnel must be used to
open the cap of the filler neck.The funnel is located on the right-
hand side storage compartment in the load compartment.
Place the funnel in a straight line to
the filler neck and press with slight force to insert.
Use the funnel to fill the diesel fuel into
the filler neck.
After topping-up, put the funnel into
the plastic bag and stow it in the storage compartment.
Selective catalytic reduction system
3 207.
Natural gas refuelling
Page 254 of 341

252Driving and operating
ACME Adapter: Screw the nut of the
filling nozzle onto the adapter. Press
locking lever on filler nozzle down.
DISH filler neck: Place the filler nozzle
into the adapter. Press locking lever
on filler nozzle down.
Bayonet filler neck: Place filler nozzle
on the adapter and turn clockwise or
anticlockwise through one quarter
turn. Pull locking lever of filler nozzle
fully.
EURO filler neck: Press the filler
nozzle onto the adapter until it
engages.
Press the button at the liquid gas
supply point. The filling system stops
or begins to run slowly when 80% of
the tank volume is reached
(maximum fill level).
Release button on filling system to
stop the filling process. Release the
locking lever and remove the filler
nozzle. A small quantity of liquid gas
may escape.
Remove adapter and stow in vehicle. Fit protective cap to prevent the
penetration of foreign bodies into the
filler opening and the system.9 Warning
Due to the system design, an
escape of liquid gas after
releasing the locking lever is
unavoidable. Avoid inhaling.
9 Warning
The liquid gas tank should only be
filled to 80% capacity, for safety
reasons.
The multivalve on the liquid gas tank
automatically limits the fill quantity. If
a larger quantity is added, we
recommend not exposing the vehicle
to the sun until the excess amount
has been used up.
Filling adapter
As filling systems are not
standardised, different adapters are
required which are available from
Opel Distributors and from Opel
Authorised Repairers.
ACME adapter: Belgium, Germany,
Ireland, Luxembourg, Switzerland
Page 259 of 341

Driving and operating257Checking the tensioning of the
coupling ball bar
● Red marking on rotary knob must
point towards green marking on
coupling ball bar.
● The gap between the rotary knob
and the coupling ball bar must be approx. 6 mm.
● The key must be in position c.
Otherwise, the coupling ball bar must be tensioned before being inserted:
● Unlock coupling ball bar by turning key to position c.
● Pull out rotary knob and turn
clockwise as far as it will go.
Inserting the coupling ball bar
Insert the tensioned coupling ball bar
in the opening and push firmly
upwards until it audibly engages.
The rotary handle snaps back into its
original position, resting against the
coupling ball bar without a gap.9 Warning
Do not touch rotary handle during
insertion.
Lock the coupling ball bar by turning
the key to position e. Remove the key
and close the protective flap.
Eye for break-away stopping cable
Page 260 of 341

258Driving and operatingAttach breakaway stopping cable to
eye.
Check that the coupling ball bar is correctly installed
● Green marking on rotary knob must point towards green
marking on coupling ball bar.
● There must be no gap between the rotary handle and the
coupling ball bar.
● The coupling ball bar must be firmly engaged in the opening.
● The coupling ball bar must be locked and the key removed.9Warning
Towing a trailer is permitted only
when a coupling ball bar is fitted correctly. If the coupling ball bardoes not engage correctly, seekthe assistance of a workshop.
Dismounting the coupling ball bar
Open the protective flap and turn the
key to position c to unlock the
coupling ball bar.
Pull out rotary handle and turn
clockwise as far as it will go. Pull out coupling ball bar downwards.
Insert sealing plug in opening. Fold away socket.
Trailer stability assist
If the system detects snaking
movements, engine power is reduced
and the vehicle/trailer combination is
selectively braked until the snaking ceases. While system is working keep steering wheel as still as possible.
Trailer stability assist (TSA) is a
function of the Electronic Stability
Control 3 218.
Page 271 of 341

Vehicle care269Low beam (1)
1. Rotate cap anticlockwise andremove it.
2. Rotate the bulb holderanticlockwise to disengage.
Withdraw the bulb holder from the
reflector housing.
3. Remove the bulb from the plug connector by pulling.
4. Replace the bulb and connect it to
the plug connector.
5. Insert the bulb holder, engaging the lugs into the reflector housing
and rotate clockwise to secure.
6. Fit the cap and rotate clockwise.
High beam (2)
1. Rotate cap anticlockwise and remove it.
Page 272 of 341

270Vehicle care2.Withdraw the bulb holder from the
reflector housing.
3. Remove the bulb from the plug connector by pulling.
4. Replace the bulb and connect it to
the plug connector.
5. Insert and push the bulb holder into the reflector housing by
setting the lug into position.
6. Fit the cap and rotate clockwise.
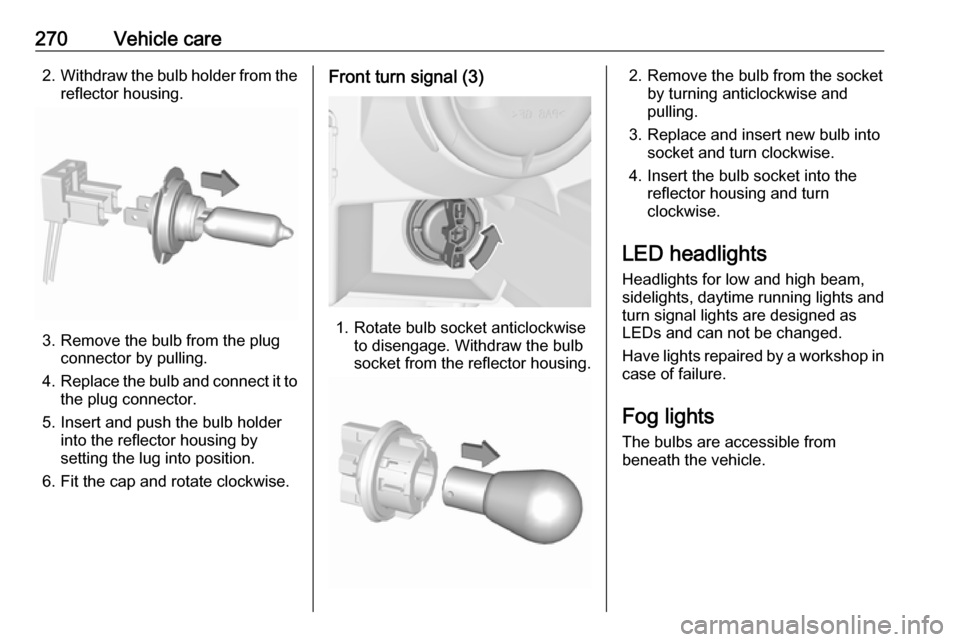
Front turn signal (3)
1. Rotate bulb socket anticlockwise to disengage. Withdraw the bulb
socket from the reflector housing.
2. Remove the bulb from the socket by turning anticlockwise and
pulling.
3. Replace and insert new bulb into socket and turn clockwise.
4. Insert the bulb socket into the reflector housing and turn
clockwise.
LED headlights
Headlights for low and high beam,
sidelights, daytime running lights and turn signal lights are designed as
LEDs and can not be changed.
Have lights repaired by a workshop in
case of failure.
Fog lights
The bulbs are accessible from
beneath the vehicle.
Page 273 of 341

Vehicle care271
1. Remove the outer screws of thecover, as shown in the illustration.
2. Hinge away the cover.
Turn the bulb socket
anticlockwise and remove it from
the reflector housing.
3. Disengage the bulb socket from the plug connector by pressing
the retaining lug.
4. Remove and replace the bulb socket with bulb and attach to the
plug connector.
5. Insert the bulb socket into the reflector housing, turn clockwise
and engage.
6. Mount the cover with the screws.
Tail lights
1. Hinge out the screw cover.
2. Remove the screws, marked by the arrows.
Page 275 of 341

Vehicle care273
2.Turn the bulb holder anticlockwise
and remove it from the reflector.
3. Remove the bulb from the socket by pulling.
4. Replace and insert new bulb intosocket.
5. Insert the bulb socket into the reflector and turn clockwise.
6. Install the cover.
Rear fog light
The bulbs are accessible from
beneath the vehicle.
1. Turn the bulb socket anticlockwise and remove it from
the reflector.
2. Remove the bulb from the socket by turning anticlockwise.
3. Replace and insert new bulb into the socket by turning clockwise.
4. Insert the bulb socket into the reflector, turn clockwise and
engage.
Bulb check
Switch on the ignition, operate and
check all lights.
Page 276 of 341

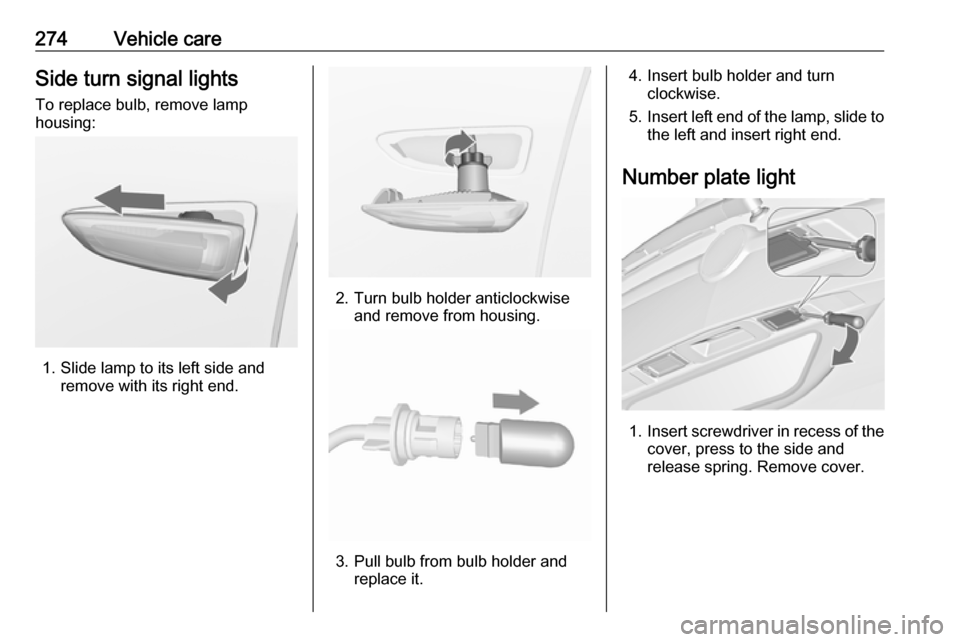
274Vehicle careSide turn signal lightsTo replace bulb, remove lamp
housing:
1. Slide lamp to its left side and remove with its right end.
2. Turn bulb holder anticlockwiseand remove from housing.
3. Pull bulb from bulb holder and replace it.
4. Insert bulb holder and turnclockwise.
5. Insert left end of the lamp, slide to
the left and insert right end.
Number plate light
1. Insert screwdriver in recess of the
cover, press to the side and
release spring. Remove cover.
Page 296 of 341

294Vehicle careFront arm position of the lifting
platform at the underbody.
Spare wheel If mounting a spare wheel which is
different from the other wheels, this
wheel might be classified as a
temporary spare wheel and the
corresponding speed limits apply,
even though no label indicates this.
Seek the assistance of a workshop to
check the applicable speed limit.
The spare wheel has a steel rim.Caution
The use of a spare wheel that is smaller than the other wheels or in combination with winter tyres
could affect driveability. Have the defective tyre replaced as soon as
possible.
The spare wheel is located in a holder
beneath the vehicle floor.
1. Open the storage in the load compartment 3 282.
2. Remove both caps above the
hexagon bolts.
3. Fit the wheel wrench on one hexagon bolt and turn it
anticlockwise until a resistance is
noticeable.
4. Proceed with the other hexagon bolt in the same way.
5. Lift the spare wheel holder andunhook both catches.
6. Lower the spare wheel holder.
7. Detach the safety cable.