tow OPEL ZAFIRA C 2018 Manual user
[x] Cancel search | Manufacturer: OPEL, Model Year: 2018, Model line: ZAFIRA C, Model: OPEL ZAFIRA C 2018Pages: 341, PDF Size: 9.99 MB
Page 138 of 341
136LightingLight switch in position AUTO:
switching on front fog lights will switch headlights on automatically.
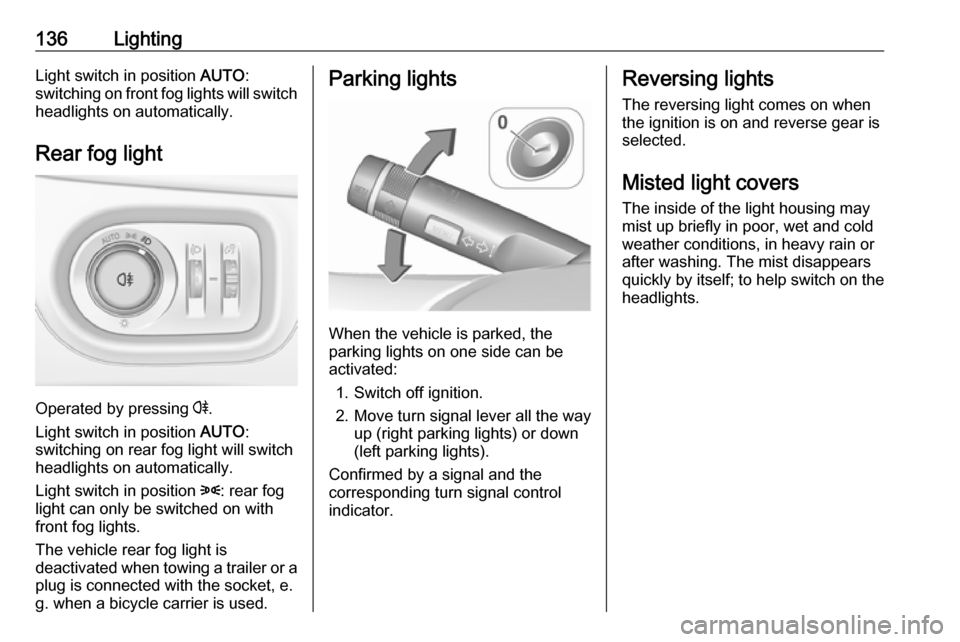
Rear fog light
Operated by pressing r
.
Light switch in position AUTO:
switching on rear fog light will switch
headlights on automatically.
Light switch in position 8: rear fog
light can only be switched on with
front fog lights.
The vehicle rear fog light is
deactivated when towing a trailer or a
plug is connected with the socket, e.
g. when a bicycle carrier is used.
Parking lights
When the vehicle is parked, the
parking lights on one side can be
activated:
1. Switch off ignition.
2. Move turn signal lever all the way up (right parking lights) or down
(left parking lights).
Confirmed by a signal and the
corresponding turn signal control
indicator.
Reversing lights
The reversing light comes on when
the ignition is on and reverse gear is
selected.
Misted light covers
The inside of the light housing may
mist up briefly in poor, wet and cold weather conditions, in heavy rain or
after washing. The mist disappears
quickly by itself; to help switch on the
headlights.
Page 170 of 341

168Infotainment systemMap manipulation
Scrolling
To scroll the map, place your finger
anywhere on the screen and move it
up, down, left or right depending on
the direction in which you want to
scroll.
The map moves accordingly
displaying a new section.
To return to the current location,
select Re-centre on the bottom of the
screen.
Centring
Touch and hold the desired location
on the screen. The map centres
around this location.
A red d is displayed at the respective
location and the corresponding
address is shown on a label.
To return to the current location,
select Re-centre on the bottom of the
screen.
Zooming
To zoom in on a selected map
location, place two fingers on the
screen and move them away from
each other.
Alternatively, use < on the map
screen.
To zoom out and display a larger area around the selected location, place
two fingers on the screen and move
them towards each other.
Alternatively, use ] on the map
screen.
Cancel screen button
During active route guidance, a
Cancel screen button is displayed on
the left side of the screen.
To cancel the active route guidance
session, select Cancel.
For a few seconds, a Resume Trip
screen button is displayed on the map
screen. Select Resume Trip to restart
the cancelled guidance session.
Overview screen button
During active route guidance, an
Overview screen button is displayed
on the left side of the screen.
To display an overview of the route
currently active, select Overview. The
map changes to the desired route
overview.
To return to the normal view, select
Overview again.
f screen button
If route guidance is active and you are
on a highway, an additional f screen
button is displayed on the bottom of
the map.
Select f to display a list of the next
upcoming service stations.
Page 192 of 341

190Climate controlClimate controlClimate control systems.............190
Heating and ventilation system 190
Air conditioning system ...........191
Electronic climate control system .................................... 192
Auxiliary heater ........................196
Air vents ..................................... 196
Adjustable air vents .................196
Fixed air vents ......................... 197
Maintenance .............................. 197
Air intake ................................. 197
Pollen filter ............................... 197
Air conditioning regular
operation ................................ 197
Service .................................... 197Climate control systems
Heating and ventilation system
Controls for: ● temperature
● air distribution
● fan speed
● demisting and defrosting
Heated rear window Ü 3 33.
Temperature
red:warmblue:coldHeating will not be fully effective until
the engine has reached normal
operating temperature.
Air distributionl:to windscreen and front door
windowsM:to head area via adjustable air
ventsK:to foot well and windscreen
All combinations are possible.
Fan speed
Adjust the air flow by switching the fan to the desired speed.
Demisting and defrosting ● Press V: fan automatically
switches to higher speed, the air
distribution is directed towards
the windscreen.
● Set temperature control to warmest level.
● Switch on heated rear window Ü.
● Open side air vents as required and direct them towards the doorwindows.
Page 193 of 341
Climate control191Air conditioning system
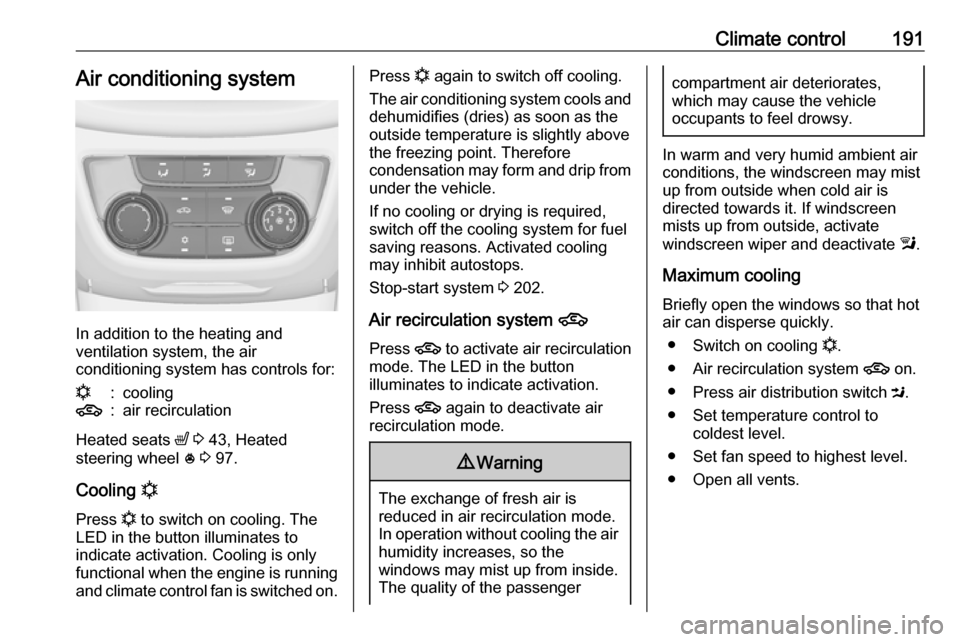
In addition to the heating and
ventilation system, the air
conditioning system has controls for:
n:cooling4:air recirculation
Heated seats ß 3 43, Heated
steering wheel * 3 97.
Cooling n
Press n to switch on cooling. The
LED in the button illuminates to
indicate activation. Cooling is only
functional when the engine is running and climate control fan is switched on.
Press n again to switch off cooling.
The air conditioning system cools and
dehumidifies (dries) as soon as the
outside temperature is slightly above
the freezing point. Therefore
condensation may form and drip from under the vehicle.
If no cooling or drying is required,
switch off the cooling system for fuel
saving reasons. Activated cooling
may inhibit autostops.
Stop-start system 3 202.
Air recirculation system 4
Press 4 to activate air recirculation
mode. The LED in the button
illuminates to indicate activation.
Press 4 again to deactivate air
recirculation mode.9 Warning
The exchange of fresh air is
reduced in air recirculation mode.
In operation without cooling the air humidity increases, so the
windows may mist up from inside.
The quality of the passenger
compartment air deteriorates,
which may cause the vehicle
occupants to feel drowsy.
In warm and very humid ambient air conditions, the windscreen may mist
up from outside when cold air is
directed towards it. If windscreen
mists up from outside, activate
windscreen wiper and deactivate l.
Maximum cooling
Briefly open the windows so that hot
air can disperse quickly.
● Switch on cooling n.
● Air recirculation system 4 on.
● Press air distribution switch M.
● Set temperature control to coldest level.
● Set fan speed to highest level.
● Open all vents.
Page 194 of 341

192Climate controlDemisting and defrosting the
windows V
●
Press V: fan automatically
switches to higher speed, the air
distribution is directed towards
the windscreen.
● Set temperature control to warmest level.
● Switch on heated rear window Ü.
● Open side air vents as required and direct them towards the door
windows.
Note
If V is pressed while the engine is
running, an Autostop will be inhibited
until V is pressed again.
If l is pressed with the fan switched
on and the engine running, an
Autostop will be inhibited until l is
pressed again or until the fan is
switched off.
If V is pressed while the engine is
in an Autostop, the engine will restart
automatically.
If l is pressed with the fan switched
on while the engine is in an
Autostop, the engine will restart
automatically.
Stop-start system 3 202.
Electronic climate control system
The dual zone climate control allows
different climatisation temperatures
for driver side and front passenger
side.
In automatic mode, temperature, fan
speed and air distribution are
regulated automatically.
Controls for:
● temperature on driver side
● air distribution
● fan speed
● temperature on front passenger side
n:coolingAUTO:automatic mode4:manual air recirculationV:demisting and defrosting
Heated rear window Ü 3 33, Heated
seats ß 3 43, Heated steering wheel
* 3 97.
Page 198 of 341
196Climate controldirected towards it. If windscreen
mists up from outside, activate
windscreen wiper and deactivate l.
Basic settings
Some settings can be changed in the
Settings menu in the Info-Display.
Vehicle personalisation 3 124.
Auxiliary heater Air heater
Quickheat is an electric auxiliary air
heater which automatically warms up
the passenger compartment more
quickly.
Air vents
Adjustable air vents
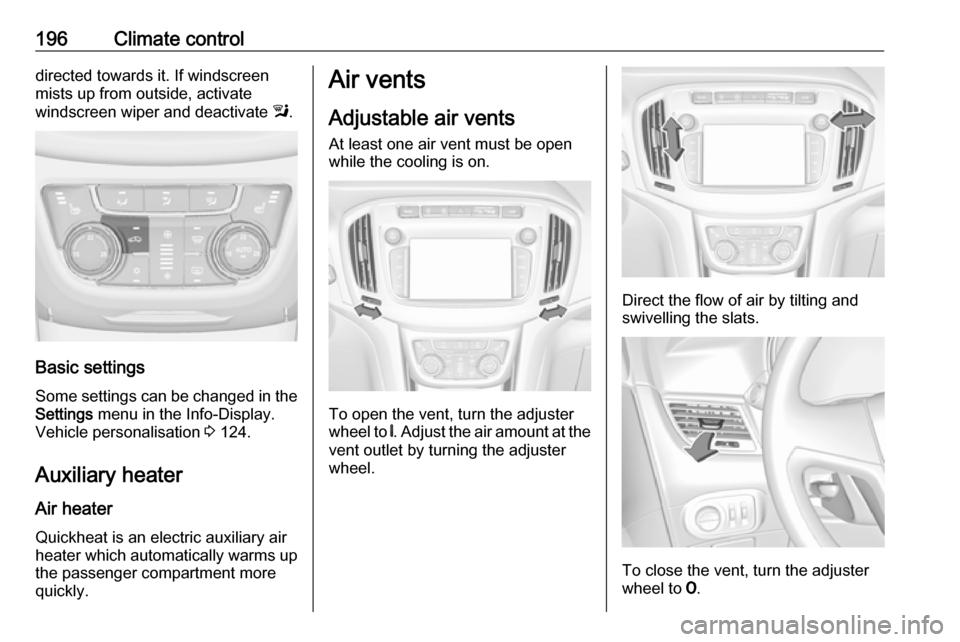
At least one air vent must be open
while the cooling is on.
To open the vent, turn the adjuster
wheel to B. Adjust the air amount at the
vent outlet by turning the adjuster
wheel.
Direct the flow of air by tilting and swivelling the slats.
To close the vent, turn the adjuster
wheel to 7.
Page 200 of 341

198Driving and operatingDriving and
operatingDriving hints ............................... 199
Control of the vehicle ...............199
Steering ................................... 199
Starting and operating ...............199
New vehicle running-in ............199
Ignition switch positions ...........199
Retained power off ..................200
Starting the engine ..................200
Overrun cut-off ........................ 201
Stop-start system ....................202
Parking .................................... 204
Engine exhaust .......................... 205
Diesel particle filter ..................205
Catalytic converter ...................206
AdBlue ..................................... 207
Automatic transmission ..............210
Transmission display ...............210
Selector lever .......................... 210
Manual mode ........................... 211
Electronic driving programmes 211
Fault ........................................ 212
Interruption of power supply ....212
Manual transmission ..................213Brakes........................................ 214
Antilock brake system .............214
Parking brake .......................... 214
Brake assist ............................. 216
Hill start assist ......................... 216
Ride control systems .................217
Traction Control system ..........217
Electronic Stability Control ......218
Interactive driving system ........219
Driver assistance systems .........220
Cruise control .......................... 220
Speed limiter ........................... 222
Adaptive cruise control ............223
Forward collision alert .............230
Following distance indication ...233
Active Emergency Braking ......234
Parking assist .......................... 235
Side blind spot alert .................238
Rear view camera ...................240
Traffic sign assistant ................241
Lane departure warning ..........245
Fuel ............................................ 246
Fuel for petrol engines .............246
Fuel for diesel engines ............247
Fuel for natural gas operation . 248
Fuel for liquid gas operation ....248
Refuelling ................................ 248
Fuel consumption - CO 2-
Emissions ............................... 253Trailer hitch................................ 254
General information .................254
Driving characteristics and towing tips .............................. 255
Trailer towing ........................... 255
Towing equipment ...................256
Trailer stability assist ...............258
Page 206 of 341
204Driving and operating● The vehicle is driven at least atwalking speed.
● The climate control system requests an engine start.
● The air conditioning is manually switched on.
If the bonnet is not fully closed, a
warning message is displayed in the
Driver Information Centre.
If an electrical accessory, e.g. a
portable CD player, is connected to
the power outlet, a brief power drop during engine restart may be
noticeable.
Parking9 Warning
● Do not park the vehicle on an
easily ignitable surface. The
high temperature of the
exhaust system could ignite the
surface.
● Always apply the parking brake. Activate the manual
parking brake without pressing
the release button. Apply as
firmly as possible on a downhill slope or uphill slope. Depress
brake pedal at the same time to
reduce operating force.
For vehicles with electric
parking brake, pull switch m for
a minimum of one second until
control indicator m illuminates
constantly and electric parking
brake is applied 3 112.
● Switch off the engine. ● If the vehicle is on a level surface or uphill slope, engage
first gear or set the selector
lever to position P before
removing the ignition key. On
an uphill slope, turn the front
wheels away from the kerb.
If the vehicle is on a downhill
slope, engage reverse gear or
set the selector lever to position
P before removing the ignition
key. Turn the front wheels
towards the kerb.● Close the windows.
● Remove the ignition key from the ignition switch. Turn the
steering wheel until the
steering wheel lock is felt to
engage.
For vehicles with automatic
transmission, the key can only
be removed when the selector
lever is in position P.
● Lock the vehicle.
● Activate the anti-theft alarm system.
● The engine cooling fans may run
after the engine has been
switched off 3 261.
Caution
After running at high engine
speeds or with high engine loads,
operate the engine briefly at a low load or run in neutral for
approx. 30 seconds before
switching off, in order to protect
the turbocharger.
Page 208 of 341
206Driving and operatingindicated by illumination of % and a
warning message in the Driver
Information Centre.
% illuminates along with a warning
message when diesel particle filter is
full. Start cleaning process as soon as
possible.
% flashes along with a warning
message when diesel particle filter
has reached the maximum filling
level. Start cleaning process
immediately to avoid damage to the
engine.
Activate self-cleaning process To activate cleaning process,
continue driving, keep engine speed
above 2000 rpm. Shift down if
necessary. Diesel particle filter
cleaning is then started.
Cleaning process is completed more
quickly at high engine speeds and
loads.
Control indicator % extinguishes as
soon as the self-cleaning operation is
complete. Keep on driving until self-
cleaning operation is complete.Caution
If possible, do not interrupt
cleaning process. Drive until
cleaning is completed to avoid the need for service or repair by a
workshop.
Cleaning process not possible
If cleaning is not possible for anyreasons, control indicator Z
illuminates and a warning message
appears in the Driver Information
Centre. Engine power may be
reduced. Seek the assistance of a
workshop immediately.
Catalytic converter
The catalytic converter reduces the
amount of harmful substances in the
exhaust gases.
Caution
Fuel grades other than those listed on pages 3 246, 3 313 could
damage the catalytic converter or
electronic components.
Unburnt petrol will overheat and
damage the catalytic converter.
Therefore avoid excessive use of the starter, running the fuel tank
dry and starting the engine by
pushing or towing.
In the event of misfiring, uneven
engine running, a reduction in engine performance or other unusual
problems, have the cause of the fault
rectified by a workshop as soon as
possible. In an emergency, driving
can be continued for a short period,
keeping vehicle speed and engine
speed low.
Page 209 of 341

Driving and operating207AdBlue
General information
The selective catalytic reduction
(BlueInjection) is a method to
substantially reduce the nitrogen
oxides in the exhaust emission. This
is achieved by injecting a Diesel
Exhaust Fluid (DEF) into the exhaust
system. The ammonia released by
the fluid reacts with nitrous gases
(NO x) from the exhaust and turns it
into nitrogen and water.
The designation of this fluid is
AdBlue ®
. It is a non-toxic, non-
flammable, colourless and odourless
fluid which consists of 32% urea and
68% water.9 Warning
Avoid contact of your eyes or skin
with AdBlue.
In case of eye or skin contact,
rinse off with water.
Caution
Avoid contact of the paintwork with AdBlue.
In case of contact, rinse off with water.
AdBlue freezes at a temperature of
approx. -11 °C. As the vehicle is
equipped with an AdBlue pre-heater,
the emissions reduction at low
temperatures is ensured. The AdBlue
pre-heater works automatically.
The typical AdBlue consumption is
approx. 1.2 litres per 1000 km for
vehicles with engine B16DTH or
B16DTJ and approx. two litres per
1000 km for vehicles with engine
B20DTH. The consumption can also
be higher depending on driving
behaviour (e.g. high load or towing).
AdBlue tank
At a remaining volume of approx. five litres, there is a liquid level switch.
Warning messages are displayed
only below that threshold. Tank
volume 3 318.
Level warnings
Depending on the calculated range of AdBlue, different messages are
displayed in the Driver Information
Centre. The messages and the
restrictions are a legal requirement.
The first possible warning is AdBlue
Range: 2400 km .
This warning will show up once briefly with the calculated range. Driving is
possible without any restrictions.
The next warning level is entered with
a range below 1750 km. The
message with the current range will
always be displayed when ignition is
switched on and needs to be
confirmed 3 117 . Refill AdBlue before
entering the next warning level.
At an AdBlue range below 900 km,
the following warning messages are
alternately displayed and cannot be
dismissed:
● AdBlue Low Refill Now
● Engine Restart Prevented in 900
km .
Additionally, control indicator Y
flashes continuously.