steering wheel OPEL ZAFIRA C 2018 Manual user
[x] Cancel search | Manufacturer: OPEL, Model Year: 2018, Model line: ZAFIRA C, Model: OPEL ZAFIRA C 2018Pages: 341, PDF Size: 9.99 MB
Page 189 of 341
Infotainment system187Using speed dial numbers
Speed dial numbers that are stored
on the mobile phone can also be
dialled using the keypad of the phone
main menu.
Press ; and then select Phone.
Touch and hold the respective digit on the keypad to initiate the call.
Incoming phone call
Taking a call
If an audio mode, e.g. the radio or
USB mode, is active at the moment a call comes in, the audio source is
muted and stays muted until the call
ends.
A message with the caller's phone
number or name (if available) is
displayed.
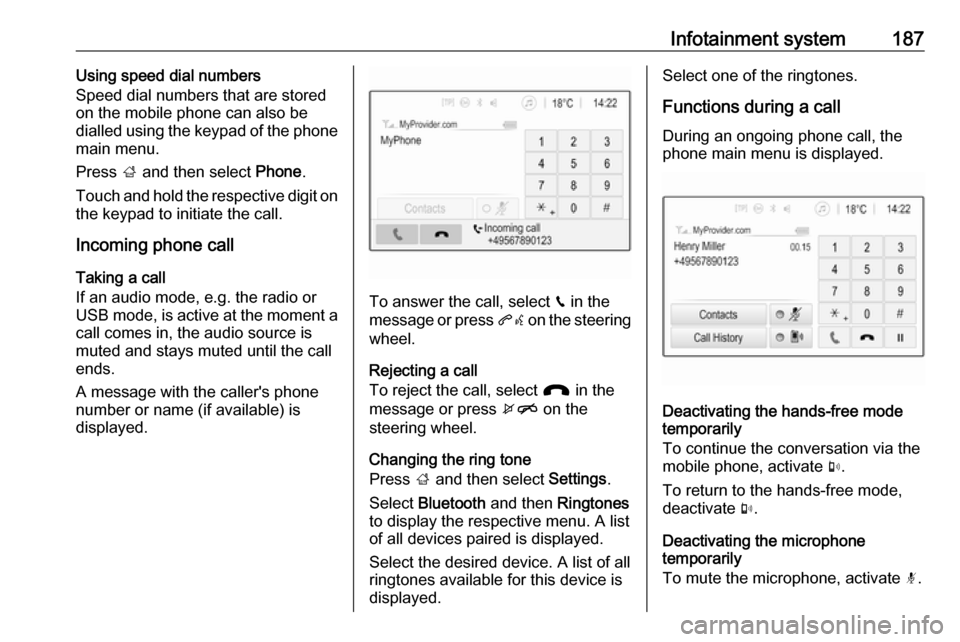
To answer the call, select v in the
message or press qw on the steering
wheel.
Rejecting a call
To reject the call, select J in the
message or press xn on the
steering wheel.
Changing the ring tone
Press ; and then select Settings.
Select Bluetooth and then Ringtones
to display the respective menu. A list
of all devices paired is displayed.
Select the desired device. A list of all
ringtones available for this device is
displayed.
Select one of the ringtones.
Functions during a call
During an ongoing phone call, the
phone main menu is displayed.
Deactivating the hands-free mode
temporarily
To continue the conversation via the mobile phone, activate m.
To return to the hands-free mode,
deactivate m.
Deactivating the microphone
temporarily
To mute the microphone, activate n.
Page 193 of 341
Climate control191Air conditioning system
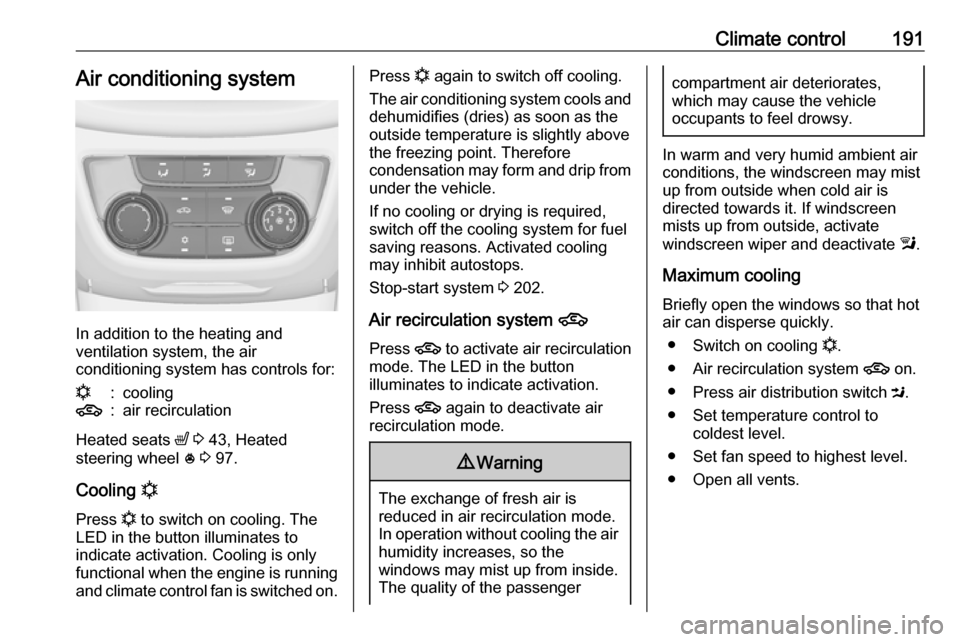
In addition to the heating and
ventilation system, the air
conditioning system has controls for:
n:cooling4:air recirculation
Heated seats ß 3 43, Heated
steering wheel * 3 97.
Cooling n
Press n to switch on cooling. The
LED in the button illuminates to
indicate activation. Cooling is only
functional when the engine is running and climate control fan is switched on.
Press n again to switch off cooling.
The air conditioning system cools and
dehumidifies (dries) as soon as the
outside temperature is slightly above
the freezing point. Therefore
condensation may form and drip from under the vehicle.
If no cooling or drying is required,
switch off the cooling system for fuel
saving reasons. Activated cooling
may inhibit autostops.
Stop-start system 3 202.
Air recirculation system 4
Press 4 to activate air recirculation
mode. The LED in the button
illuminates to indicate activation.
Press 4 again to deactivate air
recirculation mode.9 Warning
The exchange of fresh air is
reduced in air recirculation mode.
In operation without cooling the air humidity increases, so the
windows may mist up from inside.
The quality of the passenger
compartment air deteriorates,
which may cause the vehicle
occupants to feel drowsy.
In warm and very humid ambient air conditions, the windscreen may mist
up from outside when cold air is
directed towards it. If windscreen
mists up from outside, activate
windscreen wiper and deactivate l.
Maximum cooling
Briefly open the windows so that hot
air can disperse quickly.
● Switch on cooling n.
● Air recirculation system 4 on.
● Press air distribution switch M.
● Set temperature control to coldest level.
● Set fan speed to highest level.
● Open all vents.
Page 194 of 341

192Climate controlDemisting and defrosting the
windows V
●
Press V: fan automatically
switches to higher speed, the air
distribution is directed towards
the windscreen.
● Set temperature control to warmest level.
● Switch on heated rear window Ü.
● Open side air vents as required and direct them towards the door
windows.
Note
If V is pressed while the engine is
running, an Autostop will be inhibited
until V is pressed again.
If l is pressed with the fan switched
on and the engine running, an
Autostop will be inhibited until l is
pressed again or until the fan is
switched off.
If V is pressed while the engine is
in an Autostop, the engine will restart
automatically.
If l is pressed with the fan switched
on while the engine is in an
Autostop, the engine will restart
automatically.
Stop-start system 3 202.
Electronic climate control system
The dual zone climate control allows
different climatisation temperatures
for driver side and front passenger
side.
In automatic mode, temperature, fan
speed and air distribution are
regulated automatically.
Controls for:
● temperature on driver side
● air distribution
● fan speed
● temperature on front passenger side
n:coolingAUTO:automatic mode4:manual air recirculationV:demisting and defrosting
Heated rear window Ü 3 33, Heated
seats ß 3 43, Heated steering wheel
* 3 97.
Page 202 of 341
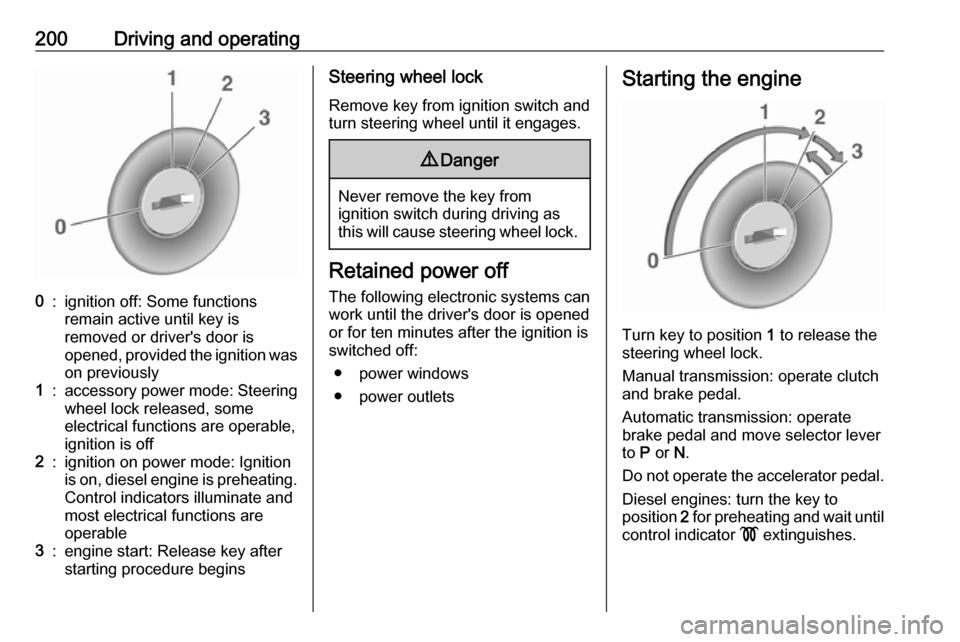
200Driving and operating0:ignition off: Some functions
remain active until key is
removed or driver's door is
opened, provided the ignition was
on previously1:accessory power mode: Steering wheel lock released, some
electrical functions are operable,
ignition is off2:ignition on power mode: Ignition
is on, diesel engine is preheating.
Control indicators illuminate and
most electrical functions are
operable3:engine start: Release key after
starting procedure beginsSteering wheel lock
Remove key from ignition switch and
turn steering wheel until it engages.9 Danger
Never remove the key from
ignition switch during driving as
this will cause steering wheel lock.
Retained power off
The following electronic systems can
work until the driver's door is opened
or for ten minutes after the ignition is
switched off:
● power windows
● power outlets
Starting the engine
Turn key to position 1 to release the
steering wheel lock.
Manual transmission: operate clutch
and brake pedal.
Automatic transmission: operate
brake pedal and move selector lever
to P or N.
Do not operate the accelerator pedal. Diesel engines: turn the key to
position 2 for preheating and wait until
control indicator ! extinguishes.
Page 206 of 341
204Driving and operating● The vehicle is driven at least atwalking speed.
● The climate control system requests an engine start.
● The air conditioning is manually switched on.
If the bonnet is not fully closed, a
warning message is displayed in the
Driver Information Centre.
If an electrical accessory, e.g. a
portable CD player, is connected to
the power outlet, a brief power drop during engine restart may be
noticeable.
Parking9 Warning
● Do not park the vehicle on an
easily ignitable surface. The
high temperature of the
exhaust system could ignite the
surface.
● Always apply the parking brake. Activate the manual
parking brake without pressing
the release button. Apply as
firmly as possible on a downhill slope or uphill slope. Depress
brake pedal at the same time to
reduce operating force.
For vehicles with electric
parking brake, pull switch m for
a minimum of one second until
control indicator m illuminates
constantly and electric parking
brake is applied 3 112.
● Switch off the engine. ● If the vehicle is on a level surface or uphill slope, engage
first gear or set the selector
lever to position P before
removing the ignition key. On
an uphill slope, turn the front
wheels away from the kerb.
If the vehicle is on a downhill
slope, engage reverse gear or
set the selector lever to position
P before removing the ignition
key. Turn the front wheels
towards the kerb.● Close the windows.
● Remove the ignition key from the ignition switch. Turn the
steering wheel until the
steering wheel lock is felt to
engage.
For vehicles with automatic
transmission, the key can only
be removed when the selector
lever is in position P.
● Lock the vehicle.
● Activate the anti-theft alarm system.
● The engine cooling fans may run
after the engine has been
switched off 3 261.
Caution
After running at high engine
speeds or with high engine loads,
operate the engine briefly at a low load or run in neutral for
approx. 30 seconds before
switching off, in order to protect
the turbocharger.
Page 260 of 341

258Driving and operatingAttach breakaway stopping cable to
eye.
Check that the coupling ball bar is correctly installed
● Green marking on rotary knob must point towards green
marking on coupling ball bar.
● There must be no gap between the rotary handle and the
coupling ball bar.
● The coupling ball bar must be firmly engaged in the opening.
● The coupling ball bar must be locked and the key removed.9Warning
Towing a trailer is permitted only
when a coupling ball bar is fitted correctly. If the coupling ball bardoes not engage correctly, seekthe assistance of a workshop.
Dismounting the coupling ball bar
Open the protective flap and turn the
key to position c to unlock the
coupling ball bar.
Pull out rotary handle and turn
clockwise as far as it will go. Pull out coupling ball bar downwards.
Insert sealing plug in opening. Fold away socket.
Trailer stability assist
If the system detects snaking
movements, engine power is reduced
and the vehicle/trailer combination is
selectively braked until the snaking ceases. While system is working keep steering wheel as still as possible.
Trailer stability assist (TSA) is a
function of the Electronic Stability
Control 3 218.
Page 261 of 341

Vehicle care259Vehicle careGeneral Information...................260
Accessories and vehicle modifications .......................... 260
Vehicle storage ........................260
End-of-life vehicle recovery .....261
Vehicle checks ........................... 261
Performing work ......................261
Bonnet ..................................... 261
Engine oil ................................. 262
Engine coolant ......................... 263
Power steering fluid .................264
Washer fluid ............................ 265
Brakes ..................................... 265
Brake fluid ............................... 265
Vehicle battery ......................... 265
Diesel fuel system bleeding .....267
Wiper blade replacement ........267
Bulb replacement .......................268
Halogen headlights ..................268
LED headlights ........................ 270
Fog lights ................................. 270
Tail lights ................................. 271
Side turn signal lights ..............274
Number plate light ...................274Interior lights ............................ 275
Instrument panel illumination ...275
Electrical system ........................275
Fuses ....................................... 275
Engine compartment fuse box . 277
Instrument panel fuse box .......279
Load compartment fuse box ....280
Vehicle tools .............................. 282
Tools ........................................ 282
Wheels and tyres .......................282
Winter tyres ............................. 282
Tyre designations ....................282
Tyre pressure .......................... 283
Tyre pressure monitoring system .................................... 284
Tread depth ............................. 287
Changing tyre and wheel size . 288
Wheel covers ........................... 288
Tyre chains .............................. 288
Tyre repair kit .......................... 288
Wheel changing .......................291
Spare wheel ............................ 294
Jump starting ............................. 297
Towing ....................................... 298
Towing the vehicle ...................298
Towing another vehicle ...........299Appearance care .......................300
Exterior care ............................ 300
Interior care ............................. 302
Page 281 of 341
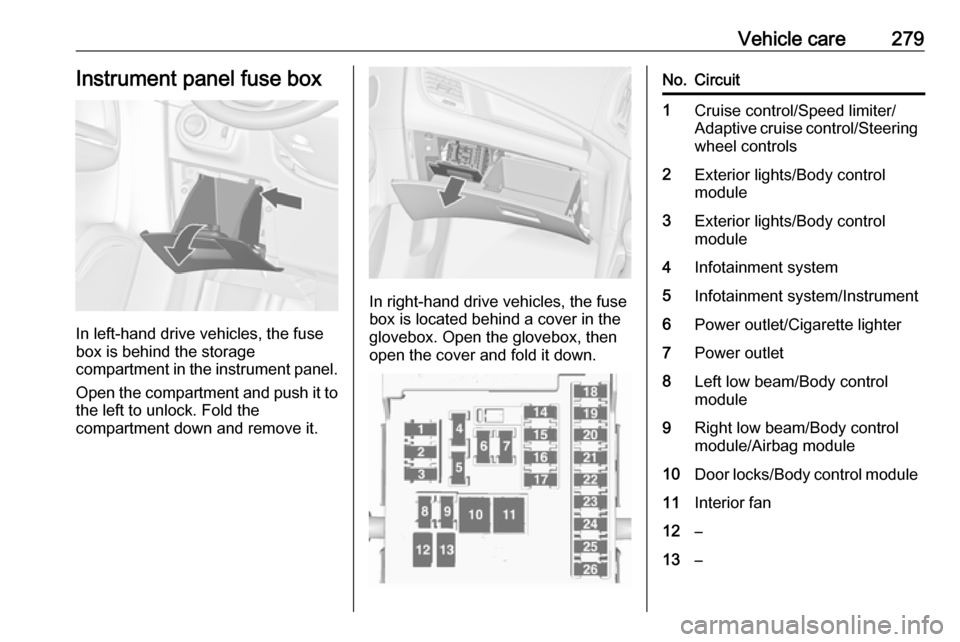
Vehicle care279Instrument panel fuse box
In left-hand drive vehicles, the fuse
box is behind the storage
compartment in the instrument panel.
Open the compartment and push it to the left to unlock. Fold the
compartment down and remove it.
In right-hand drive vehicles, the fuse
box is located behind a cover in the
glovebox. Open the glovebox, then
open the cover and fold it down.
No.Circuit1Cruise control/Speed limiter/
Adaptive cruise control/Steering wheel controls2Exterior lights/Body control
module3Exterior lights/Body control
module4Infotainment system5Infotainment system/Instrument6Power outlet/Cigarette lighter7Power outlet8Left low beam/Body control
module9Right low beam/Body control
module/Airbag module10Door locks/Body control module11Interior fan12–13–
Page 283 of 341

Vehicle care281No.Circuit1–2Trailer outlet3Parking assist4Selective catalytic reduction
system5–6–7Power seat8–9Selective catalytic reduction
system10Nitrogen oxide sensor11Trailer module/Trailer socket12Trailer module13Trailer outlet14–15–No.Circuit16Interior mirror/Rear view
camera17Power outlet18–19Steering wheel heating20Sunblind21Heated front seats22–23–24Selective catalytic reduction
system25–26–27–28–29–30–No.Circuit31–32Active damping system/Lane
departure warning
Page 301 of 341
Vehicle care299
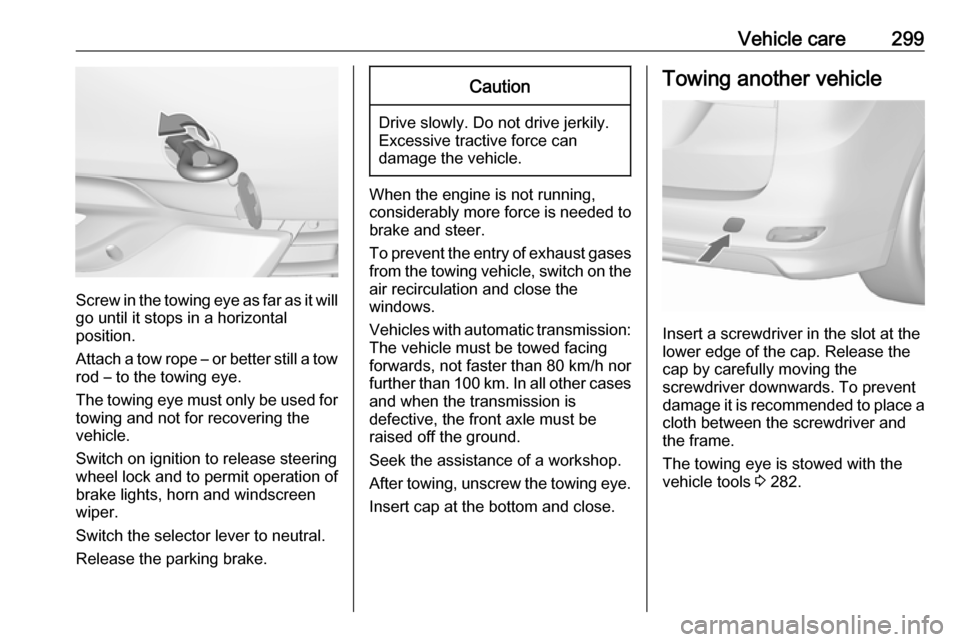
Screw in the towing eye as far as it will
go until it stops in a horizontal
position.
Attach a tow rope – or better still a tow
rod – to the towing eye.
The towing eye must only be used for towing and not for recovering the
vehicle.
Switch on ignition to release steering
wheel lock and to permit operation of
brake lights, horn and windscreen
wiper.
Switch the selector lever to neutral.
Release the parking brake.
Caution
Drive slowly. Do not drive jerkily.
Excessive tractive force can
damage the vehicle.
When the engine is not running,
considerably more force is needed to
brake and steer.
To prevent the entry of exhaust gases from the towing vehicle, switch on the
air recirculation and close the
windows.
Vehicles with automatic transmission: The vehicle must be towed facing
forwards, not faster than 80 km/h nor further than 100 km. In all other cases
and when the transmission is
defective, the front axle must be
raised off the ground.
Seek the assistance of a workshop.
After towing, unscrew the towing eye.
Insert cap at the bottom and close.
Towing another vehicle
Insert a screwdriver in the slot at the
lower edge of the cap. Release the
cap by carefully moving the
screwdriver downwards. To prevent
damage it is recommended to place a cloth between the screwdriver and
the frame.
The towing eye is stowed with the vehicle tools 3 282.