change time OPEL ZAFIRA C 2019 Manual user
[x] Cancel search | Manufacturer: OPEL, Model Year: 2019, Model line: ZAFIRA C, Model: OPEL ZAFIRA C 2019Pages: 317, PDF Size: 9.38 MB
Page 124 of 317

122LightingReading lights
Operated by pressing s and t in
front and rear courtesy lights.
Sunvisor lights Illuminates when the cover is opened.
Lighting features
Centre console lighting Spotlight incorporated in the interior
lighting comes on when headlights
are switched on.
Entry lighting
Welcome lighting Headlights, tail lights, number plate
lights, instrument panel light, interior
lights and the light pipes in doors and
FlexConsole are switched on for a
short time by unlocking the vehicle
with the radio remote control. This
function works only in the dark and
facilitates locating the vehicle.
The lighting switches off immediately
when the ignition key is turned to
position 1 3 182.
Activation or deactivation of this
function can be changed in the
Settings menu in the Info-Display.
Vehicle personalisation 3 108.
The settings can be saved for the key being used 3 22.The following lights will additionally
switch on when the driver's door is
opened:
● illumination of some switches
● Driver Information Centre
● door pocket lights
Exit lighting The following lights switch on if the
key is removed from the ignition
switch:
● interior lights
● instrument panel light (only when
it is dark)
● light tubes in doors
● number plate lights (puddle lights)
They will switch off automatically after
a delay and will be activated again if
the driver's door is opened.
Path lighting Headlights, tail lights and number
plate lights illuminate the surrounding
area for an adjustable time after
leaving the vehicle.
Page 125 of 317
Lighting123Activating
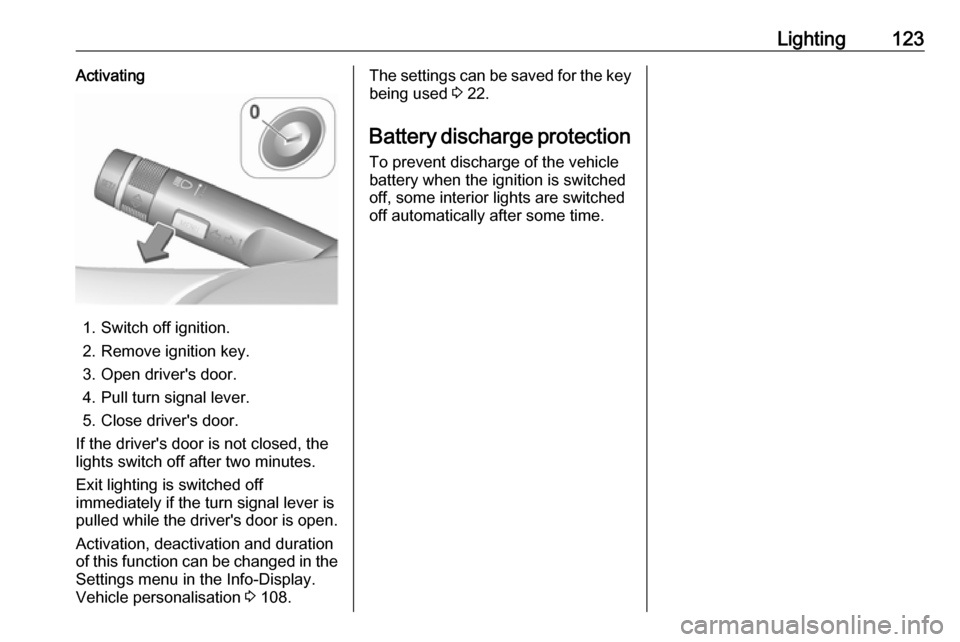
1. Switch off ignition.
2. Remove ignition key.
3. Open driver's door.
4. Pull turn signal lever.
5. Close driver's door.
If the driver's door is not closed, the
lights switch off after two minutes.
Exit lighting is switched off
immediately if the turn signal lever is pulled while the driver's door is open.
Activation, deactivation and duration
of this function can be changed in the Settings menu in the Info-Display.
Vehicle personalisation 3 108.
The settings can be saved for the key
being used 3 22.
Battery discharge protection
To prevent discharge of the vehicle
battery when the ignition is switched
off, some interior lights are switched
off automatically after some time.
Page 127 of 317
Infotainment system125panel, the controls on the steering
wheel, or - if provided by your mobile
phone - via speech recognition.
The well-thought-out design of the
control elements, the touch screen
and the clear display enable you to
control the system easily and
intuitively.
Note
This manual describes all options
and features available for the
various Infotainment systems.
Certain descriptions, including those
for display and menu functions, may
not apply to your vehicle due to
model variant, country
specifications, special equipment or
accessories.
Important information on
operation and traffic safety9 Warning
The Infotainment system must be
used so that the vehicle can be
driven safely at all times. If in
doubt, stop the vehicle and
operate the Infotainment system
while the vehicle is stationary.9 Warning
In some areas one-way streets
and other roads and entrances
(e.g. pedestrian zones) that you
are not allowed to turn into are not marked on the map. In such areas
the Infotainment system may
issue a warning that must be
accepted. Here you must pay
particular attention to one-way
streets, roads and entrances that
you are not allowed to drive into.
Radio reception
Radio reception may be disrupted by
static, noise, distortion or loss of
reception due to:
● changes in distance from the transmitter
● multipath reception due to reflection
● shadowing
Theft-deterrent feature
The Infotainment system is equipped
with an electronic security system for
the purpose of theft deterrence.
The Infotainment system therefore
functions only in your vehicle and is
worthless to a thief.
Page 149 of 317
Infotainment system147Display settings
Select Display Settings to open a
submenu for the adjustment of brightness and contrast.
Touch + or - to adjust the settings.
Playing movies You can view movies from a USBdevice.
Note
For your safety, the movie function is
not available while driving.
Activating the movie function
If the device is not yet connected to
the Infotainment system, connect the device 3 143.
Press ; and then select Gallery to
open the media main menu.
Touch m to open the movie main
menu to display a list of items stored
on the USB device. Select the desired
movie. If this is stored within a folder,
select the respective folder first.
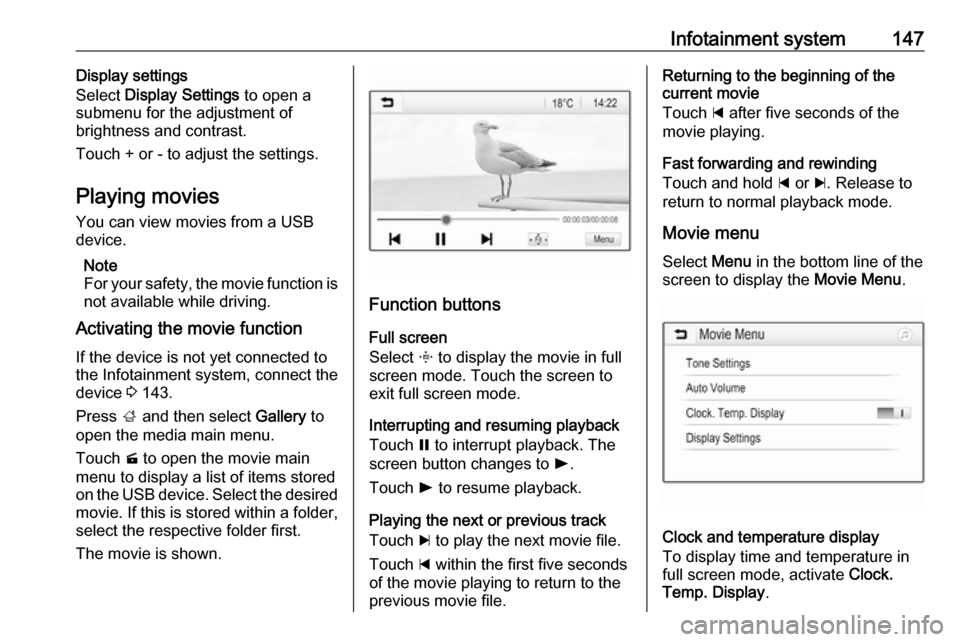
The movie is shown.
Function buttons
Full screen
Select x to display the movie in full
screen mode. Touch the screen to
exit full screen mode.
Interrupting and resuming playback
Touch = to interrupt playback. The
screen button changes to l.
Touch l to resume playback.
Playing the next or previous track
Touch c to play the next movie file.
Touch d within the first five seconds
of the movie playing to return to the
previous movie file.
Returning to the beginning of the
current movie
Touch d after five seconds of the
movie playing.
Fast forwarding and rewinding
Touch and hold d or c. Release to
return to normal playback mode.
Movie menuSelect Menu in the bottom line of the
screen to display the Movie Menu.
Clock and temperature display
To display time and temperature in
full screen mode, activate Clock.
Temp. Display .
Page 155 of 317
Infotainment system153
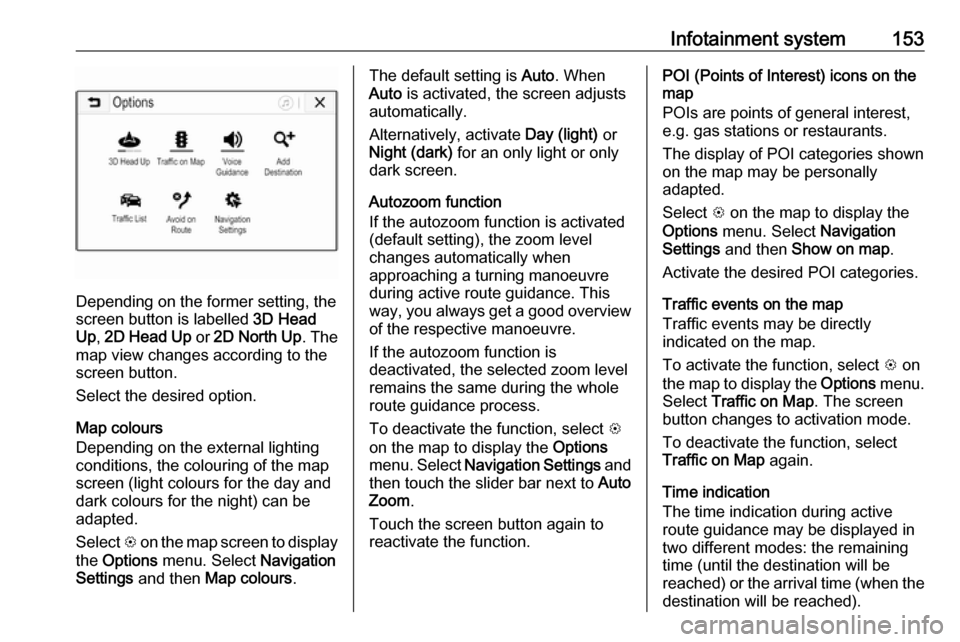
Depending on the former setting, the
screen button is labelled 3D Head
Up , 2D Head Up or 2D North Up . The
map view changes according to the
screen button.
Select the desired option.
Map colours
Depending on the external lighting
conditions, the colouring of the map
screen (light colours for the day and
dark colours for the night) can be
adapted.
Select L on the map screen to display
the Options menu. Select Navigation
Settings and then Map colours .
The default setting is Auto. When
Auto is activated, the screen adjusts
automatically.
Alternatively, activate Day (light) or
Night (dark) for an only light or only
dark screen.
Autozoom function
If the autozoom function is activated
(default setting), the zoom level
changes automatically when
approaching a turning manoeuvre
during active route guidance. This
way, you always get a good overview of the respective manoeuvre.
If the autozoom function is
deactivated, the selected zoom level
remains the same during the whole
route guidance process.
To deactivate the function, select L
on the map to display the Options
menu. Select Navigation Settings and
then touch the slider bar next to Auto
Zoom .
Touch the screen button again to
reactivate the function.POI (Points of Interest) icons on the
map
POIs are points of general interest,
e.g. gas stations or restaurants.
The display of POI categories shown
on the map may be personally
adapted.
Select L on the map to display the
Options menu. Select Navigation
Settings and then Show on map .
Activate the desired POI categories.
Traffic events on the map
Traffic events may be directly
indicated on the map.
To activate the function, select L on
the map to display the Options menu.
Select Traffic on Map . The screen
button changes to activation mode.
To deactivate the function, select
Traffic on Map again.
Time indication
The time indication during active
route guidance may be displayed in
two different modes: the remaining
time (until the destination will be
reached) or the arrival time (when the destination will be reached).
Page 156 of 317

154Infotainment systemSelect L on the map to display the
Options menu. Select Navigation
Settings and then Time to Destination
Format .
Activate the desired option in the
submenu.
Note
During active route guidance, the
time indication can be changed by
simply tapping on the time indication
field on the screen.
Alert preferences
If desired, you may receive an
additional notification in specific traffic
zones.
Select L on the map to display the
Options menu. Select Navigation
Settings and then Alert Preferences .
If Safety camera is activated, you are
warned when approaching a
stationary speed camera.
Note
This function is only available if such an alert system corresponds to the
legal provisions applicable in the
country you are in.
Activate the desired option.Voice guidance
The route guidance process can be
supported by voice prompts given out
by the system.
Note
The navigation voice prompts
function is not supported for all
languages. If there are no voice
prompts available, the system
automatically plays a tone to
indicate a manoeuvre ahead.
Activation
The voice guidance function is
activated by default. To deactivate
the function, select L on the map to
display the Options menu and then
touch Voice Guidance . The screen
button changes.
Select the screen button again to
reactivate the function.
Voice guidance settings
To define which system outputs may assist during active route guidance,
select L on the map, Navigation
Settings and then Voice Guidance .If Normal voice guidance is activated,
a voice announces the next turning
manoeuvre to be taken.
If Beep only is activated, only beep
tones are given out for notification.
In the submenu of Prompts during
Phone Call , the possible voice
outputs during a phone call can be
set.
Activate the desired options.
Note
Voice guidance prompts are only
given out if Voice Guidance is
activated in the Options menu, see
above.
Information
Select L on the map to display the
Options menu. Select Navigation
Settings and then About.
The texts of the manufacturer's terms and conditions or privacy statement
can be accessed via the respective
menu items.
The navigation map version is
displayed.
Page 162 of 317
160Infotainment systemNote
If you select Go, route guidance to
the destination first selected is
stopped and route guidance to the
new destination is started.
The destinations are arranged in the
order in which they are entered while
the last destination added is the first
you are guided to. In order to check or
confirm while driving, the name of the
next destination is displayed above
the arrival time and distance.
The order of the destinations can be
changed 3 160.
Guidance
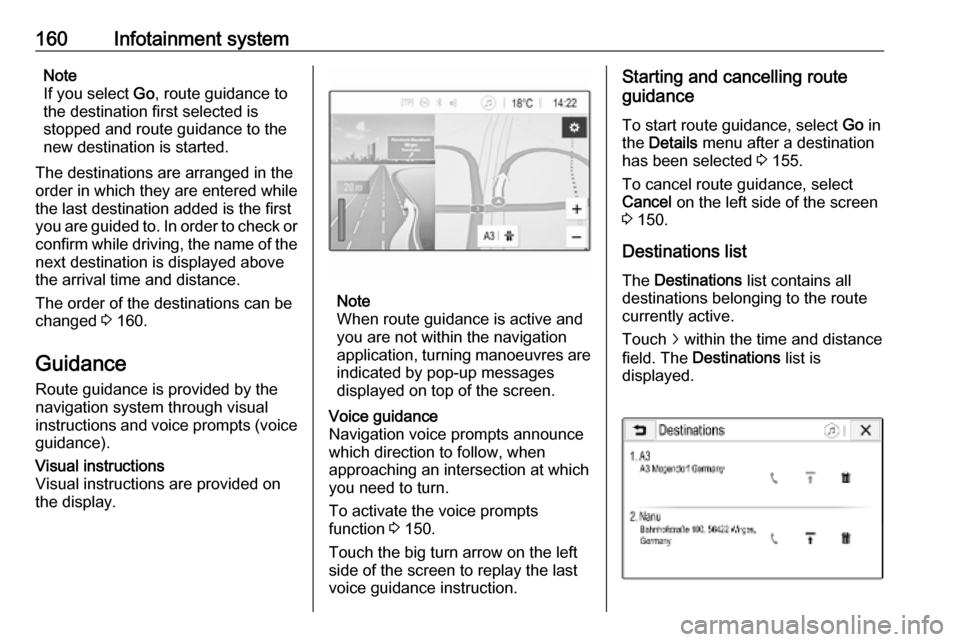
Route guidance is provided by the navigation system through visual
instructions and voice prompts (voice guidance).Visual instructions
Visual instructions are provided on
the display.
Note
When route guidance is active and
you are not within the navigation
application, turning manoeuvres are indicated by pop-up messages
displayed on top of the screen.
Voice guidance
Navigation voice prompts announce
which direction to follow, when
approaching an intersection at which
you need to turn.
To activate the voice prompts
function 3 150.
Touch the big turn arrow on the left side of the screen to replay the last voice guidance instruction.Starting and cancelling route
guidance
To start route guidance, select Go in
the Details menu after a destination
has been selected 3 155.
To cancel route guidance, select
Cancel on the left side of the screen
3 150.
Destinations list
The Destinations list contains all
destinations belonging to the route
currently active.
Touch j within the time and distance
field. The Destinations list is
displayed.
Page 212 of 317
210Driving and operatingSwitching off the system
Press C to switch off adaptive cruise
control. The control indicator m and
C in the Driver Information Centre
extinguish. The stored speed is
deleted.
Switching off the ignition also
switches off adaptive cruise control
and deletes the stored speed.
Driver's attention ● Use adaptive cruise control carefully on bends or mountain
roads, as it can lose the vehicle
ahead and require time to detect
it again.
● Do not use the system on slippery roads as it can create
rapid changes in tyre traction
(wheel spinning), so that you
could lose control of the vehicle.
● Do not use adaptive cruise control during rain, snow or
heavy dirt, as the radar sensor
can be covered by a water film,
dust, ice or snow. This reduces or completely suppresses thevisibility. In case of sensor
blockage, clean the sensor
cover.
System limits ● The system's automatic brake force does not permit hard
braking and the braking level
may not be sufficient to avoid a
collision.
● After a sudden lane change, the system needs a certain time to
detect the next preceding
vehicle. So if a new vehicle is
detected, the system may
accelerate instead of braking.
● Adaptive cruise control does ignore the oncoming traffic.
● Adaptive cruise control does not brake for pedestrians, animals,very slow speed driving or
stopped vehicles.
● Don't use adaptive cruise control when towing a trailer.Bends
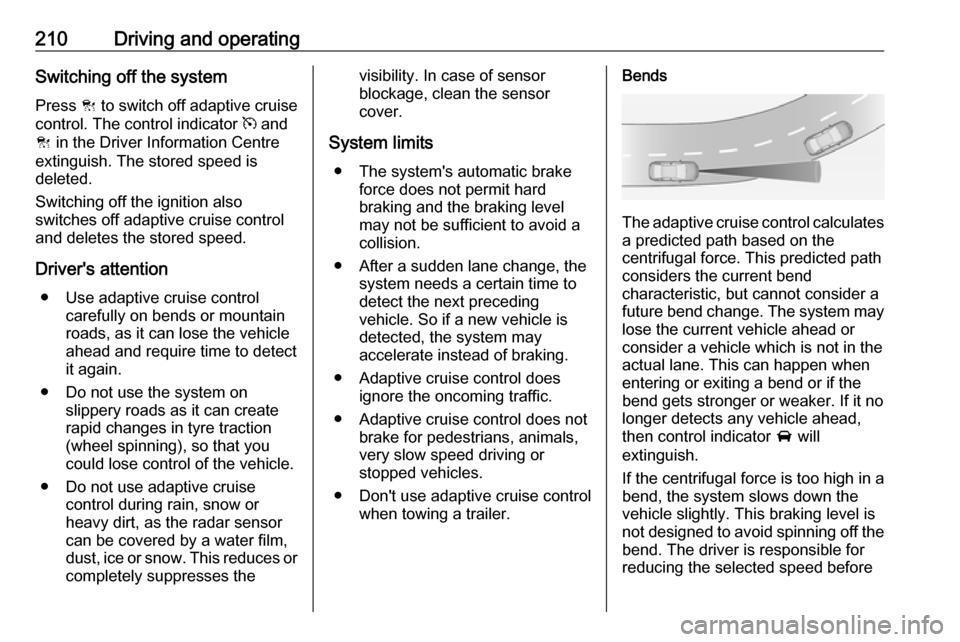
The adaptive cruise control calculates
a predicted path based on the
centrifugal force. This predicted path
considers the current bend
characteristic, but cannot consider a
future bend change. The system may lose the current vehicle ahead or
consider a vehicle which is not in the
actual lane. This can happen when
entering or exiting a bend or if the
bend gets stronger or weaker. If it no
longer detects any vehicle ahead,
then control indicator A will
extinguish.
If the centrifugal force is too high in a bend, the system slows down the vehicle slightly. This braking level is
not designed to avoid spinning off the bend. The driver is responsible for
reducing the selected speed before
Page 213 of 317
Driving and operating211entering a bend and in general to
adapt the speed to the road type and
to existing speed limits.
Motorways
On motorways, adapt the set speed
to the situation and the weather.
Always consider that adaptive cruise
control has a limited visibility range, a
limited braking level and a certain
reaction time to verify if a vehicle is in
the driving path or not. Adaptive
cruise control may not be able to
brake the vehicle in time to avoid a
collision with a much slower vehicle or after a lane change. This is
particularly true if driving fast or if the
visibility is reduced due to weather
conditions.
While entering or exiting a motorway,
adaptive cruise control may lose the
vehicle ahead and accelerate up to
the set speed. For this reason,
decrease the set speed before the
exit or before the entry.
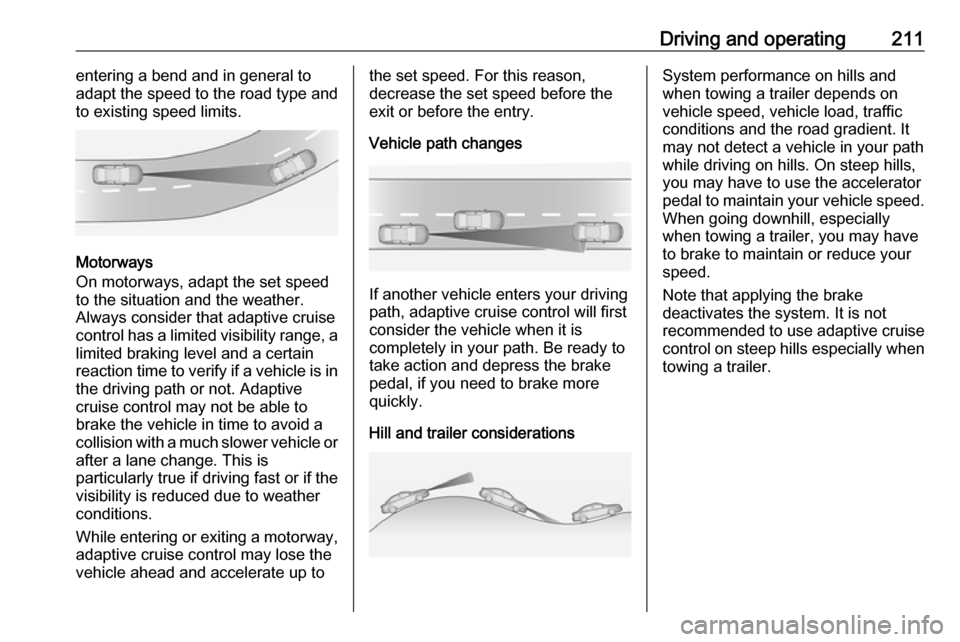
Vehicle path changes
If another vehicle enters your driving
path, adaptive cruise control will first
consider the vehicle when it is
completely in your path. Be ready to
take action and depress the brake
pedal, if you need to brake more
quickly.
Hill and trailer considerations
System performance on hills and
when towing a trailer depends on
vehicle speed, vehicle load, traffic
conditions and the road gradient. It
may not detect a vehicle in your path
while driving on hills. On steep hills,
you may have to use the accelerator
pedal to maintain your vehicle speed.
When going downhill, especially
when towing a trailer, you may have
to brake to maintain or reduce your
speed.
Note that applying the brake
deactivates the system. It is not
recommended to use adaptive cruise
control on steep hills especially when towing a trailer.
Page 216 of 317

214Driving and operatingCaution
The colour lighting of this control
indicator does not correspond to
local traffic laws on following
distance. The driver bears full
responsibility for maintaining safe
following distance according to
applicable traffic rules, weather
and road conditions etc. at all
times.
When the distance to a preceding
moving vehicle gets too small or when
approaching another vehicle too rapidly and a collision is imminent the collision alert symbol pops-up in the
Driver Information Centre and a
warning chime sounds. Depress the
brake pedal, if it is required by the
situation.
Settings
Settings can be changed in the
vehicle personalisation menu in the
Info-Display.
Select the relevant setting in
Settings in the Info-Display.
Vehicle personalisation 3 108.
Forward collision alert based on
front camera system
Forward collision alert uses the front
camera system in the windscreen to
detect a vehicle directly ahead, in
your path, within a distance of approx. 60 metres.
Activation
Forward collision alert operates
automatically above 40 km/h, if it is not deactivated by pressing V, see
below.
Selecting the alert sensitivity
The alert sensitivity can be set to
near, medium or far.
Press V; the current setting is shown
in the Driver Information Centre.
Press V again to change the alert
sensitivity.