change wheel OPEL ZAFIRA C 2019 Manual user
[x] Cancel search | Manufacturer: OPEL, Model Year: 2019, Model line: ZAFIRA C, Model: OPEL ZAFIRA C 2019Pages: 317, PDF Size: 9.38 MB
Page 212 of 317

210Driving and operatingSwitching off the system
Press C to switch off adaptive cruise
control. The control indicator m and
C in the Driver Information Centre
extinguish. The stored speed is
deleted.
Switching off the ignition also
switches off adaptive cruise control
and deletes the stored speed.
Driver's attention ● Use adaptive cruise control carefully on bends or mountain
roads, as it can lose the vehicle
ahead and require time to detect
it again.
● Do not use the system on slippery roads as it can create
rapid changes in tyre traction
(wheel spinning), so that you
could lose control of the vehicle.
● Do not use adaptive cruise control during rain, snow or
heavy dirt, as the radar sensor
can be covered by a water film,
dust, ice or snow. This reduces or completely suppresses thevisibility. In case of sensor
blockage, clean the sensor
cover.
System limits ● The system's automatic brake force does not permit hard
braking and the braking level
may not be sufficient to avoid a
collision.
● After a sudden lane change, the system needs a certain time to
detect the next preceding
vehicle. So if a new vehicle is
detected, the system may
accelerate instead of braking.
● Adaptive cruise control does ignore the oncoming traffic.
● Adaptive cruise control does not brake for pedestrians, animals,very slow speed driving or
stopped vehicles.
● Don't use adaptive cruise control when towing a trailer.Bends
The adaptive cruise control calculates
a predicted path based on the
centrifugal force. This predicted path
considers the current bend
characteristic, but cannot consider a
future bend change. The system may lose the current vehicle ahead or
consider a vehicle which is not in the
actual lane. This can happen when
entering or exiting a bend or if the
bend gets stronger or weaker. If it no
longer detects any vehicle ahead,
then control indicator A will
extinguish.
If the centrifugal force is too high in a bend, the system slows down the vehicle slightly. This braking level is
not designed to avoid spinning off the bend. The driver is responsible for
reducing the selected speed before
Page 274 of 317

272Vehicle care
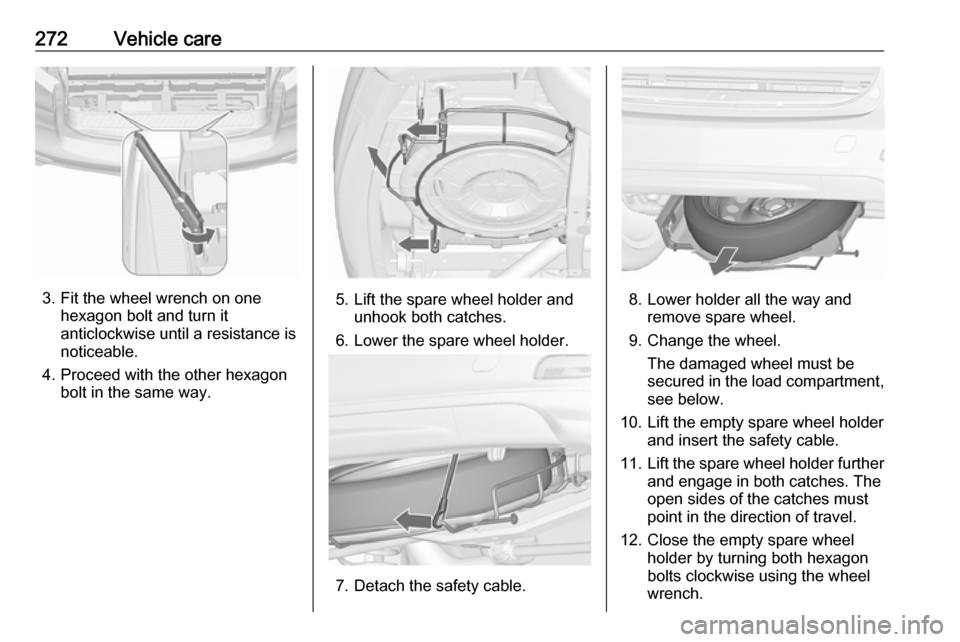
3. Fit the wheel wrench on onehexagon bolt and turn it
anticlockwise until a resistance is
noticeable.
4. Proceed with the other hexagon bolt in the same way.5. Lift the spare wheel holder andunhook both catches.
6. Lower the spare wheel holder.
7. Detach the safety cable.
8. Lower holder all the way and remove spare wheel.
9. Change the wheel. The damaged wheel must be
secured in the load compartment,
see below.
10. Lift the empty spare wheel holder and insert the safety cable.
11. Lift the spare wheel holder further
and engage in both catches. The open sides of the catches must
point in the direction of travel.
12. Close the empty spare wheel holder by turning both hexagon
bolts clockwise using the wheel
wrench.
Page 275 of 317

Vehicle care27313. Fit the caps above both hexagonbolts.
14. Stow wheel wrench and the jack in the storage in front of the
tailgate.
15. Close the storage compartment cover.
When stowing the spare wheel in the
spare wheel holder, note that the
wheel is positioned with the tyre valve
above the recess of the wheel holder.
Fitting the spare wheel
Make the following preparations and
observe the following information:
● Park the vehicle on a level, firm and non-skid surface. The front
wheels must be in the straight- ahead position.
● If necessary, place a chock under
the wheel diagonally opposite the
wheel to be changed.
● Apply the parking brake and engage first gear, reverse gear orP .
● Remove the spare wheel 3 271.● Never change more than one
wheel at once.
● Use the jack only to change wheels in case of puncture, notfor seasonal winter or summer
tyre change.
● The jack is maintenance-free. ● If the ground on which the vehicle
is standing is soft, a solid board
(max. 1 cm thick) should be
placed under the jack.
● Take heavy objects out of the vehicle before jacking up.
● No people or animals may be in the vehicle when it is jacked-up.
● Never crawl under a jacked-up vehicle.
● Do not start the vehicle when it is
raised on the jack.
● Clean wheel nuts and thread with
a clean cloth before mounting the
wheel.9 Warning
Do not grease wheel bolt, wheel
nut and wheel nut cone.
9 Warning
Ensure to use always the correct
wheel bolts if changing the
wheels. When installing the spare
wheel, the bolts for alloy wheels can also be used.
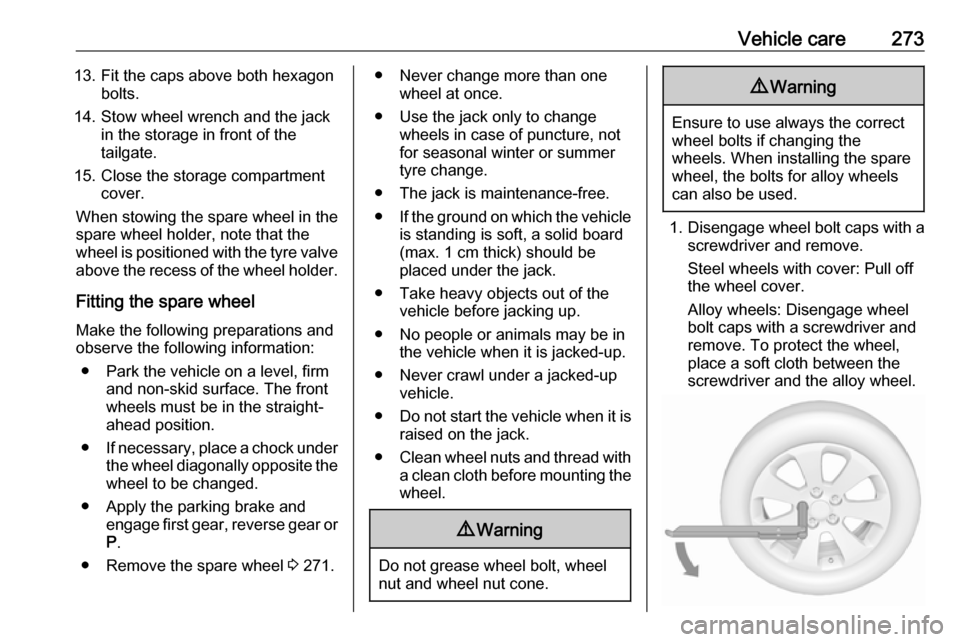
1. Disengage wheel bolt caps with a
screwdriver and remove.
Steel wheels with cover: Pull off
the wheel cover.
Alloy wheels: Disengage wheel
bolt caps with a screwdriver and
remove. To protect the wheel,
place a soft cloth between the
screwdriver and the alloy wheel.
Page 276 of 317

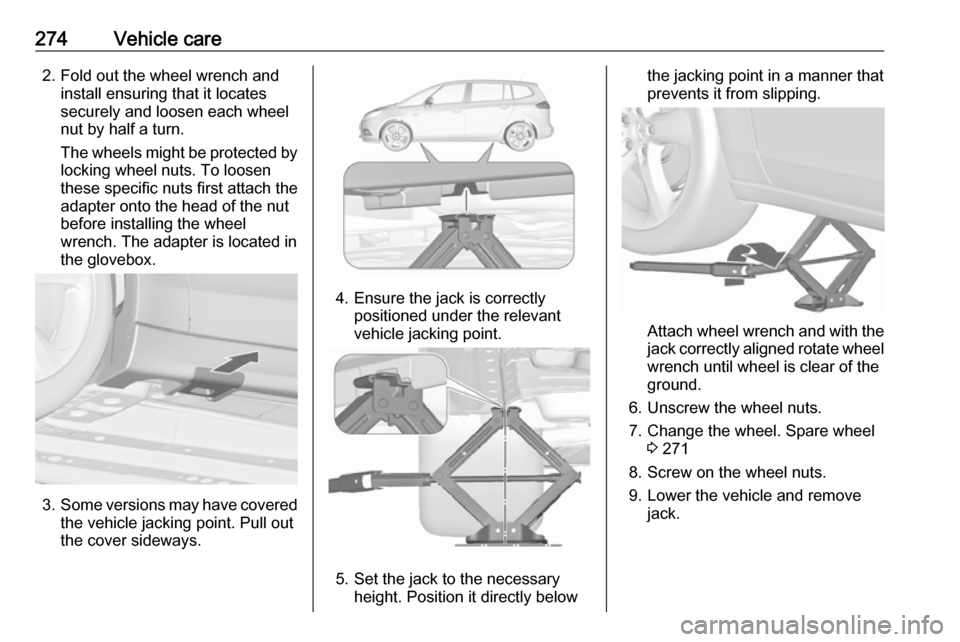
274Vehicle care2. Fold out the wheel wrench andinstall ensuring that it locates
securely and loosen each wheel
nut by half a turn.
The wheels might be protected by
locking wheel nuts. To loosen
these specific nuts first attach the
adapter onto the head of the nut
before installing the wheel
wrench. The adapter is located in
the glovebox.
3. Some versions may have covered
the vehicle jacking point. Pull out
the cover sideways.
4. Ensure the jack is correctly positioned under the relevant
vehicle jacking point.
5. Set the jack to the necessary height. Position it directly below
the jacking point in a manner that
prevents it from slipping.
Attach wheel wrench and with the
jack correctly aligned rotate wheel wrench until wheel is clear of the
ground.
6. Unscrew the wheel nuts. 7. Change the wheel. Spare wheel 3 271
8. Screw on the wheel nuts.
9. Lower the vehicle and remove jack.
Page 308 of 317

306Customer informationComfort and infotainment
functions
Comfort settings and custom settings
can be stored in the vehicle and
changed or reset at any time.
Depending on the equipment level in
question, these include
● seat and steering wheel position settings
● chassis and air conditioning settings
● custom settings such as interior lighting
You can input your own data in the
infotainment functions for your
vehicle as part of the selected
features.
Depending on the equipment level in
question, these include
● multimedia data such as music, videos or photos for playback in
an integrated multimedia system
● address book data for use with an
integrated hands-free system or an integrated navigation system● input destinations
● data on the use of online services
This data for comfort and
infotainment functions can be stored
locally in the vehicle or be kept on a
device that you have connected to the
vehicle ( e.g. a smartphone, USB stick
or MP3 player). Data that you have
input yourself can be deleted at any
time.
This data can only be transmitted out
of the vehicle at your request,
particularly when using online
services in accordance with the
settings selected by you.
Smartphone integration, e.g.
Android Auto or Apple CarPlay
If your vehicle is equipped
accordingly, you can connect your
smartphone or another mobile device
to the vehicle so that you can control
it via the controls integrated in the
vehicle. The smartphone image and
sound can be output via the
multimedia system in this case. At the same time, specific information is
transmitted to your smartphone.
Depending on the type of integration,this includes data such as position
data, day / night mode and other
general vehicle information. For more
information, please see the operating
instructions for the vehicle /
infotainment system.
Integration allows selected
smartphone apps to be used, such as
navigation or music playback. No
further integration is possible
between smartphone and vehicle, in particular active access to vehicle
data. The nature of further data
processing is determined by the
provider of the app used. Whether
you can define settings, and if so
which ones, is dependent on the app
in question and your smartphone's
operating system.