OPEL ZAFIRA TOURER 2016 Owners Manual
ZAFIRA TOURER 2016
OPEL
OPEL
https://www.carmanualsonline.info/img/37/58247/w960_58247-0.png
OPEL ZAFIRA TOURER 2016 Owners Manual
Trending: run flat, roof rack, navigation, cruise control, length, ESP, boot
Page 231 of 301
Vehicle care229Diesel fuel system
bleeding
If the tank has been run dry, the diesel fuel system must be bled. Switch on
the ignition three times for
15 seconds at a time. Then crank the
engine for a maximum of
40 seconds. Repeat this process after no less than 5 seconds. If the enginefails to start, seek the assistance of a
workshop.
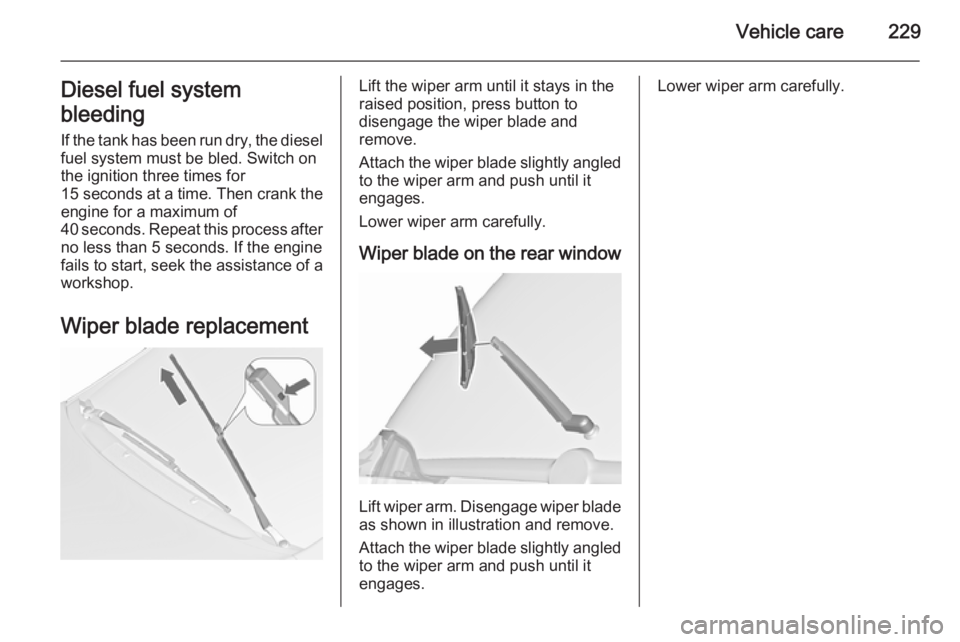
Wiper blade replacementLift the wiper arm until it stays in the
raised position, press button to
disengage the wiper blade and
remove.
Attach the wiper blade slightly angled
to the wiper arm and push until it
engages.
Lower wiper arm carefully.
Wiper blade on the rear window
Lift wiper arm. Disengage wiper blade as shown in illustration and remove.
Attach the wiper blade slightly angled
to the wiper arm and push until it
engages.
Lower wiper arm carefully.
Page 232 of 301
230Vehicle careBulb replacement
Switch off the ignition and switch off
the relevant switch or close the doors.
Only hold a new bulb at the base. Do not touch the bulb glass with bare
hands.
Use only the same bulb type for
replacement.
Replace headlight bulbs from within
the engine compartment.
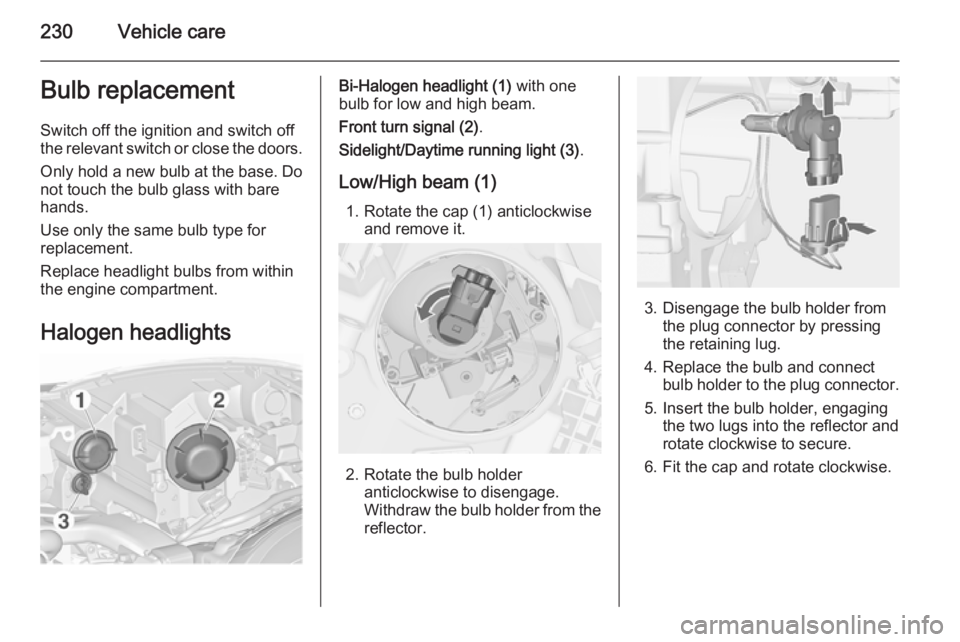
Halogen headlightsBi-Halogen headlight (1) with one
bulb for low and high beam.
Front turn signal (2) .
Sidelight/Daytime running light (3) .
Low/High beam (1) 1. Rotate the cap (1) anticlockwise and remove it.
2. Rotate the bulb holder anticlockwise to disengage.
Withdraw the bulb holder from the
reflector.
3. Disengage the bulb holder from the plug connector by pressing
the retaining lug.
4. Replace the bulb and connect bulb holder to the plug connector.
5. Insert the bulb holder, engaging the two lugs into the reflector androtate clockwise to secure.
6. Fit the cap and rotate clockwise.
Page 233 of 301
Vehicle care231
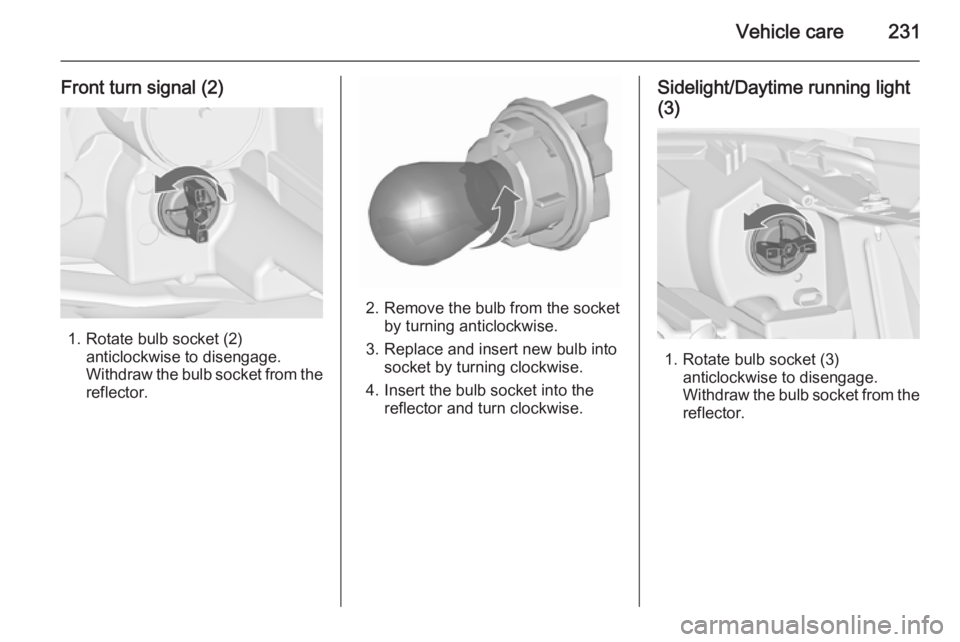
Front turn signal (2)
1. Rotate bulb socket (2)anticlockwise to disengage.
Withdraw the bulb socket from the
reflector.
2. Remove the bulb from the socket by turning anticlockwise.
3. Replace and insert new bulb into socket by turning clockwise.
4. Insert the bulb socket into the reflector and turn clockwise.
Sidelight/Daytime running light
(3)
1. Rotate bulb socket (3) anticlockwise to disengage.
Withdraw the bulb socket from the
reflector.
Page 234 of 301
232Vehicle care
2. Remove the bulb from the socketby pulling.
3. Replace and insert new bulb into socket.
4. Insert the bulb socket into the reflector and turn clockwise.
Adaptive forward lighting9 Danger
Adaptive forward lighting system
uses Xenon headlights.
Xenon headlights work under
extremely high electrical voltage.
Do not touch. Have bulbs replaced by a workshop.
Bulbs for front turn signal and
corner lighting can be replaced.
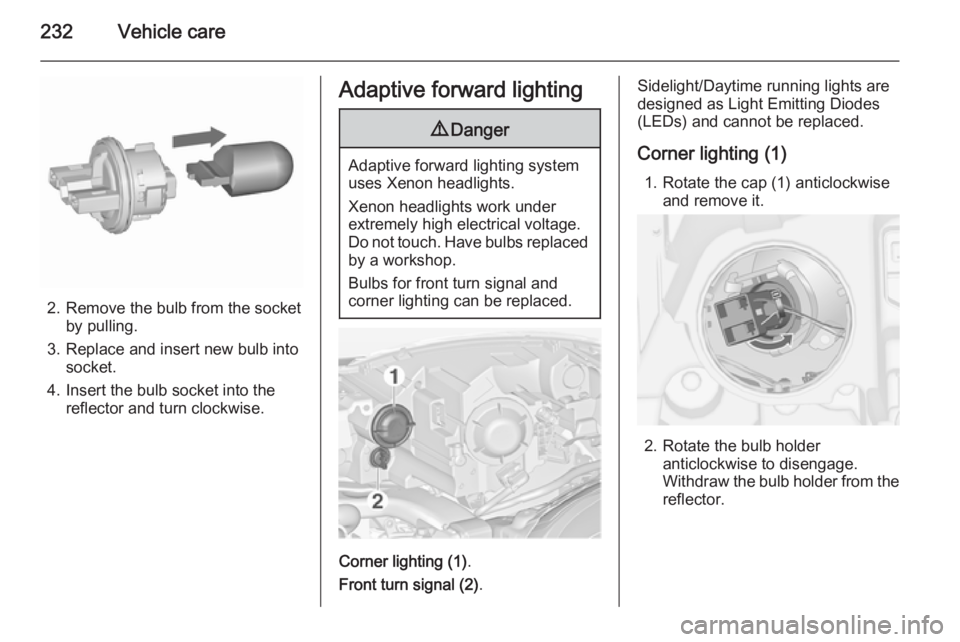
Corner lighting (1) .
Front turn signal (2) .
Sidelight/Daytime running lights are
designed as Light Emitting Diodes
(LEDs) and cannot be replaced.
Corner lighting (1) 1. Rotate the cap (1) anticlockwise and remove it.
2. Rotate the bulb holder anticlockwise to disengage.
Withdraw the bulb holder from the
reflector.
Page 235 of 301
Vehicle care233
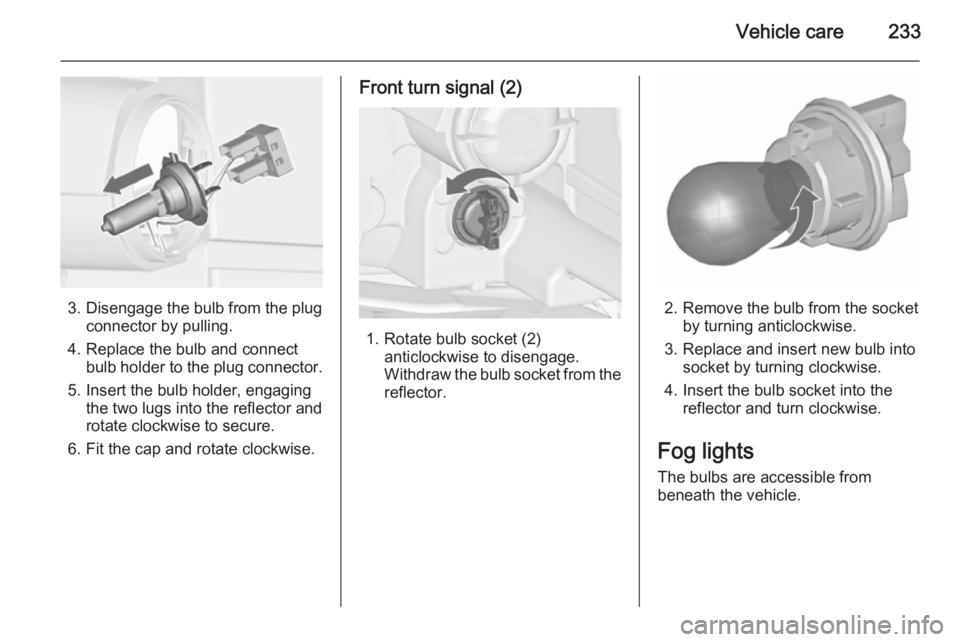
3. Disengage the bulb from the plugconnector by pulling.
4. Replace the bulb and connect bulb holder to the plug connector.
5. Insert the bulb holder, engaging the two lugs into the reflector and
rotate clockwise to secure.
6. Fit the cap and rotate clockwise.
Front turn signal (2)
1. Rotate bulb socket (2) anticlockwise to disengage.
Withdraw the bulb socket from the
reflector.
2. Remove the bulb from the socket by turning anticlockwise.
3. Replace and insert new bulb into socket by turning clockwise.
4. Insert the bulb socket into the reflector and turn clockwise.
Fog lights The bulbs are accessible from
beneath the vehicle.
Page 236 of 301
234Vehicle care
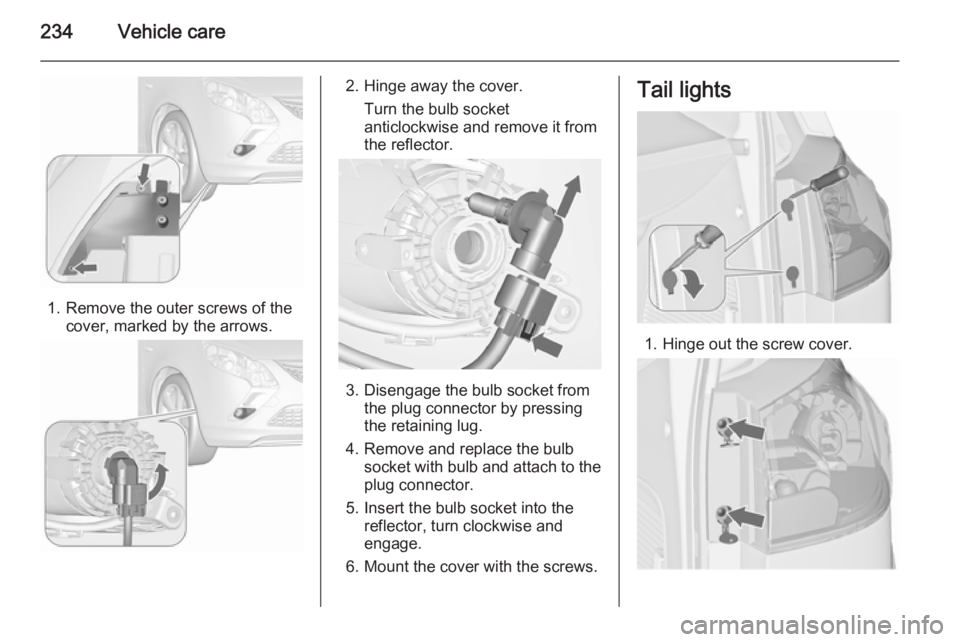
1. Remove the outer screws of thecover, marked by the arrows.
2. Hinge away the cover.
Turn the bulb socket
anticlockwise and remove it from
the reflector.
3. Disengage the bulb socket from the plug connector by pressing
the retaining lug.
4. Remove and replace the bulb socket with bulb and attach to the
plug connector.
5. Insert the bulb socket into the reflector, turn clockwise and
engage.
6. Mount the cover with the screws.
Tail lights
1. Hinge out the screw cover.
Page 237 of 301
Vehicle care235
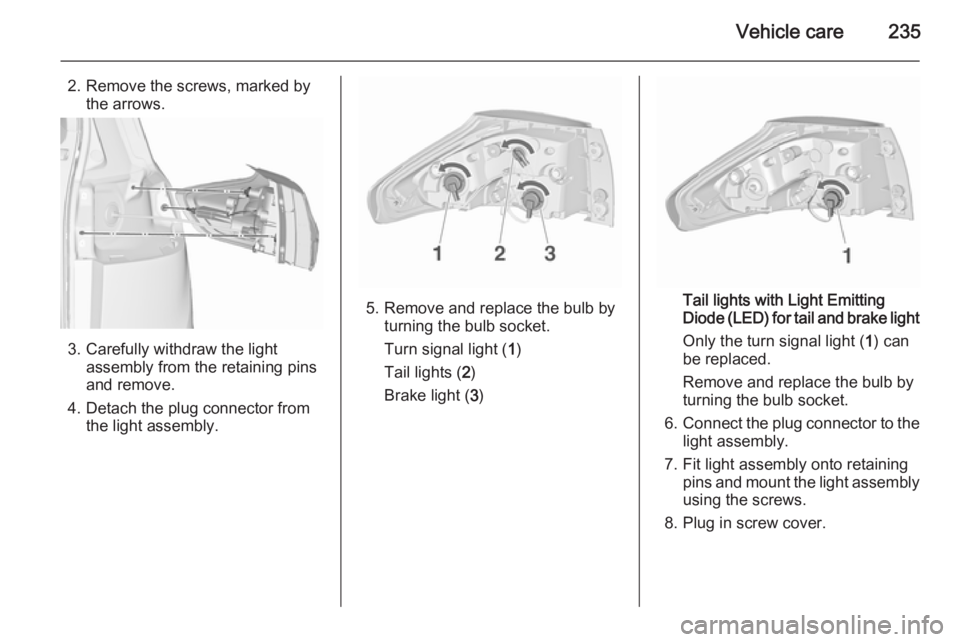
2. Remove the screws, marked bythe arrows.
3. Carefully withdraw the light assembly from the retaining pins
and remove.
4. Detach the plug connector from the light assembly.
5. Remove and replace the bulb byturning the bulb socket.
Turn signal light ( 1)
Tail lights ( 2)
Brake light ( 3)Tail lights with Light Emitting
Diode (LED) for tail and brake light
Only the turn signal light ( 1) can
be replaced.
Remove and replace the bulb by
turning the bulb socket.
6. Connect the plug connector to the
light assembly.
7. Fit light assembly onto retaining pins and mount the light assembly
using the screws.
8. Plug in screw cover.
Page 238 of 301
236Vehicle care
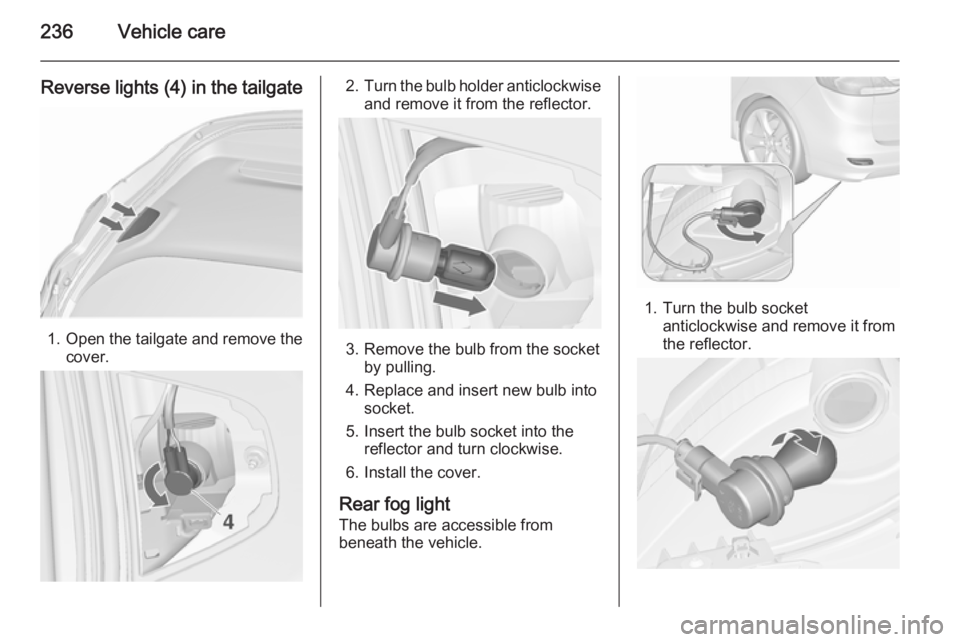
Reverse lights (4) in the tailgate
1.Open the tailgate and remove the
cover.
2. Turn the bulb holder anticlockwise
and remove it from the reflector.
3. Remove the bulb from the socket by pulling.
4. Replace and insert new bulb into socket.
5. Insert the bulb socket into the reflector and turn clockwise.
6. Install the cover.
Rear fog light The bulbs are accessible from
beneath the vehicle.
1. Turn the bulb socket anticlockwise and remove it from
the reflector.
Page 239 of 301
Vehicle care237
2. Remove the bulb from the socketby turning anticlockwise.
3. Replace and insert new bulb into the socket by turning clockwise.
4. Insert the bulb socket into the reflector, turn clockwise andengage.
Bulb check Switch on the ignition, operate and
check all lights.
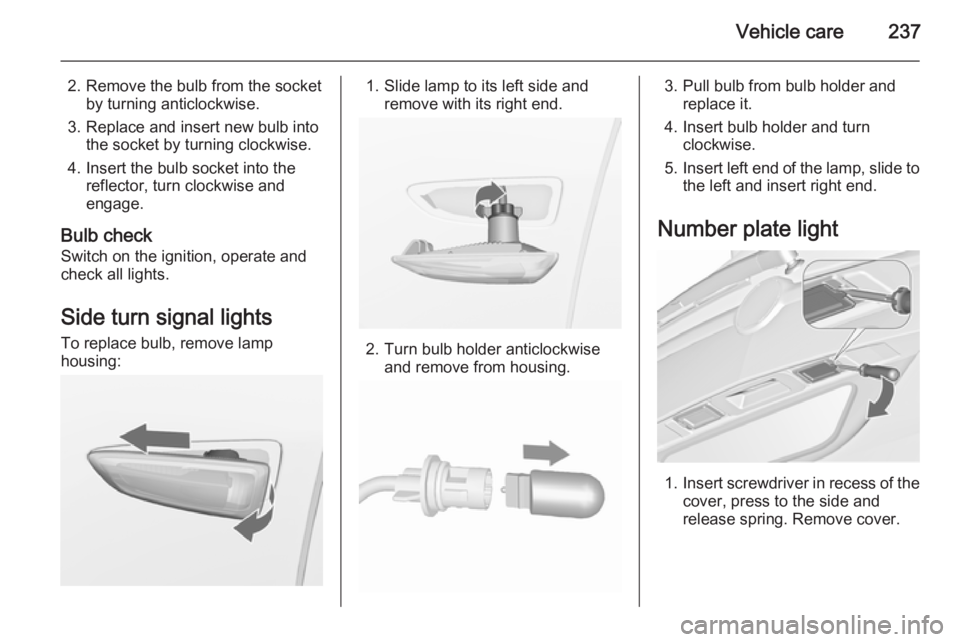
Side turn signal lights
To replace bulb, remove lamp
housing:1. Slide lamp to its left side and remove with its right end.
2. Turn bulb holder anticlockwiseand remove from housing.
3. Pull bulb from bulb holder andreplace it.
4. Insert bulb holder and turn clockwise.
5. Insert left end of the lamp, slide to
the left and insert right end.
Number plate light
1. Insert screwdriver in recess of the
cover, press to the side and
release spring. Remove cover.
Page 240 of 301
238Vehicle care
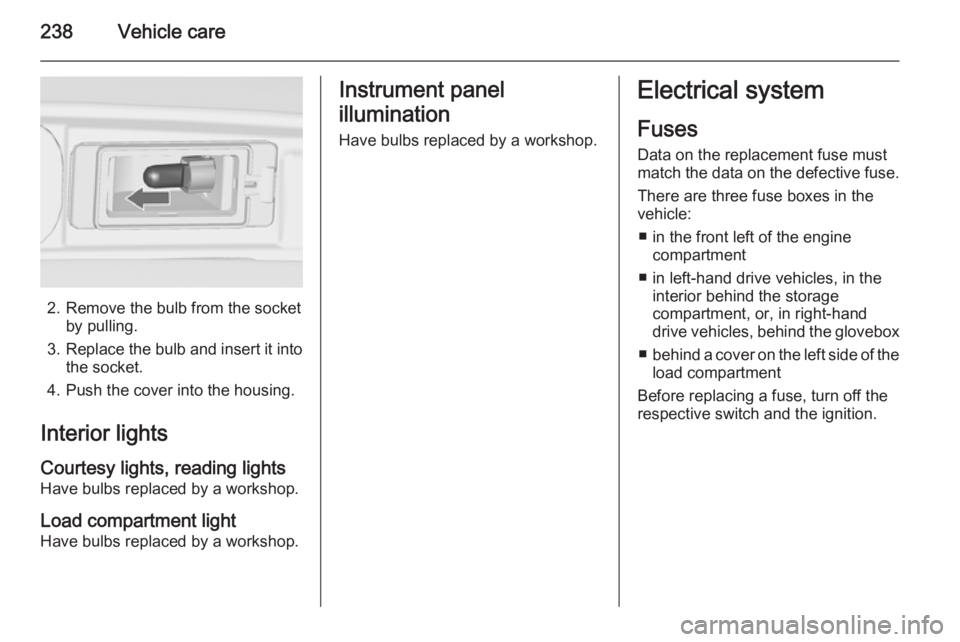
2. Remove the bulb from the socketby pulling.
3. Replace the bulb and insert it into
the socket.
4. Push the cover into the housing.
Interior lights
Courtesy lights, reading lights
Have bulbs replaced by a workshop.
Load compartment light
Have bulbs replaced by a workshop.
Instrument panel
illumination
Have bulbs replaced by a workshop.Electrical system
Fuses
Data on the replacement fuse must
match the data on the defective fuse.
There are three fuse boxes in the
vehicle:
■ in the front left of the engine compartment
■ in left-hand drive vehicles, in the interior behind the storage
compartment, or, in right-hand
drive vehicles, behind the glovebox
■ behind a cover on the left side of the
load compartment
Before replacing a fuse, turn off the
respective switch and the ignition.
Trending: airbag, oil capacities, infotainment, parking sensors, octane, warning lights, deactivate passenger airbag
