bulb PEUGEOT 2008 2014 Owners Manual
[x] Cancel search | Manufacturer: PEUGEOT, Model Year: 2014, Model line: 2008, Model: PEUGEOT 2008 2014Pages: 336, PDF Size: 9.35 MB
Page 5 of 336
.
.
Contents
Direction indicators 123
Hazard warning lamps 123
Emergency or assistance call 124
H or n 124
ESC system 125
Grip control 128
Front seat belts 130
Airbags 133
Child seats 137
Deactivating the passenger's front airbag 139
ISOFIX child seats 146
Child lock 150
Safety
Temporary puncture repair kit 151
Changing a wheel 157
Snow chains 164
Changing a bulb 165
Changing a fuse 172
Battery 178
Electrical energy economy mode 181
Changing a wiper blade 182
Towing the vehicle 183
Towing a trailer 185
Fitting roof bars 187
Advice on care and maintenance 187
Accessories 188
Practical information
Bonnet 191
Petrol engines 192
Diesel engines 193
Fuel tank 194
Misfuel prevention (Diesel) 196
Running out of fuel (Diesel) 198
Checking levels 199
Checks 202
Checks
Petrol engines 204
Petrol weights 205
Diesel engines 206
Diesel weights 208
Dimensions 211
Identifi cation markings 212
Technical data
Emergency or assistance 213
Touch screen 215
Audio system / Bluetooth 277
Audio system 303
Audio equipment and telematics
Visual search
Alphabetical index
Page 167 of 336
165
7
Practical information
Changing a bulb
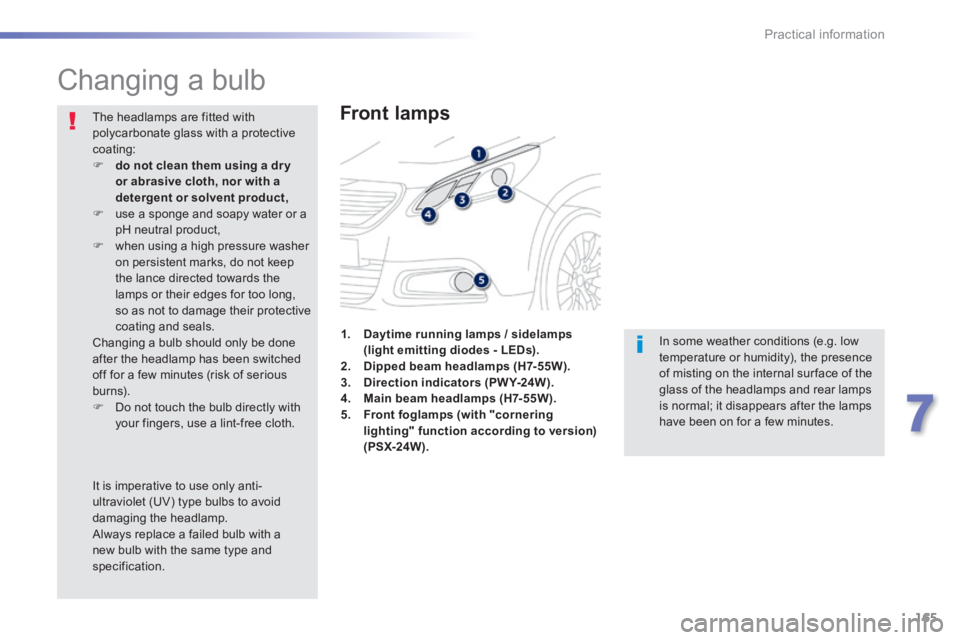
Front lamps
In some weather conditions (e.g. low temperature or humidity), the presence of misting on the internal sur face of the glass of the headlamps and rear lamps is normal; it disappears after the lamps have been on for a few minutes.
The headlamps are fitted with polycarbonate glass with a protective coating: do not clean them using a dr y or abrasive cloth, nor with a detergent or solvent product, use a sponge and soapy water or a pH neutral product, when using a high pressure washer on persistent marks, do not keep the lance directed towards the lamps or their edges for too long, so as not to damage their protective coating and seals. Changing a bulb should only be done after the headlamp has been switched off for a few minutes (risk of serious burns). Do not touch the bulb directly with your fingers, use a lint-free cloth.
1. Daytime running lamps / sidelamps (light emitting diodes - LEDs).2. Dipped beam headlamps (H7-55W).3. Direction indicators (PWY-24W).4. Main beam headlamps (H7-55W).5. Front foglamps (with "cornering lighting" function according to version) (PSX-24W).
It is imperative to use only anti-ultraviolet (UV) type bulbs to avoid damaging the headlamp.
Always replace a failed bulb with a new bulb with the same type and specification.
Page 168 of 336
166
Practical information
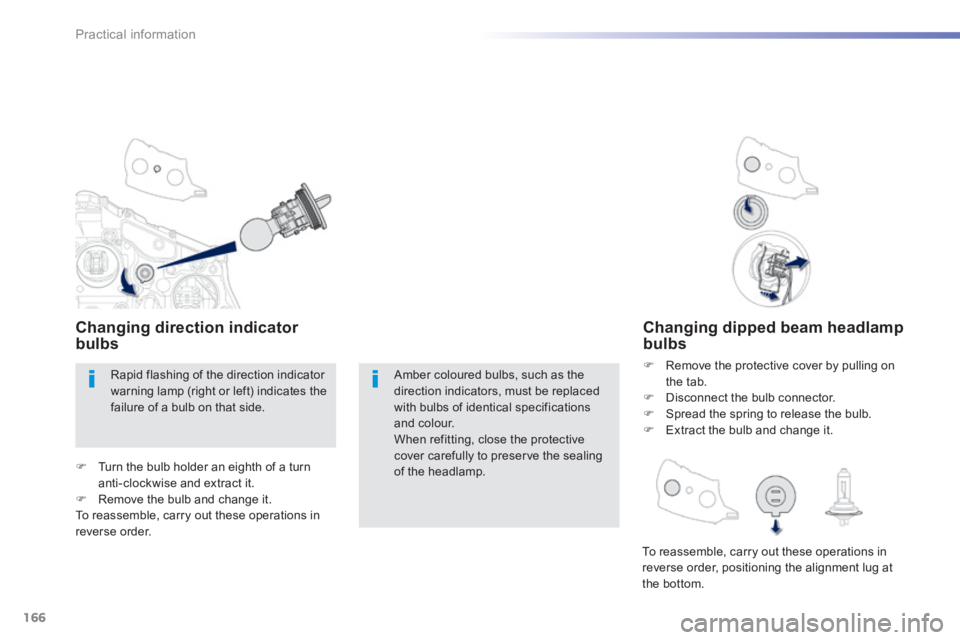
Changing dipped beam headlamp bulbs
Remove the protective cover by pulling on the tab. Disconnect the bulb connector. Spread the spring to release the bulb. Extract the bulb and change it.
Amber coloured bulbs, such as the direction indicators, must be replaced with bulbs of identical specifications and colour. When refitting, close the protective cover carefully to preserve the sealing of the headlamp.
Rapid flashing of the direction indicator warning lamp (right or left) indicates the failure of a bulb on that side.
Changing direction indicator bulbs
To reassemble, carry out these operations in reverse order, positioning the alignment lug at the bottom.
Turn the bulb holder an eighth of a turn anti-clockwise and extract it. Remove the bulb and change it. To reassemble, carry out these operations in reverse order.
Page 169 of 336
167
7
Practical information
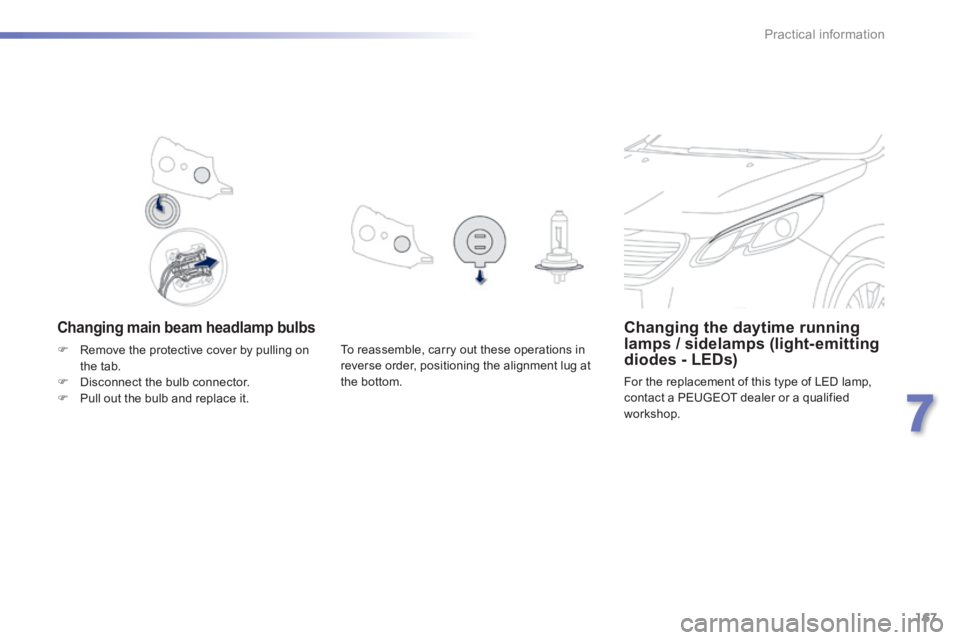
Changing main beam headlamp bulbs Changing the daytime running lamps / sidelamps (light- emitting diodes - LEDs)
For the replacement of this type of LED lamp, contact a PEUGEOT dealer or a qualified workshop.
To reassemble, carry out these operations in reverse order, positioning the alignment lug at the bottom.
Remove the protective cover by pulling on the tab. Disconnect the bulb connector. Pull out the bulb and replace it.
Page 170 of 336
168
Practical information
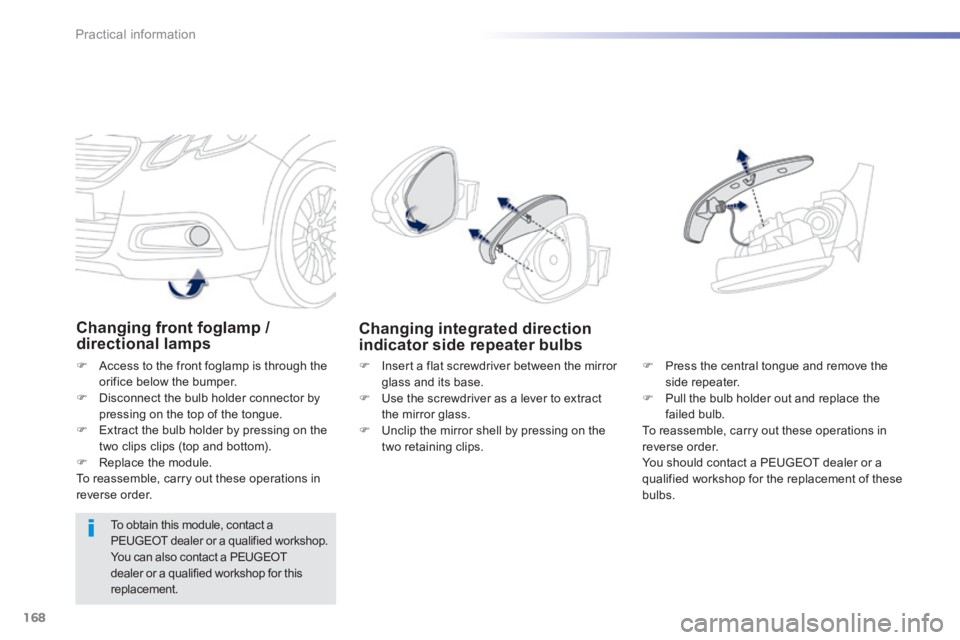
Changing front foglamp / directional lamps
Access to the front foglamp is through the orifice below the bumper. Disconnect the bulb holder connector by pressing on the top of the tongue. Extract the bulb holder by pressing on the two clips clips (top and bottom). Replace the module. To reassemble, carry out these operations in reverse order.
Changing integrated direction indicator side repeater bulbs
Press the central tongue and remove the side repeater. Pull the bulb holder out and replace the failed bulb. To reassemble, carry out these operations in reverse order. You should contact a PEUGEOT dealer or a qualified workshop for the replacement of these bulbs.
Insert a flat screwdriver between the mirror glass and its base. Use the screwdriver as a lever to extract the mirror glass. Unclip the mirror shell by pressing on the two retaining clips.
To obtain this module, contact a
PEUGEOT dealer or a qualified workshop. You can also contact a PEUGEOT dealer or a qualified workshop for this replacement.
Page 172 of 336
170
Practical information
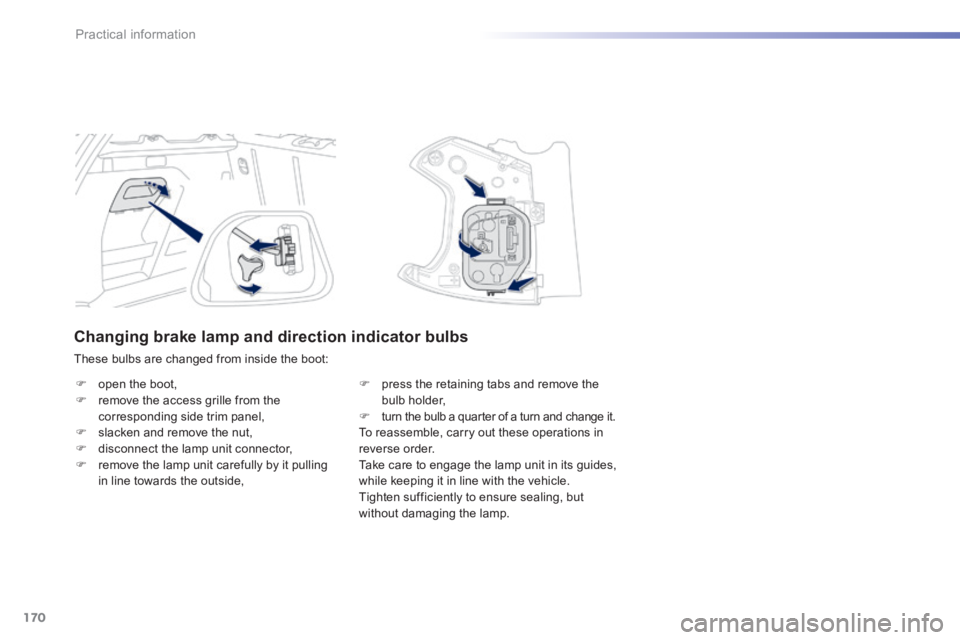
Changing brake lamp and direction indicator bulbs
These bulbs are changed from inside the boot:
open the boot, remove the access grille from the corresponding side trim panel, slacken and remove the nut, disconnect the lamp unit connector, remove the lamp unit carefully by it pulling in line towards the outside,
press the retaining tabs and remove the bulb holder, turn the bulb a quarter of a turn and change it. To reassemble, carry out these operations in reverse order. Take care to engage the lamp unit in its guides, while keeping it in line with the vehicle. Tighten sufficiently to ensure sealing, but without damaging the lamp.
Page 173 of 336
171
7
Practical information
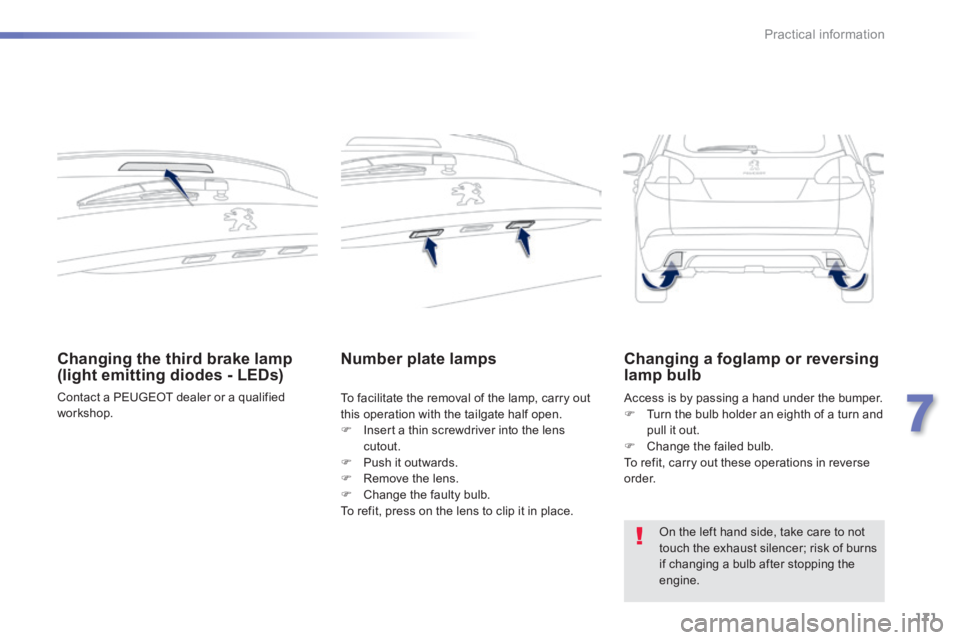
Changing the third brake lamp (light emitting diodes - LEDs)
Contact a PEUGEOT dealer or a qualified workshop.
Number plate lamps
To facilitate the removal of the lamp, carry out this operation with the tailgate half open.
Insert a thin screwdriver into the lens cutout. Push it outwards. Remove the lens. Change the faulty bulb. To refit, press on the lens to clip it in place.
Access is by passing a hand under the bumper. Turn the bulb holder an eighth of a turn and pull it out. Change the failed bulb. To refit, carry out these operations in reverse o r d e r.
Changing a foglamp or reversing lamp bulb
On the left hand side, take care to not touch the exhaust silencer; risk of burns if changing a bulb after stopping the engine.
Page 191 of 336
189
7
Practical information
The fitting of electrical equipment or accessories which are not recommended by PEUGEOT may result in a failure of your vehicle's electronic system and excessive electrical consumption. Please note this precaution. You are advised to contact a PEUGEOT representative to be shown the range of recommended equipment and accessories.
Installation of radio communication transmitters
Before installing any after-market radio communication transmitter, you can contact a PEUGEOT dealer for the
specification of transmitters which can be fitted (frequency, maximum power, aerial position, specific installation requirements), in line with the Vehicle Electromagnetic Compatibility Directive (2004/104/EC).
Depending on the legislation in force in the country, certain safety equipment may be compulsory: high visibility safety vests, warning triangles, breathalyzers, spare bulbs, spare fuses, a fire extinguisher, a first aid kit, mud flaps at the rear of the vehicle.
By visiting a PEUGEOT dealer, you can also obtain products for cleaning and maintenance (exterior and interior) - including ecological products in the "TECHNATURE" range, topping up products (screenwash...), touch-up pens and paint aerosols for the exact colour of your vehicle, refills (cartridge for the temporary puncture repair kit...), ...
"Multimedia":
audio systems, portable satellite navigation systems, semi-integral support for portable satellite navigation system, hands-free kit, speakers, DVD player, connection kit for MP3 or CD player, Wi-Fi on-board, CD player for touch screen...
Page 321 of 336

.
319
Visual search
Exterior
Remote control key 44-50 - opening / closing - anti-theft protection - guide-me-home lighting - starting - battery
Boot 55 - opening / closing - emergency release Temporary puncture repair kit 151-156
Wipers 117-120 Changing a wiper blade 120, 182
Changing bulbs 169-171 - rear lamps - 3 rd brake lamp - number plate lamps - foglamp - reversing lamp
Fuel tank, misfuel prevention 19 4 -197
Panoramic sunroof 56 Roof bars 187 Accessories 188-189
Electronic stability programme 125-127 Snow chains 164 Tyre pressures 156, 212 Changing a wheel 157-163 - tools - removing / refitting
Lighting controls 108 -114 LED lamps 112 Daytime running lamps 112 Headlamp beam adjustment 115 Cornering lighting 116 Changing bulbs 165-168 - front lamps - foglamps - direction indicator repeaters
Door mirrors 61- 62
Doors 44- 49 - opening / closing - central locking - emergency control Alarm 51-52 Electric windows 53 -54
Parking sensors 102-103 Park Assist 104-107 Towbar 185 -18 6 Towing 183 -18 4
Page 325 of 336
.
323
Visual search
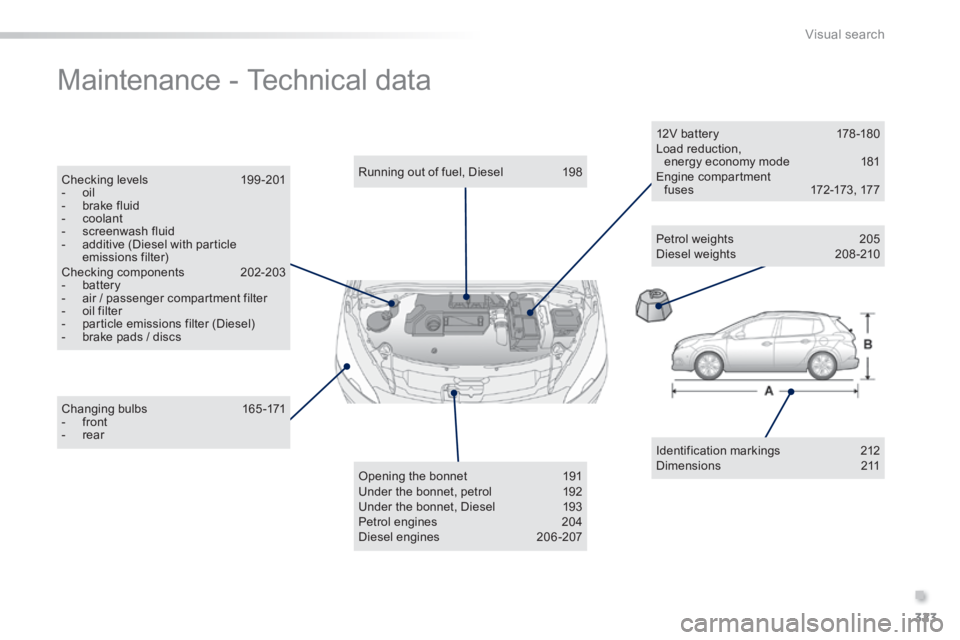
Maintenance - Technical data
Identification markings 212 Dimensions 211
Changing bulbs 165-171 - front - rear
Running out of fuel, Diesel 198
Opening the bonnet 191 Under the bonnet, petrol 192 Under the bonnet, Diesel 193 Petrol engines 204 Diesel engines 206-207
12V battery 178 -180 Load reduction, energy economy mode 181 Engine compartment f u s e s 172-173 , 17 7
Petrol weights 205 Diesel weights 208 -210
Checking levels 199 -201 - oil - brake fluid - coolant - screenwash fluid - additive (Diesel with particle emissions filter) Checking components 202-203 - battery - air / passenger compartment filter - oil filter - particle emissions filter (Diesel) - brake pads / discs