height PEUGEOT 2008 2014 Owners Manual
[x] Cancel search | Manufacturer: PEUGEOT, Model Year: 2014, Model line: 2008, Model: PEUGEOT 2008 2014Pages: 336, PDF Size: 9.35 MB
Page 10 of 336
8Familiarisation
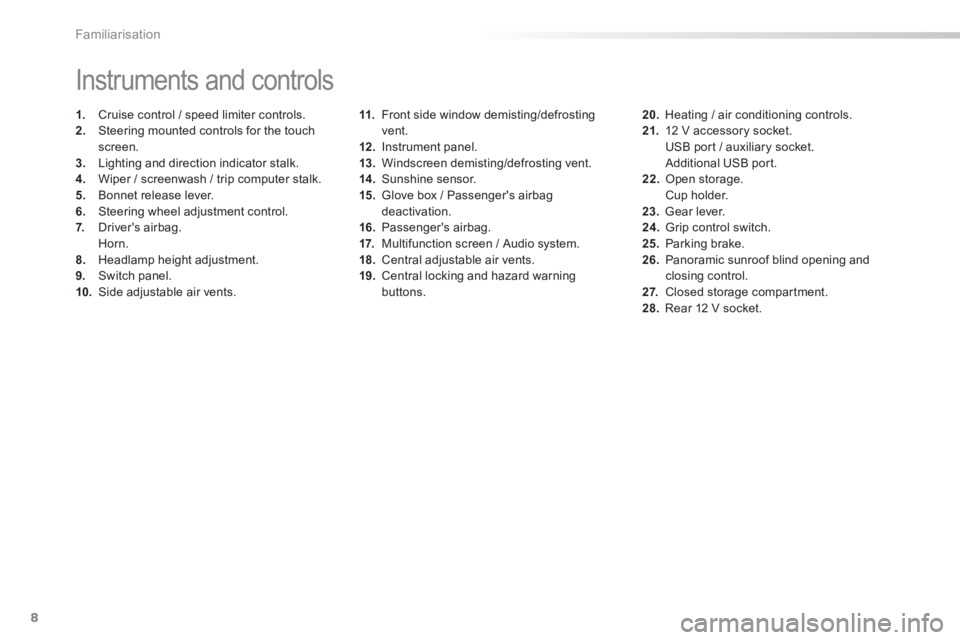
11. Front side window demisting/defrosting vent. 12 . Instrument panel. 13. Windscreen demisting/defrosting vent. 14 . Sunshine sensor. 15. Glove box / Passenger's airbag deactivation. 16. Passenger's airbag. 17. Multifunction screen / Audio system. 18. Central adjustable air vents. 19. Central locking and hazard warning buttons.
Instruments and controls
1. Cruise control / speed limiter controls. 2. Steering mounted controls for the touch screen. 3. Lighting and direction indicator stalk .4. Wiper / screenwash / trip computer stalk. 5. Bonnet release lever. 6. Steering wheel adjustment control. 7. Driver's airbag. Horn. 8. Headlamp height adjustment. 9. Switch panel. 10. Side adjustable air vents.
20. Heating / air conditioning controls. 21. 12 V accessory socket. USB port / auxiliary socket. Additional USB port. 22. Open storage. Cup holder. 23. Gear lever. 24. Grip control switch. 25. Parking brake. 26. Panoramic sunroof blind opening and closing control. 2 7. Closed storage compartment. 28. Rear 12 V socket.
Page 12 of 336
10
57
Familiarisation
Sitting comfortably
Front seats
Manual adjustments
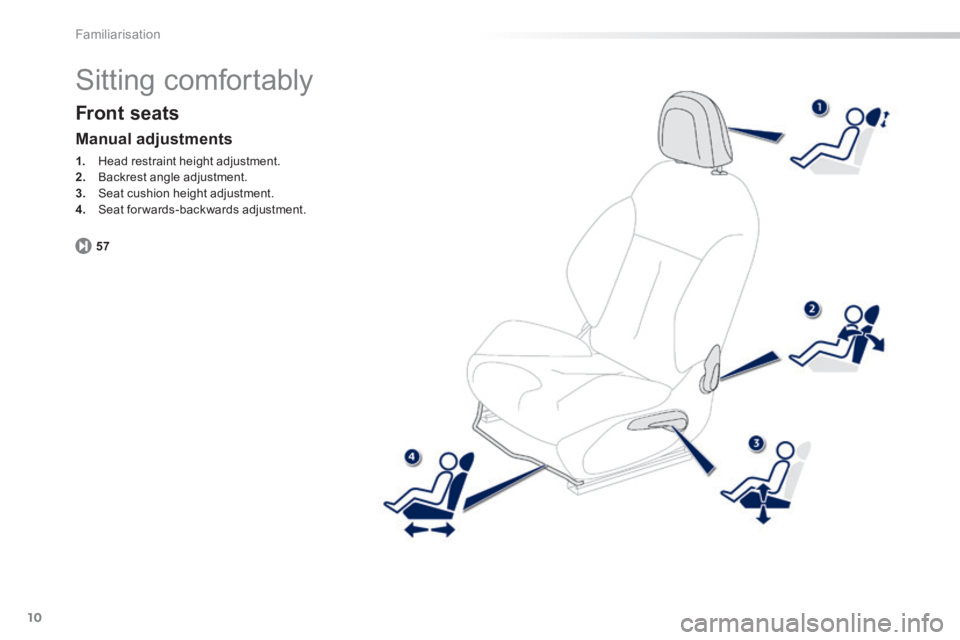
1. Head restraint height adjustment. 2. Backrest angle adjustment. 3. Seat cushion height adjustment. 4. Seat forwards-backwards adjustment.
Page 13 of 336
.
11
5860
Familiarisation
Sitting comfortably
Head restraint adjustment
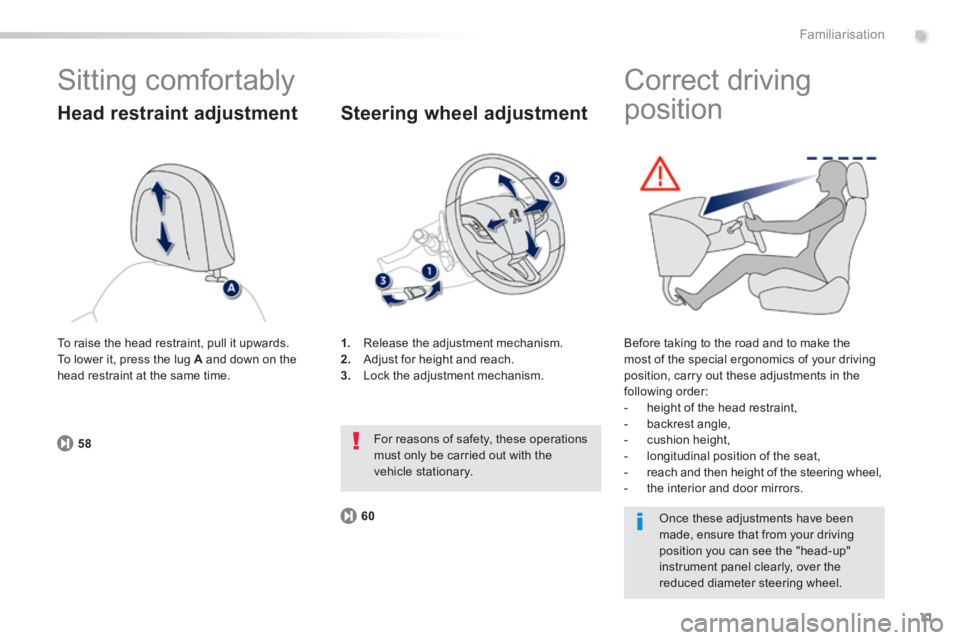
1. Release the adjustment mechanism. 2. Adjust for height and reach. 3. Lock the adjustment mechanism.
Steering wheel adjustment
For reasons of safety, these operations must only be carried out with the vehicle stationary.
To raise the head restraint, pull it upwards. To lower it, press the lug A and down on the head restraint at the same time.
Correct driving
position
Before taking to the road and to make the most of the special ergonomics of your driving position, carry out these adjustments in the following order: - height of the head restraint, - backrest angle, - cushion height, - longitudinal position of the seat, - reach and then height of the steering wheel, - the interior and door mirrors.
Once these adjustments have been made, ensure that from your driving position you can see the "head-up" instrument panel clearly, over the reduced diameter steering wheel.
Page 14 of 336
12
6162
130
Familiarisation
Sitting comfortably
Door mirrors
Adjustment
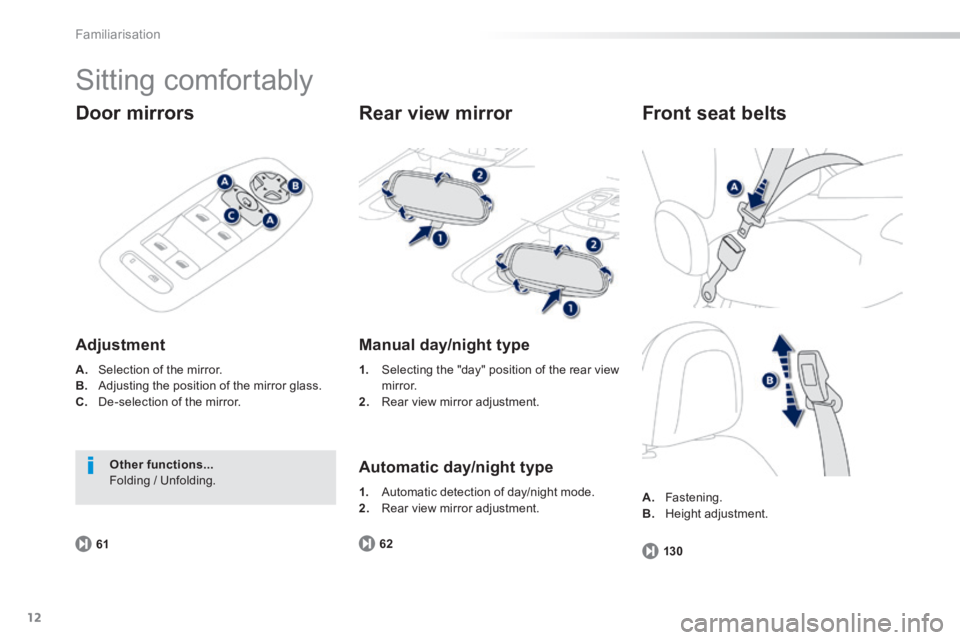
A. Selection of the mirror. B. Adjusting the position of the mirror glass. C. De-selection of the mirror.
Other functions... Folding / Unfolding.
Rear view mirror
Manual day/night type
1. Selecting the "day" position of the rear view m i r r o r. 2. Rear view mirror adjustment.
Automatic day/night type
1. Automatic detection of day/night mode. 2. Rear view mirror adjustment. A. Fastening. B. Height adjustment.
Front seat belts
Page 59 of 336
57
3
Comfort
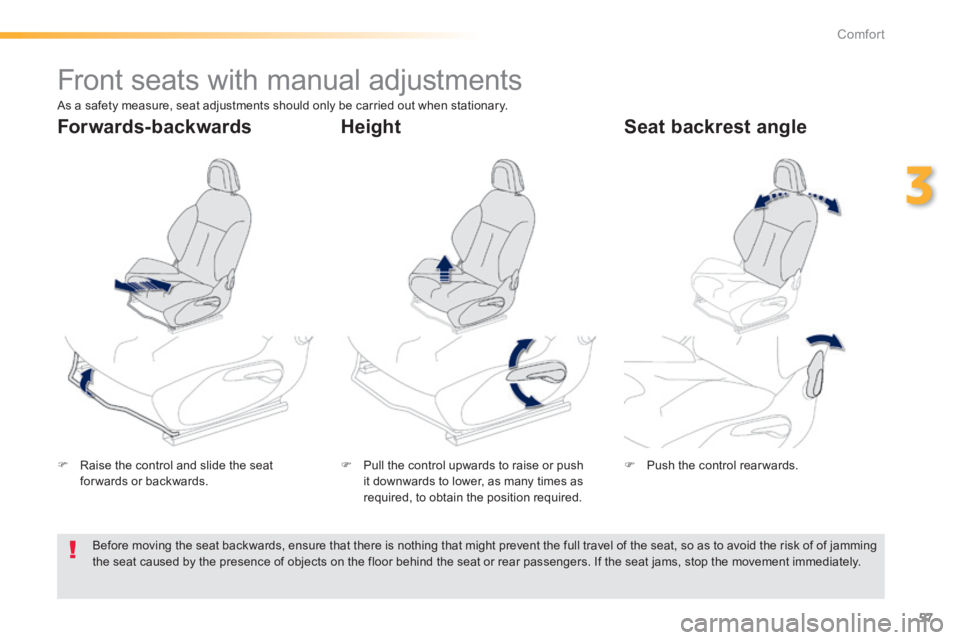
Front seats with manual adjustments
Raise the control and slide the seat for wards or backwards. Pull the control upwards to raise or push it downwards to lower, as many times as required, to obtain the position required.
Push the control rear wards.
Forwards-backwards Height Seat backrest angle
As a safety measure, seat adjustments should only be carried out when stationary.
Before moving the seat backwards, ensure that there is nothing that might prevent the full travel of the seat, so as to avoid the risk of of jamming the seat caused by the presence of objects on the floor behind the seat or rear passengers. If the seat jams, stop the movement immediately.
Page 60 of 336
58
Comfort
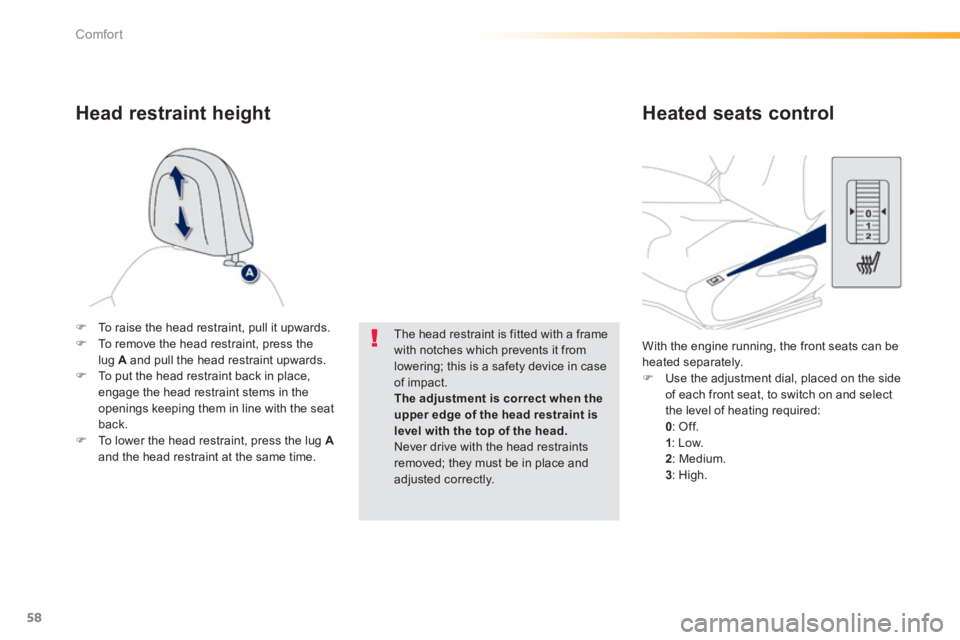
With the engine running, the front seats can be heated separately. Use the adjustment dial, placed on the side of each front seat, to switch on and select the level of heating required: 0 : Off. 1 : Low. 2 : Medium. 3 : High.
To raise the head restraint, pull it upwards. To remove the head restraint, press the lug A and pull the head restraint upwards. To put the head restraint back in place, engage the head restraint stems in the openings keeping them in line with the seat back.
To lower the head restraint, press the lug Aand the head restraint at the same time.
The head restraint is fitted with a frame with notches which prevents it from lowering; this is a safety device in case of impact. The adjustment is correct when the upper edge of the head restraint is
level with the top of the head. Never drive with the head restraints removed; they must be in place and adjusted correctly.
Head restraint height Heated seats control
Page 62 of 336
60
Comfort
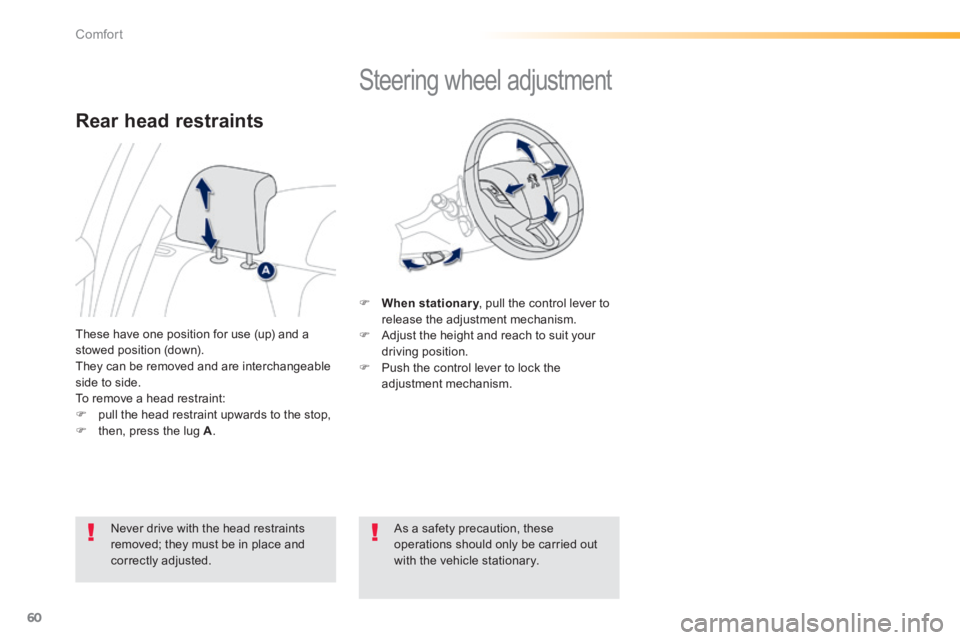
Steering wheel adjustment
When stationary , pull the control lever to When stationary , pull the control lever to When stationaryrelease the adjustment mechanism. Adjust the height and reach to suit your driving position. Push the control lever to lock the adjustment mechanism.
As a safety precaution, these operations should only be carried out with the vehicle stationary.
These have one position for use (up) and a stowed position (down). They can be removed and are interchangeable side to side. To remove a head restraint: pull the head restraint upwards to the stop,
then, press the lug A .
Rear head restraints
Never drive with the head restraints removed; they must be in place and correctly adjusted.
Page 80 of 336
78
Comfort
Warning triangle (stowing)
Before leaving your vehicle to set up and install the triangle, put on your high visibility vest.
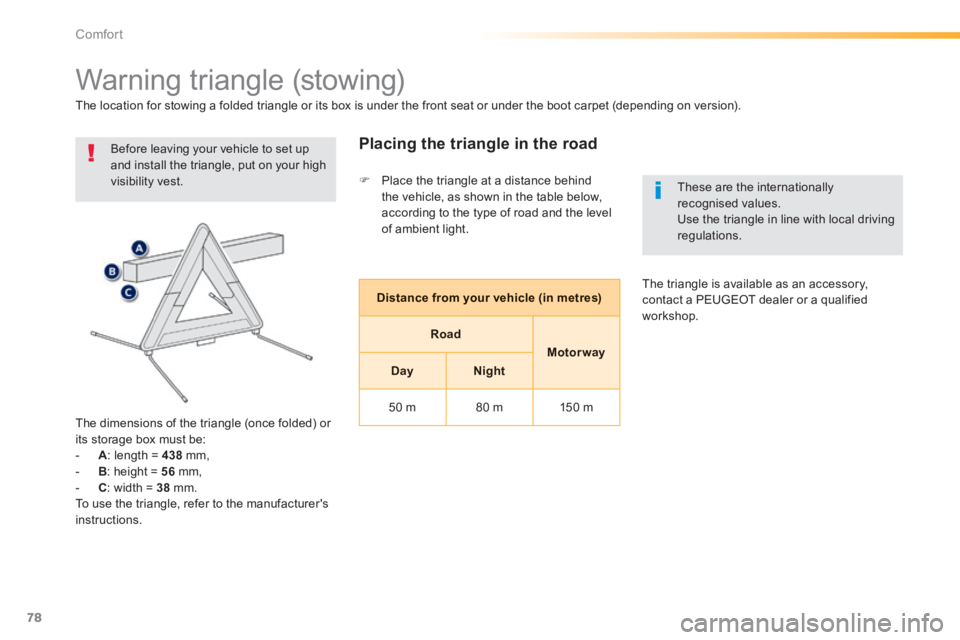
The dimensions of the triangle (once folded) or
its storage box must be: - A : length = 438 mm, - B : height = 56 mm, - C : width = 38 mm. To use the triangle, refer to the manufacturer's instructions.
Placing the triangle in the road
The location for stowing a folded triangle or its box is under the front seat or under the boot carpet (depending on version).
Distance from your vehicle (in metres)
Road
Motor way
DayNight
50 m 80 m 150 m
These are the internationally recognised values. Use the triangle in line with local driving regulations.
The triangle is available as an accessory, contact a PEUGEOT dealer or a qualified workshop.
Place the triangle at a distance behind the vehicle, as shown in the table below, according to the type of road and the level of ambient light.
Page 132 of 336
130
Safety
Seat belts
Front seat belts
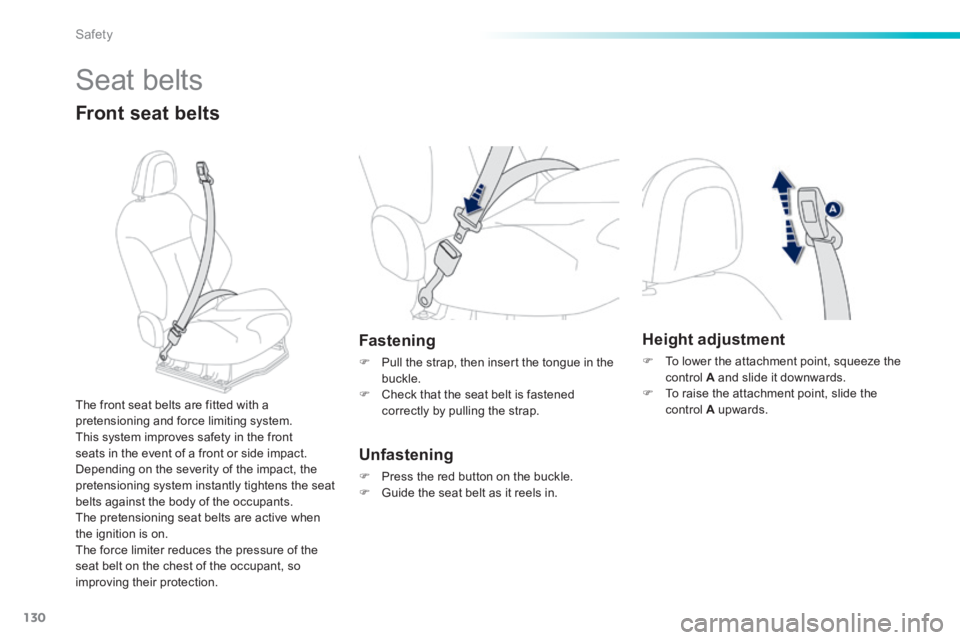
Fastening
Pull the strap, then insert the tongue in the buckle. Check that the seat belt is fastened correctly by pulling the strap.
Unfastening
Press the red button on the buckle. Guide the seat belt as it reels in.
The front seat belts are fitted with a pretensioning and force limiting system. This system improves safety in the front seats in the event of a front or side impact. Depending on the severity of the impact, the pretensioning system instantly tightens the seat belts against the body of the occupants. The pretensioning seat belts are active when the ignition is on. The force limiter reduces the pressure of the seat belt on the chest of the occupant, so improving their protection.
Height adjustment
To lower the attachment point, squeeze the control A and slide it downwards. To raise the attachment point, slide the control A upwards.
Page 140 of 336
138
Safety
Ensure that the seat belt is correctly tensioned. For child seats with a support leg, ensure that this is in steady contact with the floor. If not, adjust the passenger seat.
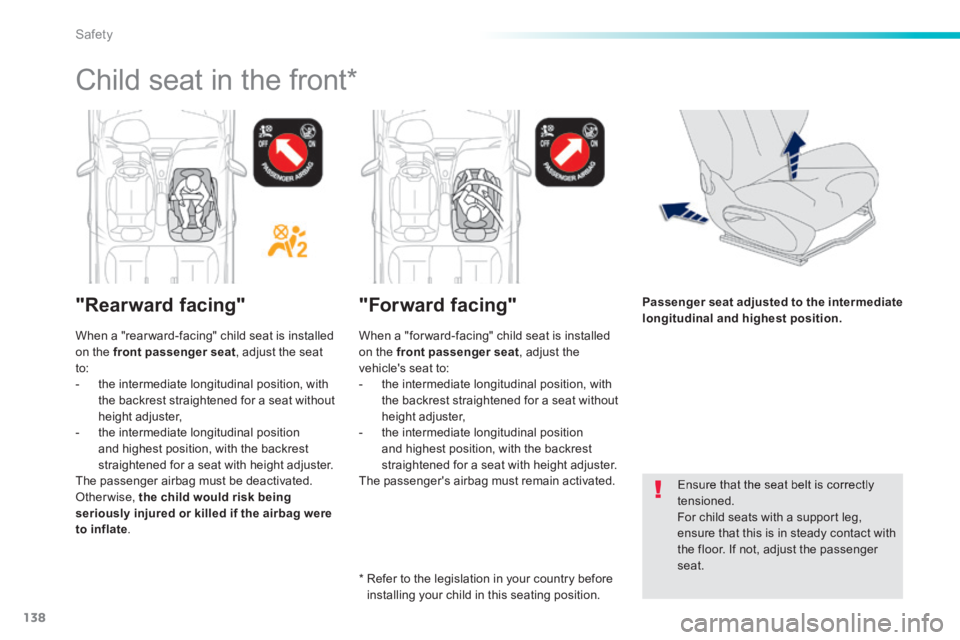
Child seat in the front *
"Rearward facing"
When a "rear ward-facing" child seat is installed on the front passenger seat , adjust the seat to: - the intermediate longitudinal position, with the backrest straightened for a seat without height adjuster,
- the intermediate longitudinal position and highest position, with the backrest straightened for a seat with height adjuster. The passenger airbag must be deactivated. Otherwise, the child would risk being seriously injured or killed if the airbag were to inflate .
"Forward facing"
* Refer to the legislation in your country before installing your child in this seating position.
When a "for ward-facing" child seat is installed on the front passenger seat , adjust the vehicle's seat to: - the intermediate longitudinal position, with the backrest straightened for a seat without height adjuster,
- the intermediate longitudinal position and highest position, with the backrest straightened for a seat with height adjuster. The passenger's airbag must remain activated.
Passenger seat adjusted to the intermediate longitudinal and highest position.