headlamp PEUGEOT 2008 2015 User Guide
[x] Cancel search | Manufacturer: PEUGEOT, Model Year: 2015, Model line: 2008, Model: PEUGEOT 2008 2015Pages: 340, PDF Size: 8.4 MB
Page 117 of 340
115
2008_en_Chap06_visibilite_ed01-2015
Daytime running lamps
Daytime lighting, compulsory in certain
countries, which comes on automatically when
the engine is started making the vehicle more
visible to other users.
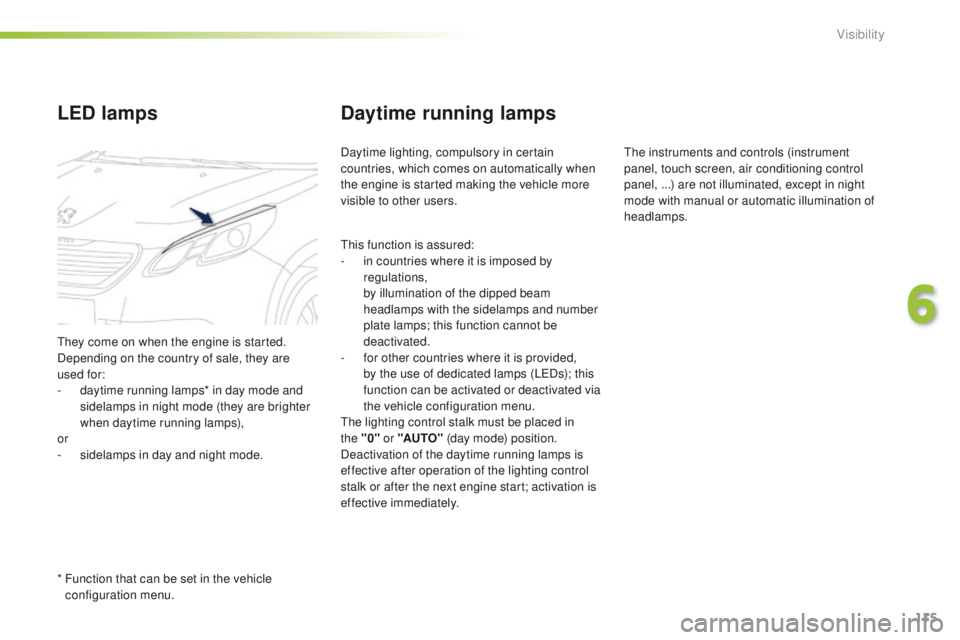
LED lamps
They come on when the engine is started.
Depending on the country of sale, they are
used for:
-
d
aytime running lamps* in day mode and
sidelamps in night mode (they are brighter
when daytime running lamps),
or
-
s
idelamps in day and night mode.
*
F
unction that can be set in the vehicle
configuration menu. This function is assured:
-
i
n countries where it is imposed by
regulations,
b
y illumination of the dipped beam
headlamps with the sidelamps and number
plate lamps; this function cannot be
deactivated.
- f or other countries where it is provided,
b
y the use of dedicated lamps (LEDs); this
function can be activated or deactivated via
the vehicle configuration menu.
The lighting control stalk must be placed in
the
"0"
or "AUTO" (day mode) position.
Deactivation of the daytime running lamps is
effective after operation of the lighting control
stalk or after the next engine start; activation is
effective immediately. The instruments and controls (instrument
panel, touch screen, air conditioning control
panel, ...) are not illuminated, except in night
mode with manual or automatic illumination of
headlamps.
6
Visibility
Page 118 of 340
116
2008_en_Chap06_visibilite_ed01-2015
Temporarily keeping the dipped beam
headlamps on after the vehicle's ignition has
been switched off makes the driver's exit easier
when the light is poor.
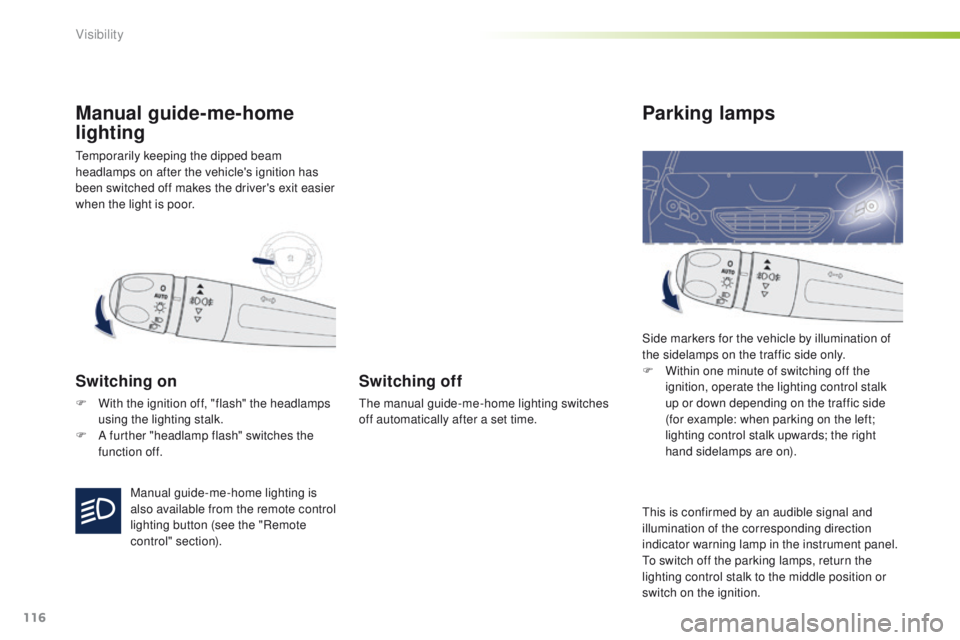
Manual guide-me-home
lighting
Switching on
F With the ignition off, "flash" the headlamps using the lighting stalk.
F
A f
urther "headlamp flash" switches the
function off.
Switching off
The manual guide-me-home lighting switches
off automatically after a set time.
Parking lamps
Side markers for the vehicle by illumination of
the sidelamps on the traffic side only.
F
W
ithin one minute of switching off the
ignition, operate the lighting control stalk
up or down depending on the traffic side
(for example: when parking on the left;
lighting control stalk upwards; the right
hand sidelamps are on).
Manual guide-me-home lighting is
also available from the remote control
lighting button (see the "Remote
control" section). This is confirmed by an audible signal and
illumination of the corresponding direction
indicator warning lamp in the instrument panel.
To switch off the parking lamps, return the
lighting control stalk to the middle position or
switch on the ignition.
Visibility
Page 119 of 340
117
2008_en_Chap06_visibilite_ed01-2015
The sidelamps and dipped beam headlamps are
switched on automatically, without any action
on the part of the driver, when a low level of
external light is detected or in certain cases of
activation of the windscreen wipers.
As soon as the brightness returns to a sufficient
level or after the windscreen wipers are switched
off, the lamps are switched off automatically.
Automatic illumination of headlamps
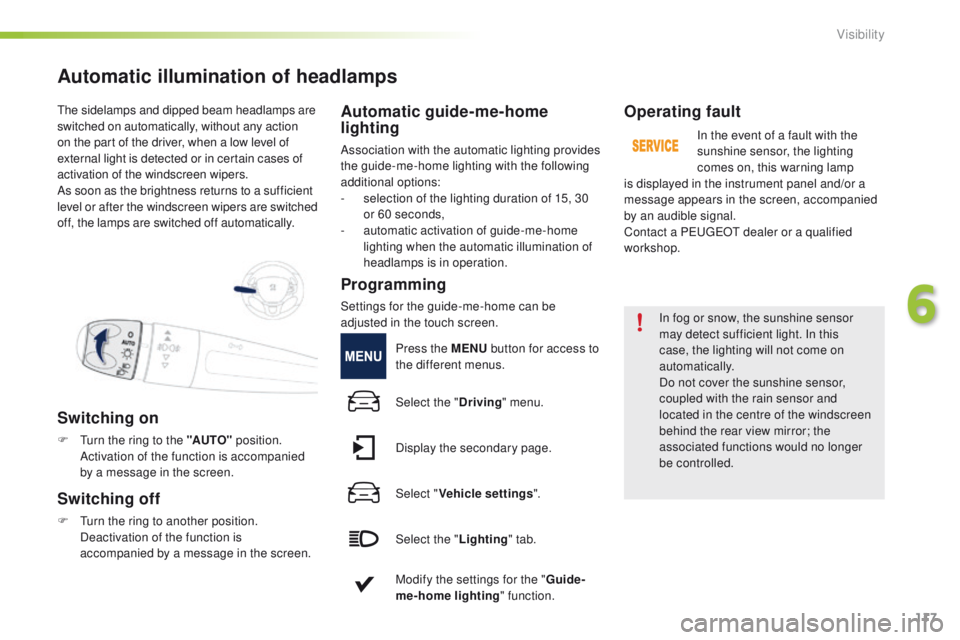
Switching on
F Turn the ring to the "AUTO" position.
Activation of the function is accompanied
by a message in the screen.
Switching off
F Turn the ring to another position. Deactivation of the function is
accompanied by a message in the screen.
Automatic guide-me-home
lighting
Association with the automatic lighting provides
the guide-me-home lighting with the following
additional options:
-
s
election of the lighting duration of 15, 30
or 60 seconds,
-
a
utomatic activation of guide-me-home
lighting when the automatic illumination of
headlamps is in operation.
Operating fault
In the event of a fault with the
sunshine sensor, the lighting
comes on, this warning lamp
is displayed in the instrument panel and/or a
message appears in the screen, accompanied
by an audible signal.
Contact a PEUGEOT dealer or a qualified
workshop.
In fog or snow, the sunshine sensor
may detect sufficient light. In this
case, the lighting will not come on
automatically.
Do not cover the sunshine sensor,
coupled with the rain sensor and
located in the centre of the windscreen
behind the rear view mirror; the
associated functions would no longer
be controlled.
Programming
Settings for the guide-me-home can be
adjusted in the touch screen. Press the MENU button for access to
the different menus.
Select the " Driving" menu.
Display the secondary page.
Select " Vehicle settings ".
Select the " Lighting" tab.
Modify the settings for the " Guide-
me-home lighting " function.
6
Visibility
Page 120 of 340
118
2008_en_Chap06_visibilite_ed01-2015
Headlamp
adjustment
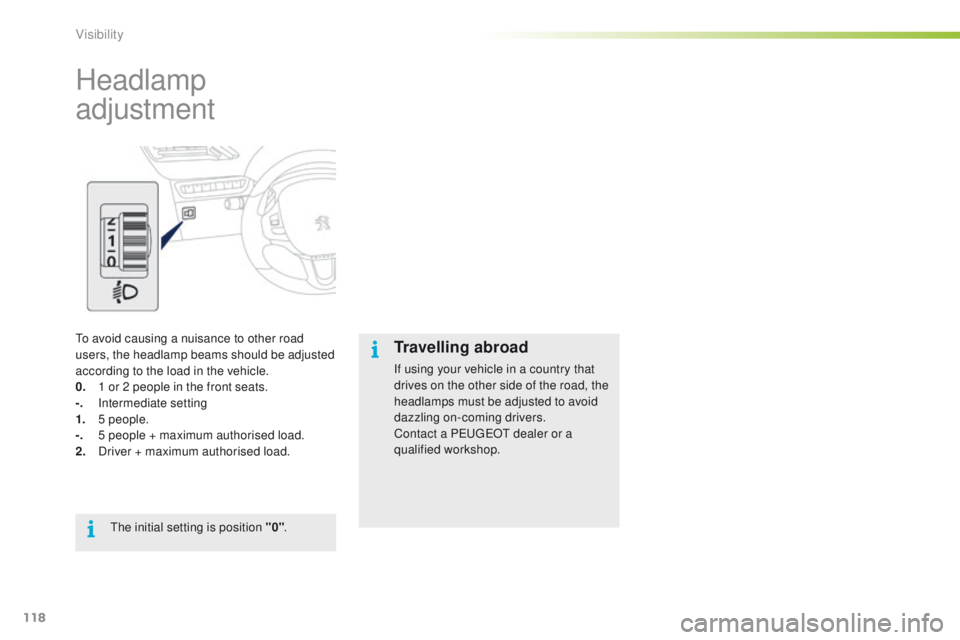
To avoid causing a nuisance to other road
users, the headlamp beams should be adjusted
according to the load in the vehicle.
0.
1 o
r 2 people in the front seats.
-.
I
ntermediate setting
1.
5
people.
-.
5 p
eople + maximum authorised load.
2.
D
river + maximum authorised load.The initial setting is position "0" .Travelling abroad
If using your vehicle in a country that
drives on the other side of the road, the
headlamps must be adjusted to avoid
dazzling on-coming drivers.
Contact a PEUGEOT dealer or a
qualified workshop.
Visibility
Page 126 of 340
124
2008_en_Chap06_visibilite_ed01-2015
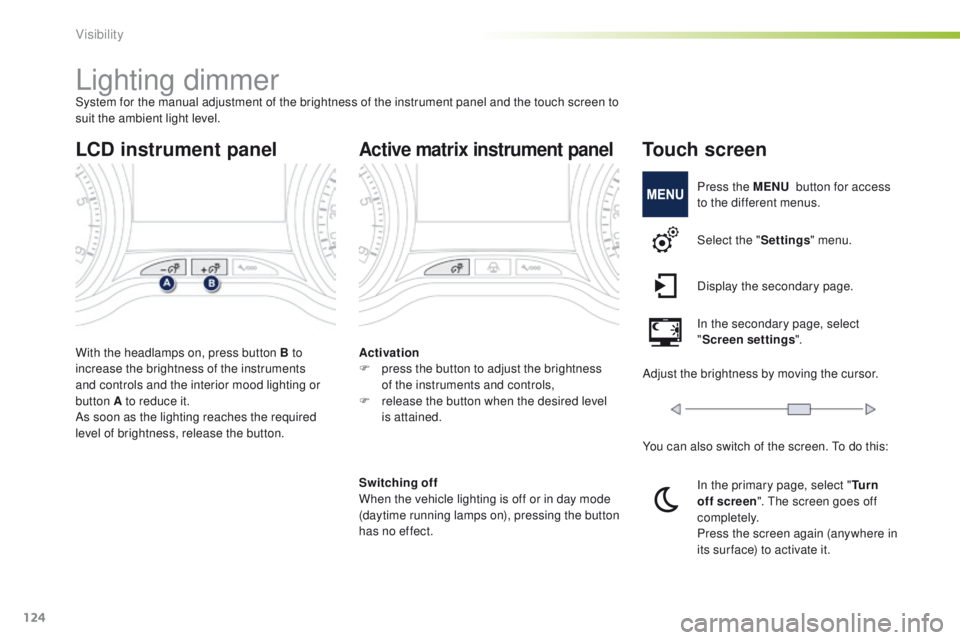
Lighting dimmerSystem for the manual adjustment of the brightness of the instrument panel and the touch screen to
suit the ambient light level.
With the headlamps on, press button B to
increase the brightness of the instruments
and controls and the interior mood lighting or
button A to reduce it.
As soon as the lighting reaches the required
level of brightness, release the button.
LCD instrument panel
Activation
F p ress the button to adjust the brightness
of the instruments and controls,
F
r
elease the button when the desired level
is attained.
Active matrix instrument panel
Switching off
When the vehicle lighting is off or in day mode
(daytime running lamps on), pressing the button
has no effect.
Touch screen
Press the MENU button for access
to the different menus.
Select the " Settings" menu.
Display the secondary page.
In the secondary page, select
" Screen settings ".
Adjust the brightness by moving the cursor.
You can also switch of the screen. To do this:
In the primary page, select " Tu r n
off screen ". The screen goes off
completely.
Press the screen again (anywhere in
its sur face) to activate it.
Visibility
Page 187 of 340
185
2008_en_Chap09_info-pratiques_ed01-2015
Changing a bulb
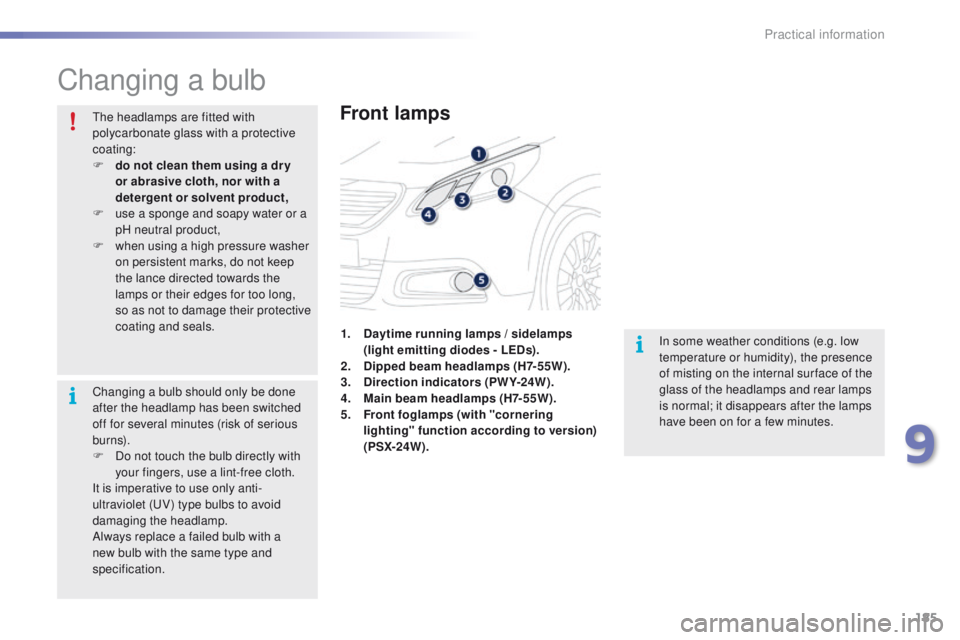
Front lamps
In some weather conditions (e.g. low
temperature or humidity), the presence
of misting on the internal sur face of the
glass of the headlamps and rear lamps
is normal; it disappears after the lamps
have been on for a few minutes.
The headlamps are fitted with
polycarbonate glass with a protective
coating:
F
d
o not clean them using a dr y
or abrasive cloth, nor with a
detergent or solvent product,
F
u
se a sponge and soapy water or a
pH neutral product,
F
w
hen using a high pressure washer
on persistent marks, do not keep
the lance directed towards the
lamps or their edges for too long,
so as not to damage their protective
coating and seals. 1. D
aytime running lamps / sidelamps
(light emitting diodes - LEDs).
2.
D
ipped beam headlamps (H7-55W).
3.
D
irection indicators (PWY-24W).
4.
M
ain beam headlamps (H7-55W).
5.
F
ront foglamps (with "cornering
lighting" function according to version)
(PSX-24W).
Changing a bulb should only be done
after the headlamp has been switched
off for several minutes (risk of serious
burns).
F
D
o not touch the bulb directly with
your fingers, use a lint-free cloth.
It is imperative to use only anti-
ultraviolet (UV) type bulbs to avoid
damaging the headlamp.
Always replace a failed bulb with a
new bulb with the same type and
specification.
9
Practical information
Page 188 of 340
186
2008_en_Chap09_info-pratiques_ed01-2015
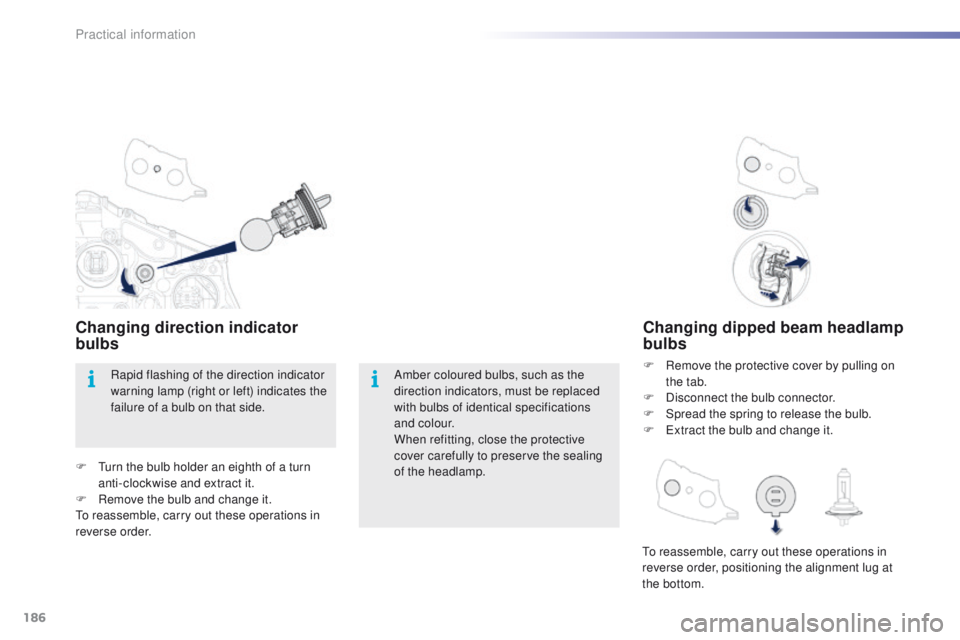
Changing dipped beam headlamp
bulbs
F Remove the protective cover by pulling on the tab.
F
D
isconnect the bulb connector.
F
S
pread the spring to release the bulb.
F
E
xtract the bulb and change it.
Amber coloured bulbs, such as the
direction indicators, must be replaced
with bulbs of identical specifications
and colour.
When refitting, close the protective
cover carefully to preserve the sealing
of the headlamp.
Rapid flashing of the direction indicator
warning lamp (right or left) indicates the
failure of a bulb on that side.
Changing direction indicator
bulbs
To reassemble, carry out these operations in
reverse order, positioning the alignment lug at
the bottom.
F
T
urn the bulb holder an eighth of a turn
anti-clockwise and extract it.
F
R
emove the bulb and change it.
To reassemble, carry out these operations in
reverse order.
Practical information
Page 189 of 340
187
2008_en_Chap09_info-pratiques_ed01-2015
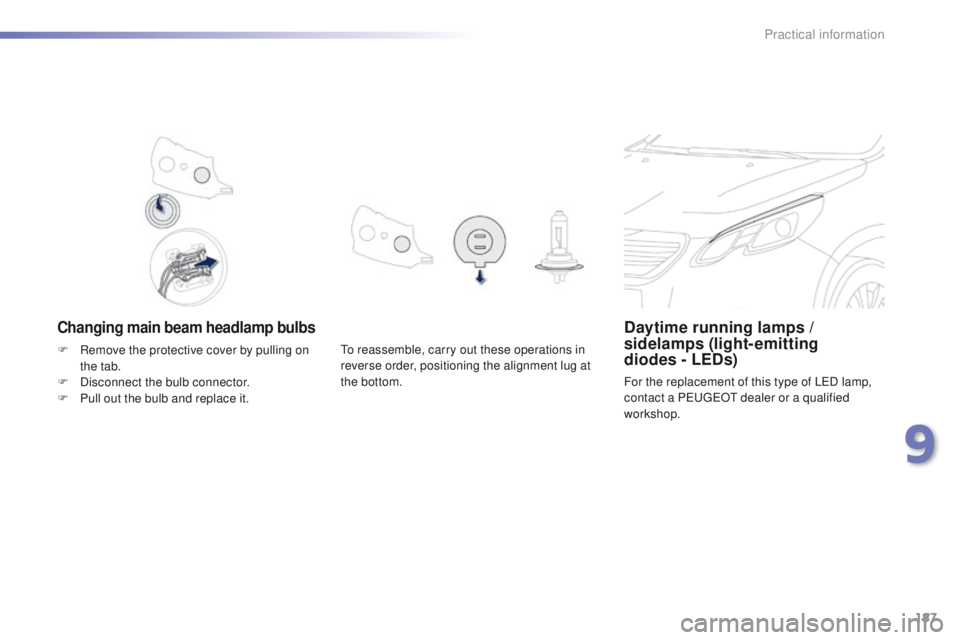
Changing main beam headlamp bulbsDaytime running lamps /
sidelamps (light-emitting
diodes - LEDs)
For the replacement of this type of LED lamp,
contact a PEUGEOT dealer or a qualified
workshop.
To reassemble, carry out these operations in
reverse order, positioning the alignment lug at
the bottom.
F
R
emove the protective cover by pulling on
the tab.
F
D
isconnect the bulb connector.
F
P
ull out the bulb and replace it.
9
Practical information
Page 196 of 340
194
2008_en_Chap09_info-pratiques_ed01-2015
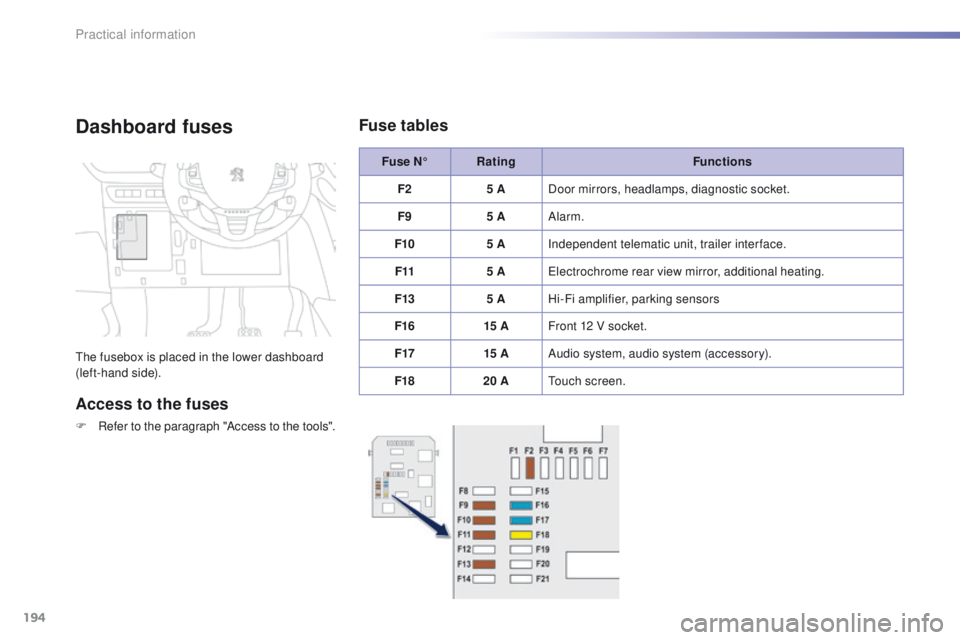
Dashboard fuses
The fusebox is placed in the lower dashboard
(left-hand side).
Access to the fuses
F Refer to the paragraph "Access to the tools".Fuse N°
Rating Functions
F2 5 ADoor mirrors, headlamps, diagnostic socket.
F9 5 AAlarm.
F10 5 AIndependent telematic unit, trailer interface.
F11 5 AElectrochrome rear view mirror, additional heating.
F13 5 AHi-Fi amplifier, parking sensors
F16 15 AFront 12 V socket.
F17 15 AAudio system, audio system (accessory).
F18 20 ATouch screen.
Fuse tables
Practical information
Page 199 of 340
197
2008_en_Chap09_info-pratiques_ed01-2015
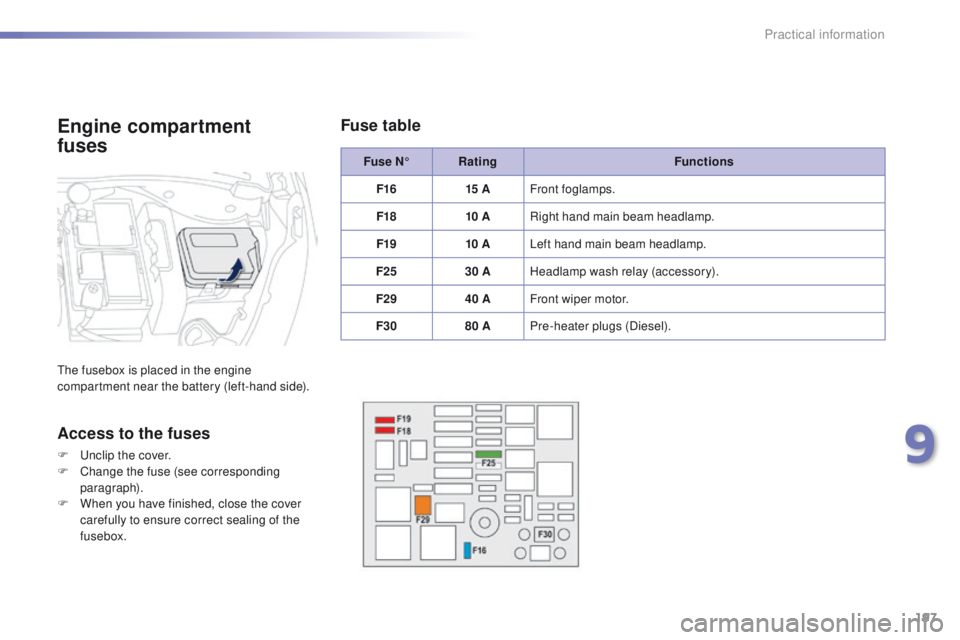
Fuse N°Rating Functions
F16 15 AFront foglamps.
F18 10 ARight hand main beam headlamp.
F19 10 ALeft hand main beam headlamp.
F25 30 AHeadlamp wash relay (accessory).
F29 40 AFront wiper motor.
F30 80 APre-heater plugs (Diesel).
Engine compartment
fuses
The fusebox is placed in the engine
compartment near the battery (left-hand side).
Access to the fuses
F Unclip the cover.
F
C hange the fuse (see corresponding
paragraph).
F
W
hen you have finished, close the cover
carefully to ensure correct sealing of the
fusebox.
Fuse table
9
Practical information