audio Peugeot 206 CC Dag 2001.5 Owner's Manual
[x] Cancel search | Manufacturer: PEUGEOT, Model Year: 2001.5, Model line: 206 CC Dag, Model: Peugeot 206 CC Dag 2001.5Pages: 123, PDF Size: 2.86 MB
Page 2 of 123
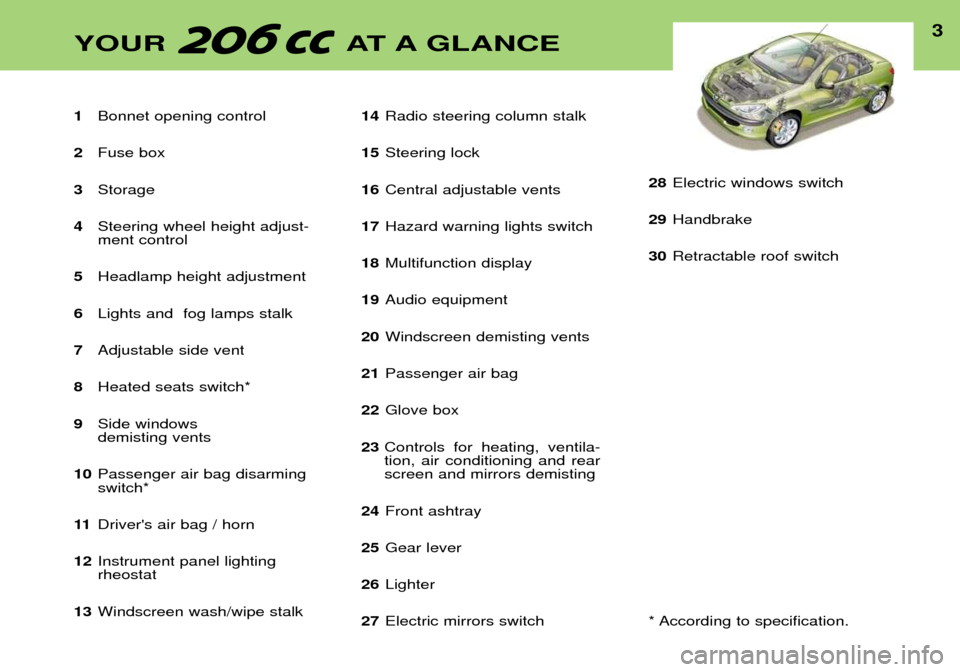
1Bonnet opening control
2 Fuse box
3 Storage
4 Steering wheel height adjust- ment control
5 Headlamp height adjustment
6 Lights and fog lamps stalk
7 Adjustable side vent
8 Heated seats switch*
9 Side windows demisting vents
10 Passenger air bag disarmingswitch*
11 Driver's air bag / horn
12 Instrument panel lighting rheostat
13 Windscreen wash/wipe stalk 14
Radio steering column stalk
15 Steering lock
16 Central adjustable vents
17 Hazard warning lights switch
18 Multifunction display
19 Audio equipment
20 Windscreen demisting vents
21 Passenger air bag
22 Glove box
23 Controls for heating, ventila-tion, air conditioning and rearscreen and mirrors demisting
24 Front ashtray
25 Gear lever
26 Lighter
27 Electric mirrors switch 28
Electric windows switch
29 Handbrake
30 Retractable roof switch
* According to specification.
3YOUR AT A GLANCE
Page 32 of 123
YOUR 206 CC IN DETAIL
34
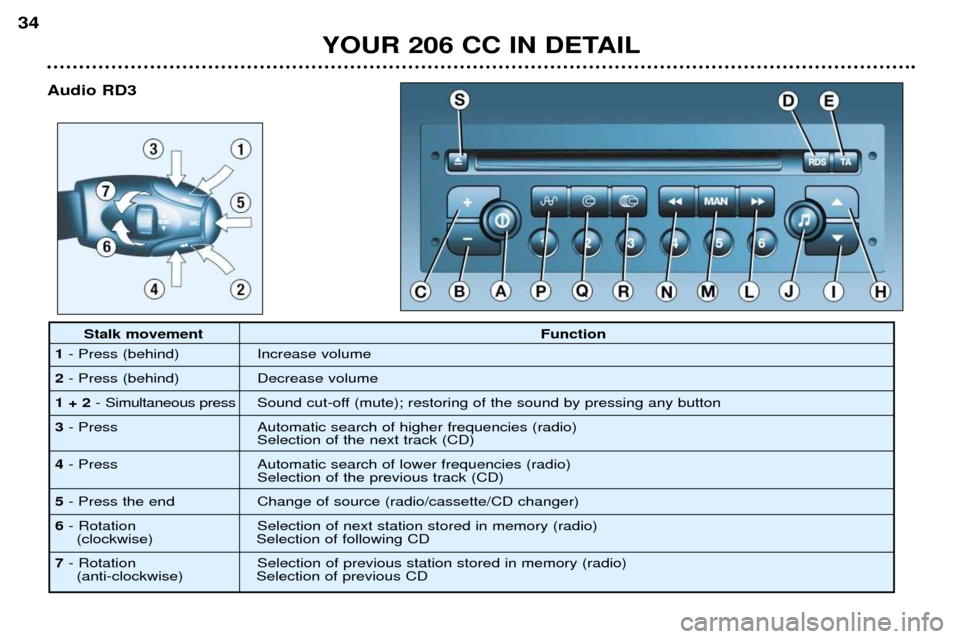
Audio RD3
Stalk movement Function
1 - Press (behind) Increase volume
2 - Press (behind) Decrease volume
1 + 2 - Simultaneous press Sound cut-off (mute); restoring of the sound by pressing any button
3 - Press Automatic search of higher frequencies (radio)
Selection of the next track (CD)
4 - Press Automatic search of lower frequencies (radio)
Selection of the previous track (CD)
5 - Press the end Change of source (radio/cassette/CD changer)
6 - Rotation Selection of next station stored in memory (radio)
(clockwise) Selection of following CD
7 - Rotation Selection of previous station stored in memory (radio)
(anti-clockwise) Selection of previous CD
Page 33 of 123
YOUR 206 CC IN DETAIL35
Button
Function
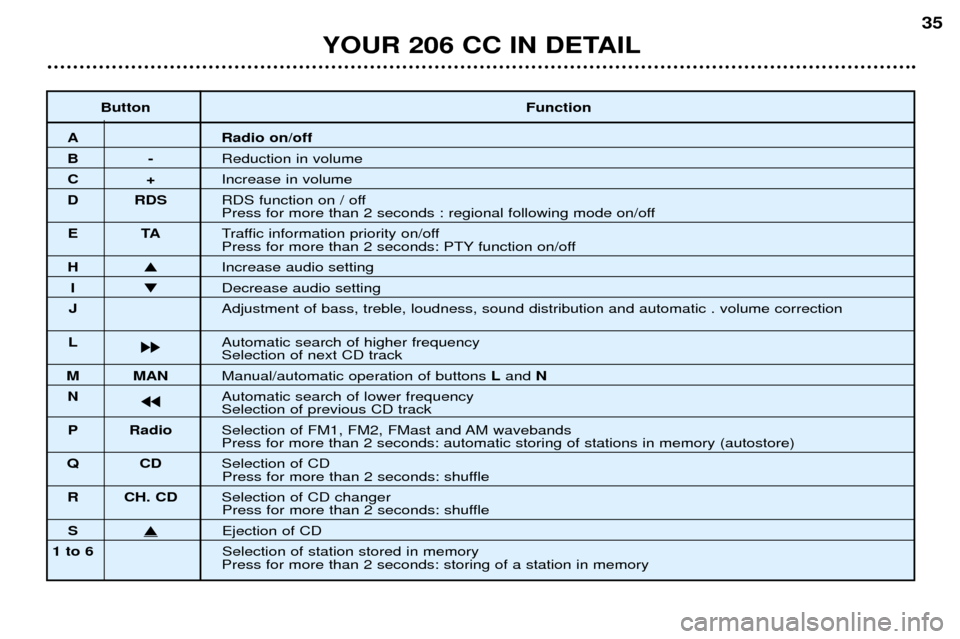
A Radio on/off
B-Reduction in volume
C+Increase in volume
D RDS RDS function on / off
Press for more than 2 seconds : regional following mode on/off
ET ATraffic information priority on/off
Press for more than 2 seconds: PTY function on/off
H � Increase audio setting
I� Decrease audio setting
J Adjustment of bass, treble, loudness, sound distribution and automatic . volume correction
L
kk Automatic search of higher frequencySelection of next CD track
M MAN
Manual/automatic operation of buttons Land N
N jj Automatic search of lower frequency
Selection of previous CD track
P Radio Selection of FM1, FM2, FMast and AM wavebands
Press for more than 2 seconds: automatic storing of stations in memory (autostore)
QC DSelection of CD
Press for more than 2 seconds: shuffle
R CH. CD Selection of CD changer
Press for more than 2 seconds: shuffle
S�Ejection of CD
1 to 6 Selection of station stored in memory
Press for more than 2 seconds: storing of a station in memory
Page 34 of 123
YOUR 206 CC IN DETAIL
36
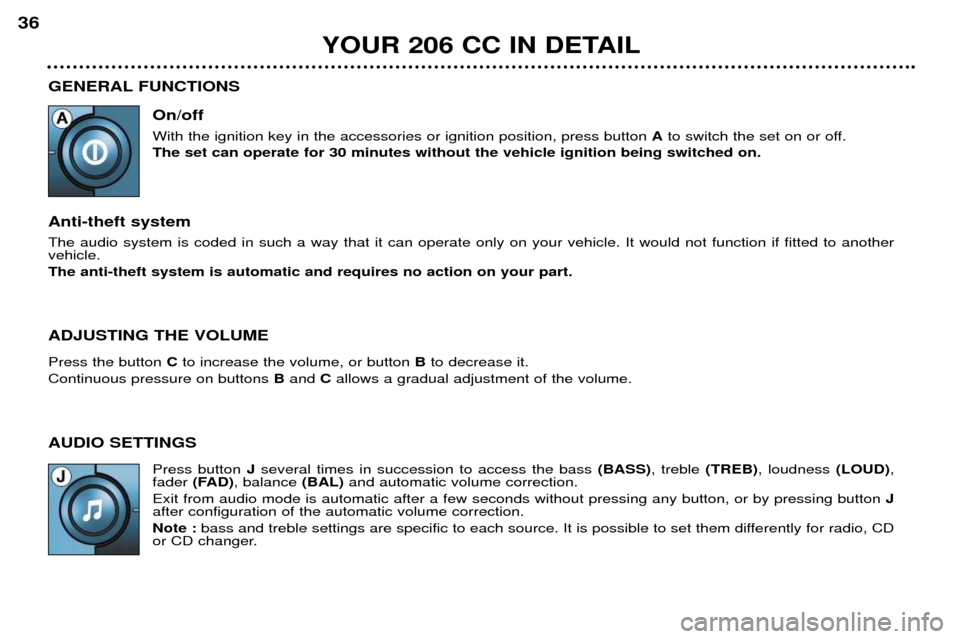
GENERAL FUNCTIONS On/off With the ignition key in the accessories or ignition position, press button Ato switch the set on or off.
The set can operate for 30 minutes without the vehicle ignition being switched on.
Anti-theft system The audio system is coded in such a way that it can operate only on your vehicle. It would not function if fitted to another vehicle. The anti-theft system is automatic and requires no action on your part. ADJUSTING THE VOLUME Press the button Cto increase the volume, or button Bto decrease it.
Continuous pressure on buttons Band Callows a gradual adjustment of the volume.
AUDIO SETTINGS Press button Jseveral times in succession to access the bass (BASS), treble (TREB), loudness (LOUD),
fader (FAD) , balance (BAL)and automatic volume correction.
Exit from audio mode is automatic after a few seconds without pressing any button, or by pressing button J
after configuration of the automatic volume correction. Note : bass and treble settings are specific to each source. It is possible to set them differently for radio, CD
or CD changer.
Page 40 of 123
YOUR 206 CC IN DETAIL
42
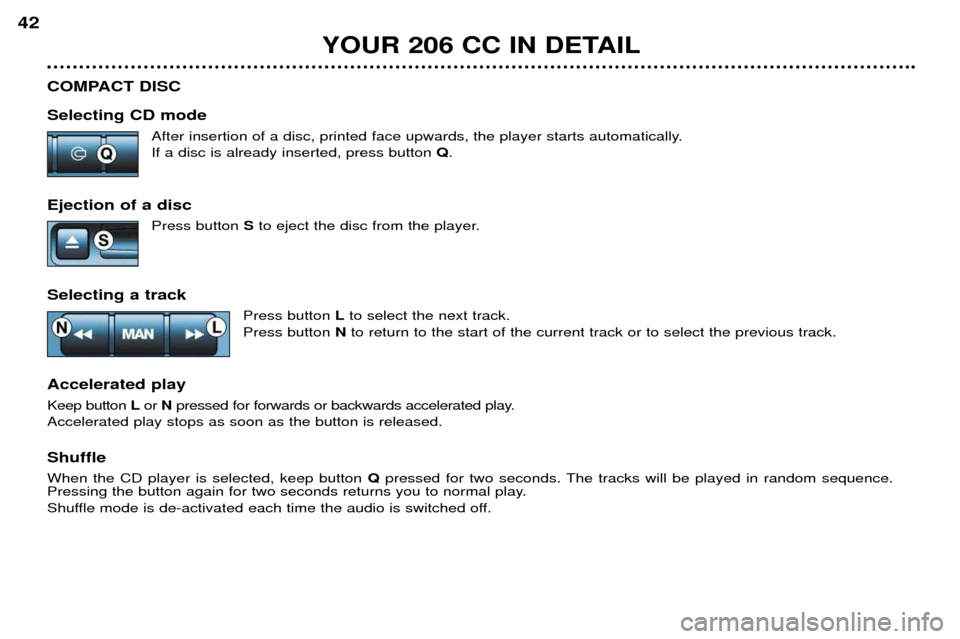
COMPACT DISC Selecting CD mode After insertion of a disc, printed face upwards, the player starts automatically. If a disc is already inserted, press button Q.
Ejection of a disc Press button Sto eject the disc from the player.
Selecting a track Press button Lto select the next track.
Press button Nto return to the start of the current track or to select the previous track.
Accelerated play Keep button Lor Npressed for forwards or backwards accelerated play.
Accelerated play stops as soon as the button is released.
ShuffleWhen the CD player is selected, keep button Qpressed for two seconds. The tracks will be played in random sequence.
Pressing the button again for two seconds returns you to normal play.
Shuffle mode is de-activated each time the audio is switched off.
Page 106 of 123
PRACTICAL ASPECTS OF YOUR VEHICLE103
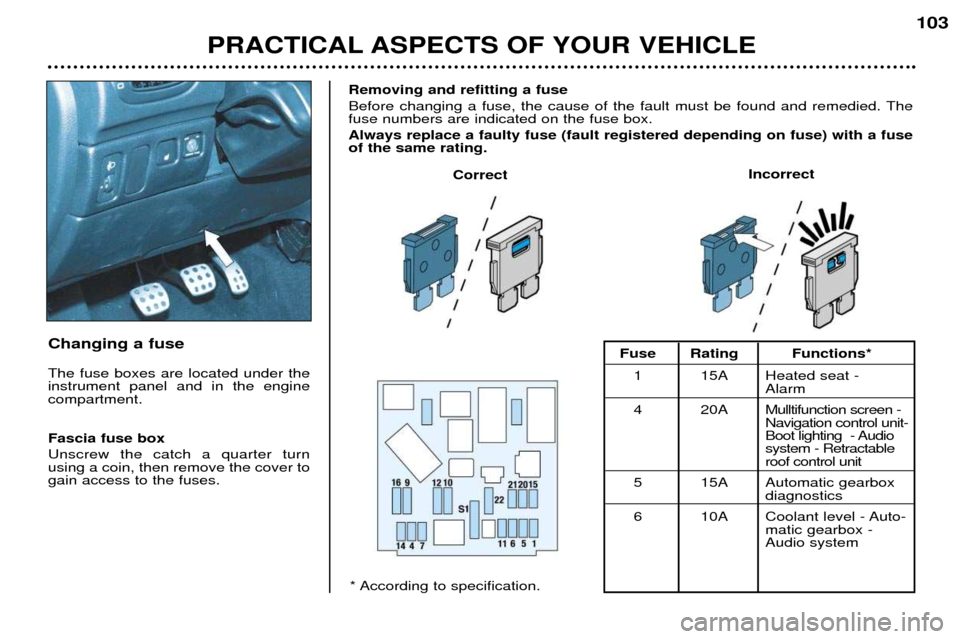
Changing a fuse
The fuse boxes are located under the instrument panel and in the enginecompartment. Fascia fuse box Unscrew the catch a quarter turn using a coin, then remove the cover togain access to the fuses.Removing and refitting a fuse
Before changing a fuse, the cause of the fault must be found and remedied. The fuse numbers are indicated on the fuse box. Always replace a faulty fuse (fault registered depending on fuse) with a fuse of the same rating.
Correct
Incorrect
* According to specification.Fuse Rating Functions*
1 15A Heated seat - Alarm
4 20A Mulltifunction screen - Navigation control unit-
Boot lighting - Audiosystem - Retractableroof control unit
5 15A Automatic gearbox diagnostics
6 10A Coolant level - Auto- matic gearbox - Audio system
Page 107 of 123
PRACTICAL ASPECTS OF YOUR VEHICLE103
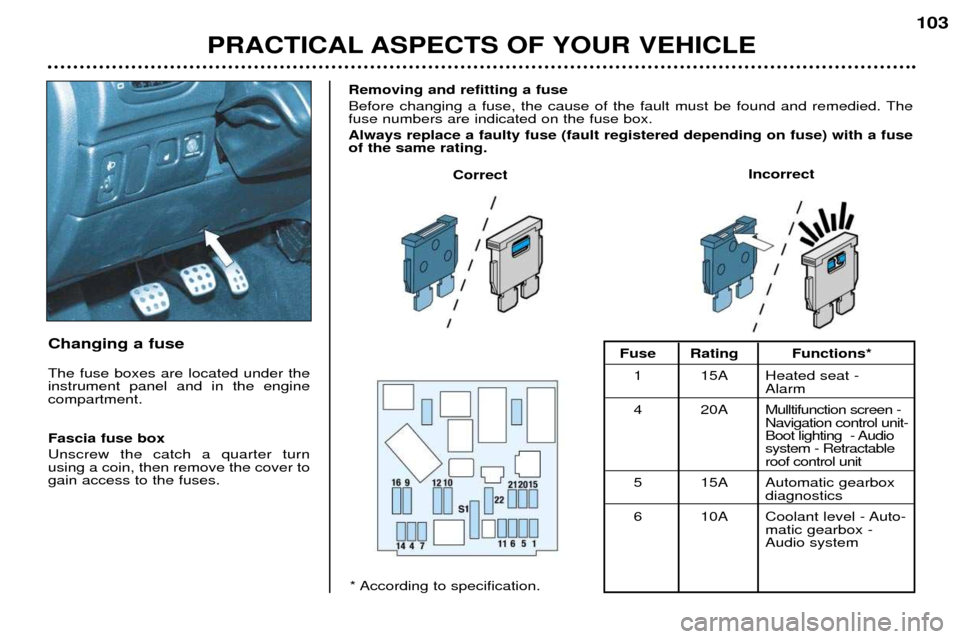
Changing a fuse
The fuse boxes are located under the instrument panel and in the enginecompartment. Fascia fuse box Unscrew the catch a quarter turn using a coin, then remove the cover togain access to the fuses.Removing and refitting a fuse
Before changing a fuse, the cause of the fault must be found and remedied. The fuse numbers are indicated on the fuse box. Always replace a faulty fuse (fault registered depending on fuse) with a fuse of the same rating.
Correct
Incorrect
* According to specification.Fuse Rating Functions*
1 15A Heated seat - Alarm
4 20A Mulltifunction screen - Navigation control unit-
Boot lighting - Audiosystem - Retractableroof control unit
5 15A Automatic gearbox diagnostics
6 10A Coolant level - Auto- matic gearbox - Audio system
Page 108 of 123
PRACTICAL ASPECTS OF YOUR VEHICLE
104
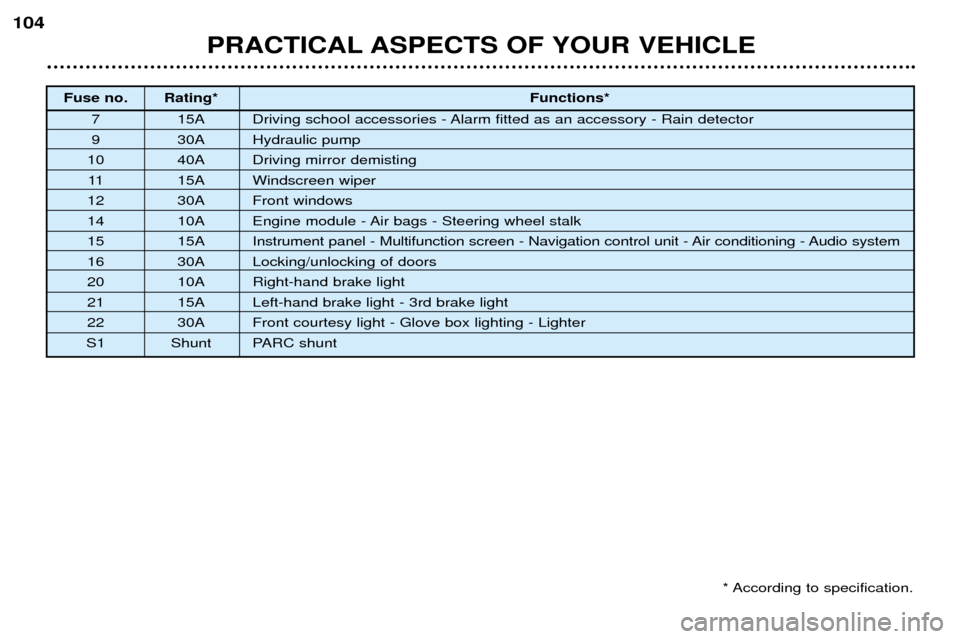
Fuse no. Rating*
Functions*
7 15A Driving school accessories - Alarm fitted as an accessory - Rain detector
9 30A Hydraulic pump
10 40A Driving mirror demisting 11 15A Windscreen wiper
12 30A Front windows
14 10A Engine module - Air bags - Steering wheel stalk
15 15A Instrument panel - Multifunction screen - Navigation control unit - Air conditioning - Audio system
16 30A Locking/unlocking of doors
20 10A Right-hand brake light
21 15A Left-hand brake light - 3rd brake light
22 30A Front courtesy light - Glove box lighting - Lighter
S1 Shunt PARC shunt
* According to specification.
Page 111 of 123
PRACTICAL ASPECTS OF YOUR VEHICLE107
Battery
To charge the battery using a battery charger:
Ð Disconnect the battery.
Ð Follow the instructions for use given by the battery charger manufacturer.
Ð Reconnect starting with the negative (-) terminal.
Ð Check that the terminals and connectors are clean. If they are covered with sul-
phate (white or greenish deposit), disconnect them and clean them.
To start the vehicle and charge the battery from another battery:
Ð Connect the red cable to the positive (+) terminals of the two batteries.
Ð Connect one end of the green or black cable to the negative (-) terminal of the slave battery.
Ð Connect the other end of the green or black cable to an earth point on the bro- ken down vehicle as far as possible from the battery.
Operate the starter, let the engine run.
Wait for the engine to return to idle, then disconnect the cables. Economy mode function After the engine has stopped, with the key in the accessories position, cer-
tain functions (windscreen wiper, elec-tric windows, courtesy lights, audioequipment etc.) can only be used forthirty minutes, to prevent discharging
the battery.
Once the thirty minutes are over, the message
"Economy mode active"
appears on the multifunction displayand the active functions are put on
standby.
A flat battery will prevent the engine from starting.
- Never disconnect a terminal when the engine is running.
- Never charge a battery without first disconnecting the terminals.
- After every reconnection of the battery, switch on the ignition and wait 1 minute before starting to allow the electronic systems to be initiali- sed. If slight difficulties are experienced after this, please contact a
PEUGEOT dealer.
It is advisable to disconnect the battery if the vehicle is not to be used for a period of more than one month.
Page 112 of 123
PRACTICAL ASPECTS OF YOUR VEHICLE
108
Fitting audio equipment
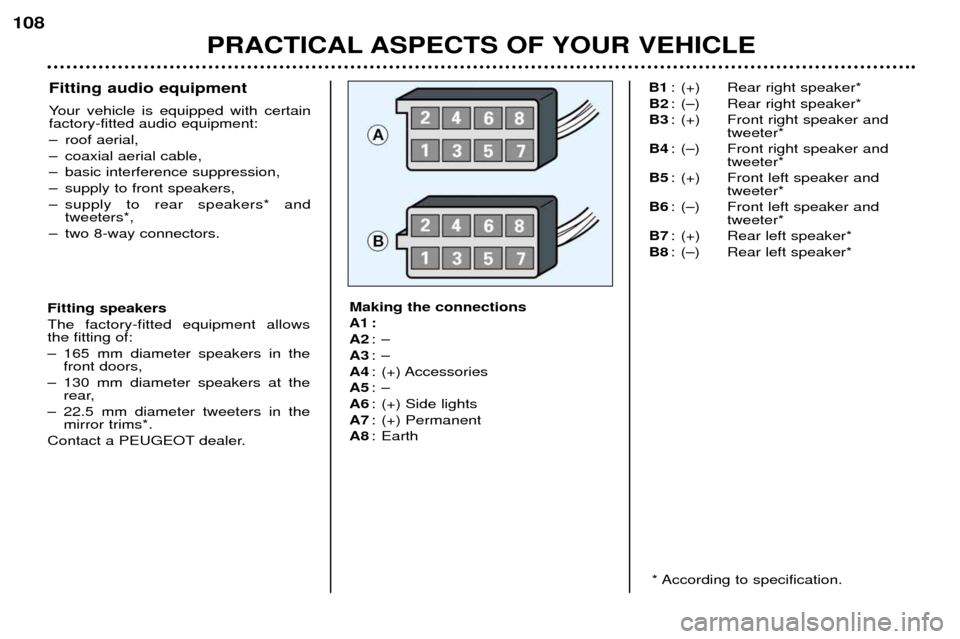
Your vehicle is equipped with certain factory-fitted audio equipment:
Ð roof aerial,
Ð coaxial aerial cable,
Ð basic interference suppression,
Ð supply to front speakers,
Ð supply to rear speakers* and
tweeters*,
Ð two 8-way connectors.
Making the connections
A1 :
A2:Ð
A3 :Ð
A4 : (+) Accessories
A5 :Ð
A6 : (+) Side lights
A7 : (+) Permanent
A8 : Earth
B1: (+) Rear right speaker*
B2 : (Ð) Rear right speaker*
B3 : (+) Front right speaker and
tweeter*
B4 : (Ð) Front right speaker and
tweeter*
B5 : (+) Front left speaker and
tweeter*
B6 : (Ð) Front left speaker and
tweeter*
B7 : (+) Rear left speaker*
B8 : (Ð) Rear left speaker*
Fitting speakers The factory-fitted equipment allows the fitting of:
Ð 165 mm diameter speakers in the front doors,
Ð 130 mm diameter speakers at the rear,
Ð 22.5 mm diameter tweeters in the mirror trims*.
Contact a PEUGEOT dealer.
* According to specification.