fuse Peugeot 206 P Dag 2009 Owner's Manual
[x] Cancel search | Manufacturer: PEUGEOT, Model Year: 2009, Model line: 206 P Dag, Model: Peugeot 206 P Dag 2009Pages: 113, PDF Size: 4.32 MB
Page 4 of 113
FAMILIARISATION
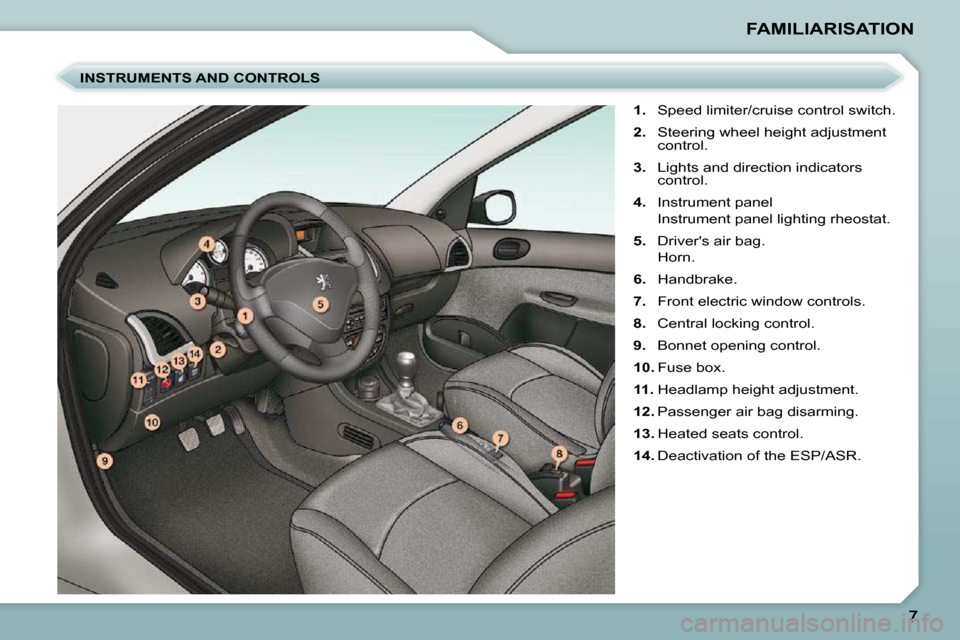
INSTRUMENTS AND CONTROLS
1. Speed limiter/cruise control switch.
2. Steering wheel height adjustment
control.
3. Lights and direction indicators
control.
4. Instrument panel
Instrument panel lighting rheostat.
5. Driver's air bag.
Horn.
6. Handbrake.
7. Front electric window controls.
8. Central locking control.
9. Bonnet opening control.
10. Fuse box.
11. Headlamp height adjustment.
12. Passenger air bag disarming.
13. Heated seats control.
14. Deactivation of the ESP/ASR.
Page 24 of 113
26
VENTILATION
System which creates and maintains
comfortable conditions in the vehicle's
passenger compartment.
Air treatment
The incoming air follows various routes
depending on the controls selected by
the driver:
- direct arrival in the passenger com-partment (air intake),
- passage through a heating circuit (heating),
- passage through a cooling circuit (air conditioning). The temperature control enables you to
obtain the level of comfort required by
mixing the air of the various circuits.
The air distribution control enables you
to diffuse the air in the passenger com-
partment combining several air vents.
� �T�h�e� �a�i�r� �fl� �o�w� �c�o�n�t�r�o�l� �e�n�a�b�l�e�s� �y�o�u� �t�o� �i�n�-
crease or reduce the speed of the ven-
tilation blower.
The air circulating in the passenger
�c�o�m�p�a�r�t�m�e�n�t� �i�s� �fi� �l�t�e�r�e�d� �a�n�d� �o�r�i�g�i�n�a�t�e�s�
either from the outside via the grille lo-
cated on the bonnet or from the inside
in air recirculation mode.
Control panel
The controls of this system are grouped
together on the centre console. De-
pending on the model, the functions of-
fered are:
- the level of comfort required,
� � �-� � �t�h�e� �a�i�r� �fl� �o�w�,�
- the air distribution,
- the de-icing and demisting,
- the manual or automatic air condi-
tioning controls.
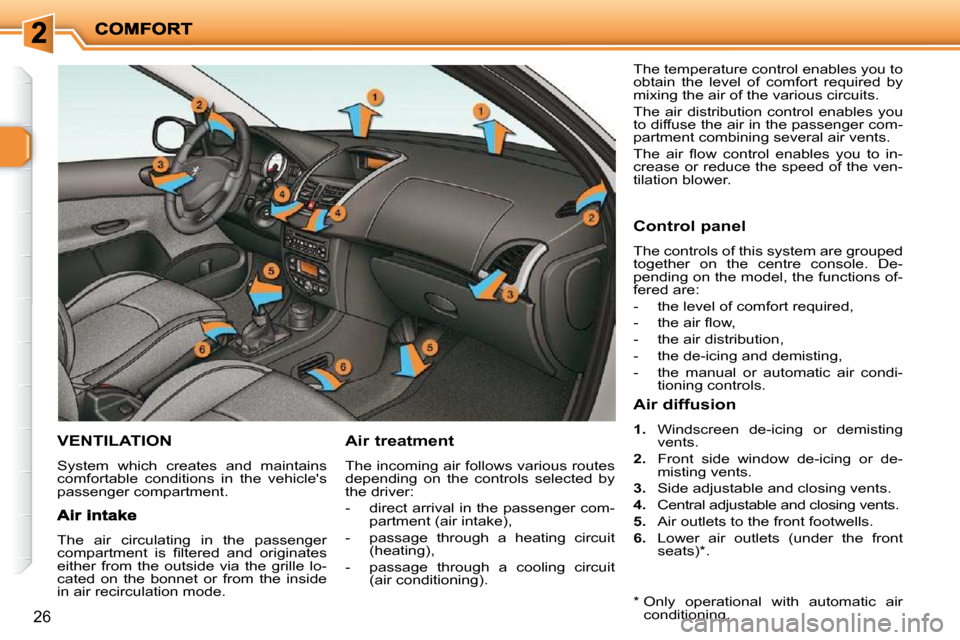
Air diffusion
1. Windscreen de-icing or demisting
vents.
2. Front side window de-icing or de-
misting vents.
3. Side adjustable and closing vents.
4. Central adjustable and closing vents.
5. Air outlets to the front footwells.
6. Lower air outlets (under the front
seats) * .
*
Only operational with automatic air
conditioning.
Page 74 of 113
69
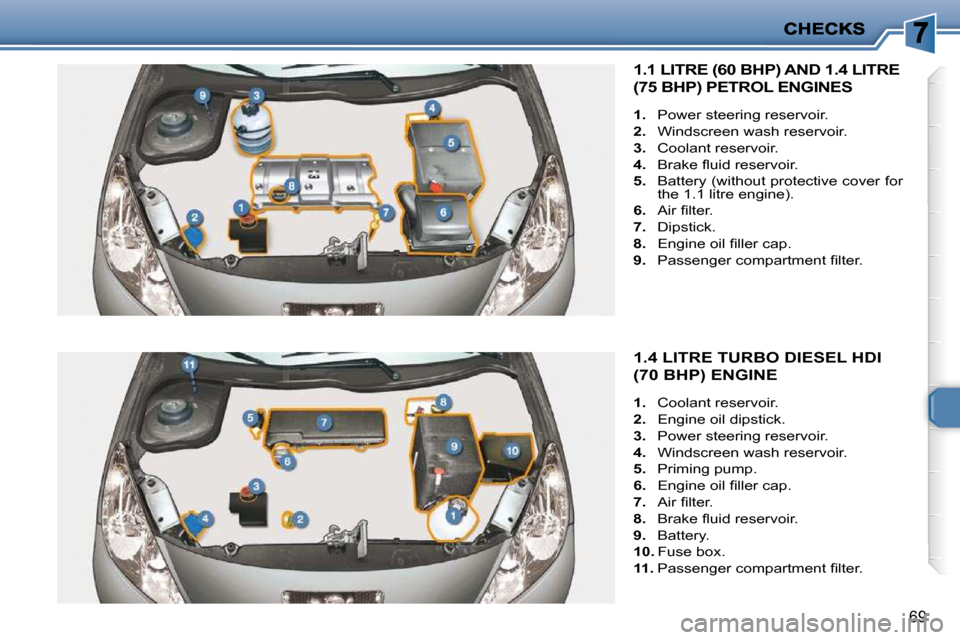
1.4 LITRE TURBO DIESEL HDI
(70 BHP) ENGINE
1. Coolant reservoir.
2. Engine oil dipstick.
3. Power steering reservoir.
4. Windscreen wash reservoir.
5. Priming pump.
6. � � �E�n�g�i�n�e� �o�i�l� �fi� �l�l�e�r� �c�a�p�.�
7. � � �A�i�r� �fi� �l�t�e�r�.�
8. � � �B�r�a�k�e� �fl� �u�i�d� �r�e�s�e�r�v�o�i�r�.�
9. Battery.
10. Fuse box.
11. � � �P�a�s�s�e�n�g�e�r� �c�o�m�p�a�r�t�m�e�n�t� �fi� �l�t�e�r�.� �
1.1 LITRE (60 BHP) AND 1.4 LITRE
(75 BHP) PETROL ENGINES
1. Power steering reservoir.
2. Windscreen wash reservoir.
3. Coolant reservoir.
4. � � �B�r�a�k�e� �fl� �u�i�d� �r�e�s�e�r�v�o�i�r�.�
5. Battery (without protective cover for
the 1.1 litre engine).
6. � � �A�i�r� �fi� �l�t�e�r�.�
7. Dipstick.
8. � � �E�n�g�i�n�e� �o�i�l� �fi� �l�l�e�r� �c�a�p�.�
9. � � �P�a�s�s�e�n�g�e�r� �c�o�m�p�a�r�t�m�e�n�t� �fi� �l�t�e�r�.� �
Page 86 of 113
81
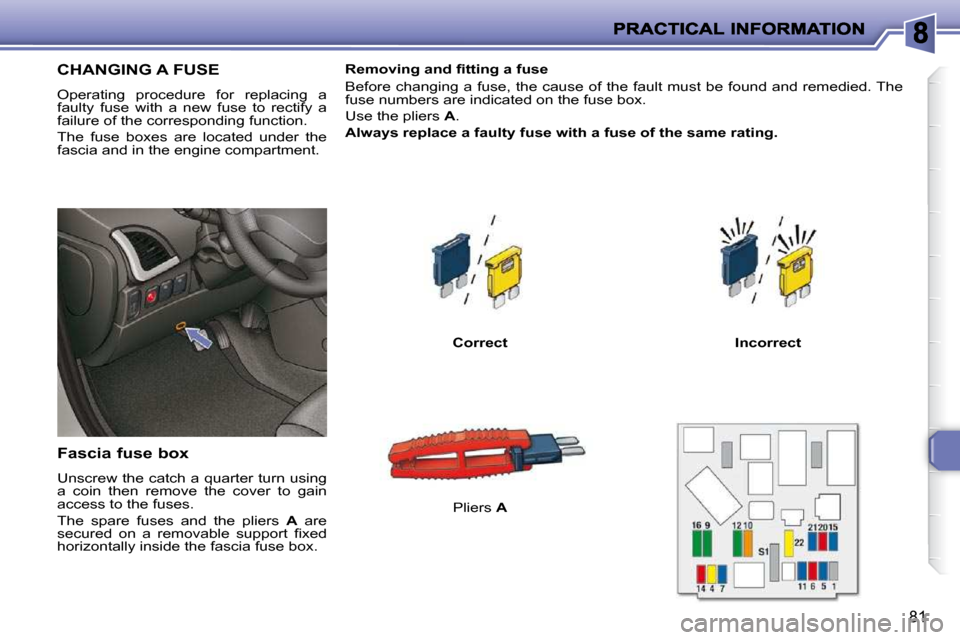
CHANGING A FUSE
Operating procedure for replacing a
faulty fuse with a new fuse to rectify a
failure of the corresponding function.
The fuse boxes are located under the
fascia and in the engine compartment.
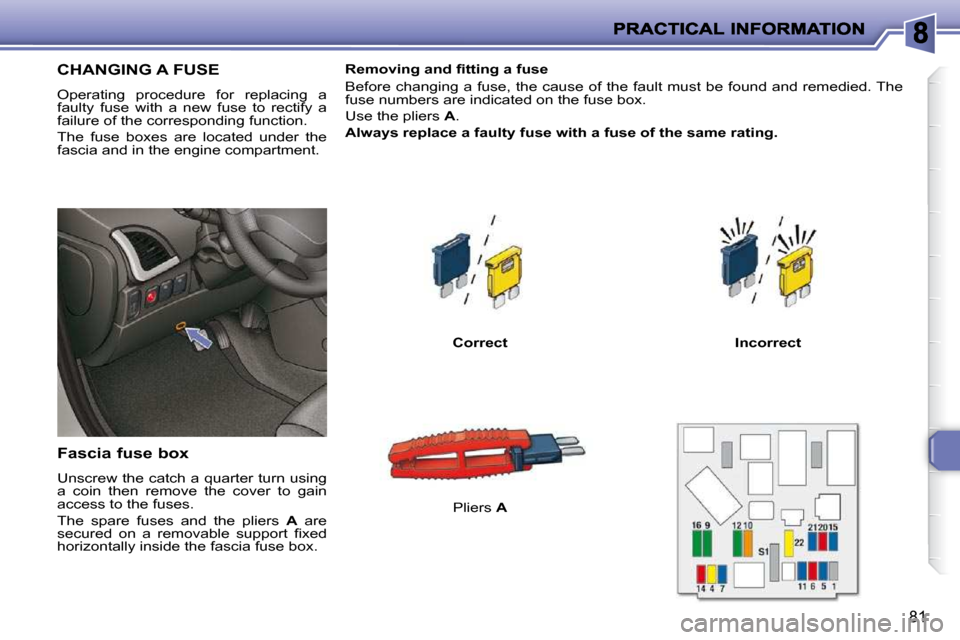
Fascia fuse box
Unscrew the catch a quarter turn using
a coin then remove the cover to gain
access to the fuses.
The spare fuses and the pliers A are
�s�e�c�u�r�e�d� �o�n� �a� �r�e�m�o�v�a�b�l�e� �s�u�p�p�o�r�t� �fi� �x�e�d�
horizontally inside the fascia fuse box. � � �R�e�m�o�v�i�n�g� �a�n�d� �fi� �t�t�i�n�g� �a� �f�u�s�e�
Before changing a fuse, the cause of the fault must be fou
nd and remedied. The
fuse numbers are indicated on the fuse box.
Use the pliers A .
Always replace a faulty fuse with a fuse of the same rating .
Pliers A
Correct Incorrect
Page 87 of 113
81
CHANGING A FUSE
Operating procedure for replacing a
faulty fuse with a new fuse to rectify a
failure of the corresponding function.
The fuse boxes are located under the
fascia and in the engine compartment.
Fascia fuse box
Unscrew the catch a quarter turn using
a coin then remove the cover to gain
access to the fuses.
The spare fuses and the pliers A are
�s�e�c�u�r�e�d� �o�n� �a� �r�e�m�o�v�a�b�l�e� �s�u�p�p�o�r�t� �fi� �x�e�d�
horizontally inside the fascia fuse box. � � �R�e�m�o�v�i�n�g� �a�n�d� �fi� �t�t�i�n�g� �a� �f�u�s�e�
Before changing a fuse, the cause of the fault must be fou
nd and remedied. The
fuse numbers are indicated on the fuse box.
Use the pliers A .
Always replace a faulty fuse with a fuse of the same rating .
Pliers A
Correct Incorrect
Page 88 of 113

82
Fuse N° Rating
Functions
1 - Not used
4 20 A Multifunction display - Boot lighting - Audio equipment - Steering wheel controls - Trailer
5 - Not used
6 10 A Coolant level - Audio equipment
7 15 A � �D�r�i�v�i�n�g� �s�c�h�o�o�l� �a�c�c�e�s�s�o�r�y� �-� �A�l�a�r�m� �fi� �t�t�e�d� �a�s� �a�n� �a�c�c�e�s�s�o�r�y�
9 - Not used
10 40 A Rear screen demisting 11 15 A Rear windscreen wiper
12 30 A Front electric windows
14 10 A Engine fuse box - Air bags - Steering wheel con trols - Rain sensor
15 15 A Instrument panel - Multifunction display - Air conditioning - Audio equipment
16 30 A Locking/unlocking controls for doors, bonnet a nd boot
20 10 A Right-hand brake light
21 15 A Left-hand brake light - 3rd brake light
22 20 A Front courtesy light - 12 volt accessories socket
S1 Shunt PARC shunt
Page 89 of 113
83
or
Fuse N° Rating Functions
1 10 A Pre-heat unit (diesel) - Water in diesel sensor -
�R�e�v�e�r�s�i�n�g� �l�i�g�h�t� �s�w�i�t�c�h� �-� �S�p�e�e�d� �s�e�n�s�o�r� �-� �A�i�r� �fl� �o�w�
sensor (diesel)
2 15 A Canister solenoid valve - Fuel pump
3 10 A ABS engine control unit
4 10 A Engine control unit
5 - Not used
6 15 A Front fog lamps
7 - Not used
8 20 A Fan assembly relay - Engine control unit - Diesel
injection pump - Diesel high pressure regulator -
Engine management solenoid valve
9 15 A Left-hand dipped beam
10 15 A Right-hand dipped beam 11 10 A Left-hand main beam
12 10 A Right-hand main beam
13 15 A Horn
14 10 A Front and rear windscreen wash pumps
15 30 A Throttle housing heater - Diesel injection pump -
�O�x�y�g�e�n� �s�e�n�s�o�r� �-� �E�n�g�i�n�e� �c�o�n�t�r�o�l� �u�n�i�t� �-� �A�i�r� �fl� �o�w�
sensor - Ignition coil - Engine management
solenoid valve - Diesel heater - Injectors
16 30 A Air pump relay
17 30 A High and low speed windscreen wiper
18 40 A Air conditioning fan
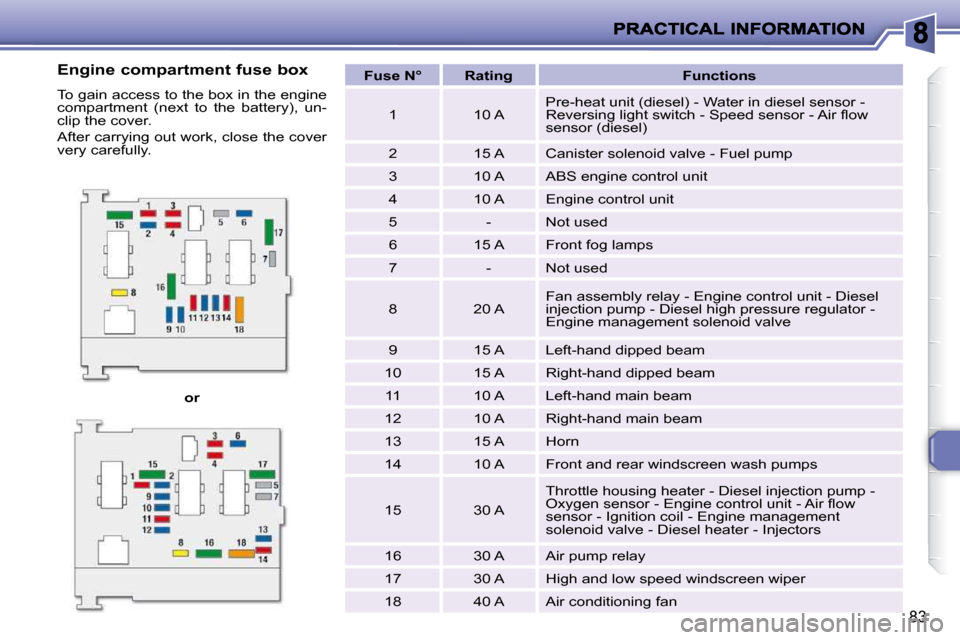
Engine compartment fuse box
To gain access to the box in the engine
compartment (next to the battery), un-
clip the cover.
After carrying out work, close the cover
very carefully.
Page 90 of 113
!
84
The electrical circuit of your
vehicle is designed to operate with
standard or optional equipment.
Before installing other electrical
equipment or accessories in your
vehicle, consult a PEUGEOT
dealer.
Some electrical accessories or
�t�h�e� �w�a�y� �i�n� �w�h�i�c�h� �t�h�e�y� �a�r�e� �fi� �t�t�e�d�
may have an adverse effect on
the operation of your vehicle (its
electronic control circuits, the
audio circuit and the electrical
charging circuit).
PEUGEOT declines any respon-
sibility for expenses incurred
through the repair of your vehicle
or for any malfunctions resulting
from the installation of auxiliary
accessories, not supplied and not
recommended by PEUGEOT and
not installed in accordance with
PEUGEOT's instructions, in par-
ticular when the combined con-
sumption of all of the additional
equipment connected exceeds
10 milliamps.
The maxi fuses present provide
additional protection for the elec-
trical systems. Any work on these
fuses must be carried out by a
PEUGEOT dealer.
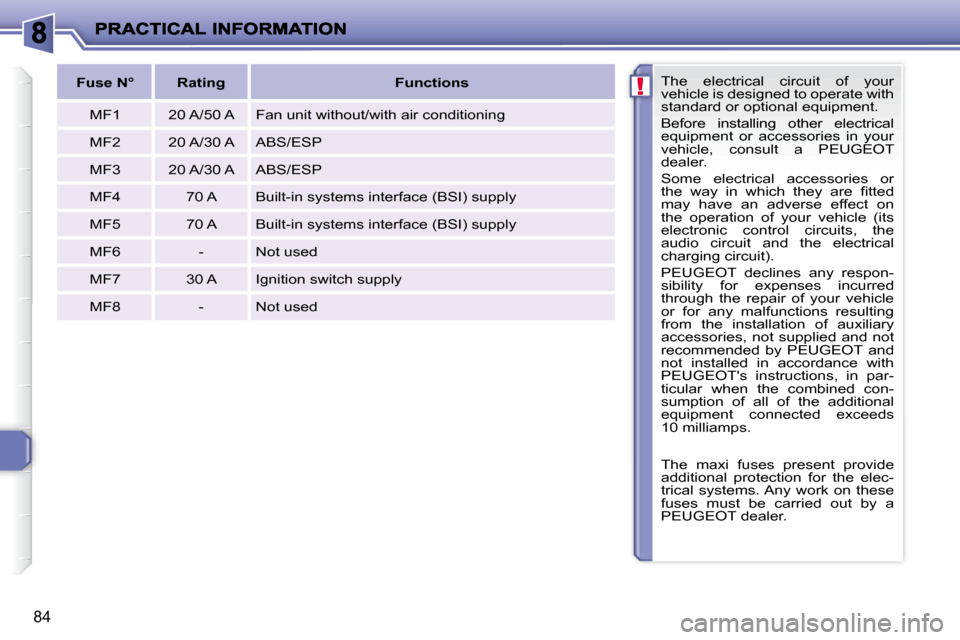
Fuse N° Rating Functions
MF1 20 A/50 A Fan unit without/with air conditio ning
MF2 20 A/30 A ABS/ESP
MF3 20 A/30 A ABS/ESP
MF4 70 A Built-in systems interface (BSI) supply
MF5 70 A Built-in systems interface (BSI) supply
MF6 - Not used
MF7 30 A Ignition switch supply
MF8 - Not used