instrument panel Peugeot 206 P Dag 2009 Owner's Manual
[x] Cancel search | Manufacturer: PEUGEOT, Model Year: 2009, Model line: 206 P Dag, Model: Peugeot 206 P Dag 2009Pages: 113, PDF Size: 4.32 MB
Page 3 of 113
FAMILIARISATION INTERIOR
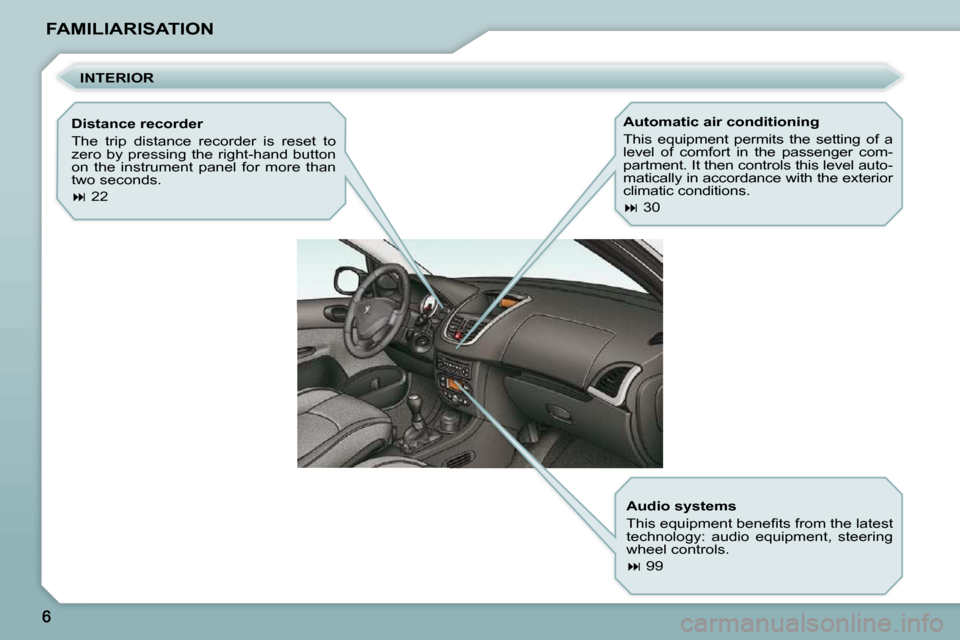
Distance recorder
The trip distance recorder is reset to
zero by pressing the right-hand button
on the instrument panel for more than
two seconds.
22 Automatic air conditioning
This equipment permits the setting of a
level of comfort in the passenger com-
partment. It then controls this level auto-
matically in accordance with the exterior
climatic conditions.
30
Audio systems
This equipment benefi ts from the latest
technology: audio equipment, steering
wheel controls.
99
Page 4 of 113
FAMILIARISATION
INSTRUMENTS AND CONTROLS
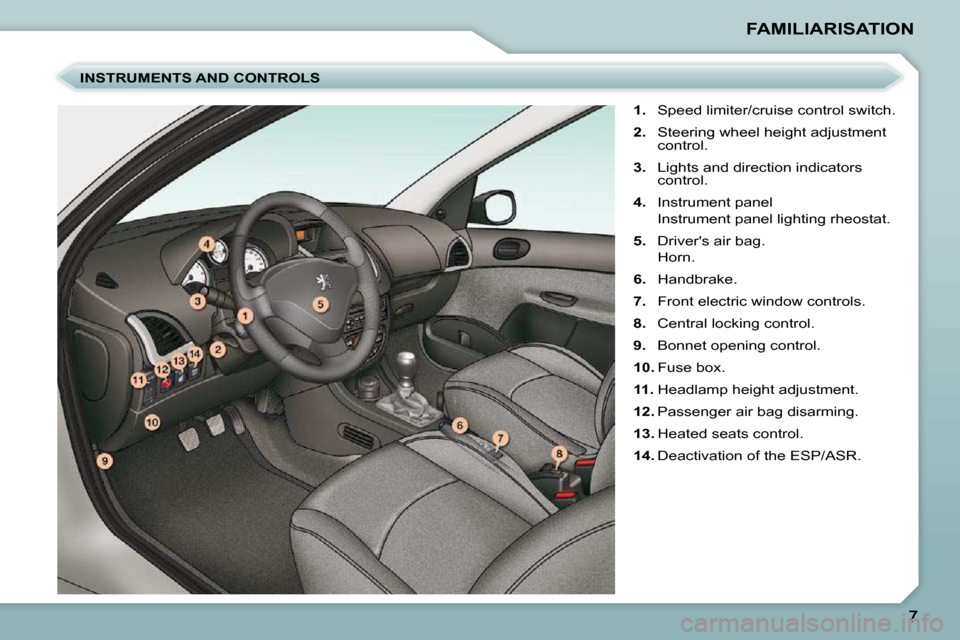
1. Speed limiter/cruise control switch.
2. Steering wheel height adjustment
control.
3. Lights and direction indicators
control.
4. Instrument panel
Instrument panel lighting rheostat.
5. Driver's air bag.
Horn.
6. Handbrake.
7. Front electric window controls.
8. Central locking control.
9. Bonnet opening control.
10. Fuse box.
11. Headlamp height adjustment.
12. Passenger air bag disarming.
13. Heated seats control.
14. Deactivation of the ESP/ASR.
Page 10 of 113
FAMILIARISATION
MONITOR THOROUGHLY
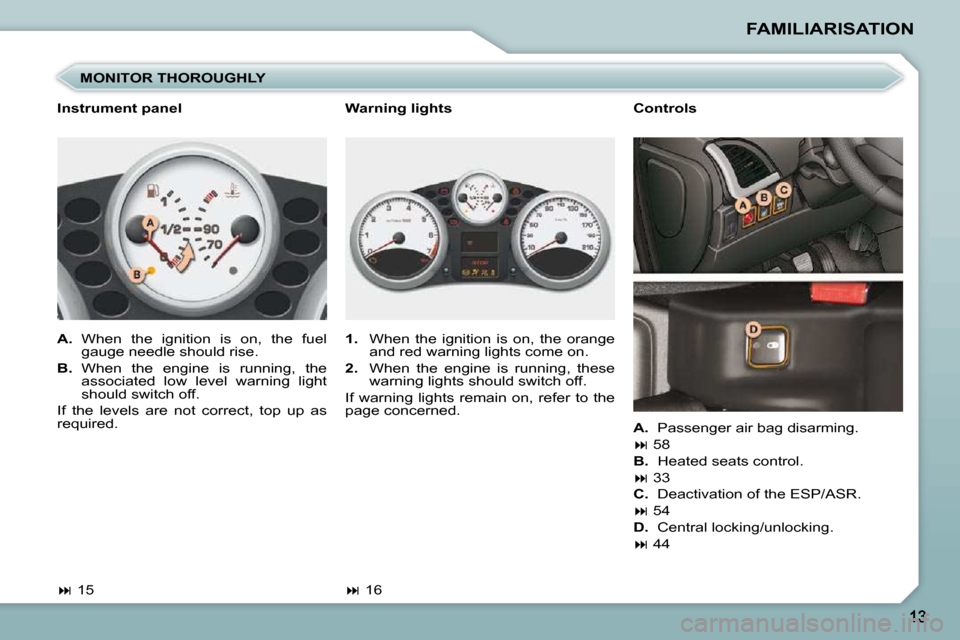
1. When the ignition is on, the orange
and red warning lights come on.
2. When the engine is running, these
warning lights should switch off.
If warning lights remain on, refer to the
page concerned.
Warning lights
16
Instrument panel
A. When the ignition is on, the fuel
gauge needle should rise.
B. When the engine is running, the
associated low level warning light
should switch off.
If the levels are not correct, top up as
required.
15 Controls
A. Passenger air bag disarming.
58
B. Heated seats control.
33
C. Deactivation of the ESP/ASR.
54
D. Central locking/unlocking.
44
Page 12 of 113
15
PETROL - DIESEL MANUAL GEARBOX INSTRUMENT PANELS
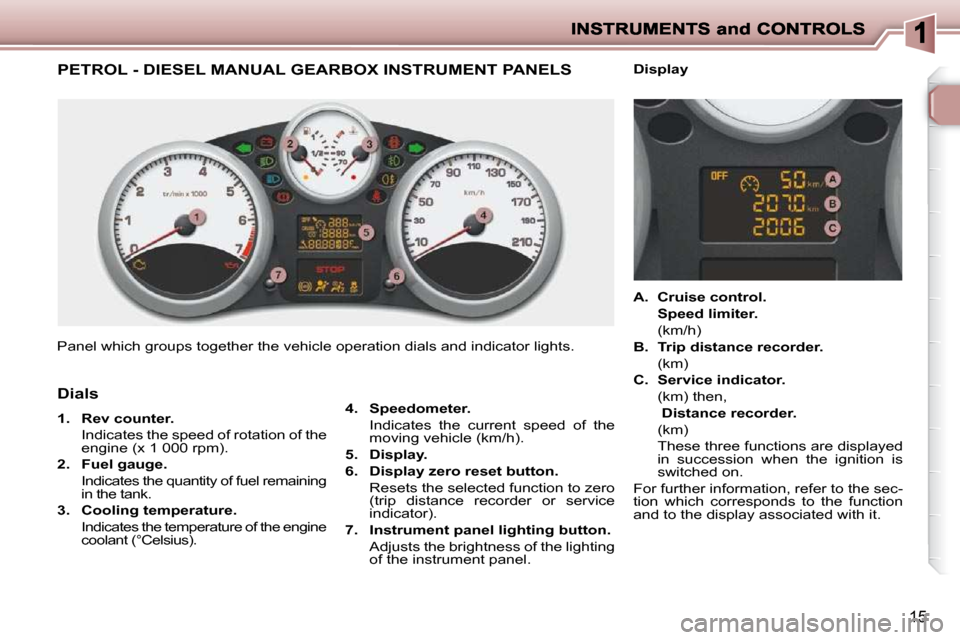
Panel which groups together the vehicle operation dials and indicator lights.
4. Speedometer.
Indicates the current speed of the moving vehicle (km/h).
5. Display.
6. Display zero reset button.
Resets the selected function to zero (trip distance recorder or service
indicator).
7. Instrument panel lighting button.
Adjusts the brightness of the lighting of the instrument panel.
Dials
1. Rev counter.
Indicates the speed of rotation of the engine (x 1 000 rpm).
2. Fuel gauge.
Indicates the quantity of fuel remaining in the tank.
3. Cooling temperature.
Indicates the temperature of the engine coolant (°Celsius).
A. Cruise control.
Speed limiter.
(km/h)
B. Trip distance recorder.
(km)
C. Service indicator.
(km) then,
Distance recorder.
(km)
These three functions are displayed in succession when the ignition is
switched on.
For further information, refer to the sec-
tion which corresponds to the function
and to the display associated with it.
Display
Page 20 of 113
22
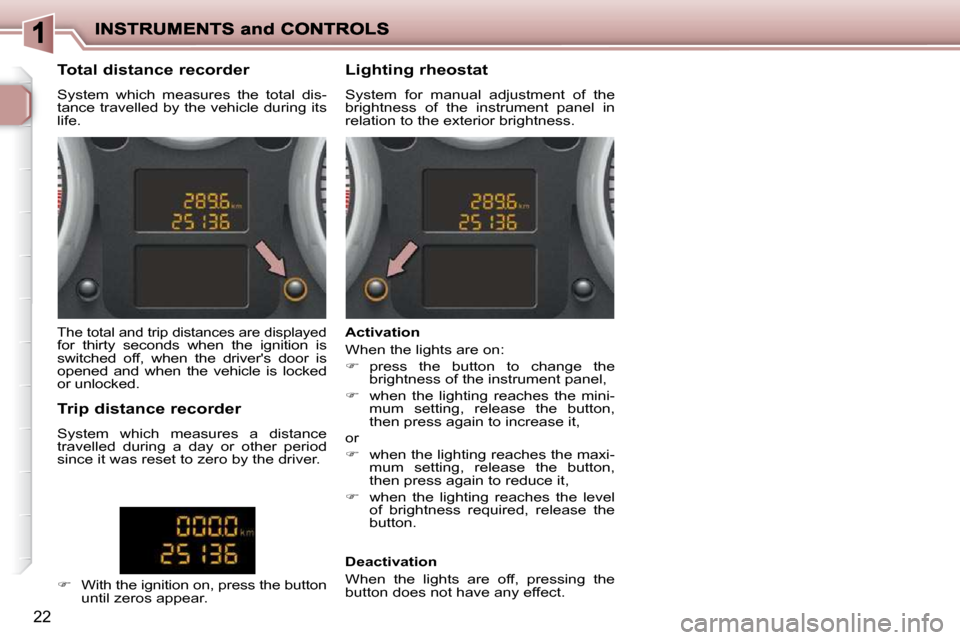
Total distance recorder
System which measures the total dis-
tance travelled by the vehicle during its
life. Lighting rheostat
System for manual adjustment of the
brightness of the instrument panel in
relation to the exterior brightness.
The total and trip distances are displayed for thirty seconds when the ignition is
switched off, when the driver's door is
opened and when the vehicle is locked
or unlocked.
Trip distance recorder
System which measures a distance
travelled during a day or other period
since it was reset to zero by the driver.
With the ignition on, press the button
until zeros appear. Activation
When the lights are on:
press the button to change the
brightness of the instrument panel,
when the lighting reaches the mini-
mum setting, release the button,
then press again to increase it,
or
when the lighting reaches the maxi-
mum setting, release the button,
then press again to reduce it,
when the lighting reaches the level
of brightness required, release the
button.
Deactivation
When the lights are off, pressing the
button does not have any effect.
Page 49 of 113
i
47
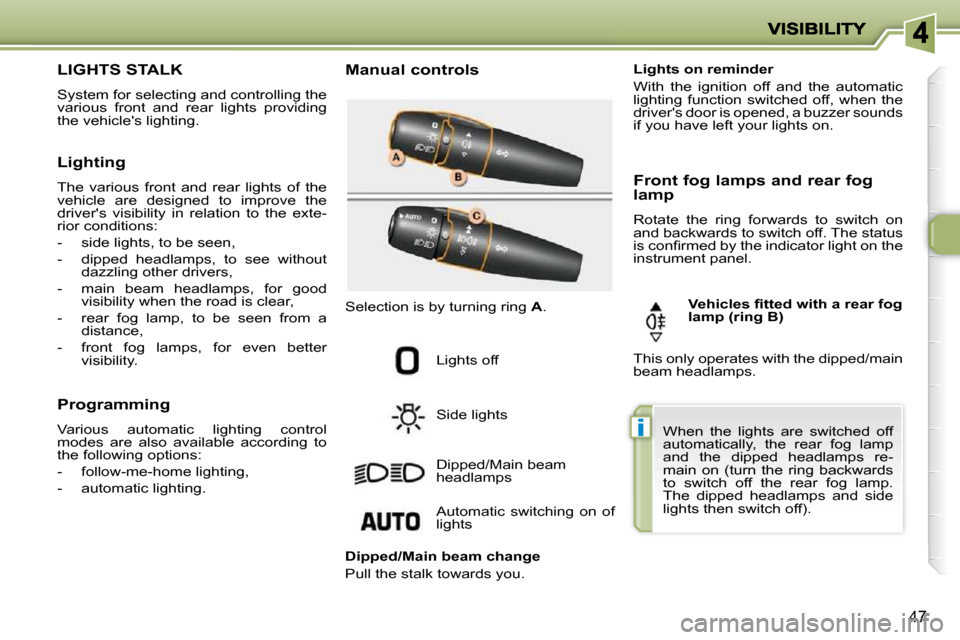
LIGHTS STALK
System for selecting and controlling the
various front and rear lights providing
the vehicle's lighting. Manual controls
Lights off
Side lights
Dipped/Main beam
headlamps
Lighting
The various front and rear lights of the
vehicle are designed to improve the
driver's visibility in relation to the exte-
rior conditions:
- side lights, to be seen,
- dipped headlamps, to see without
dazzling other drivers,
- main beam headlamps, for good visibility when the road is clear,
- rear fog lamp, to be seen from a distance,
- front fog lamps, for even better visibility.
Programming
Various automatic lighting control
modes are also available according to
the following options:
- follow-me-home lighting,
- automatic lighting. Selection is by turning ring
A .
Automatic switching on of
lights Lights on reminder
With the ignition off and the automatic
lighting function switched off, when the
driver's door is opened, a buzzer sounds
if you have left your lights on.
Front fog lamps and rear fog
lamp
Rotate the ring forwards to switch on
and backwards to switch off. The status
is confi rmed by the indicator light on the
instrument panel.
Vehicles fi tted with a rear fog
lamp (ring B)
Dipped/Main beam change
Pull the stalk towards you. When the lights are switched off
automatically, the rear fog lamp
and the dipped headlamps re-
main on (turn the ring backwards
to switch off the rear fog lamp.
The dipped headlamps and side
lights then switch off).
This only operates with the dipped/main
beam headlamps.
Page 57 of 113
!
SAFETY
54
TRAJECTORY CONTROL
SYSTEMS
Anti-skid regulation (ASR) and
electronic stability programme (ESP)
The anti-skid regulation (also known as
Traction Control) optimises traction to
prevent skidding of the wheels, by act-
ing on the brakes of the driving wheels
and on the engine.
The electronic stability programme acts
on the brake of one or more wheels and
on the engine to keep the vehicle on the
trajectory required by the driver.
Activation
These systems are activated automati-
cally each time the vehicle is started. They come into operation in
the event of a grip or trajectory
problem.
This is indicated by fl ashing of
this warning lamp on the instru-
ment panel. Deactivation
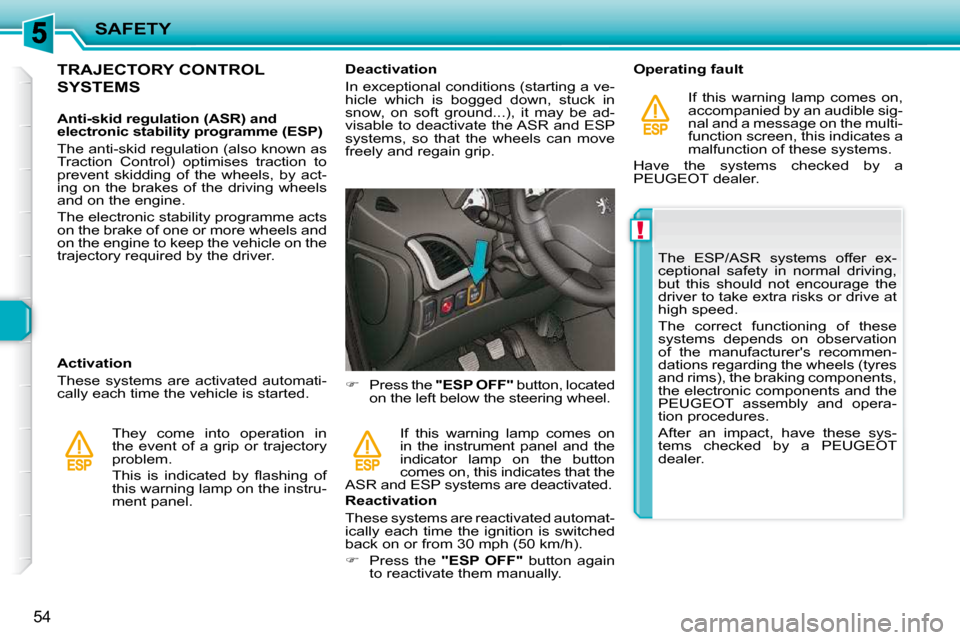
In exceptional conditions (starting a ve-
hicle which is bogged down, stuck in
snow, on soft ground...), it may be ad-
visable to deactivate the ASR and ESP
systems, so that the wheels can move
freely and regain grip.
Press the "ESP OFF" button, located
on the left below the steering wheel.
Reactivation
These systems are reactivated automat-
ically each time the ignition is switched
back on or from 30 mph (50 km/h).
Press the "ESP OFF" button again
to reactivate them manually. If this warning lamp comes on
in the instrument panel and the
indicator lamp on the button
comes on, this indicates that the
ASR and ESP systems are deactivated. Operating fault
If this warning lamp comes on,
accompanied by an audible sig-
nal and a message on the multi-
function screen, this indicates a
malfunction of these systems.
Have the systems checked by a
PEUGEOT dealer.
The ESP/ASR systems offer ex-
ceptional safety in normal driving,
but this should not encourage the
driver to take extra risks or drive at
high speed.
The correct functioning of these
systems depends on observation
of the manufacturer's recommen-
dations regarding the wheels (tyres
and rims), the braking components,
the electronic components and the
PEUGEOT assembly and opera-
tion procedures.
After an impact, have these sys-
tems checked by a PEUGEOT
dealer.
Page 61 of 113
SAFETY
58
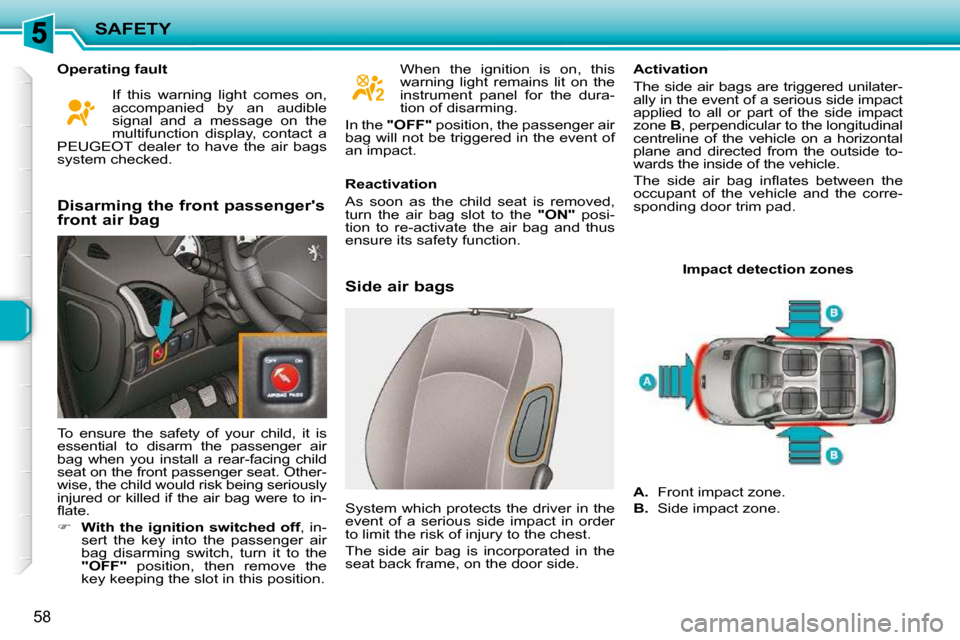
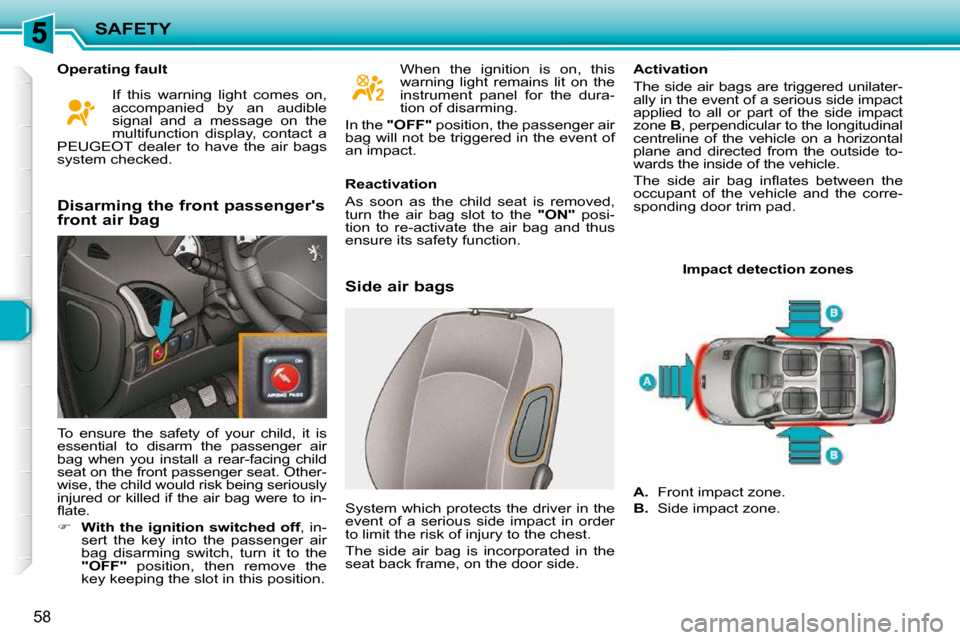
Operating fault Side air bags Activation
The side air bags are triggered unilater-
ally in the event of a serious side impact
applied to all or part of the side impact
zone
B , perpendicular to the longitudinal
centreline of the vehicle on a horizontal
plane and directed from the outside to-
wards the inside of the vehicle.
The side air bag infl ates between the
occupant of the vehicle and the corre-
sponding door trim pad.
Impact detection zones
A. Front impact zone.
B. Side impact zone.
Disarming the front passenger's
front air bag
To ensure the safety of your child, it is
essential to disarm the passenger air
bag when you install a rear-facing child
seat on the front passenger seat. Other-
wise, the child would risk being seriously
injured or killed if the air bag were to in-
fl ate.
With the ignition switched off , in-
sert the key into the passenger air
bag disarming switch, turn it to the
"OFF" position, then remove the
key keeping the slot in this position. Reactivation
As soon as the child seat is removed,
turn the air bag slot to the
"ON" posi-
tion to re-activate the air bag and thus
ensure its safety function.
System which protects the driver in the
event of a serious side impact in order
to limit the risk of injury to the chest.
The side air bag is incorporated in the
seat back frame, on the door side. When the ignition is on, this
warning light remains lit on the
instrument panel for the dura-
tion of disarming.
If this warning light comes on,
accompanied by an audible
signal and a message on the
multifunction display, contact a
PEUGEOT dealer to have the air bags
system checked. In the
"OFF" position, the passenger air
bag will not be triggered in the event of
an impact.
Page 63 of 113
SAFETY
58
Operating fault Side air bags Activation
The side air bags are triggered unilater-
ally in the event of a serious side impact
applied to all or part of the side impact
zone
B , perpendicular to the longitudinal
centreline of the vehicle on a horizontal
plane and directed from the outside to-
wards the inside of the vehicle.
The side air bag infl ates between the
occupant of the vehicle and the corre-
sponding door trim pad.
Impact detection zones
A. Front impact zone.
B. Side impact zone.
Disarming the front passenger's
front air bag
To ensure the safety of your child, it is
essential to disarm the passenger air
bag when you install a rear-facing child
seat on the front passenger seat. Other-
wise, the child would risk being seriously
injured or killed if the air bag were to in-
fl ate.
With the ignition switched off , in-
sert the key into the passenger air
bag disarming switch, turn it to the
"OFF" position, then remove the
key keeping the slot in this position. Reactivation
As soon as the child seat is removed,
turn the air bag slot to the
"ON" posi-
tion to re-activate the air bag and thus
ensure its safety function.
System which protects the driver in the
event of a serious side impact in order
to limit the risk of injury to the chest.
The side air bag is incorporated in the
seat back frame, on the door side. When the ignition is on, this
warning light remains lit on the
instrument panel for the dura-
tion of disarming.
If this warning light comes on,
accompanied by an audible
signal and a message on the
multifunction display, contact a
PEUGEOT dealer to have the air bags
system checked. In the
"OFF" position, the passenger air
bag will not be triggered in the event of
an impact.
Page 69 of 113
i
64
CRUISE CONTROL
System which automatically maintains
the speed of the vehicle at the value
programmed by the driver, without any
action on the accelerator pedal.
The cruise control is switched on
manually: it requires a minimum vehicle
speed of 25 mph (40 km/h) and the en-
gaging of fourth gear.
The cruise control is switched off man-
ually or by pressing the brake or clutch
pedal or on triggering of the ESP sys-
tem for safety reasons.
It is possible to exceed the programmed
speed temporarily by pressing the ac-
celerator pedal.
To return to the programmed speed,
simply release the accelerator pedal.
Switching off the ignition cancels any
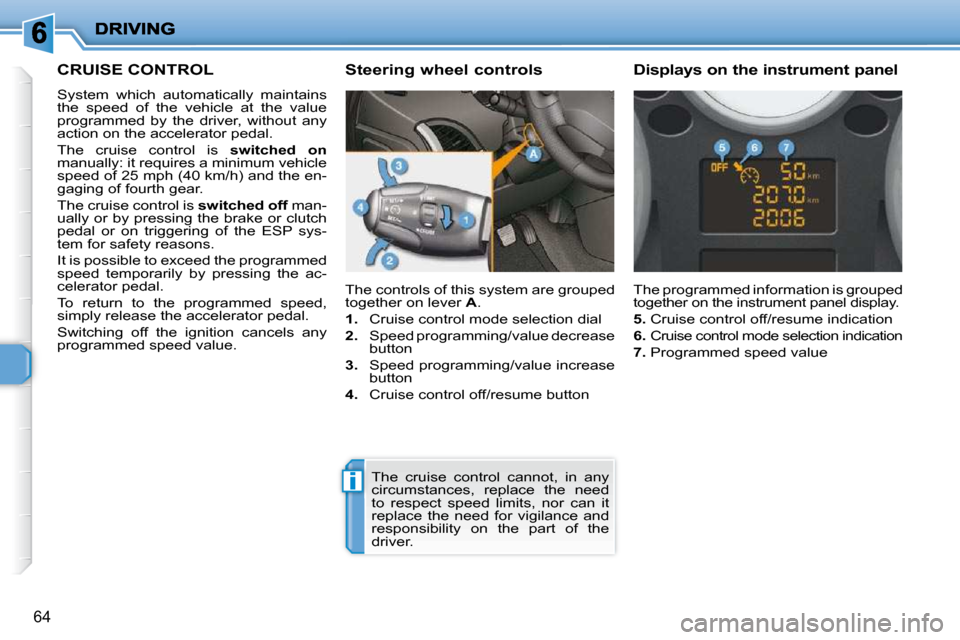
programmed speed value. The controls of this system are grouped
together on lever
A .
1. Cruise control mode selection dial
2. Speed programming/value decrease
button
3. Speed programming/value increase
button
4. Cruise control off/resume button The programmed information is grouped
together on the instrument panel display.
5. Cruise control off/resume indication
6. Cruise control mode selection indication
7. Programmed speed value
Steering wheel controls Displays on the instrument
panel
The cruise control cannot, in any
circumstances, replace the need
to respect speed limits, nor can it
replace the need for vigilance and
responsibility on the part of the
driver.