wheel Peugeot 206 SW Dag 2002 User Guide
[x] Cancel search | Manufacturer: PEUGEOT, Model Year: 2002, Model line: 206 SW Dag, Model: Peugeot 206 SW Dag 2002Pages: 155, PDF Size: 2.09 MB
Page 114 of 155

17-06-2002
YOUR 206 IN DETAIL109
For the front and side air bags to be fully effective, observe the following safety rules:
¥ Wear a correctly adjusted seat belt.
¥ Sit in a normal upright position (passengers must not place their feet on the fascia).
¥ Ensure there is nothing between the occupants of the front seats and the air bags (animal, child, object etc). This could hamper the operation of the air bags or injure the occupants.
¥ All work on the air bag system is strictly forbidden unless it is carried out by qualified personnel of the PEUGEOT net- work.
¥ After an accident or if the vehicle has been stolen or broken into, have the air bag systems checked.
¥ The air bag systems have been designed to be fully operational for 10 years after the vehicle has been registered. Have them replaced by a PEUGEOT dealer after this period.
Front air bags
¥ Do not drive holding the steering wheel by its spokes or resting your hands on the centre part of the wheel.
¥ Never remove or pierce the steering wheel or hit it violently.
¥ Smoke as little as possible; deployment of the air bags can cause burns or the risk of injury from a cigarette or pipe. Side air bags
¥ Do not fix or glue anything to the front seat backs. This could cause injury to the chest or arms when the side air bag inflates.
¥ Do not sit with the upper part of the body any nearer to the door than necessary.
¥ Never put covers on the front seats. Contact your PEUGEOT dealer.
Page 124 of 155

17-06-2002
PRACTICAL INFORMATION
118
CHANGING A WHEEL (saloon) Parking the vehicle
Ð If possible, park the vehicle on
level, stable and non-slippery ground.
Ð Apply the handbrake, engage first or reverse gear (position Pfor the
automatic gearbox).
Access to the spare wheel andthe jack The wheel is located outside the vehicle, under the boot, supported
by a metal carrier.
Ð Remove the wheelbrace 1, secu-
red on the rear right inner panel of the boot. Ð Using the wheelbrace
1, slacken the spare wheel carrier retaining bolt, loca-
ted inside the boot under the carpet.
Ð Lift the carrier to release the hook rearwards, then lower it.
Ð Remove the jack storage box 2located in the spare wheel.
Removing a wheel
Ð Chock the rear of the wheel diagonally opposite the wheel to be changed, using the jack storage box.
Ð Remove the wheel trim using the wheelbrace, by pulling at the valve passage hole.
Ð Slacken the wheel bolts.
Ð Place the jack under the locating point on the sub-frame Ethat is closest to
the wheel to be changed. Ensure that the entire surface of the jack base plate is in contact with the ground.
Ð Extend the jack, completely unscrew the bolts and remove the wheel.
Page 125 of 155

17-06-2002
PRACTICAL INFORMATION
120
Refitting the wheel
Ð After positioning the wheel, lightly pre-tighten the bolts using the wheelbrace.
Ð Compress the jack and release it.
Ð Fully tighten the bolts using the wheelbrace.
Ð Replace the trim except in the case of a space-saver spare wheel, starting atthe valve passage hole, and press it on using the palm of the hand.
Note: If the vehicle is fitted in production with a wheel anti-theft lock, the trim cap on the anti-theft bolt is in two parts.
Replacing the wheel in the carrier
Ð Replace the jack storage box in the wheel.
Ð Replace the support spacer 3by clipping it to the space-saving spare wheel.
Ð Replace the wheel in the carrier directing the spacer 3along the centre line of
the vehicle, with the opening towards the front as shown in the diagram above (for a space-saving spare wheel only).
Ð Lift the wheel then the carrier and reposition the hook.
Ð Do not forget to fully tighten the spare wheel carrier retaining bolt.
Ð Stow the wheelbrace.
For your safety, always change a wheel:
- on level, stable and non slippery ground,
- with the handbrake applied,
- wiith first or reverse gear enga- ged,
- with the vehicle chocked using the jack storage box,
- Never go underneath a vehicle raised using a jack (use an axle stand).
After changing the wheel
- Have the tightening of the bolts and the pressure of the spare tyre checked as soon as pos-
sible by a PEUGEOT dealer.
- Have the punctured tyre repai- red and replace it on the vehicleas soon as possible.
- The space-saver spare wheel fitted with a 115/70R15 tyremust only be used temporarily:
- inflation pressure: 4.2 bars(60 p.s.i.),
- maximum speed: 80 km/h.
Page 126 of 155

17-06-2002
PRACTICAL INFORMATION121
SPECIAL FEATURES OF
ALLOY WHEELS Bolt covers Alloy wheel bolts are covered by chrome trims. Use tool 4to remove the trims befo-
re slackening the bolts.
Tool 4is located:
- on the saloon, on the rear right inner panel of the boot,
- on the 206 SW, in the jack storage compartment. Fitting the spare wheelIf your vehicle is equipped with a steel spare wheel, when fitting it, it isnormal
to notice that the bolt
washers do not come into contact
with the rim. The spare wheel issecured by the cone-shape of eachbolt. Fitting snow tyres If you fit snow tyres that are moun- ted on steel rims onto your vehicle, itis essential that you use special
bolts available from your PEUGEOT
dealer. Anti-theft bolt* If your wheels are fitted with an anti- theft bolt (one per wheel), the chro-me trim and then the plastic covermust be removed, using tool
4, befo-
re it is unscrewed using one of thetwo anti-theft sockets (which weregiven to you on delivery of yourvehicle along with the duplicate keysand the confidential card) and thewheelbrace 1.
Note: make a careful note of the
code number engraved on the top of
the anti-theft socket. This will enableyou to obtain a duplicate anti-theft
socket from your PEUGEOT dealer.
* According to model and destination.
Page 127 of 155

17-06-2002
PRACTICAL INFORMATION119
CHANGING A WHEEL (206 SW) Parking the vehicle
Ð If possible, park the vehicle on
level, stable and non-slippery ground.
Ð Apply the handbrake, engage first or reverse gear, (position Pfor the
automatic gearbox).
Access to the spare wheel andthe jack The wheel is located outside the vehicle, under the boot, supported
by a metal carrier.
Ð Remove the wheelbrace 1secu-
red under the right-hand boot trim. Ð Using the wheelbrace
1, slacken the spare wheel carrier retaining bolt located
inside the boot under the carpet.
Ð Lift the carrier to release the hook rearwards, then lower it.
Ð Remove the jack storage box 2located in the spare wheel.
Removing a wheel
Ð Chock the rear of the wheel diagonally opposite the wheel to be changed, using the collapsible chock located in jack storage box.
Ð Remove the wheel trim using the wheelbrace, by pulling at the valve passage hole.
Ð Slacken the wheel bolts.
Ð Place the jack under the locating point on the sub-frame Ethat is closest to
the wheel to be changed. Ensure that the entire surface of the jack base plate is in contact with the ground.
Ð Extend the jack, completely unscrew the bolts and remove the wheel.
Page 128 of 155

17-06-2002
PRACTICAL INFORMATION
120
Refitting the wheel
Ð After positioning the wheel, lightly pre-tighten the bolts using the wheelbrace.
Ð Compress the jack and release it.
Ð Fully tighten the bolts using the wheelbrace.
Ð Replace the trim except in the case of a space-saver spare wheel, starting atthe valve passage hole, and press it on using the palm of the hand.
Note: If the vehicle is fitted in production with a wheel anti-theft lock, the trim cap on the anti-theft bolt is in two parts.
Replacing the wheel in the carrier
Ð Replace the jack storage box in the wheel.
Ð Replace the support spacer 3by clipping it to the space-saving spare wheel.
Ð Replace the wheel in the carrier directing the spacer 3along the centre line of
the vehicle, with the opening towards the front as shown in the diagram above (for a space-saving spare wheel only).
Ð Lift the wheel then the carrier and reposition the hook.
Ð Do not forget to fully tighten the spare wheel carrier retaining bolt.
Ð Stow the wheelbrace.
For your safety, always change a wheel:
- on level, stable and non slippery ground,
- with the handbrake applied,
- wiith first or reverse gear enga- ged,
- with the vehicle chocked using the jack storage box,
- Never go underneath a vehicle raised using a jack (use an axle stand).
After changing the wheel
- Have the tightening of the bolts and the pressure of the spare tyre checked as soon as pos-
sible by a PEUGEOT dealer.
- Have the punctured tyre repai- red and replace it on the vehicleas soon as possible.
- The space-saver spare wheel fitted with a 115/70R15 tyremust only be used temporarily:
- inflation pressure: 4.2 bars(60 p.s.i.),
- maximum speed: 80 km/h.
Page 129 of 155

17-06-2002
PRACTICAL INFORMATION121
SPECIAL FEATURES OF
ALLOY WHEELS Bolt covers Alloy wheel bolts are covered by chrome trims. Use tool 4to remove the trims befo-
re slackening the bolts.
Tool 4is located:
- on the saloon, on the rear right inner panel of the boot,
- on the 206 SW, in the jack storage compartment. Fitting the spare wheelIf your vehicle is equipped with a steel spare wheel, when fitting it, it isnormal
to notice that the bolt
washers do not come into contact
with the rim. The spare wheel issecured by the cone-shape of eachbolt. Fitting snow tyres If you fit snow tyres that are moun- ted on steel rims onto your vehicle, itis essential that you use special
bolts available from your PEUGEOT
dealer. Anti-theft bolt* If your wheels are fitted with an anti- theft bolt (one per wheel), the chro-me trim and then the plastic covermust be removed, using tool
4, befo-
re it is unscrewed using one of thetwo anti-theft sockets (which weregiven to you on delivery of yourvehicle along with the duplicate keysand the confidential card) and thewheelbrace 1.
Note: make a careful note of the
code number engraved on the top of
the anti-theft socket. This will enableyou to obtain a duplicate anti-theft
socket from your PEUGEOT dealer.
* According to model and destination.
Page 133 of 155

17-06-2002
PRACTICAL INFORMATION
124
Rear lights (saloon) Release the top of the boot side trim. Unscrew the wing bolt inside the boot using the wheelbrace if neces-
sary. Disconnect the connector
A.
Release the light unit. Release spanner Bfrom the bulb
holder. Unscrew nut Cusing spanner Band
remove the bulb holder. Change the faulty bulb.When refitting, stow spanner Bon
support Dand refit the light.
Saloon 206 SW
1. Direction indicators PY21W (saloon) P21W (206 SW).
2. Reversing lights P21W.
3. Brake lights / side lights P21/5W.
The amber bulbs must be replaced by bulbs ofidentical specification
and colour. Rear lights (206 SW) Unclip the top of the boot trim using a coin. Unscrew the two wing bolts using
the wheelbrace if necessary. Release the light unit.
Disconnect the connector.Move aside the tabs
1and remove
the bulb holder 2.
Change the faulty bulb.When refitting, refit the boot trim by engaging it from the bottom thenclipping the top.
Page 140 of 155
17-06-2002
PRACTICAL INFORMATION
128
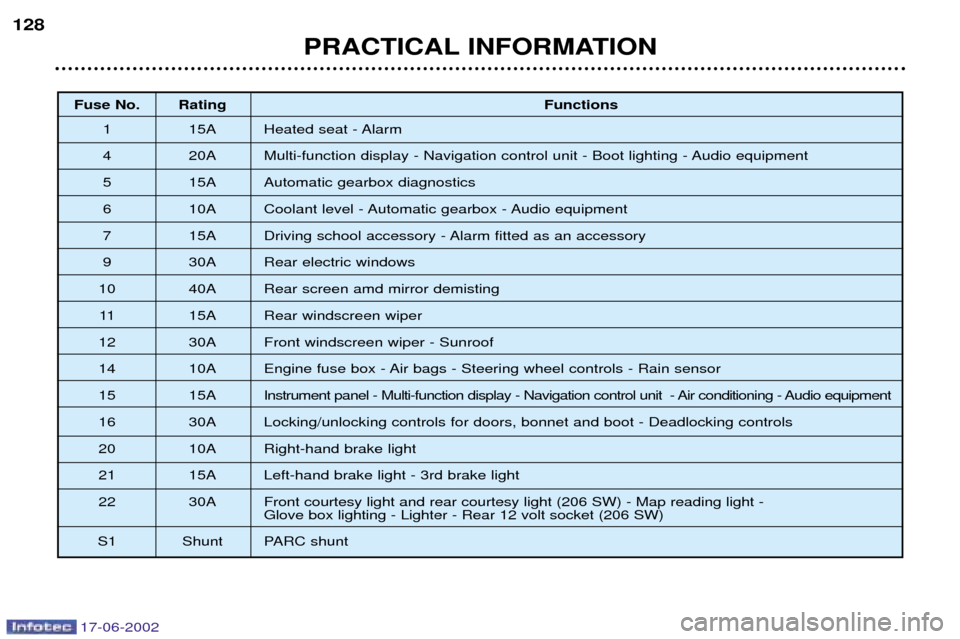
Fuse No. Rating
Functions
1 15A Heated seat - Alarm
4 20A Multi-function display - Navigation control unit - Boot lighting - Audio equipment
5 15A Automatic gearbox diagnostics
6 10A Coolant level - Automatic gearbox - Audio equipment
7 15A Driving school accessory - Alarm fitted as an accessory
9 30A Rear electric windows
10 40A Rear screen amd mirror demisting 11 15A Rear windscreen wiper
12 30A Front windscreen wiper - Sunroof
14 10A Engine fuse box - Air bags - Steering wheel controls - Rain sensor
15 15A Instrument panel - Multi-function display - Navigation control unit - Air conditioning - Audio equipment
16 30A Locking/unlocking controls for doors, bonnet and boot - Deadlocking controls
20 10A Right-hand brake light
21 15A Left-hand brake light - 3rd brake light
22 30A Front courtesy light and rear courtesy light (206 SW) - Map reading light - Glove box lighting - Lighter - Rear 12 volt socket (206 SW)
S1 Shunt PARC shunt
Page 143 of 155

17-06-2002
PRACTICAL INFORMATION133
Without lifting (four wheels on the ground)
You must always use a tow bar. Saloon From the front or the rearAttach the tow bar to the towing eye. 206 SW From the front , attach the tow bar to the towing eye.
From the rear:
- unclip the cover using a coin,
- screw the towing eye (located in the jack storage compartment) as far as it will go. By lifting (two wheels only on the ground) It is preferable to lift the vehicle by the wheels.
Special features of the automatic gearbox When towing with all four wheels on the ground, the following rules mustbe adhered to:
Ð gear lever in position N,
Ð tow the vehicle at a speed less than 50 km/h over a distance of not more than 50 km,
Ð do not add oil to the gearbox.
Saloon rear towing eye
206 SW rear towing eye
Never use the radiator crossmember.
TOWING YOUR VEHICLE