fuse box Peugeot 206 SW Dag 2002 Owner's Manual
[x] Cancel search | Manufacturer: PEUGEOT, Model Year: 2002, Model line: 206 SW Dag, Model: Peugeot 206 SW Dag 2002Pages: 155, PDF Size: 2.09 MB
Page 2 of 155

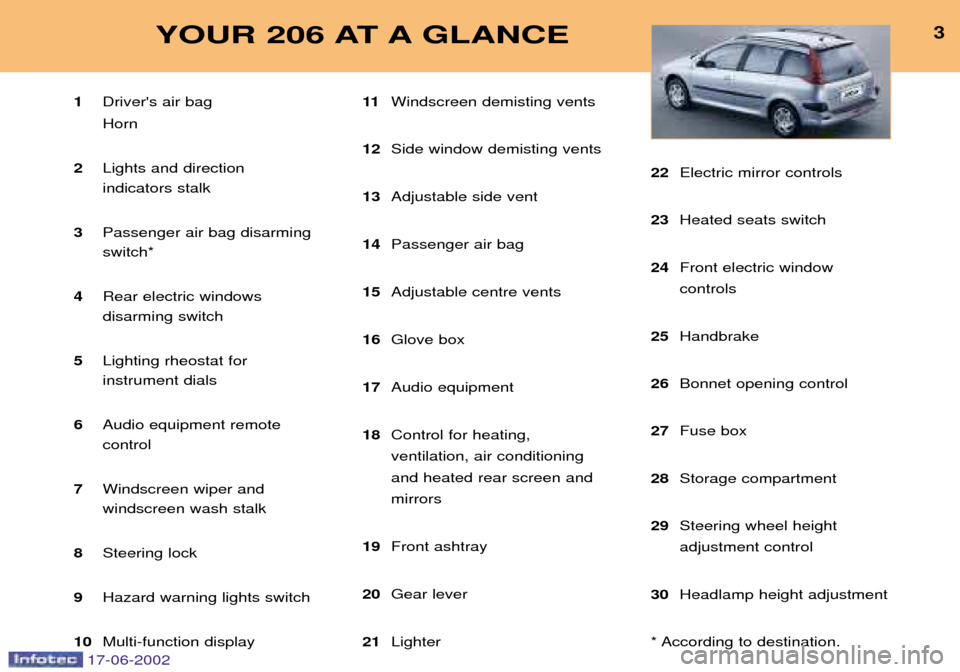
3YOUR 206 AT A GLANCE
1Driver's air bag Horn
2 Lights and direction indicators stalk
3 Passenger air bag disarmingswitch*
4 Rear electric windows disarming switch
5 Lighting rheostat for instrument dials
6 Audio equipment remotecontrol
7 Windscreen wiper and windscreen wash stalk
8 Steering lock
9 Hazard warning lights switch
10 Multi-function display 11
Windscreen demisting vents
12 Side window demisting vents
13 Adjustable side vent
14 Passenger air bag
15 Adjustable centre vents
16 Glove box
17 Audio equipment
18 Control for heating, ventilation, air conditioningand heated rear screen andmirrors
19 Front ashtray
20 Gear lever
21 Lighter 22
Electric mirror controls
23 Heated seats switch
24 Front electric window controls
25 Handbrake
26 Bonnet opening control
27 Fuse box
28 Storage compartment
29 Steering wheel height adjustment control
30 Headlamp height adjustment
* According to destination.
17-06-2002
Page 136 of 155

17-06-2002
PRACTICAL INFORMATION127
CHANGING A FUSE The fuse boxes are located under the fascia and in the engine com-partment. Fascia fuse box Unscrew the catch a quarter turn using a coin then remove the coverto gain access to the fuses. The spare fuses and the pliers Aare
secured on the inside of the fascia
fuse box cover. Removing and fitting a fuse
Before changing a fuse, the cause of the fault must be found and remedied. The fuse numbers are indicated on the fuse box. Use the pliers
A.
Always replace a faulty fuse (identification according to fuse) with a fuse of the same rating.
Correct Incorrect
Page 137 of 155

17-06-2002
PRACTICAL INFORMATION129
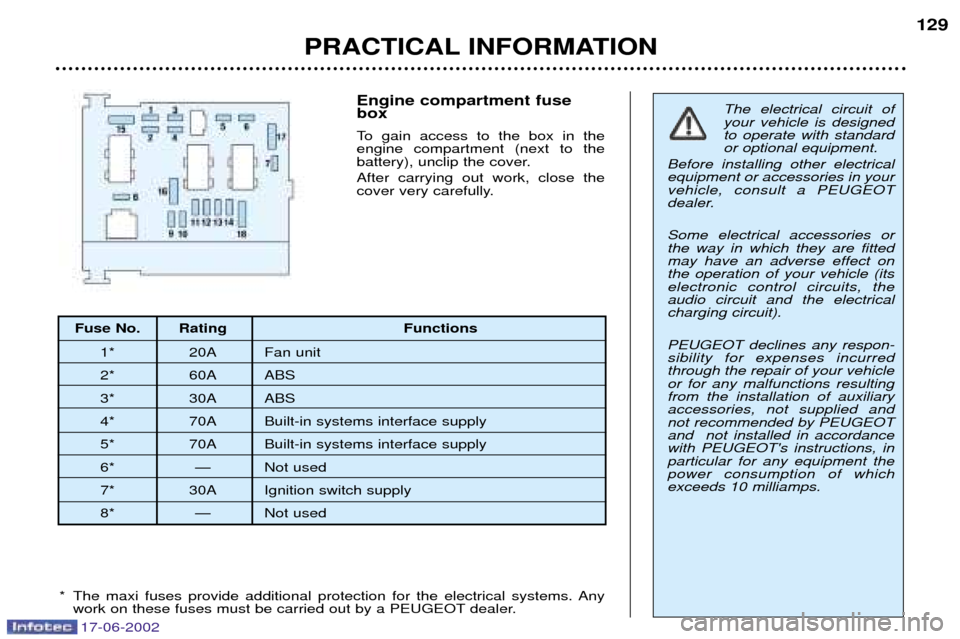
Engine compartment fuse box
To gain access to the box in the engine compartment (next to the
battery), unclip the cover. After carrying out work, close the
cover very carefully.The electrical circuit of your vehicle is designedto operate with standardor optional equipment.
Before installing other electricalequipment or accessories in yourvehicle, consult a PEUGEOT
dealer. Some electrical accessories or the way in which they are fittedmay have an adverse effect onthe operation of your vehicle (itselectronic control circuits, theaudio circuit and the electricalcharging circuit). PEUGEOT declines any respon- sibility for expenses incurredthrough the repair of your vehicleor for any malfunctions resultingfrom the installation of auxiliaryaccessories, not supplied andnot recommended by PEUGEOTand not installed in accordancewith PEUGEOT's instructions, inparticular for any equipment thepower consumption of whichexceeds 10 milliamps.
* The maxi fuses provide additional protection for the electrical systems. Any work on these fuses must be carried out by a PEUGEOT dealer.
Fuse No. Rating Functions
1* 20A Fan unit
2* 60A ABS
3* 30A ABS
4* 70A Built-in systems interface supply
5* 70A Built-in systems interface supply
6* Ñ Not used
7* 30A Ignition switch supply
8* Ñ Not used
Page 138 of 155

17-06-2002
PRACTICAL INFORMATION
130
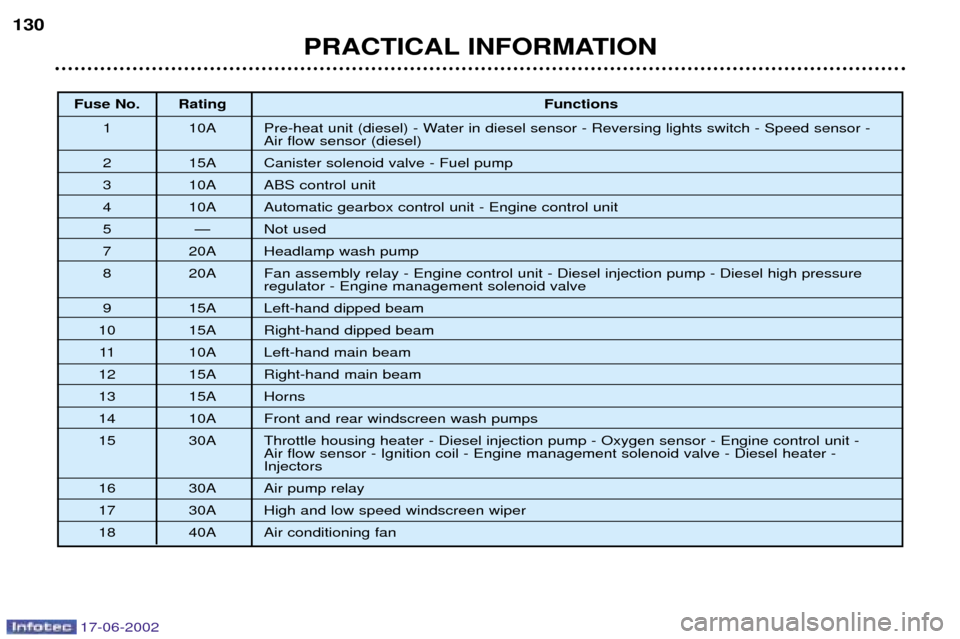
Fuse No. Rating
Functions
1 10A Pre-heat unit (diesel) - Water in diesel sensor - Reversing lights switch - Speed sensor - Air flow sensor (diesel)
2 15A Canister solenoid valve - Fuel pump
3 10A ABS control unit
4 10A Automatic gearbox control unit - Engine control unit
5 Ñ Not used
7 20A Headlamp wash pump
8 20A Fan assembly relay - Engine control unit - Diesel injection pump - Diesel high pressure regulator - Engine management solenoid valve
9 15A Left-hand dipped beam
10 15A Right-hand dipped beam 11 10A Left-hand main beam
12 15A Right-hand main beam
13 15A Horns
14 10A Front and rear windscreen wash pumps
15 30A Throttle housing heater - Diesel injection pump - Oxygen sensor - Engine control unit - Air flow sensor - Ignition coil - Engine management solenoid valve - Diesel heater - Injectors
16 30A Air pump relay
17 30A High and low speed windscreen wiper
18 40A Air conditioning fan
Page 139 of 155

17-06-2002
PRACTICAL INFORMATION127
CHANGING A FUSE The fuse boxes are located under the fascia and in the engine com-partment. Fascia fuse box Unscrew the catch a quarter turn using a coin then remove the coverto gain access to the fuses. The spare fuses and the pliers Aare
secured on the inside of the fascia
fuse box cover. Removing and fitting a fuse
Before changing a fuse, the cause of the fault must be found and remedied. The fuse numbers are indicated on the fuse box. Use the pliers
A.
Always replace a faulty fuse (identification according to fuse) with a fuse of the same rating.
Correct Incorrect
Page 140 of 155

17-06-2002
PRACTICAL INFORMATION
128
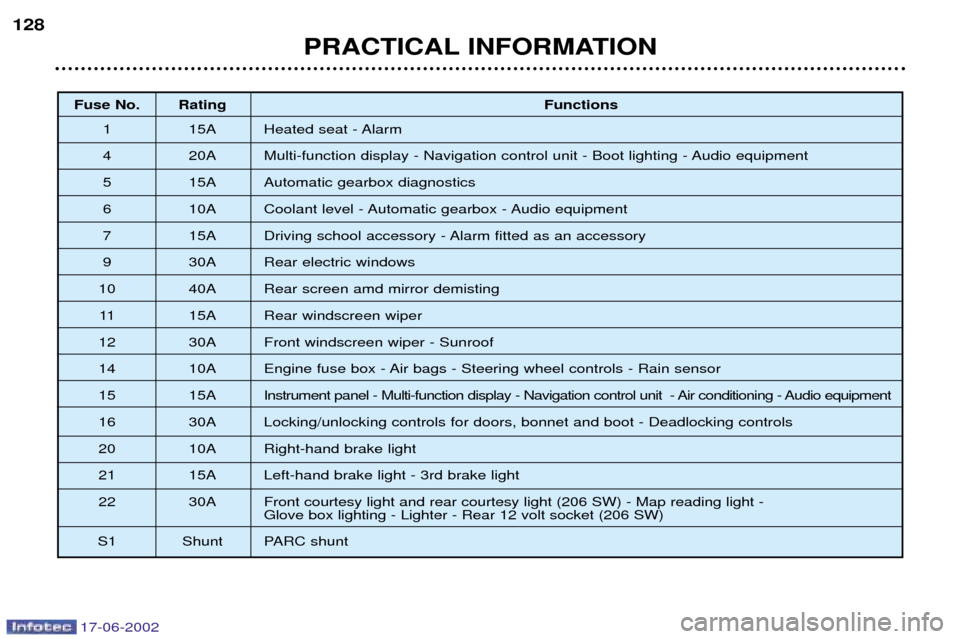
Fuse No. Rating
Functions
1 15A Heated seat - Alarm
4 20A Multi-function display - Navigation control unit - Boot lighting - Audio equipment
5 15A Automatic gearbox diagnostics
6 10A Coolant level - Automatic gearbox - Audio equipment
7 15A Driving school accessory - Alarm fitted as an accessory
9 30A Rear electric windows
10 40A Rear screen amd mirror demisting 11 15A Rear windscreen wiper
12 30A Front windscreen wiper - Sunroof
14 10A Engine fuse box - Air bags - Steering wheel controls - Rain sensor
15 15A Instrument panel - Multi-function display - Navigation control unit - Air conditioning - Audio equipment
16 30A Locking/unlocking controls for doors, bonnet and boot - Deadlocking controls
20 10A Right-hand brake light
21 15A Left-hand brake light - 3rd brake light
22 30A Front courtesy light and rear courtesy light (206 SW) - Map reading light - Glove box lighting - Lighter - Rear 12 volt socket (206 SW)
S1 Shunt PARC shunt