remove seats Peugeot 206 SW Dag 2002 Owner's Manual
[x] Cancel search | Manufacturer: PEUGEOT, Model Year: 2002, Model line: 206 SW Dag, Model: Peugeot 206 SW Dag 2002Pages: 155, PDF Size: 2.09 MB
Page 7 of 155

72
9YOUR 206 AT A GLANCE
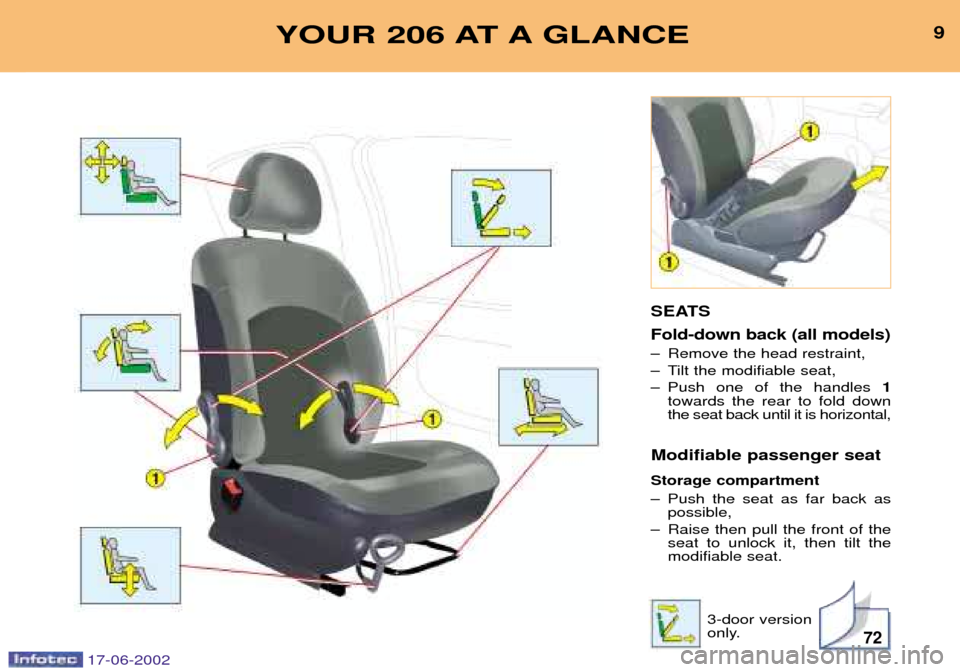
SEATS Fold-down back (all models)
Ð Remove the head restraint,
Ð Tilt the modifiable seat,
Ð Push one of the handles 1
towards the rear to fold down the seat back until it is horizontal,
Modifiable passenger seat
Storage compartment
Ð Push the seat as far back as possible,
Ð Raise then pull the front of the seat to unlock it, then tilt the modifiable seat.
3-door version
only.
17-06-2002
Page 8 of 155

7675
10YOUR 206 AT A GLANCE
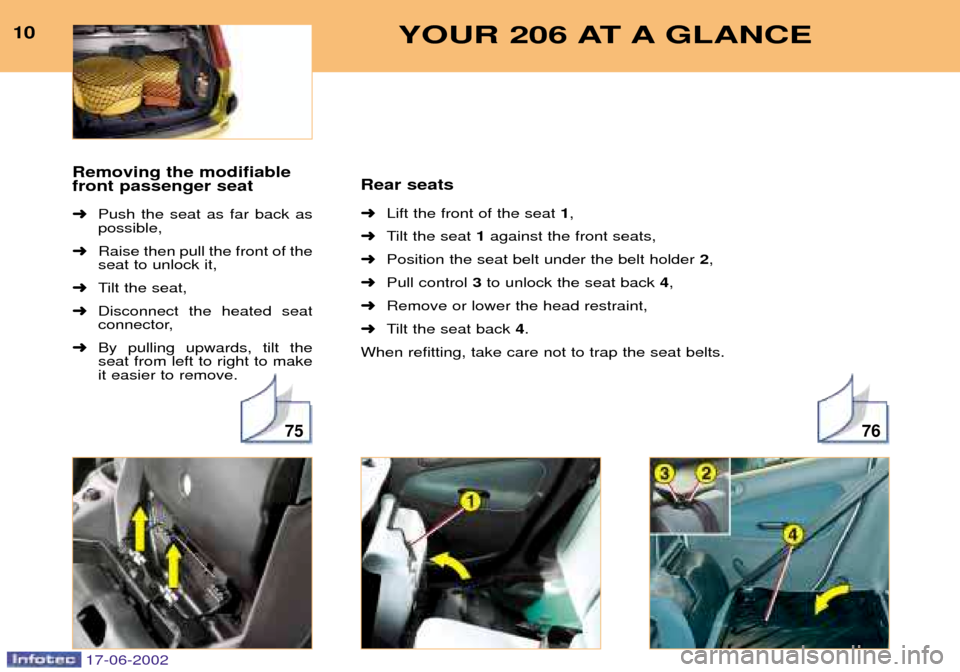
Rear seats ➜Lift the front of the seat 1,
➜ Tilt the seat 1against the front seats,
➜ Position the seat belt under the belt holder 2,
➜ Pull control 3to unlock the seat back 4,
➜ Remove or lower the head restraint,
➜ Tilt the seat back 4.
When refitting, take care not to trap the seat belts.
Removing the modifiable front passenger seat ➜
Push the seat as far back as possible,
➜ Raise then pull the front of theseat to unlock it,
➜ Tilt the seat,
➜ Disconnect the heated seat
connector,
➜ By pulling upwards, tilt theseat from left to right to makeit easier to remove.
17-06-2002
Page 9 of 155

7675
10YOUR 206 AT A GLANCE
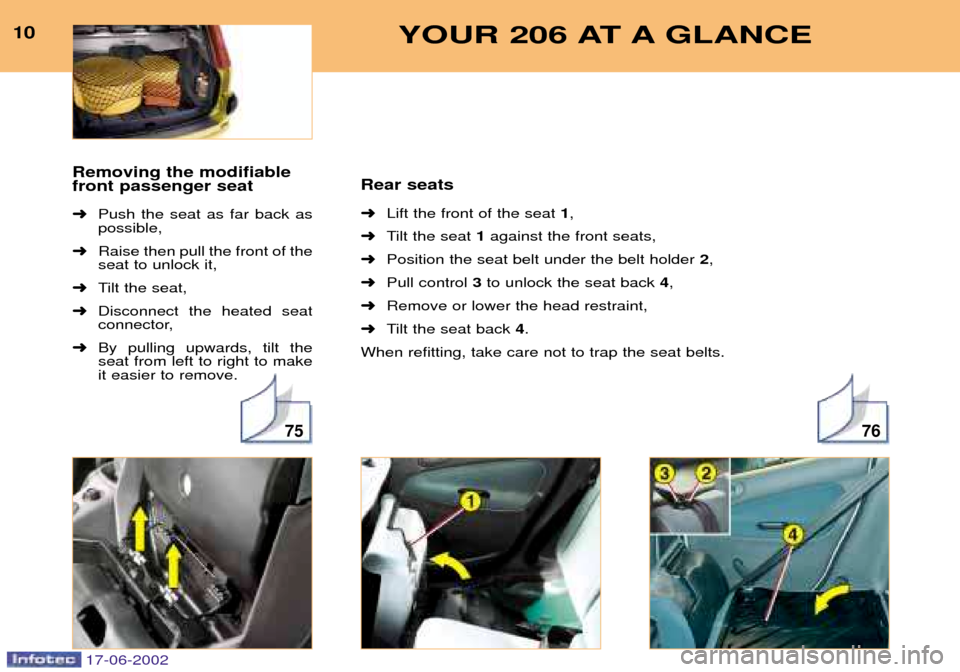
Rear seats ➜Lift the front of the seat 1,
➜ Tilt the seat 1against the front seats,
➜ Position the seat belt under the belt holder 2,
➜ Pull control 3to unlock the seat back 4,
➜ Remove or lower the head restraint,
➜ Tilt the seat back 4.
When refitting, take care not to trap the seat belts.
Removing the modifiable front passenger seat ➜
Push the seat as far back as possible,
➜ Raise then pull the front of theseat to unlock it,
➜ Tilt the seat,
➜ Disconnect the heated seat
connector,
➜ By pulling upwards, tilt theseat from left to right to makeit easier to remove.
17-06-2002
Page 74 of 155

17-06-2002
YOUR 206 IN DETAIL73
6. Head restraint height adjust-
ment
To raise the restraint, pull it upwards.
The adjustment is correctwhen the upper edge of thehead restraint is level withthe top of the head.
The head restraint has a framewith notches, which prevent thehead restraint dropping down(this is a safety device in theevent of an impact).
To lower the head restraint, it is necessary to push simultaneously:
Ð the button located on the left guide at the base of the head restraint,
Ð the head restraint downwards.
To remove the head restraint, press the lug.
Never drive with thehead restraints removed;they must be in placeand correctly adjusted. Rear head restraints These have a high position for when they are in use and a lowposition for when they are stored.They are removable.
To lower the head restraints, press the lug.
To remove them, pull upwards as far as the stop then press therelease control.FRONT SEATS
1. Forwards-backwards
adjustment Lift the control and slide the seat forwards or backwards.
2. Access to rear seats (3 door) Place your fingers in one of the two handles and push forwards tofold the seat back and move theseat forwards. On repositioning,the seat returns to its initial posi-tion. It is impossible to access the rear seats if the front seat is in thereclining position.
3. Seat back angle adjustment Push one of the two handles
towards the rear.
4. Seat height adjustment Pull the handle upwards. Remove your weight from the seat to raise, or press on the seat
to lower.
5. Heated seats switch Press the switch. The temperatu-
re is controlled automatically. Press the switch again to stop operation.
Page 77 of 155

17-06-2002
YOUR 206 IN DETAIL73
6. Head restraint height adjust-
ment
To raise the restraint, pull it upwards.
The adjustment is correctwhen the upper edge of thehead restraint is level withthe top of the head.
The head restraint has a framewith notches, which prevent thehead restraint dropping down(this is a safety device in theevent of an impact).
To lower the head restraint, it is necessary to push simultaneously:
Ð the button located on the left guide at the base of the head restraint,
Ð the head restraint downwards.
To remove the head restraint, press the lug.
Never drive with thehead restraints removed;they must be in placeand correctly adjusted. Rear head restraints These have a high position for when they are in use and a lowposition for when they are stored.They are removable.
To lower the head restraints, press the lug.
To remove them, pull upwards as far as the stop then press therelease control.FRONT SEATS
1. Forwards-backwards
adjustment Lift the control and slide the seat forwards or backwards.
2. Access to rear seats (3 door) Place your fingers in one of the two handles and push forwards tofold the seat back and move theseat forwards. On repositioning,the seat returns to its initial posi-tion. It is impossible to access the rear seats if the front seat is in thereclining position.
3. Seat back angle adjustment Push one of the two handles
towards the rear.
4. Seat height adjustment Pull the handle upwards. Remove your weight from the seat to raise, or press on the seat
to lower.
5. Heated seats switch Press the switch. The temperatu-
re is controlled automatically. Press the switch again to stop operation.
Page 78 of 155

17-06-2002
YOUR 206 IN DETAIL
76
REAR SEATS
To fold the rear seat(s):
Ð lift the front of the seat cushion
1,
Ð tilt the seat cushion 1against the front seats,
Ð position the seat belt under the belt holder 2,
Ð pull control 3to unlock the seat back 4,
Ð remove or lower the head restraint,
Ð tilt the seat back 4.
Always start with the seat, never the seat back (risk of damage). When repositioning:
Ð fold up the seat back,
Ð fold back the seat cushion,
Ð reposition the lap belt and the buckles before locking the front of the seat cushion.
Take care not to trap the seat belts.
Page 79 of 155

17-06-2002
YOUR 206 IN DETAIL77
Removing the rear seat
Ð Tilt the seat cushion against the front seats.
Ð Squeeze the seat fasteners to release them from their attach- ments.
Ð Remove the seat cushion. TRANSPORTING LONG OBJECTS
To allow the transportation of long objects: Front seat:
Ð remove the modifiable seat (see
corresponding paragraph) and fold down the seat back.
Rear seat:
Ð remove the seat cushion,
Ð tilt the seat back.
Page 104 of 155

17-06-2002
YOUR 206 IN DETAIL
100
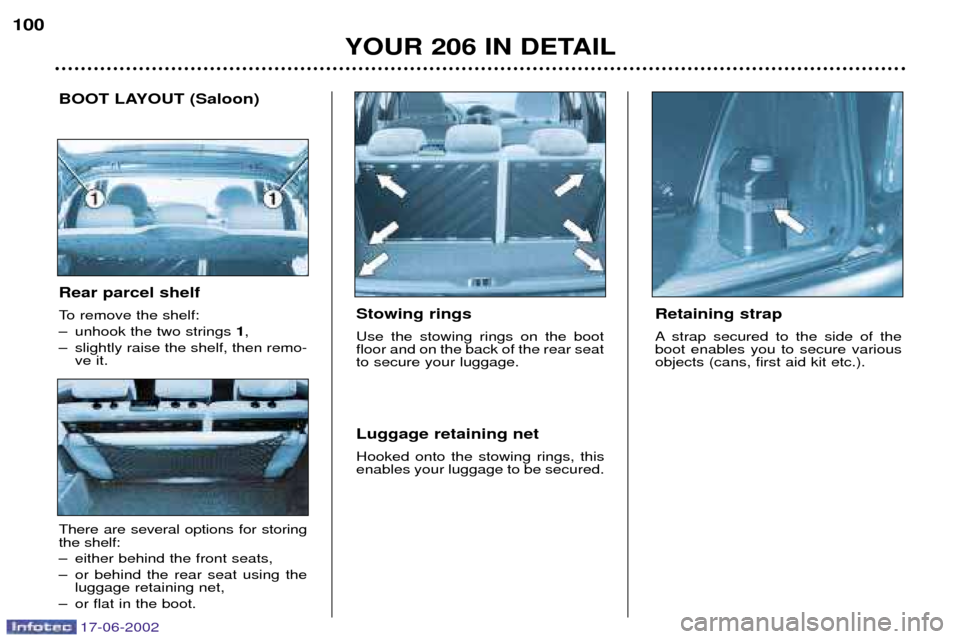
Stowing rings Use the stowing rings on the boot floor and on the back of the rear seatto secure your luggage. Luggage retaining net Hooked onto the stowing rings, this enables your luggage to be secured.
BOOT LAYOUT (Saloon)
Retaining strap
A strap secured to the side of the boot enables you to secure variousobjects (cans, first aid kit etc.).
Rear parcel shelf
To remove the shelf:
Ð unhook the two strings 1,
Ð slightly raise the shelf, then remo- ve it.
There are several options for storing the shelf:
Ð either behind the front seats,
Ð or behind the rear seat using theluggage retaining net,
Ð or flat in the boot.
Page 106 of 155

17-06-2002
YOUR 206 IN DETAIL103
BOOT LAYOUT (206 SW)
1. Grab handles and coat hooks
2. Coat hooks There are six hooks to accommodate coats.
3. High load retaining net fastenings The high load retaining net can be installed behind the front seats or behind the rear seat. Open the covers of the corresponding upper fastenings.
Install one end of the metal bar in one of the two fastenings, compress the bar, then install the other end and release.
Secure the two net strap hooks behind the front seats, with the rear seat folded down, or in the stowing rings on the floor.The rings are located directly below the corresponding upper fastenings.Pull the two straps taut.
4. Hooks
There are two side hooks on which to hang light bags.
5. 12V Socket for accessories This is a 12 volt socket (lighter type) installed on the the rear left trim and supplied from the accessories position (1stnotch).
6. Storage nets There are two nets (which cannot be removed) which can contain the luggage retaining net, a first aid kit etc.
7. Retaining straps There are two straps for securing various objects: cans etc.
8. Tonneau To install it:
Ð position one end of the tonneau roller in one of the two supports,
Ð compress the opposite end of the roller and position it,
Ð release it to allow it to engage,
Ð unroll the tonneau as far as the boot pillars,
Ð insert the tonneau guides in the rails in the pillars.
To remove it:
Ð remove the tonneau guides from the pillar rails,
Ð return the tonneau into its roller, compress it and remove it from its support.
9. Stowing rings There are eight stowing rings for securing the luggage retaining net: four on the rear seat back and four on the boot floor(two of which are under the carpet, at the far end of the boot).
Warning triangle The tailgate has a location intended for a warning triangle.
Page 112 of 155

17-06-2002
YOUR 206 IN DETAIL109
For the front and side air bags to be fully effective, observe the following safety rules:
¥ Wear a correctly adjusted seat belt.
¥ Sit in a normal upright position (passengers must not place their feet on the fascia).
¥ Ensure there is nothing between the occupants of the front seats and the air bags (animal, child, object etc). This could hamper the operation of the air bags or injure the occupants.
¥ All work on the air bag system is strictly forbidden unless it is carried out by qualified personnel of the PEUGEOT net- work.
¥ After an accident or if the vehicle has been stolen or broken into, have the air bag systems checked.
¥ The air bag systems have been designed to be fully operational for 10 years after the vehicle has been registered. Have them replaced by a PEUGEOT dealer after this period.
Front air bags
¥ Do not drive holding the steering wheel by its spokes or resting your hands on the centre part of the wheel.
¥ Never remove or pierce the steering wheel or hit it violently.
¥ Smoke as little as possible; deployment of the air bags can cause burns or the risk of injury from a cigarette or pipe. Side air bags
¥ Do not fix or glue anything to the front seat backs. This could cause injury to the chest or arms when the side air bag inflates.
¥ Do not sit with the upper part of the body any nearer to the door than necessary.
¥ Never put covers on the front seats. Contact your PEUGEOT dealer.