driver seat adjustment PEUGEOT 208 2021 Owners Manual
[x] Cancel search | Manufacturer: PEUGEOT, Model Year: 2021, Model line: 208, Model: PEUGEOT 208 2021Pages: 276, PDF Size: 8.02 MB
Page 7 of 276
5
Overview
D.Select previous/next media
Confirm a selection
E. Access the Telephone menu
Manage calls
F. Select an audio source
G. Display the list of radio stations/audio tracks
5. Horn/Driver front airbag
6. Controls for Cruise control/Speed limiter/
Adaptive cruise control
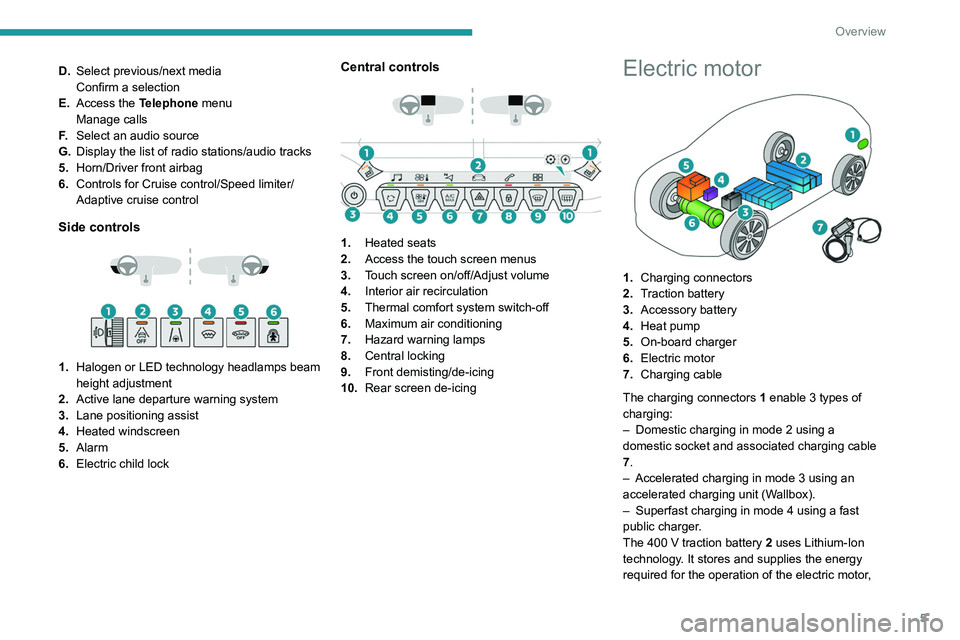
Side controls
1. Halogen or LED technology headlamps beam
height adjustment
2. Active lane departure warning system
3. Lane positioning assist
4. Heated windscreen
5. Alarm
6. Electric child lock
Central controls
1. Heated seats
2. Access the touch screen menus
3. Touch screen on/off/Adjust volume
4. Interior air recirculation
5. Thermal comfort system switch-off
6. Maximum air conditioning
7. Hazard warning lamps
8. Central locking
9. Front demisting/de-icing
10. Rear screen de-icing
Electric motor
1.Charging connectors
2. Traction battery
3. Accessory battery
4. Heat pump
5. On-board charger
6. Electric motor
7. Charging cable
The charging connectors 1 enable 3
types of
charging:
–
Domestic charging in mode 2 using a
domestic socket and associated charging cable
7
.
–
Accelerated charging in mode 3 using an
accelerated charging unit (W
allbox).
–
Superfast charging in mode 4 using a fast
public charger
.
The 400
V traction battery 2 uses Lithium-Ion
technology. It stores and supplies the energy
required for the operation of the electric motor,
Page 44 of 276
42
Ease of use and comfort
After one hour, the function is deactivated; the
indicator lamp goes off.
Heated seats
The function is active only with the engine
running and when the outside temperature is
below 20°C.
► Press the button corresponding to the seat.
► Each press changes the heating level; the
corresponding number of indicator lamps come
on.
► To switch off the heating, press the button
until all of the indicator lamps are off.
The system status is memorised when the
ignition is switched off.
Do not use the function when the seat
is not occupied.
Reduce the heating intensity as soon as
possible.
When the seat and passenger compartment
have reached a satisfactory temperature,
switch the function off; reducing electrical
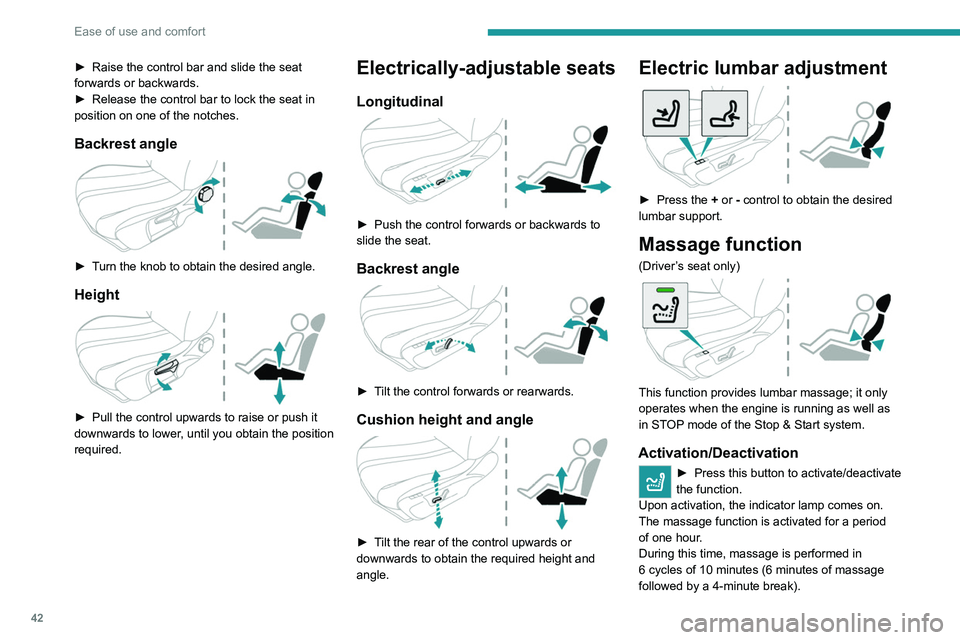
► Raise the control bar and slide the seat
forwards or backwards.
►
Release the control bar to lock the seat in
position on one of the notches.
Backrest angle
► Turn the knob to obtain the desired angle.
Height
► Pull the control upwards to raise or push it
downwards to lower , until you obtain the position
required.
Electrically-adjustable seats
Longitudinal
► Push the control forwards or backwards to
slide the seat.
Backrest angle
► Tilt the control forwards or rearwards.
Cushion height and angle
► Tilt the rear of the control upwards or
downwards to obtain the required height and
angle.
Electric lumbar adjustment
► Press the + or - control to obtain the desired
lumbar support.
Massage function
(Driver’s seat only)
This function provides lumbar massage; it only
operates when the engine is running as well as
in STOP mode of the Stop & Start system.
Activation/Deactivation
► Press this button to activate/deactivate
the function.
Upon activation, the indicator lamp comes on.
The massage function is activated for a period
of one hour
.
During this time, massage is performed in
6
cycles of 10 minutes (6 minutes of massage
followed by a 4-minute break).
Page 46 of 276
44
Ease of use and comfort
The electrochrome system uses a sensor that
detects the level of exterior brightness and that
coming from the rear of the vehicle, in order to
automatically and gradually switch between day
and night usage.
To ensure optimum visibility while manoeuvring, the mirror automatically
brightens when reverse gear is engaged.
The system is deactivated if the load in the
boot exceeds the height of the load space
cover or if the load space cover has items
placed on it.
Rear bench seat
Bench seat with fixed cushions and split folding
backrests (2/3-1/3) to adapt the boot load space.
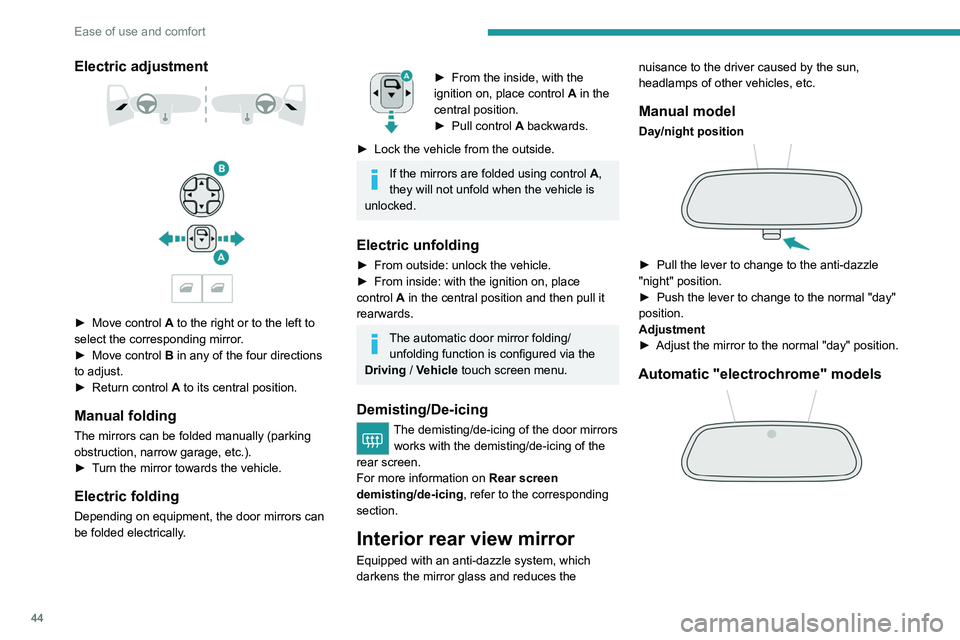
Electric adjustment
► Move control A to the right or to the left to
select the corresponding mirror.
►
Move control
B in any of the four directions
to adjust.
►
Return control A
to its central position.
Manual folding
The mirrors can be folded manually (parking
obstruction, narrow garage, etc.).
►
T
urn the mirror towards the vehicle.
Electric folding
Depending on equipment, the door mirrors can
be folded electrically.
► From the inside, with the
ignition on, place control A
in the
central position.
►
Pull control A
backwards.
►
Lock the vehicle from the outside.
If the mirrors are folded using control A,
they will not unfold when the vehicle is
unlocked.
Electric unfolding
► From outside: unlock the vehicle.
► From inside: with the ignition on, place
control
A in the central position and then pull it
rearwards.
The automatic door mirror folding/ unfolding function is configured via the
Driving
/ Vehicle touch screen menu.
Demisting/De-icing
The demisting/de-icing of the door mirrors
works with the demisting/de-icing of the
rear screen.
For more information on Rear screen
demisting/de-icing , refer to the corresponding
section.
Interior rear view mirror
Equipped with an anti-dazzle system, which
darkens the mirror glass and reduces the nuisance to the driver caused by the sun,
headlamps of other vehicles, etc.
Manual model
Day/night position
► Pull the lever to change to the anti-dazzle
"night" position.
►
Push the lever to change to the normal "day"
position.
Adjustment
►
Adjust the mirror to the normal "day" position.
Automatic "electrochrome" models
Page 82 of 276
80
Safety
IL: Seat position suitable for the installation of an Isofix Semi-Universal seat, either:
– "rearward facing" fitted with an upper strap or a support leg.
– "forward facing" fitted with a support leg.
– a carrycot fitted with an upper strap or a support leg.
For securing the upper strap using the ISOFIX mountings, refer to the corresponding section.
X: Seat position not suitable for the installation of an ISOFIX seat or carrycot for the specified weight group.
(a) Refer to the current legislation in your country before placing a child\
in this seat position.
(b) Remove the head restraints.
(c) Behind the driver: adjust the driver’s seat to its maximum height setting.
(d) Behind the front passenger: adjust the front passenger seat to its fully\
forward longitudinal position.
i-Size child seats
i-Size child seats have two latches that are anchored to the two rings A.
These i-Size child seats also have:
– either an upper strap that is attached to ring B.
– or a support leg that rests on the vehicle floor, compatible with the approved i-Size seat position.
Their role is to prevent the child seat from tipping forward in the even\
t of a collision.
For more information on the ISOFIX mountings, refer to the corresponding section.
In accordance with European regulations, this table indicates the options for installing i-Size child seats on seats in the vehicle fitted with ISOFIX
mountings approved for i-Size.
Seat Front passenger airbagi-Size restraint system
Row 1 (a)
(depending on version) Passenger seat with ISOFIX, with or
without height adjustment (b)
Deactivated: "OFF" i-U
Activated: "ON" i-UF
Passenger seat without ISOFIX Not i-Size
Locations for ISOFIX child seats
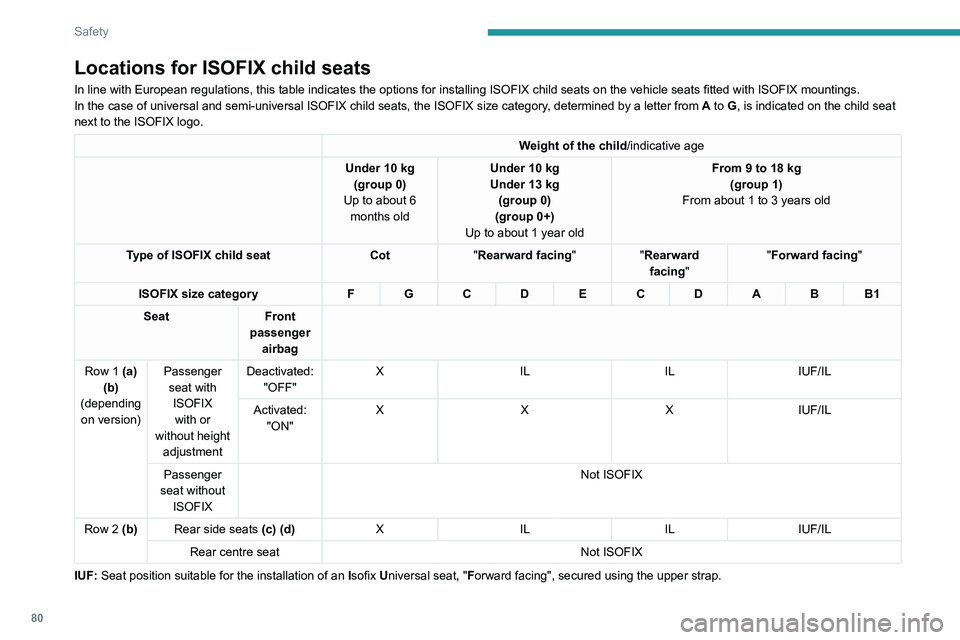
In line with European regulations, this table indicates the options for installing ISOFIX child seats on the vehicle seats fitted with ISOFIX mountings.
In the case of universal and semi-universal ISOFIX child seats, the ISOF\
IX size category, determined by a letter from A to G, is indicated on the child seat
next to the ISOFIX logo.
Weight of the child/indicative age
Under 10
kg
(group 0)
Up to about 6 months old Under 10
kg
Under 13
kg
(group 0)
(group 0+)
Up to about 1 year old From 9 to 18
kg
(group 1)
From about 1 to 3 years old
Type of ISOFIX child seat Cot"Rearward facing" "Rearward
facing" "Forward facing
"
ISOFIX size category F G C D E C D A B B1
Seat Front
passenger airbag
Row 1 (a) (b)
(depending on version) Passenger
seat with ISOFIXwith or
without height adjustment Deactivated:
"OFF" X
IL ILIUF/IL
Activated: "ON" X
XXIUF/IL
Passenger
seat without ISOFIX Not ISOFIX
Row 2 (b) Rear side seats (c) (d) X IL ILIUF/IL
Rear centre seat Not ISOFIX
IUF: Seat position suitable for the installation of an Isofix Universal seat, "Forward facing", secured using the upper strap.
Page 83 of 276
81
Safety
5IL: Seat position suitable for the installation of an I sofix Semi-Universal seat, either:
– "rearward facing" fitted with an upper strap or a support leg.
–
"forward facing" fitted with a support leg.
–
a carrycot fitted with an upper strap or a support leg.
For securing the upper strap using the ISOFIX mountings, refer to the corresponding section.
X:
Seat position not suitable for the installation of an ISOFIX seat or carrycot for the specified weight group.
(a) Refer to the current legislation in your country before placing a child\
in this seat position.
(b)
Remove the head restraints.
(c)
Behind the driver: adjust the driver’s seat to its maximum height setting.
(d)
Behind the front passenger: adjust the front passenger seat to its fully\
forward longitudinal position.
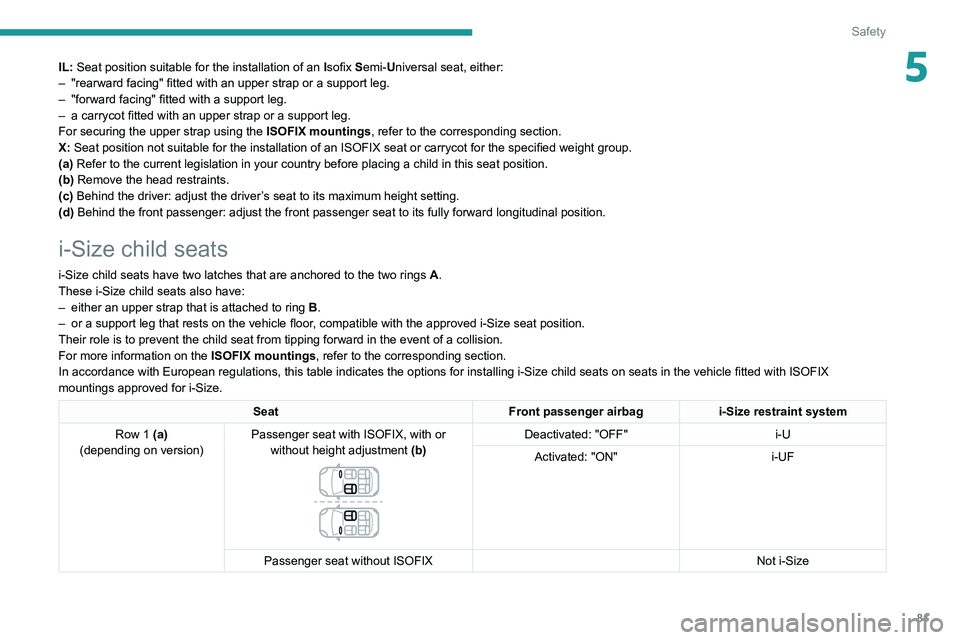
i-Size child seats
i-Size child seats have two latches that are anchored to the two rings A.
These i-Size child seats also have:
–
either an upper strap that is attached to ring B
.
–
or a support leg that rests on the vehicle floor
, compatible with the approved i-Size seat position.
Their role is to prevent the child seat from tipping forward in the even\
t of a collision.
For more information on the ISOFIX mountings, refer to the corresponding section.
In accordance with European regulations, this table indicates the options for installing i-Size child seats on seats in the vehicle fitted with ISOFIX
mountings approved for i-Size.
Seat Front passenger airbagi-Size restraint system
Row 1 (a)
(depending on version) Passenger seat with ISOFIX, with or
without height adjustment (b)
Deactivated: "OFF" i-U
Activated: "ON" i-UF
Passenger seat without ISOFIX Not i-Size