fuel PEUGEOT 208 2021 Owners Manual
[x] Cancel search | Manufacturer: PEUGEOT, Model Year: 2021, Model line: 208, Model: PEUGEOT 208 2021Pages: 276, PDF Size: 8.02 MB
Page 5 of 276
3
Contents
Parking sensors 127
Visiopark 1 129
Park Assist 131
7Practical informationCompatibility of fuels 136
Refuelling 136
Misfuel prevention (Diesel) 137
Charging system (Electric) 137
Charging the traction battery (Electric) 143
Towing device 146
Towing device with quickly detachable towball 147
Roof bars 150
Snow chains 150
Very cold climate screens 151
Energy economy mode 152
Bonnet 153
Engine compartment 154
Checking levels 155
Checks 157
AdBlue® (BlueHDi) 159
Free-wheeling 161
Advice on care and maintenance 162
8In the event of a breakdownWarning triangle 164
Running out of fuel (Diesel) 164
Tool kit 164
Temporary puncture repair kit 166
Spare wheel 168
Changing a bulb 171
Fuses 175
12
V battery
/ Accessory battery 175
Towing the vehicle 178
9Technical dataEngine technical data and towed loads 181
Petrol engines 182
Diesel engines 184
Electric motor 185
Dimensions 186
Identification markings 186
10Touch screen BLUETOOTH audio systemFirst steps 187
Steering mounted controls 187
Menus 188
Radio 189
DAB (Digital Audio Broadcasting) radio 190
Media 191
Telephone 192
Settings 194
Frequently asked questions 194
11PEUGEOT Connect RadioFirst steps 196
Steering mounted controls 197
Menus 198
Applications 199
Radio 199
DAB (Digital Audio Broadcasting) radio 201
Media 201
Telephone 203
Settings 206
Frequently asked questions 207
12PEUGEOT Connect NavFirst steps 209
Steering mounted controls 210
Menus 210
Voice commands 212
Navigation 215
Connected navigation 218
Applications 220
Radio 223
DAB (Digital Audio Broadcasting) radio 224
Media 224
Telephone 226
Settings 228
Frequently asked questions 230
13Event data recorders
■
Alphabetical index
bit.ly/helpPSA
Access to additional videos
Page 8 of 276
6
Overview
air conditioning and heating. Its charge level is
represented by an indicator and a reserve power
warning lamp on the instrument panel.
The 12 V accessory battery 3 powers the
vehicle’s conventional electrical system. It is
recharged automatically by the traction battery
via the on-board charger.
The heat pump
4 provides passenger
compartment heating and regulates traction
battery and on-board charger cooling.
The on-board charger 5 manages the domestic
charging
(mode 2) and accelerated charging
(mode 3) of the traction battery as well as the
recharging of the 12
V accessory battery.
The electric motor
6 provides propulsion in
accordance with the selected driving mode and
driving conditions. It recovers energy during
vehicle braking and deceleration
phases.
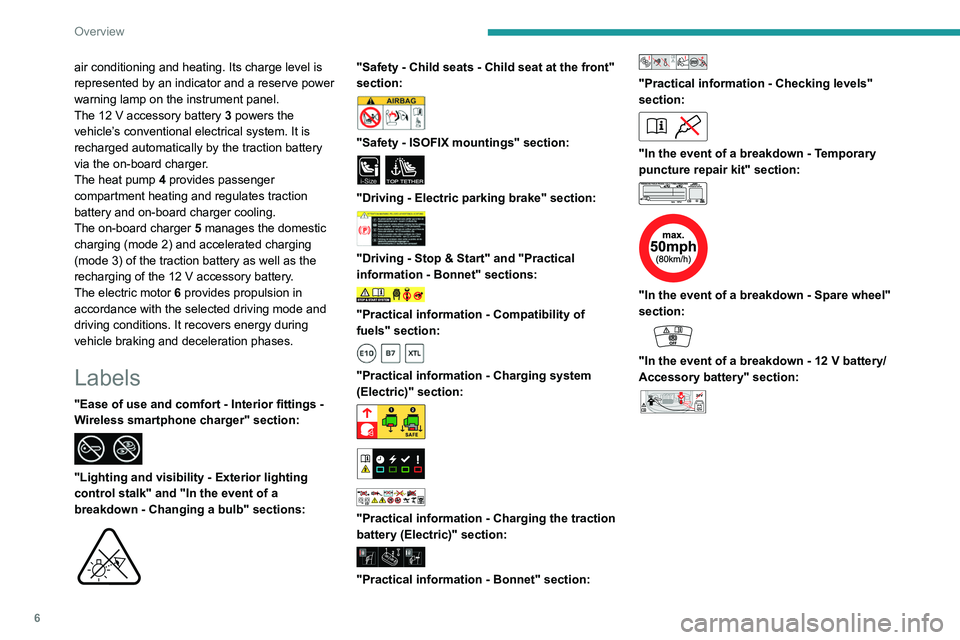
Labels
"Ease of use and comfort - Interior fittings -
Wireless smartphone charger" section:
"Lighting and visibility - Exterior lighting
control stalk" and "In the event of a
breakdown - Changing a bulb" sections:
"Safety - Child seats - Child seat at the front"
section:
"Safety - ISOFIX mountings" section:
i-SizeTOP TETHER
"Driving - Electric parking brake" section:
"Driving - Stop & Start" and "Practical
information - Bonnet" sections:
"Practical information - Compatibility of
fuels" section:
"Practical information - Charging system
(Electric)" section:
"Practical information - Charging the traction
battery (Electric)" section:
"Practical information - Bonnet" section:
"Practical information - Checking levels"
section:
"In the event of a breakdown - Temporary
puncture repair kit" section:
"In the event of a breakdown - Spare wheel"
section:
"In the event of a breakdown - 12 V battery/
Accessory battery" section:
24V12V-+
Page 9 of 276
7
Eco-driving
Eco-driving
Eco-driving refers to a range of everyday
practices that allow the motorist to optimise
the vehicle's energy consumption (fuel and/or
electricity) and CO
2 emissions.
Optimise your use of the gearbox
With a manual gearbox, move off gently and
change up promptly. While accelerating, change
up early.
With an automatic gearbox, favour automatic
mode. Do not depress the accelerator pedal
heavily or suddenly.
The gear shift indicator prompts you to engage
the most suitable gear. Whenever this indication
is displayed on the instrument panel, follow it
straight away.
With an automatic gearbox, this indicator
appears only in manual mode.
Drive smoothly
Maintain a safe distance between vehicles, use
engine braking rather than the brake pedal and
press the accelerator gradually. These practices
help to save on energy consumption, reduce
CO
2 emissions and decrease general traffic
noise.
Favour the use of the "Eco" driving mode by
selecting it using the "DRIVE MODE" control.
With an EAT8 gearbox, with the gear selector in
mode
D, and except in Sport mode, favour "free-
wheeling" by gradually and fully lifting your foot
off the accelerator pedal in order to save fuel. When the traffic is flowing smoothly, select the
cruise control.
Control the use of electrical equipment
Before moving off, if the passenger compartment
is too warm, ventilate it by opening the windows
and air vents before using the air conditioning.
At speeds above 31
mph (50 km/h), close the
windows and leave the air vents open.
Consider using equipment that can help keep
the temperature in the passenger compartment
down (e.g.
sunroof blind, window blinds).
Unless automatically regulated, switch off the air
conditioning as soon as the desired temperature
has been reached.
Switch off the demisting and defrosting functions,
if they are not managed automatically.
Switch off the heated seat as soon as possible.
Avoid running the engine before moving off,
particularly in winter (other than in severe wintry
conditions: temperature below -23°C). The
vehicle will warm up much faster while driving.
As a passenger, avoid connecting your
multimedia devices (e.g.
film, music, video
game) to help reduce the consumption of energy.
Disconnect all portable devices before leaving
the vehicle.
Limit the causes of excess consumption
Spread loads throughout the vehicle. Place the
heaviest items in the boot as close as possible to
the rear seats.
Limit the loads carried in the vehicle and
minimise wind resistance (e.g.
roof bars, roof rack, bicycle carrier, trailer). Preferably, use a
roof box.
Remove roof bars and roof racks after use.
At the end of winter, remove snow tyres and refit
summer tyres.
Avoid using
Sport mode for too long, in order to
limit your energy consumption.
Comply with the servicing instructions
Check tyre pressures regularly, with the tyres
cold, referring to the label in the door aperture on
the driver's side.
Carry out this check in particular:
–
before a long journey
.
–
at each change of season.
–
after a long period out of use.
Do not forget the spare wheel and, where
applicable, the tyres on your trailer or caravan.
Have your vehicle serviced regularly (e.g.
engine
oil, oil filter, air filter, passenger compartment
filter, etc.). Observe the schedule of operations in
the manufacturer's service schedule.
With a BlueHDi Diesel engine, if the SCR system
has a fault, your vehicle will emit pollution. Visit
a PEUGEOT dealer or a qualified workshop
as soon as possible to restore your vehicle's
nitrogen oxide emissions to legal levels.
When filling the fuel tank, do not continue after
the third cut-out of the nozzle, to avoid overflow.
You will only see the fuel consumption of your
new vehicle settle down to a consistent average
after the first 1,900 miles (3,000 kilometres).
Page 11 of 276
9
Instruments
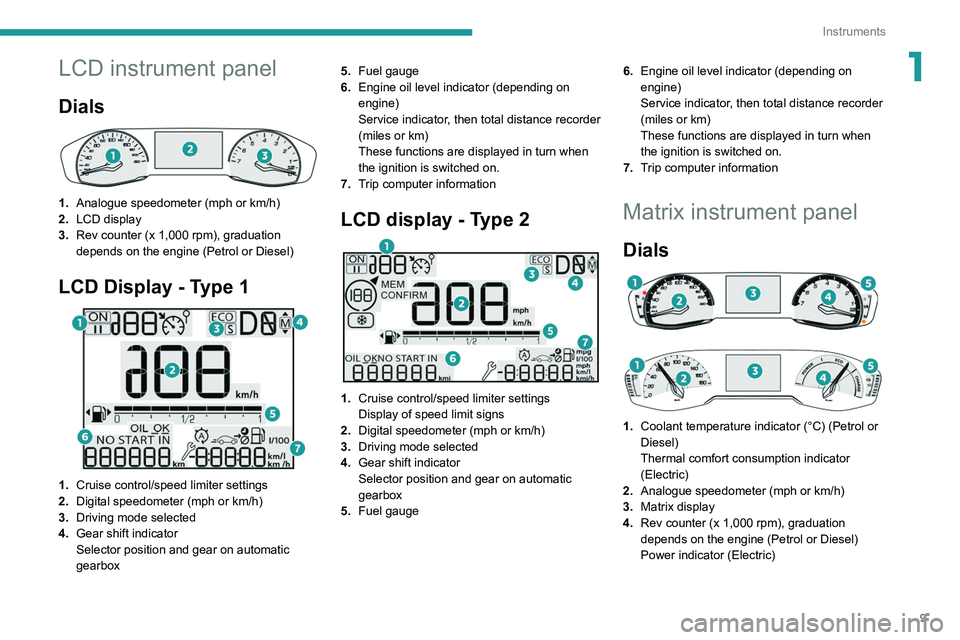
1LCD instrument panel
Dials
1.Analogue speedometer (mph or km/h)
2. LCD display
3. Rev counter (x 1,000 rpm), graduation
depends on the engine (Petrol or Diesel)
LCD Display - Type 1
1.Cruise control/speed limiter settings
2. Digital speedometer (mph or km/h)
3. Driving mode selected
4. Gear shift indicator
Selector position and gear on automatic
gearbox 5.
Fuel gauge
6. Engine oil level indicator (depending on
engine)
Service indicator, then total distance recorder
(miles or km)
These functions are displayed in turn when
the ignition is switched on.
7. Trip computer information
LCD display - Type 2
1.Cruise control/speed limiter settings
Display of speed limit signs
2. Digital speedometer (mph or km/h)
3. Driving mode selected
4. Gear shift indicator
Selector position and gear on automatic
gearbox
5. Fuel gauge 6.
Engine oil level indicator (depending on
engine)
Service indicator, then total distance recorder
(miles or km)
These functions are displayed in turn when
the ignition is switched on.
7. Trip computer information
Matrix instrument panel
Dials
1. Coolant temperature indicator (°C) (Petrol or
Diesel)
Thermal comfort consumption indicator
(Electric)
2. Analogue speedometer (mph or km/h)
3. Matrix display
4. Rev counter (x 1,000 rpm), graduation
depends on the engine (Petrol or Diesel)
Power indicator (Electric)
Page 12 of 276
10
Instruments
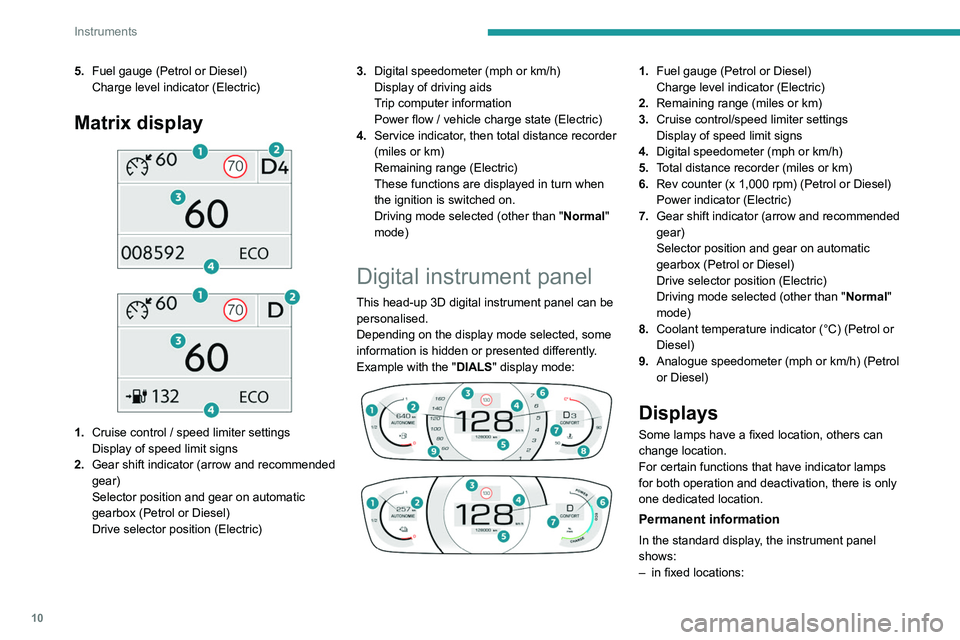
5.Fuel gauge (Petrol or Diesel)
Charge level indicator (Electric)
Matrix display
1. Cruise control / speed limiter settings
Display of speed limit signs
2. Gear shift indicator (arrow and recommended
gear)
Selector position and gear on automatic
gearbox (Petrol or Diesel)
Drive selector position (Electric) 3.
Digital speedometer (mph or km/h)
Display of driving aids
Trip computer information
Power flow / vehicle charge state (Electric)
4. Service indicator, then total distance recorder
(miles or km)
Remaining range (Electric)
These functions are displayed in turn when
the ignition is switched on.
Driving mode selected (other than " Normal"
mode)
Digital instrument panel
This head-up 3D digital instrument panel can be
personalised.
Depending on the display mode selected, some
information is hidden or presented differently.
Example with the " DIALS"
display mode:
1. Fuel gauge (Petrol or Diesel)
Charge level indicator (Electric)
2. Remaining range (miles or km)
3. Cruise control/speed limiter settings
Display of speed limit signs
4. Digital speedometer (mph or km/h)
5. Total distance recorder (miles or km)
6. Rev counter (x 1,000 rpm) (Petrol or Diesel)
Power indicator (Electric)
7. Gear shift indicator (arrow and recommended
gear)
Selector position and gear on automatic
gearbox (Petrol or Diesel)
Drive selector position (Electric)
Driving mode selected (other than " Normal"
mode)
8. Coolant temperature indicator (°C) (Petrol or
Diesel)
9. Analogue speedometer (mph or km/h) (Petrol
or Diesel)
Displays
Some lamps have a fixed location, others can
change location.
For certain functions that have indicator lamps
for both operation and deactivation, there is only
one dedicated location.
Permanent information
In the standard display, the instrument panel
shows:
–
in fixed locations:
Page 13 of 276
11
Instruments
1• Information related to the gearbox and gear
shift indicator (Petrol or Diesel).
•
Information related to the drive selector
(Electric).
•
Fuel gauge (Petrol or Diesel).
•
Range (Petrol or Diesel).
•
Coolant temperature indicator (Petrol or
Diesel).
•
Charge level and range indicator (Electric).
•
Power indicator (Electric).
•
Driving mode.
–
in variable locations:
•
Digital speedometer
.
•
T
otal distance recorder.
•
Status or alert messages displayed
temporarily
.
Optional information
Depending on the selected display mode and
active features, additional information may be
displayed:
–
Rev counter (Petrol or Diesel).
–
T
rip computer.
–
Driving aid functions.
–
Speed limiter or cruise control.
–
Media currently playing.
–
Navigation instructions.
–
Analogue speedometer
.
–
Engine information (G-meters, Power-meters,
Boost,
Torque) in Sport mode.
–
Energy flows (Electric).
Customising the instrument
panel
Depending on version, the appearance of the
instrument panel may be customisable (colour
and/or display mode).
Display language and units
These depend on the touch screen
settings.
When travelling abroad, the speed must be
shown in the official units of the country you
are driving in (mph, miles or km/h, km).
As a safety measure, these adjustments must be carried out with the vehicle
stationary.
Choice of display colour (Petrol or
Diesel)
Depending on version, the instrument panel
display colour depends on the colour scheme
chosen in this system.
The settings are changed via the Settings touch screen menu.
Choosing the display mode
In each mode, specific types of information are
displayed on the instrument panel.
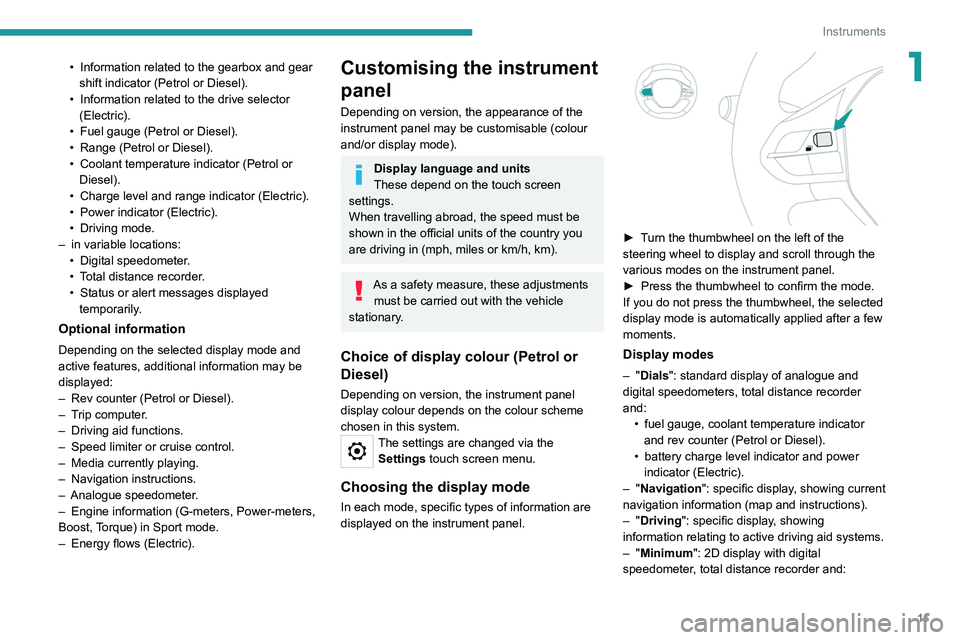
► Turn the thumbwheel on the left of the
steering wheel to display and scroll through the
various modes on the instrument panel.
►
Press the thumbwheel to confirm the mode.
If you do not press the thumbwheel, the selected
display mode is automatically applied after a few
moments.
Display modes
– "Dials": standard display of analogue and
digital speedometers, total distance recorder
and: •
fuel gauge, coolant temperature indicator
and rev counter (Petrol or Diesel).
•
battery charge level indicator and power
indicator (Electric).
–
"Navigation": specific display, showing current
navigation information (map and instructions).
–
"Driving": specific display, showing
information relating to active driving aid systems.
–
"Minimum": 2D display with digital
speedometer, total distance recorder and:
Page 14 of 276
12
Instruments
List of warning and
indicator lamps
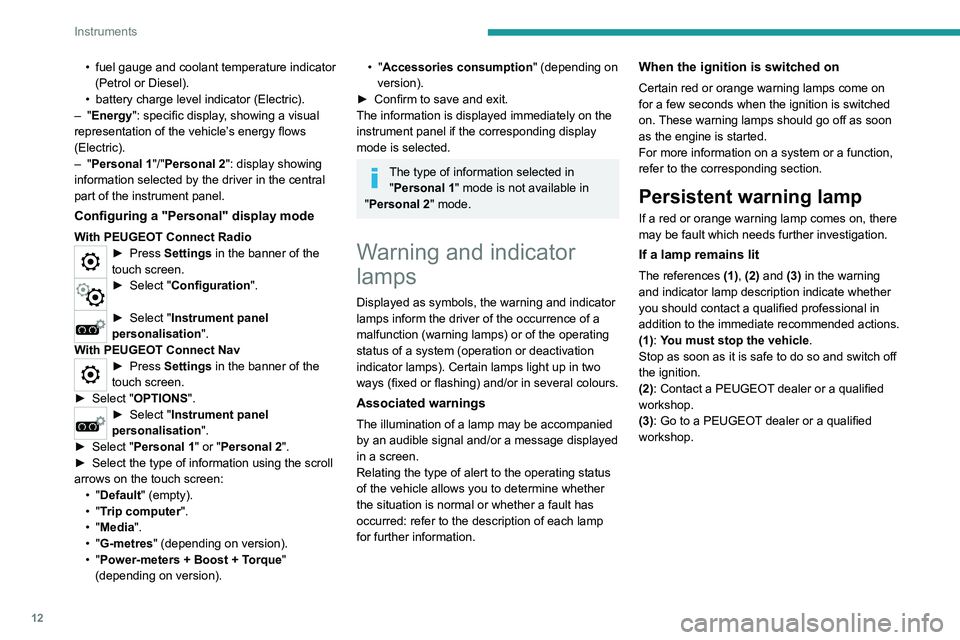
Red warning/indicator lamps
STOP
Fixed, associated with another warning
lamp, accompanied by the display of a
message and an audible signal.
A serious fault with the engine, braking system,
power steering or automatic gearbox or a major
electrical fault has been detected.
Carry out (1) and then (2).
Engine self-diagnostic system (Petrol or
Diesel)
Fixed.
A major engine fault has been
detected.
Carry out (1) and then (2).
Maximum coolant temperature (Petrol or
Diesel)
Fixed with display blocks lit in red
(with matrix instrument panel).
or
Fixed (except on matrix instrument panel).
The temperature of the cooling system is too
high.
Carry out (1), then wait until the engine has
cooled down before topping up the level, if
necessary. If the problem persists, carry out (2).
• fuel gauge and coolant temperature indicator
(Petrol or Diesel).
•
battery charge level indicator (Electric).
–
"Energy": specific display, showing a visual
representation of the vehicle’s energy flows
(Electric).
–
"Personal 1"/"Personal 2": display showing
information selected by the driver in the central
part of the instrument panel.
Configuring a "Personal" display mode
With PEUGEOT Connect Radio► Press Settings in the banner of the
touch screen.
► Select " Configuration ".
► Select "Instrument panel
personalisation".
With PEUGEOT Connect Nav
► Press Settings in the banner of the
touch screen.
►
Select "
OPTIONS".
► Select " Instrument panel
personalisation".
►
Select "
Personal 1" or "Personal 2".
►
Select the type of information using the scroll
arrows on the touch screen: •
"Default" (empty).
•
"Trip computer".
•
"Media".
•
"G-metres " (depending on version).
•
"Power-meters + Boost + Torque"
(depending on version).
• "Accessories consumption" (depending on
version).
►
Confirm to save and exit.
The information is displayed immediately on the
instrument panel if the corresponding display
mode is selected.
The type of information selected in "Personal 1" mode is not available in
"Personal 2" mode.
Warning and indicator
lamps
Displayed as symbols, the warning and indicator
lamps inform the driver of the occurrence of a
malfunction (warning lamps) or of the operating
status of a system (operation or deactivation
indicator lamps). Certain lamps light up in two
ways (fixed or flashing) and/or in several colours.
Associated warnings
The illumination of a lamp may be accompanied
by an audible signal and/or a message displayed
in a screen.
Relating the type of alert to the operating status
of the vehicle allows you to determine whether
the situation is normal or whether a fault has
occurred: refer to the description of each lamp
for further information.
When the ignition is switched on
Certain red or orange warning lamps come on
for a few seconds when the ignition is switched
on. These warning lamps should go off as soon
as the engine is started.
For more information on a system or a function,
refer to the corresponding section.
Persistent warning lamp
If a red or orange warning lamp comes on, there
may be fault which needs further investigation.
If a lamp remains lit
The references (1), (2) and (3) in the warning
and indicator lamp description indicate whether
you should contact a qualified professional in
addition to the immediate recommended actions.
(1): You must stop the vehicle .
Stop as soon as it is safe to do so and switch off
the ignition.
(2): Contact a PEUGEOT dealer or a qualified
workshop.
(3): Go to a PEUGEOT dealer or a qualified
workshop.
Page 16 of 276
14
Instruments
With an automatic gearbox or drive selector,
select mode P.
Switch off the ignition and carry out (2).
BrakingFixed.
The brake fluid level in the braking circuit
has dropped significantly.
Carry out (1), then top up with fluid that complies
with the manufacturer's recommendations. If the
problem persists, carry out (2).
Fixed.
The electronic brake force
distribution
(EBFD) system is faulty.
Carry out (1) and then (2).
Orange warning/indicator lamps
Service
Temporarily on, accompanied by the display of a message.
One or more minor faults, for which there is/are
no specific warning lamp(s), have been detected.
Identify the cause of the fault using the message
displayed on the instrument panel.
You may be able to deal with some faults
yourself, such as changing the battery in the
remote control.
For other faults, such as with the tyre under-
inflation detection system, carry out (3).
Fixed, accompanied by the display of a
message.
One or more major faults, for which there is/are
no specific warning lamp(s), have been detected. Identify the cause of the fault using the message
displayed on the instrument panel, then carry
out (3).
Fixed, accompanied by the message
"Parking brake fault".
Automatic release of the electric parking brake is
unavailable.
Carry out (2).
Service warning lamp fixed and
service spanner flashing then
fixed.
The servicing interval has been exceeded.
The vehicle must be serviced as soon as
possible.
Only with BlueHDi Diesel engines.
Engine pre-heating (Diesel)Temporarily on (up to approximately 30 seconds in
severe weather conditions).
When switching on the ignition, if the weather
conditions and the engine temperature make it
necessary.
Wait until the warning lamp goes off before
starting.
When the warning lamp goes off, starting will
occur immediately if you press and hold:
–
the clutch pedal with a manual gearbox.
–
the brake pedal with an automatic gearbox.
If the engine does not start, make the engine
starting request again, while keeping your foot
on the pedal.
Particle filter (Diesel)Fixed, accompanied by an audible signal
and a message about the risk of particle
filter blockage.
The particle filter is nearing saturation.
As soon as traffic conditions permit, regenerate
the filter by driving at a speed of at least 37
mph
(60
km/h) until the warning lamp goes off.
Fixed, accompanied by an audible signal
and a message indicating that the
additive level in the particle filter is too low.
The low level in the additive tank has been
reached.
Top up without delay: carry out (3).
Low fuel level (Petrol or Diesel)Fixed, with the blocks lit red,
accompanied by an audible signal
(with the matrix instrument panel)
or
Fixed, with the reserve level shown in red,
accompanied by an audible signal and the
display of a message (except with the matrix
instrument panel).
When it first comes on, there remains
approximately 5 litres of fuel in the tank
(reserve).
Until the fuel level is topped up, this alert will
be repeated every time the ignition is switched
on, with increasing frequency as the fuel level
decreases and approaches zero.
Refuel without delay to avoid running out of fuel.
Page 20 of 276
18
Instruments
Water in Diesel fuel filterFixed (with LCD instrument panels).
The Diesel fuel filter contains water.
Carry out (2) without delay. Risk of damaging the
fuel injection system!
Indicators
Service indicator
The servicing information is expressed in terms
of distance (miles or kilometres) and time
(months or days).
The alert is given at whichever of these two
terms is reached first.
The servicing information is displayed in the
instrument panel. Depending on the version of
the vehicle:
– The distance recorder display line indicates
the distance remaining before the next service
is due, or the distance travelled since it was due
preceded by the "-" sign.
– An alert message indicates the distance
remaining, as well as the period before the next
service is due or how long it is overdue.
The value indicated is calculated according to the distance covered and
the time elapsed since the last service.
The alert may also be triggered close to a
due date.
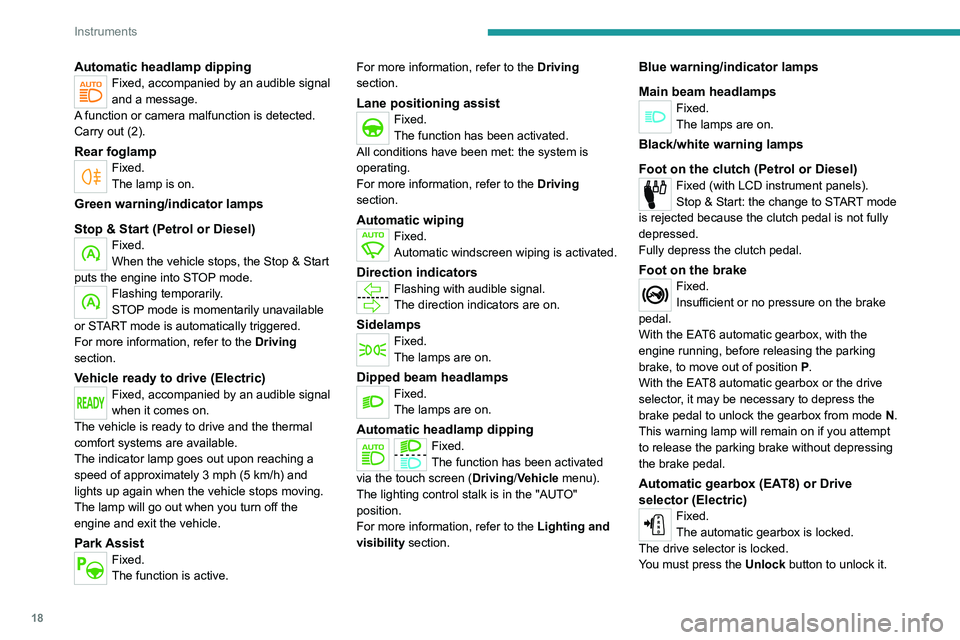
Automatic headlamp dippingFixed, accompanied by an audible signal
and a message.
A function or camera malfunction is detected.
Carry out (2).
Rear foglampFixed.
The lamp is on.
Green warning/indicator lamps
Stop & Start (Petrol or Diesel)
Fixed.
When the vehicle stops, the Stop & Start
puts the engine into STOP mode.
Flashing temporarily.
STOP mode is momentarily unavailable
or START mode is automatically triggered.
For more information, refer to the Driving
section.
Vehicle ready to drive (Electric)Fixed, accompanied by an audible signal
when it comes on.
The vehicle is ready to drive and the thermal
comfort systems are available.
The indicator lamp goes out upon reaching a
speed of approximately 3 mph (5
km/h) and
lights up again when the vehicle stops moving.
The lamp will go out when you turn off the
engine and exit the vehicle.
Park AssistFixed.
The function is active. For more information, refer to the Driving
section.
Lane positioning assistFixed.
The function has been activated.
All conditions have been met: the system is
operating.
For more information, refer to the Driving
section.
Automatic wipingFixed.
Automatic windscreen wiping is activated.
Direction indicatorsFlashing with audible signal.
The direction indicators are on.
SidelampsFixed.
The lamps are on.
Dipped beam headlampsFixed.
The lamps are on.
Automatic headlamp dippingFixed.
The function has been activated
via the touch screen (Driving/Vehicle menu).
The lighting control stalk is in the "AUTO"
position.
For more information, refer to the Lighting and
visibility section.
Blue warning/indicator lamps
Main beam headlamps
Fixed.
The lamps are on.
Black/white warning lamps
Foot on the clutch
(Petrol or Diesel)
Fixed (with LCD instrument panels).
Stop & Start: the change to START mode
is rejected because the clutch pedal is not fully
depressed.
Fully depress the clutch pedal.
Foot on the brakeFixed.
Insufficient or no pressure on the brake
pedal.
With the EAT6 automatic gearbox, with the
engine running, before releasing the parking
brake, to move out of position P.
With the EAT8 automatic gearbox or the drive
selector, it may be necessary to depress the
brake pedal to unlock the gearbox from mode N.
This warning lamp will remain on if you attempt
to release the parking brake without depressing
the brake pedal.
Automatic gearbox (EAT8) or Drive
selector (Electric)
Fixed.
The automatic gearbox is locked.
The drive selector is locked.
You must press the Unlock button to unlock it.
Page 21 of 276
19
Instruments
1Water in Diesel fuel filterFixed (with LCD instrument panels).
The Diesel fuel filter contains water.
Carry out (2) without delay. Risk of damaging the
fuel injection system!
Indicators
Service indicator
The servicing information is expressed in terms
of distance (miles or kilometres) and time
(months or days).
The alert is given at whichever of these two
terms is reached first.
The servicing information is displayed in the
instrument panel. Depending on the version of
the vehicle:
–
The distance recorder display line indicates
the distance remaining before the next service
is due, or the distance travelled since it was due
preceded by the "-" sign.
–
An alert message indicates the distance
remaining, as well as the period before the next
service is due or how long it is overdue.
The value indicated is calculated according to the distance covered and
the time elapsed since the last service.
The alert may also be triggered close to a
due date.
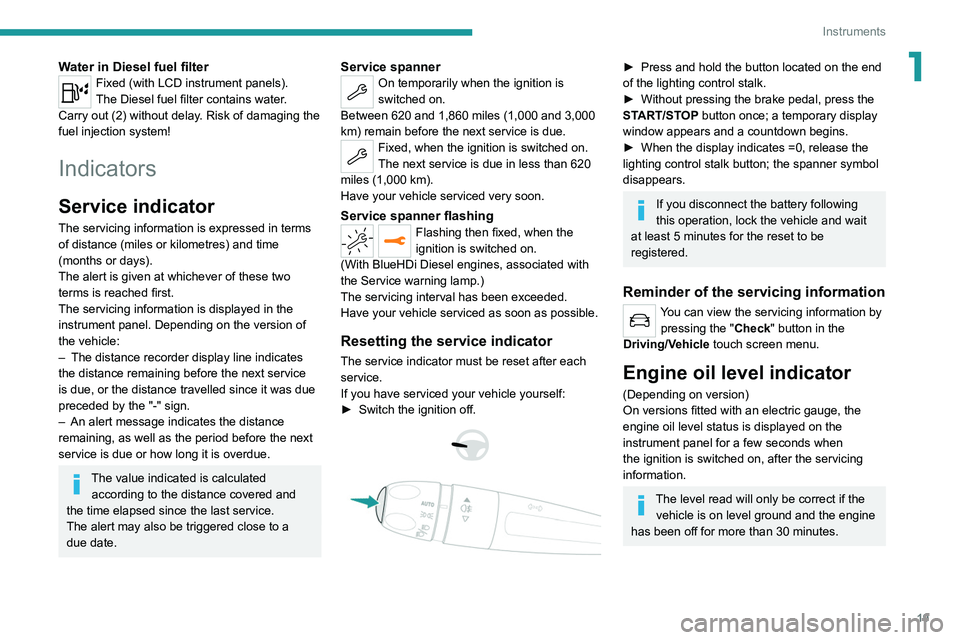
Service spannerOn temporarily when the ignition is
switched on.
Between 620 and 1,860 miles (1,000 and 3,000
km) remain before the next service is due.
Fixed, when the ignition is switched on.
The next service is due in less than 620
miles (1,000 km).
Have your vehicle serviced very soon.
Service spanner flashingFlashing then fixed, when the
ignition is switched on.
(With
BlueHDi Diesel engines, associated with
the Service warning lamp.)
The servicing interval has been exceeded.
Have your vehicle serviced as soon as possible.
Resetting the service indicator
The service indicator must be reset after each
service.
If you have serviced your vehicle yourself:
►
Switch the ignition off.
► Press and hold the button located on the end
of the lighting control stalk.
►
Without pressing the brake pedal, press the
ST
ART/STOP button once; a temporary display
window appears and a countdown begins.
►
When the display indicates =0, release the
lighting control stalk button; the spanner symbol
disappears.
If you disconnect the battery following
this operation, lock the vehicle and wait
at least 5 minutes for the reset to be
registered.
Reminder of the servicing information
You can view the servicing information by pressing the " Check" button
in the
Driving/Vehicle touch screen menu.
Engine oil level indicator
(Depending on version)
On versions fitted with an electric gauge, the
engine oil level status is displayed on the
instrument panel for a few seconds when
the ignition is switched on, after the servicing
information.
The level read will only be correct if the vehicle is on level ground and the engine
has been off for more than 30 minutes.