Open boot PEUGEOT 3008 2018 User Guide
[x] Cancel search | Manufacturer: PEUGEOT, Model Year: 2018, Model line: 3008, Model: PEUGEOT 3008 2018Pages: 360, PDF Size: 12.38 MB
Page 65 of 360
63
To avoid the risk of injury through pinching
or trapping, before and during operation of
the motorised tailgate:
-
e
nsure that there is no person close to
the rear of the vehicle,
-
w
atch the activity of your passengers,
particularly any children.
Bicycle carrier / Towbar
The motorised tailgate is not designed to
support a bicycle carrier.
When installing a bicycle carrier on a towbar
with connection of a cable to the towbar socket,
the motorised operation of the tailgate will be
automatically deactivated.
If using a towbar or bicycle carrier not
recommended by PEUGEOT, it is essential
to deactivate the motorised operation of the
tailgate.
Motorised operation
Activation / deactivation of the
motorised operation of the tailgate is
done in the Vehicle / Driving
menu
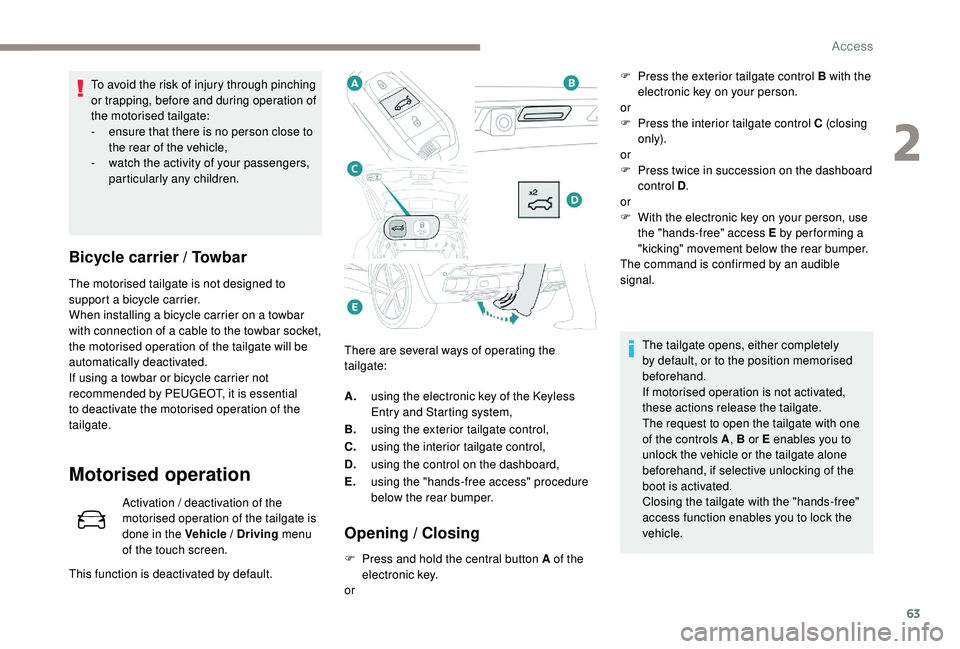
of the touch screen. There are several ways of operating the
tailgate:
Opening / Closing
F Press and hold the central button A of the
electronic key.
or
This function is deactivated by default. A.
using the electronic key of the
K
eyless
Entry and Starting system,
B. using the exterior tailgate control,
C. using the interior tailgate control,
D. using the control on the dashboard,
E. using the "hands-free access" procedure
below the rear bumper. F
P
ress the exterior tailgate control B with the
electronic key on your person.
or
F
P
ress the interior tailgate control C (closing
only).
or
F
P
ress twice in succession on the dashboard
control D .
or
F
W
ith the electronic key on your person, use
the "hands-free" access E by per forming a
"kicking" movement below the rear bumper.
The command is confirmed by an audible
signal.
The tailgate opens, either completely
by default, or to the position memorised
beforehand.
If motorised operation is not activated,
these actions release the tailgate.
The request to open the tailgate with one
of the controls A , B or E enables you to
unlock the vehicle or the tailgate alone
beforehand, if selective unlocking of the
boot is activated.
Closing the tailgate with the "hands-free"
access function enables you to lock the
vehicle.
2
Access
Page 107 of 360

105
The connection of an electrical device
not approved by PEUGEOT, such as a
USB charger, may adversely affect the
operation of vehicle electrical systems,
causing faults such as poor radio
reception or inter ference with displays
in the screens.
Rear armrest
Comfort and storage arrangement for rear
passengers.
Ski flap
Mechanism for storing and transporting long
objects.
Opening
F Lower the rear armrest for a more comfortable position.
The armrest incorporates two cup holders. F
L
ower the rear armrest.
F
P
ull the flap handle downwards.
F
L
ower the flap.
F
L
oad the objects from inside the boot.
Boot fittings
1.
Load space cover
2. 12
V accessor y socket (120 W)
3. Boot lighting
4. Rear seat folding controls
5. Hooks
6. Stowing rings
7. Adjustable boot floor (2
positions)
8. Storage well / Tool box under the floor
3
Ease of use and comfort
Page 108 of 360
106
The stowing rings are designed to
secure luggage using different types of
retaining nets.
Such nets are available as an option or
as an accessory.
For more information, contact a
PEUGEOT dealer.
For the installation of a high load
retaining net, refer to the corresponding
section.
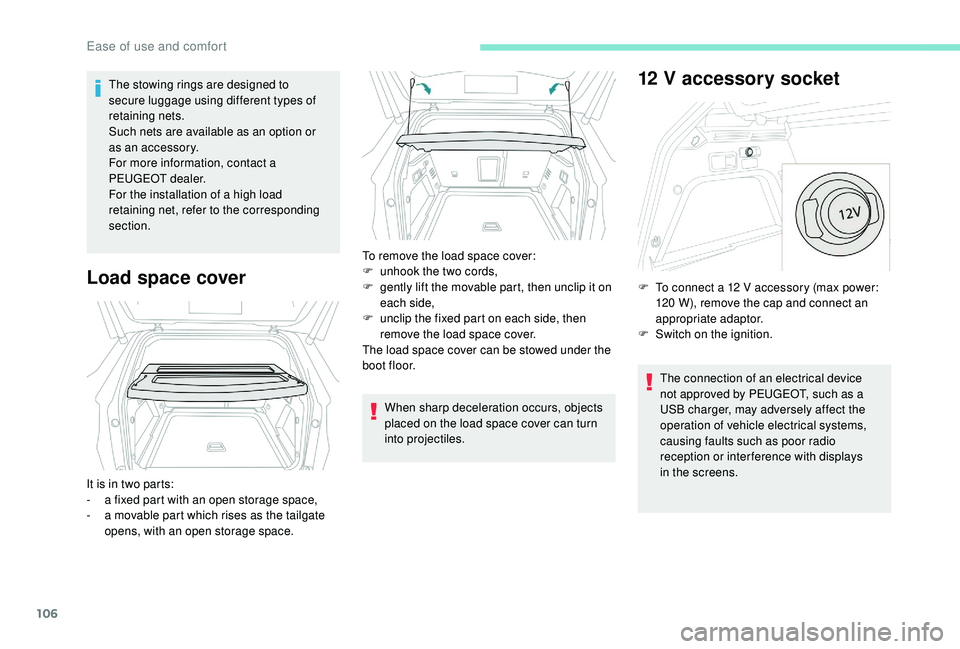
Load space cover
When sharp deceleration occurs, objects
placed on the load space cover can turn
into projectiles.
12 V accessory socket
The connection of an electrical device
not approved by PEUGEOT, such as a
USB charger, may adversely affect the
operation of vehicle electrical systems,
causing faults such as poor radio
reception or inter ference with displays
in the screens.
It is in two parts:
-
a f
ixed part with an open storage space,
-
a m
ovable part which rises as the tailgate
opens, with an open storage space. To remove the load space cover:
F
u
nhook the two cords,
F
g
ently lift the movable part, then unclip it on
each side,
F
u
nclip the fixed part on each side, then
remove the load space cover.
The load space cover can be stowed under the
boot floor. F
T
o connect a 12 V accessory (max power:
120 W), remove the cap and connect an
appropriate adaptor.
F
S
witch on the ignition.
Ease of use and comfort
Page 110 of 360
108
On certain versions, the adjustable boot
floor cannot be fitted in the low position.
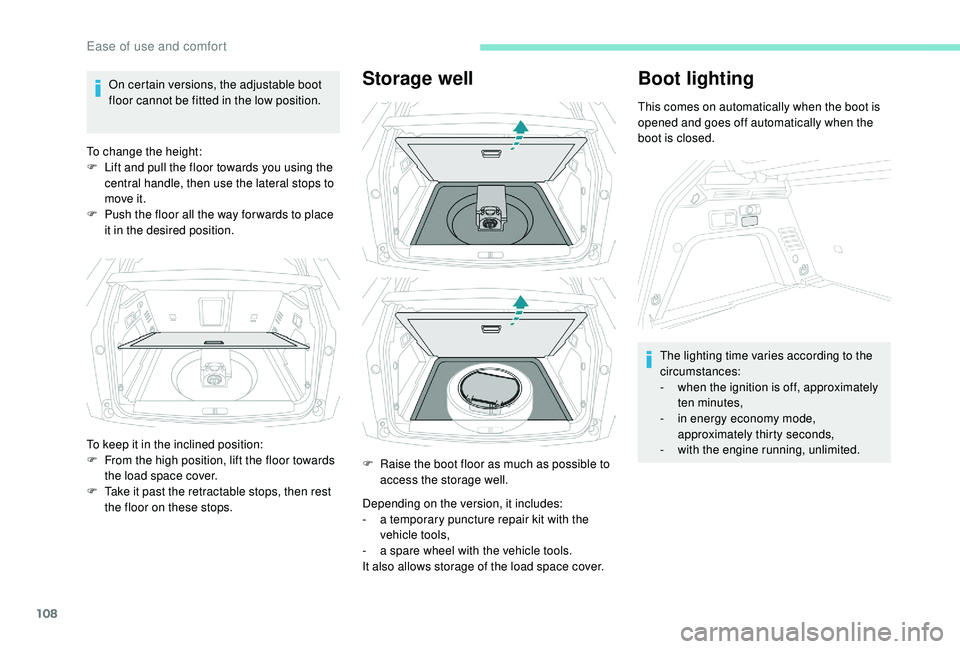
To change the height:
F
L
ift and pull the floor towards you using the
central handle, then use the lateral stops to
move it.
F
P
ush the floor all the way for wards to place
it in the desired position.Storage well
Depending on the version, it includes:
- a t emporary puncture repair kit with the
vehicle tools,
-
a s
pare wheel with the vehicle tools.
It also allows storage of the load space cover.
Boot lighting
This comes on automatically when the boot is
opened and goes off automatically when the
boot is closed.
The lighting time varies according to the
circumstances:
-
w
hen the ignition is off, approximately
ten minutes,
-
i
n energy economy mode,
approximately thirty seconds,
-
w
ith the engine running, unlimited.
To keep it in the inclined position:
F
F
rom the high position, lift the floor towards
the load space cover.
F
T
ake it past the retractable stops, then rest
the floor on these stops. F
R
aise the boot floor as much as possible to
access the storage well.
Ease of use and comfort
Page 240 of 360

238
With 1.5 BlueHDi and 2.0
BlueHDi 180 S&S engines
F Fill the fuel tank with at least 5 litres of
Diesel.
F
S
witch on the ignition (without starting the
engine).
F
W
ait around 1 minute and switch off the
ignition.
F
O
perate the starter to run the engine.
If the engine does not start, repeat the
procedure.
With 2.0 HDi engines
F Put it back in place, clip in the cover and ensure it is clipped in.
F
C
lose the bonnet.
Tool kit
This is a set of tools provided with the vehicle.
Its content depends on your vehicle's
equipment:
-
t
emporary puncture repair kit,
-
spar
e wheel.
Access to the tools
F raise the floor past the two retractable stops,
F
l
ay the floor on these two stops to hold it up.
For versions with a temporary
puncture repair kit:
F unclip the two fixings to open its cover.
For versions with a spare wheel:
F Fill the fuel tank with at least five litres of Diesel.
F
O
pen the bonnet.
F
I
f necessary, unclip the cover to access the
priming pump.
F
L
oosen the degassing screw.
F
U
se the priming pump until fuel appears in
the transparent tube.
F
R
etighten the degassing screw.
F
O
perate the starter until the engine starts (if
the engine does not start at the first attempt,
wait around 15
seconds before trying
again).
F
I
f the engine does not start after a few
attempts, operate the priming pump again
then start the engine. The main tools are stowed in the boot under
t h e f l o o r.
For access to them:
F
o
pen the boot,
F
p
lace the adjustable boot floor in the high
position,
In the event of a breakdown
Page 353 of 360
269
Massage function ...........................................76
M assage, multi-point ...................................... 76
Mat
......................................................... 101-102
Memorising a speed
..................................... 17
2
Menu
............................................................... 12
Menu, main
....................................................... 4
M
enus (audio)
........................................ 3-5, 4-5
Messages
........................................................ 28
Messages, quick
............................................. 28
M
irror, rear view ......................................... 7 7-78
Mirrors, door ......................... 76 -77, 91, 200-201
Mirror, vanity
................................................... 97
Misfuel prevention
.................................. 216 -217
Motorised tailgate
..................................... 6
2- 64
Mountings, ISOFIX
....................................... 143
MP3 CD
............................................................. 9
N
Net, high load retaining .................................107
Number plate lamps ...................................... 252
O
Obstacle detection ........................................ 202
Oil change ............................................. 2
29-230
Oil consumption
.................................... 229-230
Oil, engine
....................................... 12, 229-230
On-board tools
.............................. 108, 238-240
Opening the bonnet
..............................226-227
Opening the boot
...................................... 51, 61
Opening the doors
.................................... 51, 60
Opening the fuel filler flap
.............................216
Opening the windows
..................................... 48
L
Labels, identification ..................................... 269
Lamp, boot .................................................... 108
Lamps, parking
............................................. 111
Lamps, rear
................................................... 250
Lane Departure Warning System (LDWS)
.................................... 17, 19 4
Lane Departure Warning System (LDWS), Active
................17, 195 , 202
LEDs
– Light-emitting diodes
.......111,
248, 250
Level, brake fluid
........................................... 230
Level, Diesel additive
.............................231-232
Level, engine coolant
..............................32, 230
Level, engine oil
.............................. 31, 229-230
Levels and checks
..............................
..228 -231
Level, screenwash fluid
........................11
8, 231
Light-emitting diodes
– LEDs
.......111,
248, 250
Lighting
............................................................ 26
Lighting, cornering
................................. 11 6 -117
Lighting dimmer
.............................................. 36
Lighting, exterior
........................................... 109
Lighting, guide-me home
.................50, 113 -114
Lighting, interior
...............................
......102-103
Lighting, mood
........................................ 36, 103
Lighting, welcome
......................................... 113
Loading
......................................... 107, 225-226
Load reduction mode
.................................... 223
Locating your vehicle
...................................... 50
Locking
...............................
................49, 52 , 54
Locking from the inside
...................................57
Locking the doors
........................................... 62
L
ong objects, transporting
............................105
Low fuel level
................................................ 2
16
M
Map reading lamps ................................10 2-103
Markings, identification .................................269
I
i- Cockpit amplify
function ...............76, 80 - 81 , 10 0 -101 , 166 -167
Ignition
................
............................. 15 4, 15 6 , 28
Ignition on ...................................................... 15 6
Immobiliser, electronic
............................54, 152
Indicator, AdBlue
® range ................................. 32
Indicator, coolant temperature ........................ 32
Indicator, engine oil level
.......................... 31, 35
Indicator lamps, operation
........................ 11,
15
Indicators, direction
.............................. 111, 249
Inflating tyres
................................................ 233
Inflating tyres (using the kit)
.................. 24
0, 242
Instrument panel
................................ 8-9, 35 -37
Intelligent Traction Control
............................ 125
Internet browser
.............................................. 16
I
SOFIX
.......................................................... 14 4
ISOFIX mountings ......................................... 143
J
Jack .....................................239 -240 , 243, 23, 9
Jump starting ................................................ 258
K
Key ........................................................... 48, 54
Key, electronic ............................................ 51- 5 2
Keyless Entry and Starting ....51 - 5 2, 54 , 15 4 -15 5Key not recognised ................................ 15 6 -157
Key with remote control ................................15
2
Kit, hands-free
.................... 2
5 -26, 13 -14 , 1 0 -11
Kit, temporary puncture repair
...... 2
38-240, 242
.
Alphabetical index