Seat head rest PEUGEOT 3008 2018 Owners Manual
[x] Cancel search | Manufacturer: PEUGEOT, Model Year: 2018, Model line: 3008, Model: PEUGEOT 3008 2018Pages: 360, PDF Size: 12.38 MB
Page 72 of 360
70
Driving position
Adopting a good driving position helps improve
your comfort and protection.
It also optimises interior and exterior visibility
as well as access to controls.
Sitting comfortably
Whether or not your vehicle has certain seat
adjustments described in this section depends
on the trim level and country of sale.
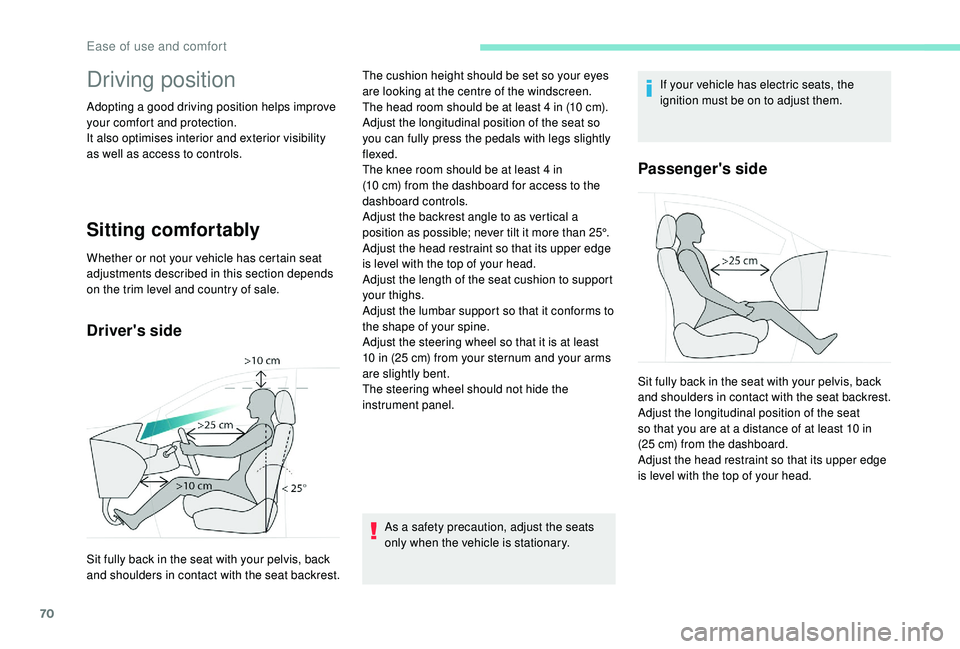
Driver's side
As a safety precaution, adjust the seats
only when the vehicle is stationary.If your vehicle has electric seats, the
ignition must be on to adjust them.
Passenger's side
Sit fully back in the seat with your pelvis, back
and shoulders in contact with the seat backrest.The cushion height should be set so your eyes
are looking at the centre of the windscreen.
The head room should be at least 4
in (10 cm).
Adjust the longitudinal position of the seat so
you can fully press the pedals with legs slightly
flexed.
The knee room should be at least 4 in
(10 cm) from the dashboard for access to the
dashboard controls.
Adjust the backrest angle to as vertical a
position as possible; never tilt it more than 25°.
Adjust the head restraint so that its upper edge
is level with the top of your head.
Adjust the length of the seat cushion to support
your thighs.
Adjust the lumbar support so that it conforms to
the shape of your spine.
Adjust the steering wheel so that it is at least
10 in (25 cm) from your sternum and your arms
are slightly bent.
The steering wheel should not hide the
instrument panel. Sit fully back in the seat with your pelvis, back
and shoulders in contact with the seat backrest.
Adjust the longitudinal position of the seat
so that you are at a distance of at least 10 in
(25 cm) from the dashboard.
Adjust the head restraint so that its upper edge
is level with the top of your head.
Ease of use and comfort
Page 74 of 360
72
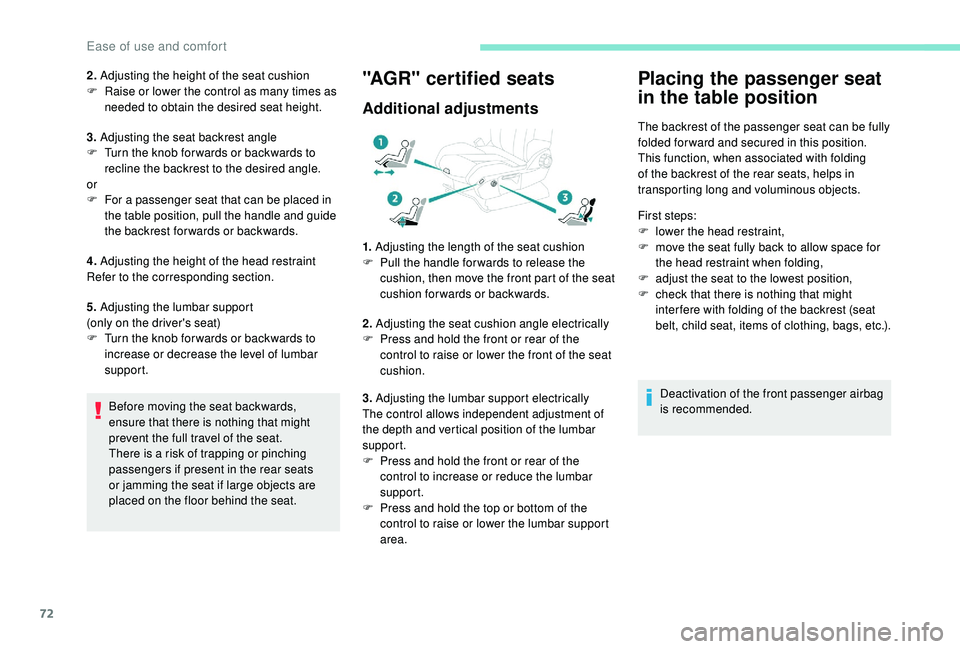
2. Adjusting the height of the seat cushion
F R aise or lower the control as many times as
needed to obtain the desired seat height.
3. Adjusting the seat backrest angle
F
T
urn the knob for wards or backwards to
recline the backrest to the desired angle.
or
F
F
or a passenger seat that can be placed in
the table position, pull the handle and guide
the backrest for wards or backwards.
4. Adjusting the height of the head restraint
Refer to the corresponding section.
5. Adjusting the lumbar support
(only on the driver's seat)
F
T
urn the knob for wards or backwards to
increase or decrease the level of lumbar
support.
Before moving the seat backwards,
ensure that there is nothing that might
prevent the full travel of the seat.
There is a risk of trapping or pinching
passengers if present in the rear seats
or jamming the seat if large objects are
placed on the floor behind the seat."AGR" certified seats
Additional adjustments
1. Adjusting the length of the seat cushion
F P ull the handle for wards to release the
cushion, then move the front part of the seat
cushion forwards or backwards.
2. Adjusting the seat cushion angle electrically
F
P
ress and hold the front or rear of the
control to raise or lower the front of the seat
cushion.
3. Adjusting the lumbar support electrically
The control allows independent adjustment of
the depth and vertical position of the lumbar
support.
F
P
ress and hold the front or rear of the
control to increase or reduce the lumbar
support.
F
P
ress and hold the top or bottom of the
control to raise or lower the lumbar support
area.
Placing the passenger seat
in the table position
The backrest of the passenger seat can be fully
folded for ward and secured in this position.
This function, when associated with folding
of the backrest of the rear seats, helps in
transporting long and voluminous objects.
First steps:
F
l
ower the head restraint,
F
m
ove the seat fully back to allow space for
the head restraint when folding,
F
a
djust the seat to the lowest position,
F
c
heck that there is nothing that might
inter fere with folding of the backrest (seat
belt, child seat, items of clothing, bags, etc.).
Deactivation of the front passenger airbag
is recommended.
Ease of use and comfort
Page 75 of 360
73
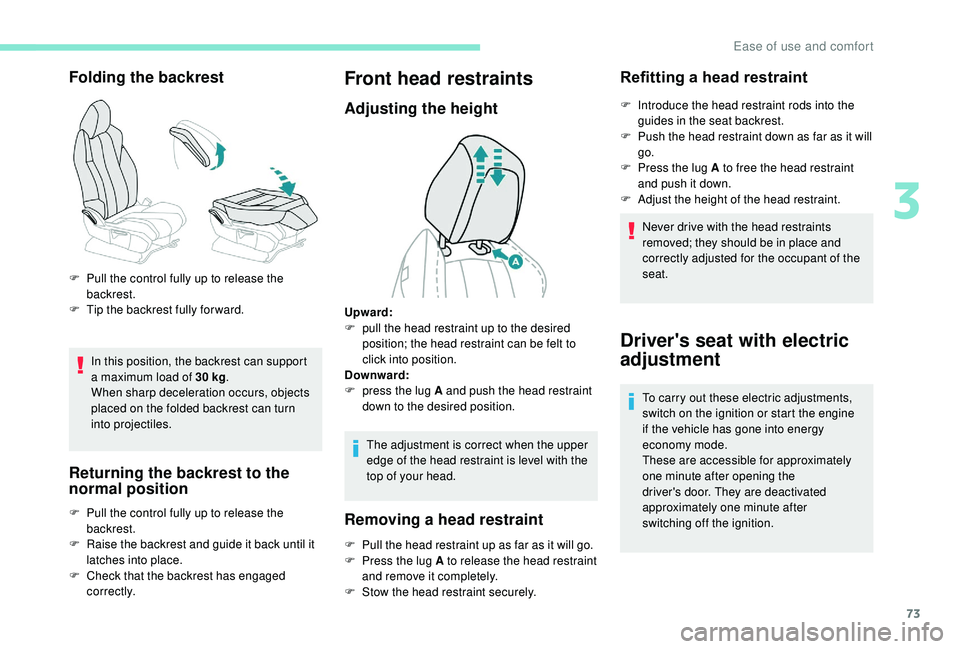
Folding the backrest
In this position, the backrest can support
a maximum load of 30 kg.
When sharp deceleration occurs, objects
placed on the folded backrest can turn
into projectiles.
Returning the backrest to the
normal position
F Pull the control fully up to release the backrest.
F
T
ip the backrest fully for ward.
F
P
ull the control fully up to release the
backrest.
F
R
aise the backrest and guide it back until it
latches into place.
F
C
heck that the backrest has engaged
c o r r e c t l y.
Front head restraints
Adjusting the height
The adjustment is correct when the upper
edge of the head restraint is level with the
top of your head.
Removing a head restraint
F Pull the head restraint up as far as it will go.
F P ress the lug A to release the head restraint
and remove it completely.
F
S
tow the head restraint securely.
Refitting a head restraint
F Introduce the head restraint rods into the guides in the seat backrest.
F
P
ush the head restraint down as far as it will
go.
F
P
ress the lug A to free the head restraint
and push it down.
F
A
djust the height of the head restraint.
Never drive with the head restraints
removed; they should be in place and
correctly adjusted for the occupant of the
seat.
Upward:
F
p
ull the head restraint up to the desired
position; the head restraint can be felt to
click into position.
Downward:
F
p
ress the lug A and push the head restraint
down to the desired position.
Driver's seat with electric
adjustment
To carry out these electric adjustments,
switch on the ignition or start the engine
if the vehicle has gone into energy
economy mode.
These are accessible for approximately
one minute after opening the
driver's door. They are deactivated
approximately one minute after
switching off the ignition.
3
Ease of use and comfort
Page 76 of 360

74
1. Adjusting the angle and height of the seat
cushion / Adjusting the seat forwards and
backwards
F
R
aise or lower the front of the control to
obtain the desired seat cushion angle.
F
R
aise or lower the rear of the control to
raise or lower the seat cushion.
F
S
lide the control for wards or backwards to
move the seat for wards or backwards.
2. Adjusting the seat backrest angle
F
T
urn the control for wards or backwards to
recline the backrest to the desired angle.
3. Adjusting the height of the head restraint
Refer to the corresponding section. 4.
Adjusting the length of the seat cushion
F
P
ull the handle for wards to release the
cushion, then move the front part of the seat
cushion forwards or backwards.
5. Adjusting the lumbar support
The control allows independent adjustment of
the depth and vertical position of the lumbar
support.
F
P
ress and hold the front or rear of the
control to increase or reduce the lumbar
support.
F
P
ress and hold the top or bottom of the
control to raise or lower the lumbar support
area.
Before moving the seat backwards,
ensure that there is nothing that might
prevent the full travel of the seat.
There is a risk of trapping or pinching
passengers if present in the rear seats
or jamming the seat if large objects are
placed on the floor behind the seat.
Storing driving positions
Associated with adjustments of the electrical
driver's seat, this function allows two driving
positions to be memorised, to make these
adjustments easier if there are frequent driver
changes.
Storing a position
Using buttons M / 1 / 2
F S it in the driver's seat.
F
S
witch on the ignition.
F
A
djust your seat and the door mirrors.
F
P
ress button M , then press button 1 or 2
within four seconds.
An audible signal indicates that the position has
been stored.
Storing a new position cancels the
previous position.
It takes account of the electric adjustments of
the seat and the door mirrors.
Ease of use and comfort
Page 80 of 360
78
Manual model
Adjustment
F A djust the mirror so that the glass is
directed correctly in the "day" position.
Day / night position
F
P
ull the lever to change to the "night" anti-
dazzle position.
F
P
ush the lever to change to the normal
"day" position.
Automatic "electrochrome"
model
In order to ensure optimum visibility
during your manoeuvres, the mirror
lightens automatically when reverse gear
is engaged.
This system automatically and progressively
changes between day and night use by means
of a sensor measuring the light coming from the
rear of the vehicle.
Rear seats
Bench seat with a fixed cushion and split
folding backrests (2/3 -1/3) to adapt the boot
load space.
Rear head restraints
The rear head restraints can be removed.
To remove a head restraint:
F
p
ull the head restraint as far up as it will go,
F
p
ress the lug A to release the head restraint
and remove it completely,
F
s
tow the head restraint.
To refit a head restraint:
F
i
nsert the head restraint rods into the guides
in the corresponding seat backrest,
F
p
ush the head restraint down as far as it will
go,
F
p
ress the lug A to release the head restraint
and push it down.
Never drive with passengers seated at
the rear when the head restraints are
removed; they must be in place and in the
high position.
The head restraint for the centre seat
and those for outer seats are not
interchangeable.
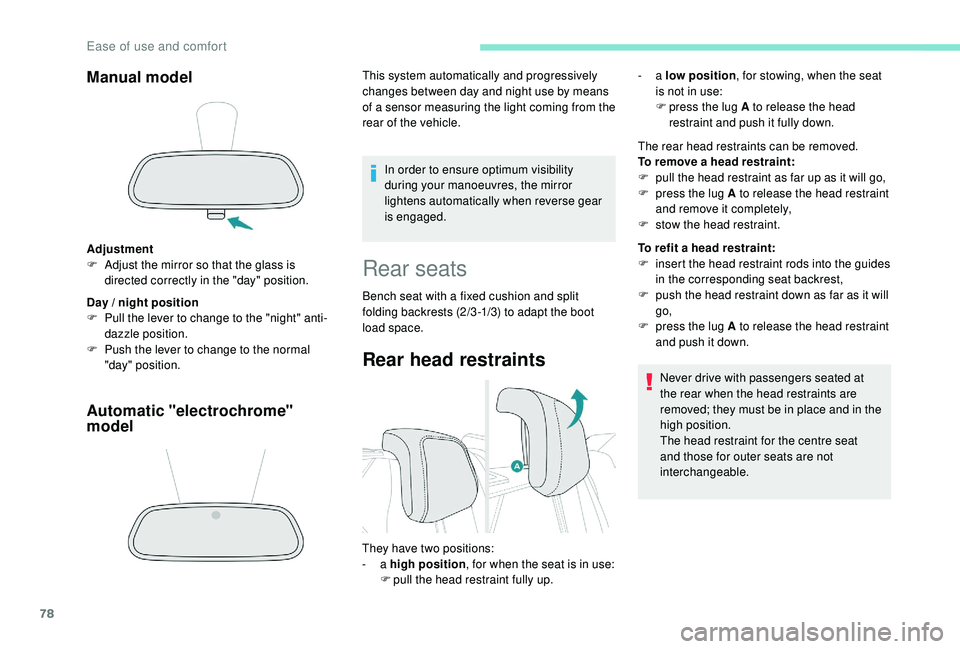
They have two positions:
-
a high position , for when the seat is in use:
F
p
ull the head restraint fully up. -
a
low position , for stowing, when the seat
is not in use:
F
p
ress the lug A to release the head
restraint and push it fully down.
Ease of use and comfort
Page 81 of 360
79
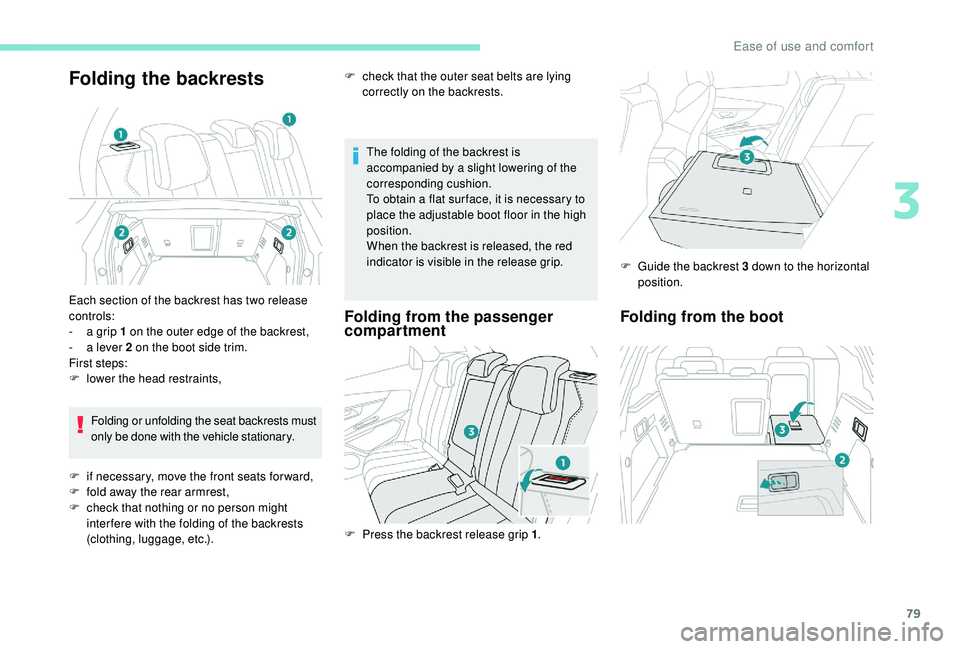
Folding the backrests
The folding of the backrest is
accompanied by a slight lowering of the
corresponding cushion.
To obtain a flat sur face, it is necessary to
place the adjustable boot floor in the high
position.
When the backrest is released, the red
indicator is visible in the release grip.
Folding from the passenger
compartmentFolding from the boot
Each section of the backrest has two release
controls:
-
a g
rip 1 on the outer edge of the backrest,
-
a l
ever 2 on the boot side trim.
First steps:
F
l
ower the head restraints,Folding or unfolding the seat backrests must
only be done with the vehicle stationary.
F
i
f necessary, move the front seats for ward,
F
f
old away the rear armrest,
F
c
heck that nothing or no person might
inter fere with the folding of the backrests
(clothing, luggage, etc.). F
P
ress the backrest release grip 1.F
G
uide the backrest 3 down to the horizontal
position.
F
c
heck that the outer seat belts are lying
correctly on the backrests.
3
Ease of use and comfort
Page 136 of 360
134
Deactivating the front passenger
airbag
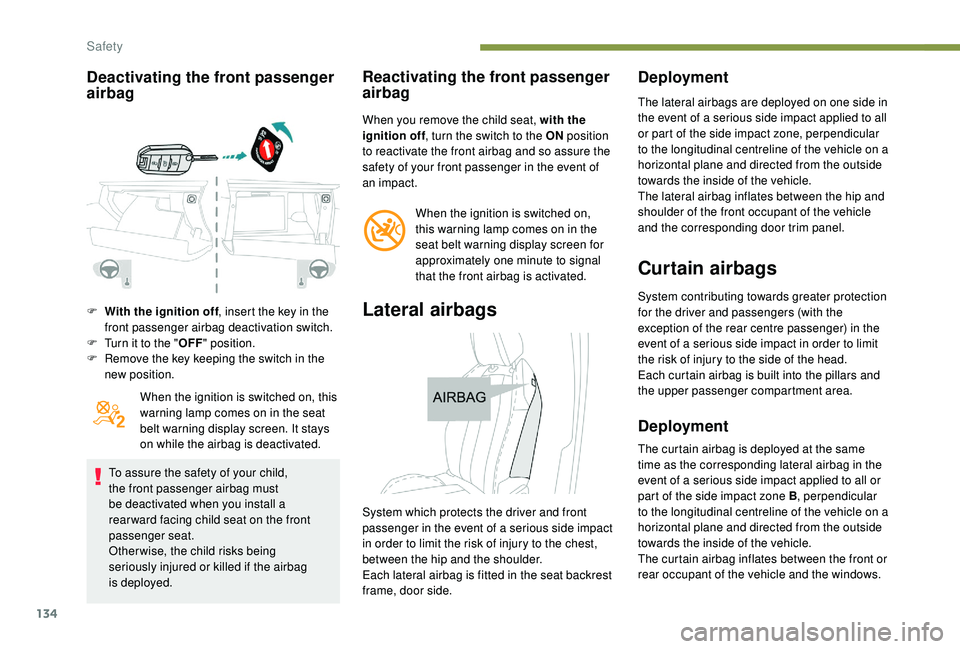
F With the ignition off, insert the key in the
front passenger airbag deactivation switch.
F
T
urn it to the " OFF" position.
F
R
emove the key keeping the switch in the
new position.
When the ignition is switched on, this
warning lamp comes on in the seat
belt warning display screen. It stays
on while the airbag is deactivated.
To assure the safety of your child,
the front passenger airbag must
be deactivated when you install a
rear ward facing child seat on the front
passenger seat.
Otherwise, the child risks being
seriously injured or killed if the airbag
is deployed.
Reactivating the front passenger
airbag
When you remove the child seat, with the
ignition off , turn the switch to the ON position
to reactivate the front airbag and so assure the
safety of your front passenger in the event of
an impact.
When the ignition is switched on,
this warning lamp comes on in the
seat belt warning display screen for
approximately one minute to signal
that the front airbag is activated.
Lateral airbags
Deployment
The lateral airbags are deployed on one side in
the event of a serious side impact applied to all
or part of the side impact zone, perpendicular
to the longitudinal centreline of the vehicle on a
horizontal plane and directed from the outside
towards the inside of the vehicle.
The lateral airbag inflates between the hip and
shoulder of the front occupant of the vehicle
and the corresponding door trim panel.
Curtain airbags
System contributing towards greater protection
for the driver and passengers (with the
exception of the rear centre passenger) in the
event of a serious side impact in order to limit
the risk of injury to the side of the head.
Each curtain airbag is built into the pillars and
the upper passenger compartment area.
Deployment
The curtain airbag is deployed at the same
time as the corresponding lateral airbag in the
event of a serious side impact applied to all or
part of the side impact zone B , perpendicular
to the longitudinal centreline of the vehicle on a
horizontal plane and directed from the outside
towards the inside of the vehicle.
The curtain airbag inflates between the front or
rear occupant of the vehicle and the windows.
System which protects the driver and front
passenger in the event of a serious side impact
in order to limit the risk of injury to the chest,
between the hip and the shoulder.
Each lateral airbag is fitted in the seat backrest
frame, door side.
Safety
Page 138 of 360
136
Advice
For the airbags to be fully effective,
observe the safety recommendations
below.
Adopt a normal and upright sitting position.
Wear a correctly adjusted seat belt.
Do not leave anything between the occupants
and the airbags (a child, pet, object, etc.), nor
fix or attach anything close to or in the way of
the airbag release trajectory; this could cause
injuries during their deployment.
Never modify the original definition of your
vehicle, particularly in the area directly
around the airbags.
After an accident or if the vehicle has been
stolen, have the airbag systems checked.
All work on the airbag systems must be
per fomed by a PEUGEOT dealer or a
qualified workshop.
Even if all of the precautions mentioned
are obser ved, a risk of injury or of minor
burns to the head, chest or arms when an
airbag is deployed cannot be ruled out. The
bag inflates almost instantly (within a few
milliseconds) then deflates within the same
time discharging the hot gas via openings
provided for this purpose.Front airbags
Do not drive holding the steering wheel by its
spokes or resting your hands on the centre
part of the wheel.
Passengers must not place their feet on the
dashboard.
Do not smoke as deployment of the airbags
can cause burns or the risk of injury from a
cigarette or pipe.
Never remove or pierce the steering wheel or
hit it violently.
Do not fit or attach anything to the steering
wheel or dashboard, this could cause injuries
in case of airbag deployment.
Do not attach anything to or hang anything
from the seat backrests (clothes, etc.) as
this could cause injuries to the thorax or arm
when the lateral airbag is deployed.
Do not sit with the upper part of the body any
nearer to the door than necessary.
The vehicle's front door panels include side
impact sensors.
A damaged door or any unauthorised or
incorrectly executed work (modification or
repair) on the front doors or their interior trim
could compromise the operation of these
sensors
– risk of malfunction of the lateral
airbags!
Such work must only be done by a PEUGEOT
dealer or a qualified workshop.
Curtain airbags
Do not attach anything or hang anything to
the roof, as this could cause head injuries
when the curtain airbag is deployed.
If fitted to your vehicle, do not remove the
grab handles installed on the roof, they play a
part in securing the curtain airbags. Lateral airbags
Use only approved covers on the seats,
compatible with the deployment of the lateral
airbags. For information on the range of seat
covers suitable for your vehicle, you can
contact a PEUGEOT
dealer.
Safety
Page 139 of 360
137
General points relating to
child seats
The regulations on carrying children are
specific to each country. Refer to the
legislation in force in your country.
For maximum safety, please obser ve the
following recommendations:
-
I
n accordance with European regulations,
all children under the age of 12 or less
than one and a half metres tall must
travel in approved child seats suited to
their weight , on seats fitted with a seat belt
or ISOFIX mountings.
-
S
tatistically, the safest seats in your
vehicle for carr ying children are the rear
seats.
-
A c
hild weighing less than 9 kg must
travel in the rear ward facing position
both in the front and in the rear.
It is recommended that children travel on
the rear seats of your vehicle:
-
"rearward facing " up to the age of 3,
-
"forward facing " over the age of 3. Ensure that the seat belt is positioned and
tightened correctly.
For child seats with a support leg, ensure
that the latter is in firm and steady contact
with the floor.
In the front: if necessary, adjust the
passenger seat.
At the rear: if necessary, adjust the
relevant front seat.
Remove and stow the head restraint
before installing a child seat with backrest
on a passenger seat.
Refit the head restraint once the child seat
has been removed.
Child seat at the front
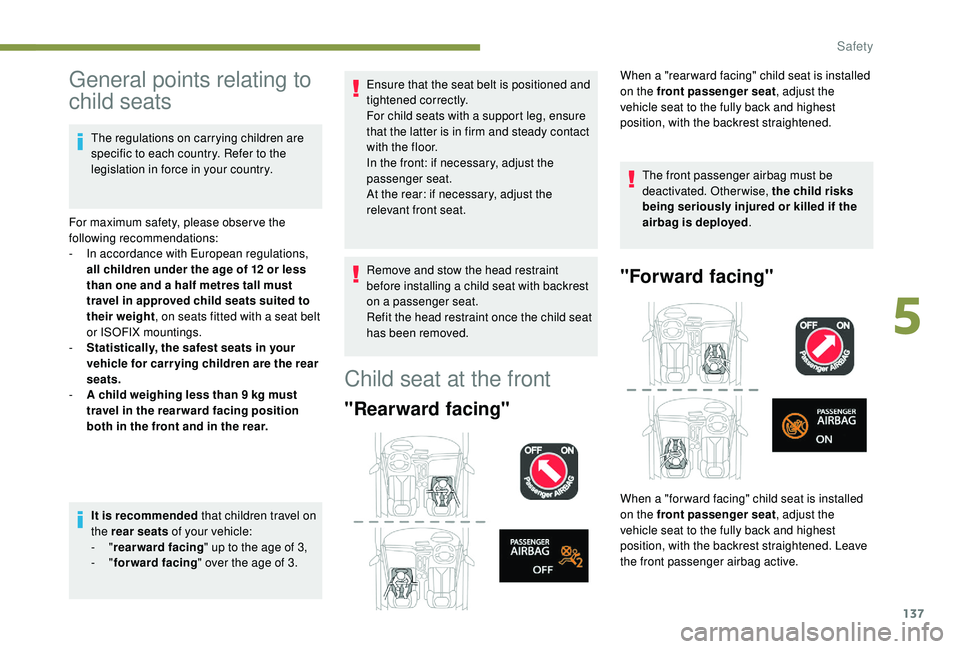
"Rearward facing"
When a "rear ward facing" child seat is installed
on the front passenger seat , adjust the
vehicle seat to the fully back and highest
position, with the backrest straightened.
The front passenger airbag must be
deactivated. Otherwise, the child risks
being seriously injured or killed if the
airbag is deployed .
"Forward facing"
When a "for ward facing" child seat is installed
on the front passenger seat , adjust the
vehicle seat to the fully back and highest
position, with the backrest straightened. Leave
the front passenger airbag active.
5
Safety
Page 146 of 360
144
To secure the child seat to the TOP TETHER:
F r emove and stow the head restraint before
installing the child seat on the seat (refit it
once the child seat has been removed),
F
p
ass the upper strap of the child seat behind
the seat backrest, between the apertures
for the head restraint rods,
F
f
ix the hook of the upper strap to ring B ,
F
t
ighten the upper strap.When fitting an ISOFIX child seat to
the left-hand rear seat of the bench
seat, before fitting the seat, first move
the centre rear seat belt towards the
middle of the vehicle, so as to avoid
the seat interfering with the operation
of the seat belt.
The incorrect installation of a child seat
in a vehicle compromises the child's
protection in the event of an accident.
Strictly obser ve the fitting instructions
provided with the child seat.
For information on the possibilities for
installing ISOFIX child seats in your
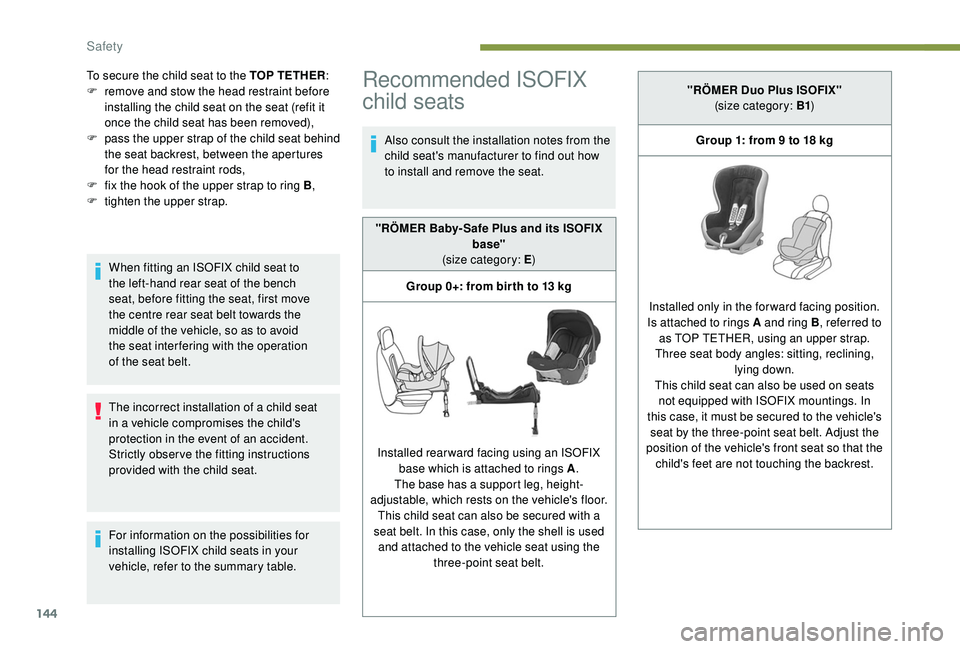
vehicle, refer to the summary table.Recommended ISOFIX
child seats
Also consult the installation notes from the
child seat's manufacturer to find out how
to install and remove the seat.
"RÖMER Baby- Safe Plus and its ISOFIX base"
(size category: E )
Group 0+: from bir th to 13
kg
Installed rearward facing using an ISOFIX base which is attached to rings A .
The base has a support leg, height-
adjustable, which rests on the vehicle's floor. This child seat can also be secured with a
seat belt. In this case, only the shell is used and attached to the vehicle seat using the three-point seat belt. "RÖMER Duo Plus ISOFIX"
(size category: B1 )
Group 1: from 9 to 18 kg
Installed only in the forward facing position.
Is attached to rings A and ring B , referred to
as TOP TETHER, using an upper strap.
Three seat body angles: sitting, reclining, lying down.
This child seat can also be used on seats not equipped with ISOFIX mountings. In
this case, it must be secured to the vehicle's seat by the three-point seat belt. Adjust the
position of the vehicle's front seat so that the child's feet are not touching the backrest.
Safety