remove seats PEUGEOT 3008 2018 Owners Manual
[x] Cancel search | Manufacturer: PEUGEOT, Model Year: 2018, Model line: 3008, Model: PEUGEOT 3008 2018Pages: 360, PDF Size: 12.38 MB
Page 9 of 360
7
Limit the causes of excess
consumption
Spread loads throughout the vehicle; place
the heaviest items in the bottom of the boot,
as close as possible to the rear seats.
Limit the loads carried in the vehicle and
reduce wind resistance (roof bars, roof rack,
bicycle carrier, trailer, etc.). Preferably, use a
roof box.
Remove roof bars and roof racks after use.
At the end of winter, remove snow tyres and
refit your summer tyres.
Observe the recommendations
on maintenance
Check the tyre pressures regularly, when cold,
referring to the label in the door aperture,
driver's side.
Carry out this check in particular:
-
b
efore a long journey,
-
a
t each change of season,
-
a
fter a long period out of use.
Do not forget the spare wheel and the tyres on
any trailer or caravan. Have your vehicle ser viced regularly (engine
oil, oil filter, air filter, cabin filter, etc.) and
obser ve the schedule of operations in the
manufacturer's service schedule.
When filling the tank, do not continue after the
3
rd cut-off of the nozzle to avoid over flow.
At the wheel of your new vehicle, it is only
after the first 1,900
miles (3,000 kilometres)
that you will see the fuel consumption settle
down to a consistent average. With a BlueHDi Diesel engine, if the SCR
system is faulty, your vehicle becomes
polluting. As soon as possible, visit a
PEUGEOT dealer or a qualified workshop to
make your vehicle's level of nitrogen oxides
emissions compliant to the standard.
.
Eco-driving
Page 67 of 360
65
Reinitialising the
motorised tailgate
This operation is necessary where there is no
movement – after detection of an obstacle,
connecting or recharging the battery, etc.
F
O
pen the tailgate manually, if necessary.
F
F
ully close the tailgate manually.
If the problem persists, contact a PEUGEOT
dealer or a qualified workshop.
Precautions in use
In wintry conditions
In the event of an accumulation of snow
on the tailgate, clear the snow before
commanding a motorised opening of the
tailgate.
The formation of ice can block the tailgate
and prevent its opening: wait until the ice
melts with the heating of the passenger
compartment.
When washing
When washing the vehicle in an automatic
car wash, do not forget to lock your vehicle
to avoid the risk of unexpected opening.
Recommendations related
to the "Hands-Free Tailgate
Access" function
If several kicking movements to operate the
tailgate have no effect, wait a few seconds
before trying again.
The function automatically deactivates in heavy
rain or following a build-up of snow.
If it does not work, check that the electronic key
is not exposed to a source of electromagnetic
pollution (smartphone, etc.).
The function may not work correctly with a
prosthetic leg.
The function may not work correctly if your
vehicle is fitted with a towbar. -
y
our vehicle is being serviced,
-
y
ou are accessing the spare wheel
(depending on version).
To avoid such operating problems, keep the
electronic key away from the recognition
zone or deactivate the "Hands-Free Tailgate
Access" function.
In some circumstances, the tailgate may open
or close by itself, particularly if:
-
y
ou hitch or unhitch a trailer,
-
y
ou fit or remove a bicycle carrier,
-
y
ou load or unload bicycles from a bicycle
c a r r i e r,
-
y
ou place or lift something behind the
vehicle,
-
an
animal approaches the rear bumper,
-
y
ou are washing your vehicle,
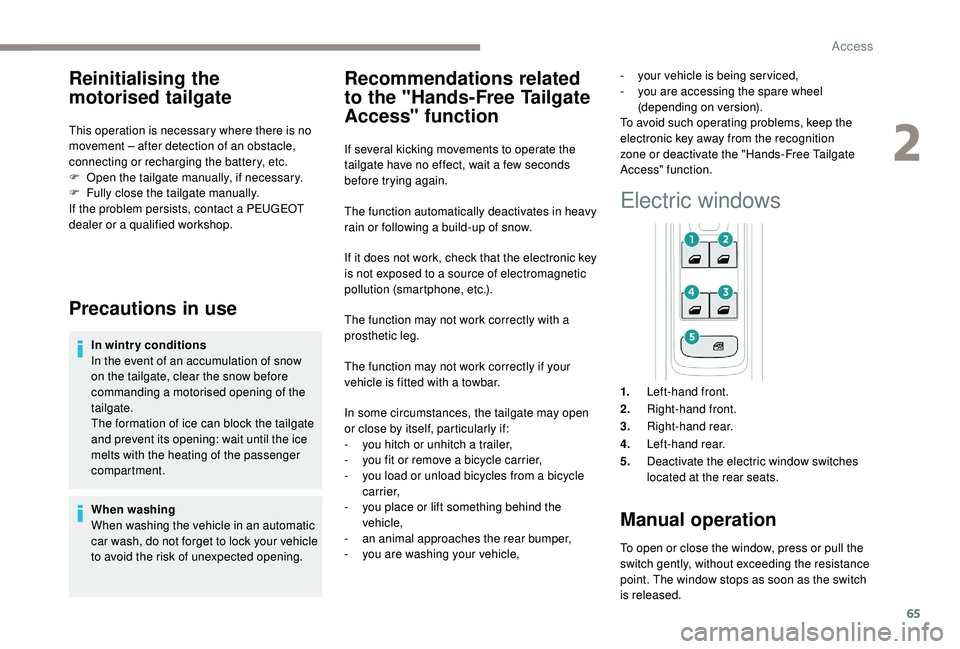
Electric windows
1. Left-hand front.
2. Right-hand front.
3. Right-hand rear.
4. Left-hand rear.
5. Deactivate the electric window switches
located at the rear seats.
Manual operation
To open or close the window, press or pull the
switch gently, without exceeding the resistance
point. The window stops as soon as the switch
is released.
2
Access
Page 80 of 360
78
Manual model
Adjustment
F A djust the mirror so that the glass is
directed correctly in the "day" position.
Day / night position
F
P
ull the lever to change to the "night" anti-
dazzle position.
F
P
ush the lever to change to the normal
"day" position.
Automatic "electrochrome"
model
In order to ensure optimum visibility
during your manoeuvres, the mirror
lightens automatically when reverse gear
is engaged.
This system automatically and progressively
changes between day and night use by means
of a sensor measuring the light coming from the
rear of the vehicle.
Rear seats
Bench seat with a fixed cushion and split
folding backrests (2/3 -1/3) to adapt the boot
load space.
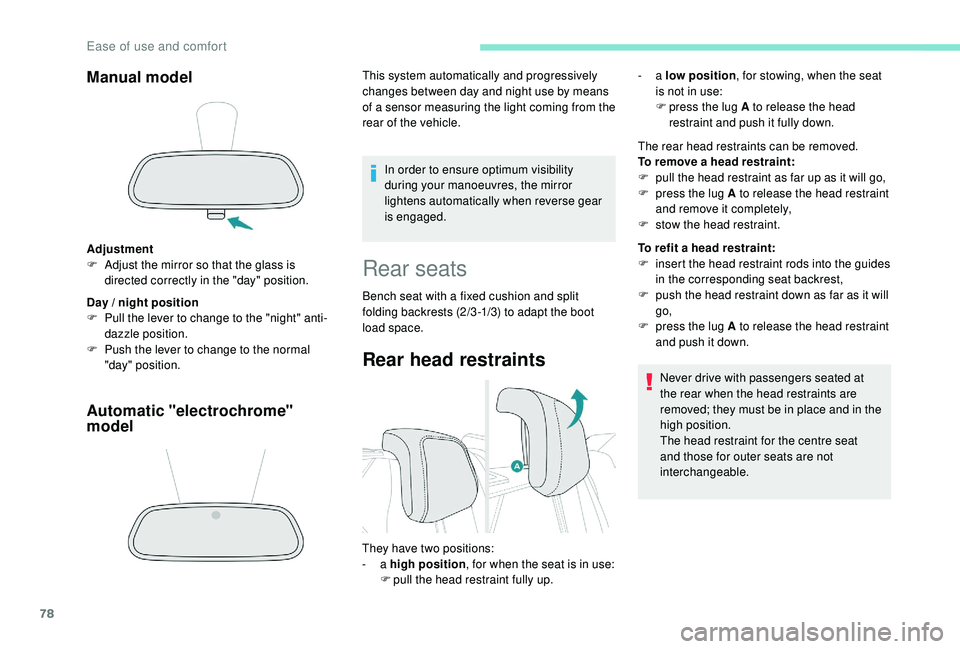
Rear head restraints
The rear head restraints can be removed.
To remove a head restraint:
F
p
ull the head restraint as far up as it will go,
F
p
ress the lug A to release the head restraint
and remove it completely,
F
s
tow the head restraint.
To refit a head restraint:
F
i
nsert the head restraint rods into the guides
in the corresponding seat backrest,
F
p
ush the head restraint down as far as it will
go,
F
p
ress the lug A to release the head restraint
and push it down.
Never drive with passengers seated at
the rear when the head restraints are
removed; they must be in place and in the
high position.
The head restraint for the centre seat
and those for outer seats are not
interchangeable.
They have two positions:
-
a high position , for when the seat is in use:
F
p
ull the head restraint fully up. -
a
low position , for stowing, when the seat
is not in use:
F
p
ress the lug A to release the head
restraint and push it fully down.
Ease of use and comfort
Page 109 of 360
107
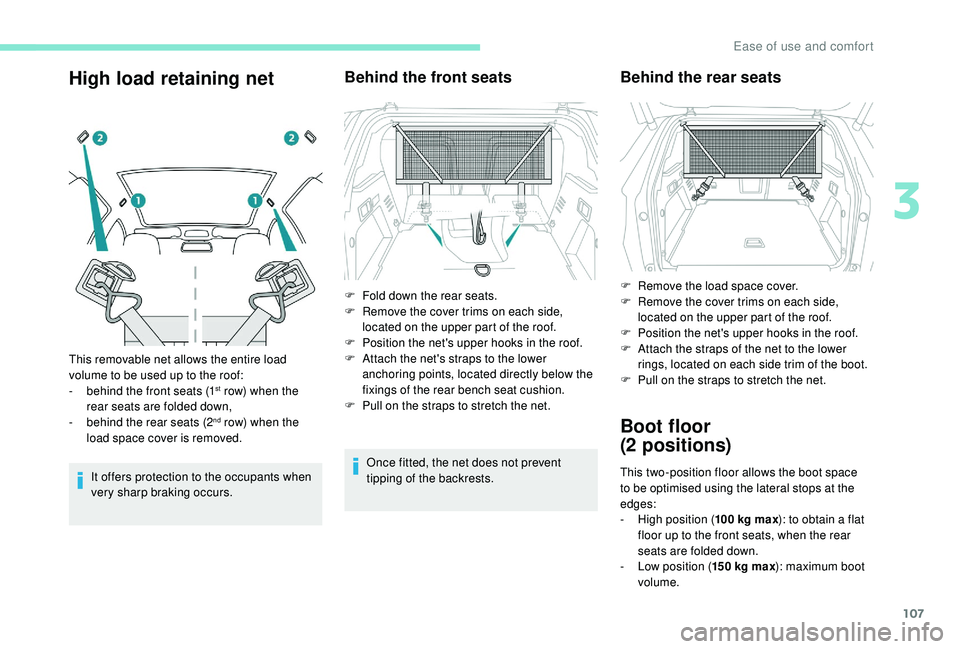
High load retaining net
It offers protection to the occupants when
very sharp braking occurs.
Behind the front seats
Once fitted, the net does not prevent
tipping of the backrests.
This removable net allows the entire load
volume to be used up to the roof:
-
b
ehind the front seats (1
st row) when the
rear seats are folded down,
-
b
ehind the rear seats (2
nd row) when the
load space cover is removed. F
F
old down the rear seats.
F
R
emove the cover trims on each side,
located on the upper part of the roof.
F
P
osition the net's upper hooks in the roof.
F
A
ttach the net's straps to the lower
anchoring points, located directly below the
fixings of the rear bench seat cushion.
F
P
ull on the straps to stretch the net.
Behind the rear seats
Boot floor
(2
positions)
This two-position floor allows the boot space
to be optimised using the lateral stops at the
edges:
-
Hig
h position ( 100
kg max): to obtain a flat
floor up to the front seats, when the rear
seats are folded down.
-
L
ow position ( 150
kg max): maximum boot
volume.
F
R
emove the load space cover.
F
R
emove the cover trims on each side,
located on the upper part of the roof.
F
P
osition the net's upper hooks in the roof.
F
A
ttach the straps of the net to the lower
rings, located on each side trim of the boot.
F
P
ull on the straps to stretch the net.
3
Ease of use and comfort
Page 138 of 360
136
Advice
For the airbags to be fully effective,
observe the safety recommendations
below.
Adopt a normal and upright sitting position.
Wear a correctly adjusted seat belt.
Do not leave anything between the occupants
and the airbags (a child, pet, object, etc.), nor
fix or attach anything close to or in the way of
the airbag release trajectory; this could cause
injuries during their deployment.
Never modify the original definition of your
vehicle, particularly in the area directly
around the airbags.
After an accident or if the vehicle has been
stolen, have the airbag systems checked.
All work on the airbag systems must be
per fomed by a PEUGEOT dealer or a
qualified workshop.
Even if all of the precautions mentioned
are obser ved, a risk of injury or of minor
burns to the head, chest or arms when an
airbag is deployed cannot be ruled out. The
bag inflates almost instantly (within a few
milliseconds) then deflates within the same
time discharging the hot gas via openings
provided for this purpose.Front airbags
Do not drive holding the steering wheel by its
spokes or resting your hands on the centre
part of the wheel.
Passengers must not place their feet on the
dashboard.
Do not smoke as deployment of the airbags
can cause burns or the risk of injury from a
cigarette or pipe.
Never remove or pierce the steering wheel or
hit it violently.
Do not fit or attach anything to the steering
wheel or dashboard, this could cause injuries
in case of airbag deployment.
Do not attach anything to or hang anything
from the seat backrests (clothes, etc.) as
this could cause injuries to the thorax or arm
when the lateral airbag is deployed.
Do not sit with the upper part of the body any
nearer to the door than necessary.
The vehicle's front door panels include side
impact sensors.
A damaged door or any unauthorised or
incorrectly executed work (modification or
repair) on the front doors or their interior trim
could compromise the operation of these
sensors
– risk of malfunction of the lateral
airbags!
Such work must only be done by a PEUGEOT
dealer or a qualified workshop.
Curtain airbags
Do not attach anything or hang anything to
the roof, as this could cause head injuries
when the curtain airbag is deployed.
If fitted to your vehicle, do not remove the
grab handles installed on the roof, they play a
part in securing the curtain airbags. Lateral airbags
Use only approved covers on the seats,
compatible with the deployment of the lateral
airbags. For information on the range of seat
covers suitable for your vehicle, you can
contact a PEUGEOT
dealer.
Safety
Page 139 of 360
137
General points relating to
child seats
The regulations on carrying children are
specific to each country. Refer to the
legislation in force in your country.
For maximum safety, please obser ve the
following recommendations:
-
I
n accordance with European regulations,
all children under the age of 12 or less
than one and a half metres tall must
travel in approved child seats suited to
their weight , on seats fitted with a seat belt
or ISOFIX mountings.
-
S
tatistically, the safest seats in your
vehicle for carr ying children are the rear
seats.
-
A c
hild weighing less than 9 kg must
travel in the rear ward facing position
both in the front and in the rear.
It is recommended that children travel on
the rear seats of your vehicle:
-
"rearward facing " up to the age of 3,
-
"forward facing " over the age of 3. Ensure that the seat belt is positioned and
tightened correctly.
For child seats with a support leg, ensure
that the latter is in firm and steady contact
with the floor.
In the front: if necessary, adjust the
passenger seat.
At the rear: if necessary, adjust the
relevant front seat.
Remove and stow the head restraint
before installing a child seat with backrest
on a passenger seat.
Refit the head restraint once the child seat
has been removed.
Child seat at the front
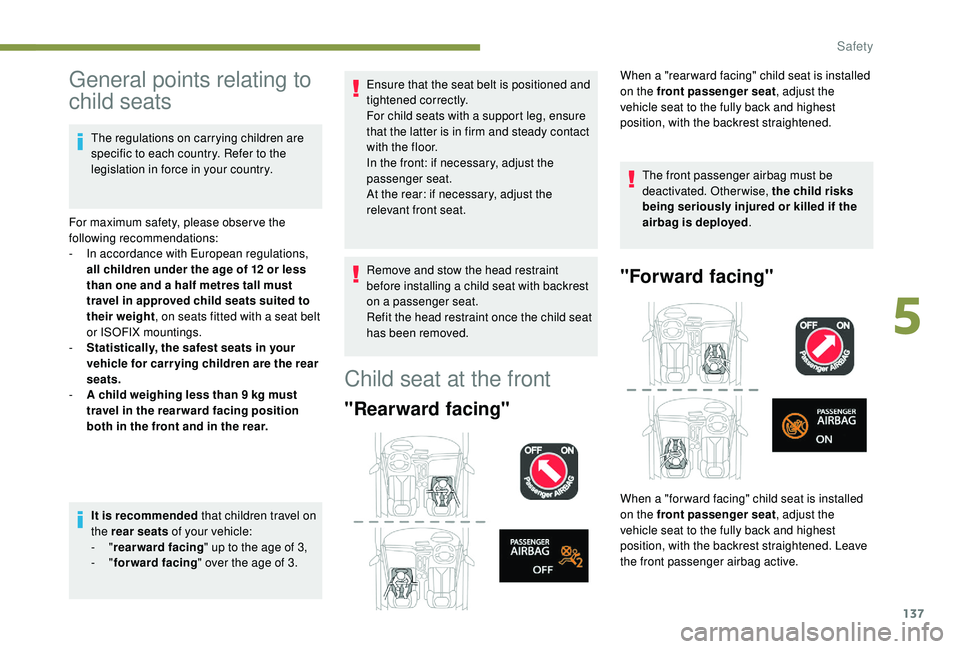
"Rearward facing"
When a "rear ward facing" child seat is installed
on the front passenger seat , adjust the
vehicle seat to the fully back and highest
position, with the backrest straightened.
The front passenger airbag must be
deactivated. Otherwise, the child risks
being seriously injured or killed if the
airbag is deployed .
"Forward facing"
When a "for ward facing" child seat is installed
on the front passenger seat , adjust the
vehicle seat to the fully back and highest
position, with the backrest straightened. Leave
the front passenger airbag active.
5
Safety
Page 146 of 360
144
To secure the child seat to the TOP TETHER:
F r emove and stow the head restraint before
installing the child seat on the seat (refit it
once the child seat has been removed),
F
p
ass the upper strap of the child seat behind
the seat backrest, between the apertures
for the head restraint rods,
F
f
ix the hook of the upper strap to ring B ,
F
t
ighten the upper strap.When fitting an ISOFIX child seat to
the left-hand rear seat of the bench
seat, before fitting the seat, first move
the centre rear seat belt towards the
middle of the vehicle, so as to avoid
the seat interfering with the operation
of the seat belt.
The incorrect installation of a child seat
in a vehicle compromises the child's
protection in the event of an accident.
Strictly obser ve the fitting instructions
provided with the child seat.
For information on the possibilities for
installing ISOFIX child seats in your
vehicle, refer to the summary table.Recommended ISOFIX
child seats
Also consult the installation notes from the
child seat's manufacturer to find out how
to install and remove the seat.
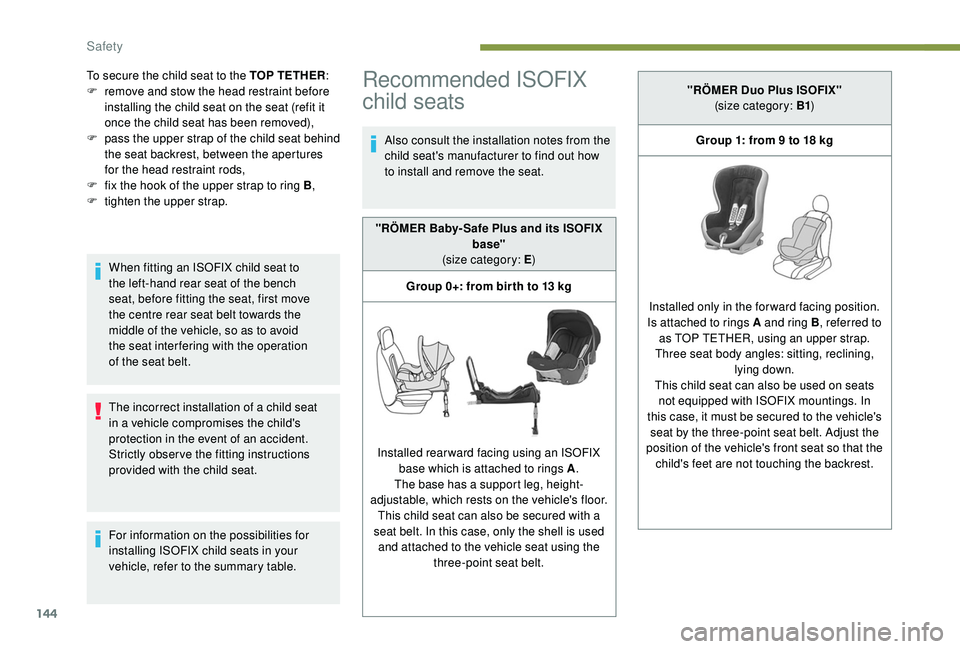
"RÖMER Baby- Safe Plus and its ISOFIX base"
(size category: E )
Group 0+: from bir th to 13
kg
Installed rearward facing using an ISOFIX base which is attached to rings A .
The base has a support leg, height-
adjustable, which rests on the vehicle's floor. This child seat can also be secured with a
seat belt. In this case, only the shell is used and attached to the vehicle seat using the three-point seat belt. "RÖMER Duo Plus ISOFIX"
(size category: B1 )
Group 1: from 9 to 18 kg
Installed only in the forward facing position.
Is attached to rings A and ring B , referred to
as TOP TETHER, using an upper strap.
Three seat body angles: sitting, reclining, lying down.
This child seat can also be used on seats not equipped with ISOFIX mountings. In
this case, it must be secured to the vehicle's seat by the three-point seat belt. Adjust the
position of the vehicle's front seat so that the child's feet are not touching the backrest.
Safety