brake PEUGEOT 3008 2022 Workshop Manual
[x] Cancel search | Manufacturer: PEUGEOT, Model Year: 2022, Model line: 3008, Model: PEUGEOT 3008 2022Pages: 292, PDF Size: 9.65 MB
Page 200 of 292

198
In the event of a breakdown
► Remove the bolts and store them in a clean
place.
► Remove the wheel.
Fitting a wheel
Fitting a steel or "space-saver" type
spare wheel
If the vehicle is fitted with alloy wheels, the
washers A do not make contact with the steel
or "space-saver" type spare wheel. The wheel
is held in place by the conical contact surface
B of each bolt.
Removing a wheel
Wheel with wheel trim
When removing the wheel , first remove
the wheel trim by pulling at the valve aperture
using the wheelbrace.
When refitting the wheel , refit the wheel
trim, starting by placing its aperture in line
with the valve and then pushing it into place
all round its edge with the palm of your hand.
Parking the vehicle
Immobilise the vehicle where it does
not obstruct traffic: the ground must be level,
stable and non-slippery.
With a manual gearbox, engage first gear
to lock the wheels, apply the parking brake,
unless it is set to automatic mode, and switch
off the ignition.
With an automatic gearbox, select mode
P
to lock the wheels, apply the parking brake,
unless it is set to automatic mode, and switch
off the ignition.
Check that the parking brake indicator lamps
on the instrument panel are on fixed.
The occupants must get out of the vehicle
and wait where they are safe.
If necessary, place a chock under the wheel
diagonally opposite the wheel to be changed.
Never go underneath a vehicle raised using a
jack; use an axle stand.
► To remove the wheel bolt cover on each of
the bolts, use tool 7 (alloy wheels).
►
Fit security socket
2 on wheelbrace
5
to
slacken the security bolt.
►
Slacken the other bolts using the
wheelbrace
5
only.
► Place the foot of jack 6 on the ground and
ensure that it is directly below the front A or
rear
B jacking point on the underbody, whichever
is closest to the wheel to be changed.
► Extend jack 6 until its head comes into
contact with jacking point A or B; contact area A
or B on the vehicle must be properly inserted
into the central part of the head of the jack.
►
Raise the vehicle until there is sufficient
space between the wheel and the ground to
easily admit the spare (not punctured) wheel.
Ensure that the jack is stable. If the
ground is slippery or loose, the jack may
slip or collapse - risk of injury!
Take care to position the jack strictly at
one of the jacking points
A
or B under the
vehicle, ensuring that the head of the jack is
centred under the contact area on the vehicle.
Otherwise, there is a risk of damage to the
vehicle and/or of the jack collapsing - risk of
injury!
Page 201 of 292

199
In the event of a breakdown
8
► Remove the bolts and store them in a clean
place.
►
Remove the wheel.
Fitting a wheel
Fitting a steel or "space-saver" type
spare wheel
If the vehicle is fitted with alloy wheels, the
washers A do not make contact with the steel
or "space-saver" type spare wheel. The wheel
is held in place by the conical contact surface
B of each bolt.
► Fit the wheel on the hub.
► Screw in the bolts by hand as far as possible.
►
Pre-tighten the security bolt using the
wheelbrace
5
equipped with a security socket
2
.
►
Pre-tighten the other bolts using the
wheelbrace
5
only.
► Lower the vehicle again fully .
► Fold jack 6 and remove it.
► Tighten the security bolt using the
wheelbrace 5 equipped with a security socket 2 .
►
T
ighten the other bolts using the
wheelbrace
5
only.
►
Refit the bolt covers to each of the bolts
(depending on equipment).
►
Store the tools.
After changing a wheel
Store the punctured wheel in the boot or,
depending on version, remove the central cover
first to store it beneath the floor in place of the
spare wheel.
With a "space-saver" type spare wheel
Deactivate certain driving aid functions
(Active Safety Brake, Adaptive Cruise Control,
etc.).
Page 202 of 292

200
In the event of a breakdown
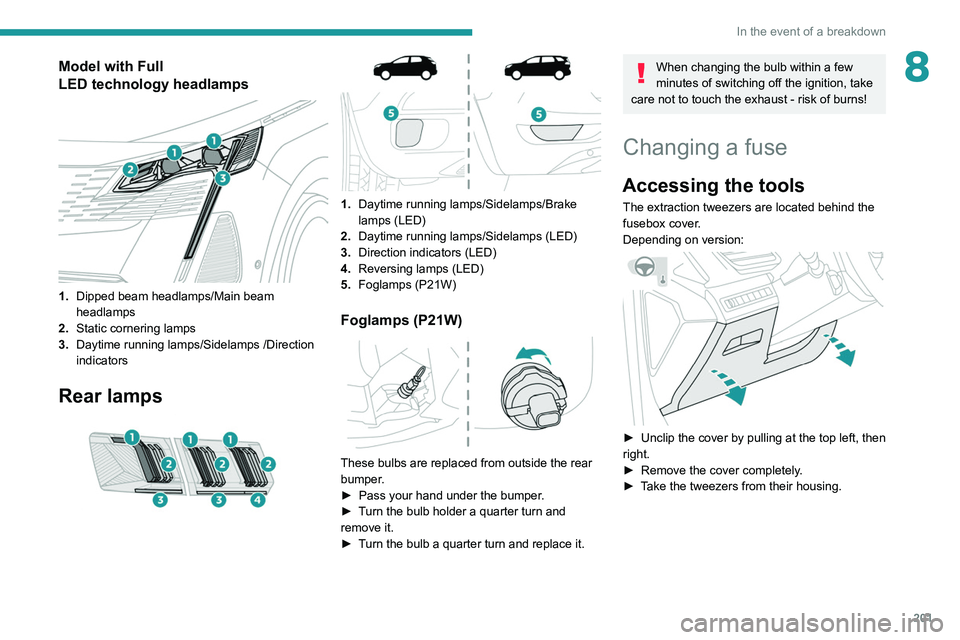
Model with Full
LED technology headlamps
1.Dipped beam headlamps/Main beam
headlamps
2. Static cornering lamps
3. Daytime running lamps/Sidelamps /Direction
indicators
Rear lamps
Do not exceed the maximum authorised
speed of 50 mph (80 km/h) or the maximum
distance of 50 miles (80 km).
Driving with more than one "space-saver"
type spare wheel is prohibited.
Go to a PEUGEOT dealer or a qualified
workshop.
Have the tightening of the spare wheel's bolts
and its tyre pressure checked.
Have the punctured tyre examined. After
inspection, the technician will advise you on
whether the tyre can be repaired or if it must
be replaced.
Changing a bulb
In some weather conditions (e.g. low
temperature or humidity), misting on the
internal surface of the glass of the headlamps
and rear lamps is normal, and will disappear
after the lamps have been on for a few
minutes.
The headlamps have polycarbonate lenses with a protective coating:
–
Do not clean them with a dry or abrasive
cloth, nor with detergent or solvent
products.
–
Use a sponge and soapy water or a pH
neutral product.
– When using a high-pressure washer on
persistent marks, do not keep the lance
directed towards the headlamps, lamps or
their edges for too long, so as not to damage
their protective coating and seals.
Changing a bulb must only be done with
the ignition off and after the headlamp /
lamp has been switched off for several
minutes - risk of serious burns!
Do not touch the bulb directly with your
fingers; use a lint-free cloth.
It is essential only to use anti-ultraviolet
(UV) type bulbs, so as not to damage the
headlamp.
Always replace a failed bulb with a new bulb
of the same type and specification. To avoid
lighting imbalance, replace the bulbs in pairs.
Refitting the lamp units
Perform the operations in the reverse
order to dismantling.
Light-emitting diode (LED)
headlamps and lamps
Depending on version, the affected types of
headlamps/lamps are:
–
"LED" technology headlamps.
–
Full LED technology headlamps.
–
Direction indicator side repeaters.
–
Side spotlamps.
– LED technology rear lamps.
– Third brake lamp.
–
Number plate lamps.
If you need to replace this type of bulb,
you must contact a PEUGEOT dealer or
a qualified workshop.
Do not touch the LED or "Full LED"
technology headlamps - risk of electrocution!
Front lamps
Model with
LED technology headlamps
1.Dipped beam headlamps/Main beam
headlamps
2. Daytime running lamps/Sidelamps /Direction
indicators
Page 203 of 292
201
In the event of a breakdown
8Model with Full
LED technology headlamps
1.Dipped beam headlamps/Main beam
headlamps
2. Static cornering lamps
3. Daytime running lamps/Sidelamps /Direction
indicators
Rear lamps
1. Daytime running lamps/Sidelamps/Brake
lamps (LED)
2. Daytime running lamps/Sidelamps (LED)
3. Direction indicators (LED)
4. Reversing lamps
(LED)
5. Foglamps (P21W)
Foglamps (P21W)
These bulbs are replaced from outside the rear
bumper.
►
Pass your hand under the bumper
.
►
T
urn the bulb holder a quarter turn and
remove it.
►
T
urn the bulb a quarter turn and replace it.
When changing the bulb within a few
minutes of switching off the ignition, take
care not to touch the exhaust - risk of burns!
Changing a fuse
Accessing the tools
The extraction tweezers are located behind the
fusebox cover.
Depending on version:
► Unclip the cover by pulling at the top left, then
right.
►
Remove the cover completely
.
►
T
ake the tweezers from their housing.
Page 214 of 292

212
In the event of a breakdown
Accessing the tools
General recommendations
Observe the legislation in force in the country where you are driving.
Check that the towing vehicle is heavier than the towed vehicle.
The driver must remain at the wheel of the towed vehicle and must have a\
valid driving licence.
When towing a vehicle with all four wheels on the ground, always use an \
approved towbar; ropes and straps are prohibited.
The towing vehicle must move off gently.
When the vehicle is towed with its engine off, there is no longer braking and steering assistance.
A professional recovery service must be called in the following cases:
– broken down on a motorway or main road;
–
not possible to put the gearbox into neutral, unlock the steering, or re\
lease the parking brake;
–
not possible to tow a vehicle with an automatic gearbox, with the engine\
running;
–
towing with only two wheels on the ground;
–
four-wheel drive vehicle;
–
no approved towbar available.
Rechargeable hybrid vehicles
Before any intervention, with the ignition
on, depress the brake pedal and select mode N, then switch off the hybrid system (READY
indicator lamp off).
Always call on professionals for recovery of
the vehicle on a flatbed lorry or trailer.Use the towing eye only to free the vehicle
if it is stuck, or to secure it for recovery on a
flatbed lorry or trailer.
Towing constraints
Type of vehicle
(engine/gearbox) Front wheels on the
ground Rear wheels on the
ground Flatbed
4 wheels on the ground
with towbar
Internal combustion/Manual
Internal combustion/Automatic
Page 215 of 292

213
In the event of a breakdown
8Towing constraints
Type of vehicle
(engine/gearbox) Front wheels on the
ground Rear wheels on the
ground Flatbed
4 wheels on the ground
with towbar
Hybrid 2WD
Hybrid 4WD
2WD: 2-wheel drive.
4WD: 4-wheel drive.
In case of battery or electric parking brake failure, it is essential to call a p
rofessional using flatbed recovery vehicles (excluding manual gearbox).
Accessing the tools
Depending on version, the towing eye is stored
either in the interior trim of the boot sill, left-hand
side, or in a bag behind the left-hand rear seat. The towing eye is stored in a tool box, under the
boot floor.
For more information on accessing the
Tool kit,
refer to the corresponding section.
Page 216 of 292

214
In the event of a breakdown
Towing your vehicle
To access the front screw thread:
► Unclip the cover by pressing at its top left-
hand corner .
To be towed:
►
Screw the towing eye in fully
.
►
Install the towbar
.
►
Put the gearbox into neutral.
Failure to observe this instruction could
result in damage to certain components
(braking, transmission, etc.) and to the
absence of braking assistance the next time
the engine is started.
Automatic gearbox
Never tow the vehicle with the driving
wheels on the ground and the engine off. ►
Unlock the steering and release the parking
brake.
►
Switch on the hazard warning lamps on both
vehicles.
►
Move off gently
, drive slowly and only for a
short distance.
Towing another vehicle
To access the rear screw thread:
► Unclip the cover by pressing at its left-hand
section.
►
Pull the cover downwards.
T
o tow:
►
Screw the towing eye in fully
.
►
Install the towbar
.
►
Switch on the hazard warning lamps on both
vehicles.
►
Move off gently
, drive slowly and only for a
short distance.
Page 218 of 292

216
Technical data
Engines and towed loads - Petrol
EnginesPureTech 130 S&S BVM6PureTech 130 S&S EAT8
Gearboxes BVM6
(Manual 6-speed) EAT8
(Auto. 8-speed)
Codes EB2ADTS MB6 STTEB2ADTS ATN8 STT
Model codes HNSM/CHNSM/SHNSU/CHNSU/S
Body styles 3008500830085008
Cubic capacity (cc) 1,1991,199
Max. power: EC standard (kW) 9696
Fuel UnleadedUnleaded
Braked trailer (within the GTW limit) (kg)
on a 10% or 12% gradient 1,400
1,2801,150 950
Unbraked trailer (kg) 690690690750
Maximum authorised nose weight (kg) 80728072
Engines THP 150 EAT6THP 165 EAT6PureTech 180 S&S EAT8
Gearboxes EAT6
(Auto. 6-speed) EAT6
(Auto. 6-speed) EAT8
(Auto. 8-speed)
Codes EP6FDTMD AT6IIIEP6FDTM AT6IIIEP6FADTXD ATN8 STT
Model codes 5GXV/C
5GXW/C 5GXV/S
5GXW/S 5GYV/C
5GYW/C 5GYV/S
5GYW/S 5GFR/C 5GFR/S
Body styles 300850083008500830085008
Cubic capacity (cc) 1,5981,5981,598
Max. power: EC standard (kW) 11 0121.4 133
Page 219 of 292

217
Technical data
9EnginesTHP 150 EAT6THP 165 EAT6PureTech 180 S&S EAT8
Gearboxes EAT6
(Auto. 6-speed) EAT6
(Auto. 6-speed) EAT8
(Auto. 8-speed)
Codes EP6FDTMD AT6IIIEP6FDTM AT6IIIEP6FADTXD ATN8 STT
Model codes 5GXV/C
5GXW/C 5GXV/S
5GXW/S 5GYV/C
5GYW/C 5GYV/S
5GYW/S 5GFR/C 5GFR/S
Body styles 300850083008500830085008
Fuel UnleadedUnleadedUnleaded
Braked trailer (within the GTW limit) (kg)
on a 10% or 12% gradient 600
600600
1,550* 600
1,350* 1,500
1,400
Unbraked trailer (kg) 600600600600750750
Maximum authorised nose weight (kg) 807280728072
* For Australia only.
Page 220 of 292

218
Technical data
Engines and towed loads – BlueHDi Diesel
EnginesBlueHDi 130 S&S BVM6 BlueHDi 130 S&S EAT8 BlueHDi 180 S&S EAT8
Gearboxes BVM6
(Manual 6-speed) EAT8
(Auto. 8-speed) EAT8
(Auto. 8-speed)
Codes DV5RC ML6C STTDV5RC ATN8 STT DW10FC AMN8 STT
Model codes YHZJ/C YHZJ/S YHZR/C YHZR/S EHZR/C EHZR/S
Body styles 3008 50083008 5008 3008 5008
Cubic capacity (cc) 1,4991,4991,997
Max. power: EC standard (kW) 9696130
Fuel DieselDieselDiesel
Braked trailer (within the GTW limit) (kg)
on a 10% or 12% gradient 1,500 1,300
1,300 1,200 2,000 1,800
Unbraked trailer (kg) 745 750750750745750
Maximum authorised nose weight (kg) 80 7280728072
Engines BlueHDi 180 S&S EAT8HDi 150 EAT8
Gearboxes EAT8
(Auto. 8-speed) EAT8
(Auto. 8-speed)
Codes DW10FC AMN8 STTDW10FD AMN8
Model codes EHZR/CAHXN/CAHXN/S
Body styles 500830085008
Cubic capacity (cc) 1,9971,997
Max. power: EC standard (kW) 13011 0
Fuel DieselDiesel