brake Peugeot 308 2017 - RHD (UK, Australia) Service Manual
[x] Cancel search | Manufacturer: PEUGEOT, Model Year: 2017, Model line: 308, Model: Peugeot 308 2017Pages: 392, PDF Size: 10.13 MB
Page 218 of 392
216
Snow chains
In wintry conditions, snow chains improve traction as well as the behaviour of the vehicle when braking.
th
e snow chains must be fitted only
to the front wheels.
t
h
ey must never
be fitted to "space-saver" type spare
wheels.
ta
ke account of the legislation in force
in your country on the use of snow
chains and the maximum running speed
authorised.
Avoid driving with snow chains on roads
that have been cleared of snow, to
avoid damaging your vehicle's tyres and
the road sur face. If your vehicle is fitted
with alloy wheels, check that no part of
the chain or its fixings is in contact with
the wheel rim.
us
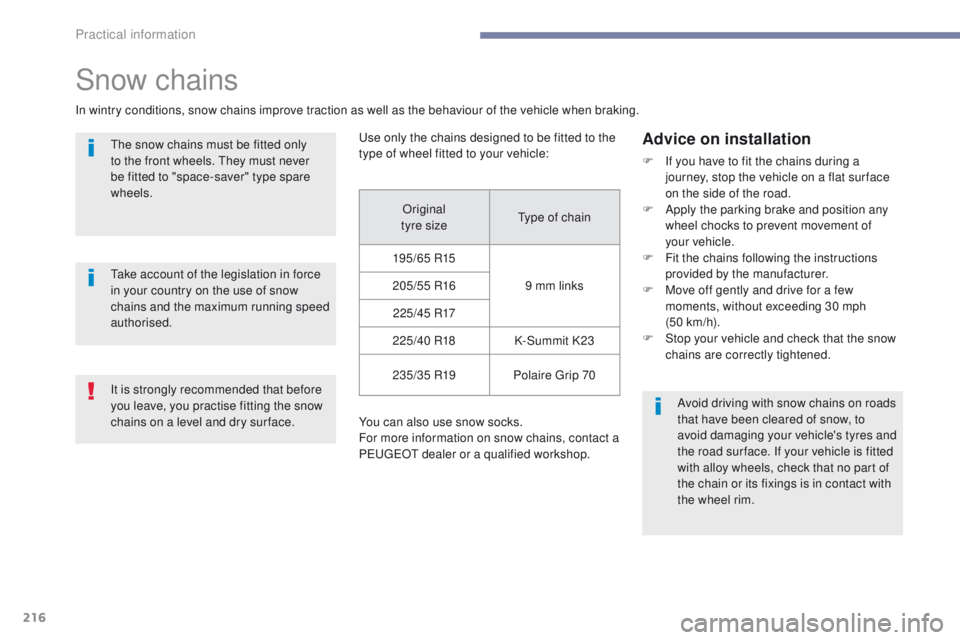
e only the chains designed to be fitted to the
type of wheel fitted to your vehicle:
You can also use snow socks.
For more information on snow chains, contact a
P
e
uge
Ot
dealer or a qualified workshop.
Advice on installation
F If you have to fit the chains during a journey, stop the vehicle on a flat sur face
on the side of the road.
F
A
pply the parking brake and position any
wheel chocks to prevent movement of
your
vehicle.
F
F
it the chains following the instructions
provided by the manufacturer.
F
M
ove off gently and drive for a few
moments, without exceeding 30 mph
(50
km/h).
F
S
top your vehicle and check that the snow
chains are correctly tightened.
Original
tyre size
ty
pe of chain
195/65 R15 9 mm links
205/55 R16
2 2 5 /4 5 R17
225/40 R18 K-Summit K23
235/35 R19 Polaire
g
r
ip 70
It is strongly recommended that before
you leave, you practise fitting the snow
chains on a level and dry sur face.
Practical information
Page 231 of 392
229
Oil grade
Before topping-up the oil or changing the oil,
check that the oil is the correct grade for your
engine and conforms to the manufacturer's
recommendations.
Topping-up the engine oil level
the location of the oil filler cap is shown in the
corresponding underbonnet layout view.
F u
n
screw the oil filler cap to reveal the filler
aperture.
F
A
dd oil in small quantities, avoiding any
spills on engine components (risk of fire).
F
W
ait a few minutes before checking the
level again using the dipstick.
F
A
dd more oil if necessary.
F
A
fter checking the level, carefully refit the
oil filler cap and the dipstick in its tube. After topping-up the oil, the check when
switching on the ignition with the oil
level indicator in the instrument panel
is not valid during the 30 minutes after
topping-up.
Engine oil change
Refer to the manufacturer's service schedule
for details of the interval for this operation.
In order to maintain the reliability of the engine
and emission control system, never use
additives in the engine oil.th
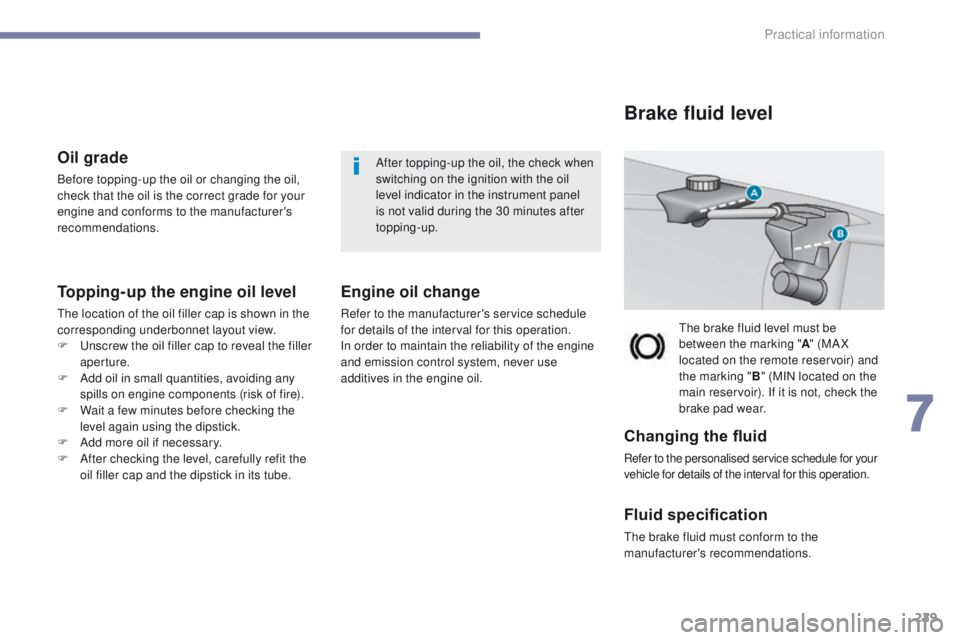
e brake fluid level must be
between the marking " A" (MA X
located on the remote reservoir) and
the marking " B" (MIN located on the
main reservoir). If it is not, check the
brake pad wear.
Brake fluid level
Changing the fluid
Refer to the personalised service schedule for your
vehicle for details of the interval for this operation.
Fluid specification
the brake fluid must conform to the
manufacturer's recommendations.
7
Practical information
Page 234 of 392
232
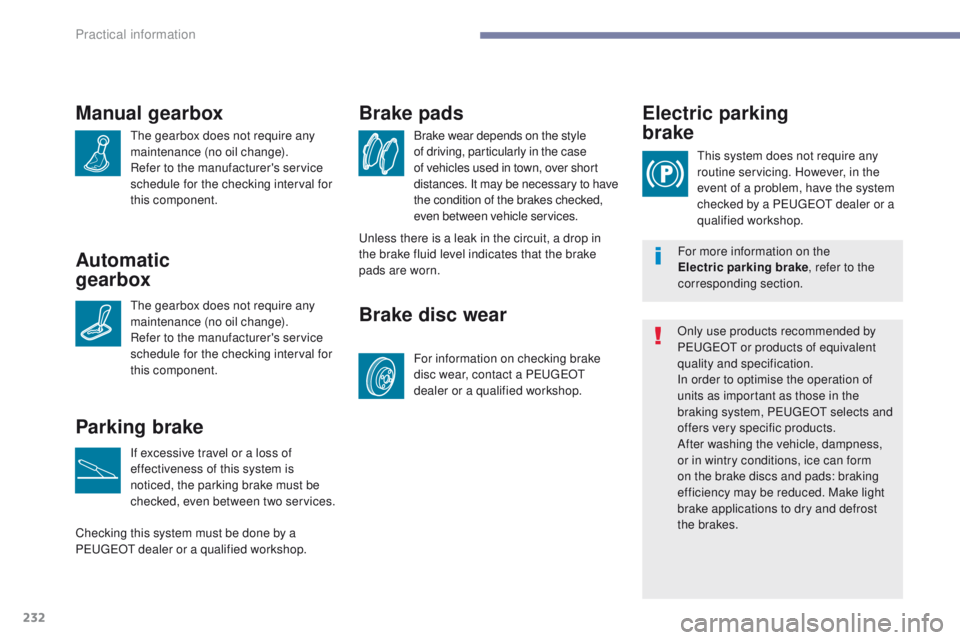
Manual gearbox
the gearbox does not require any
maintenance (no oil change).
Refer to the manufacturer's service
schedule for the checking interval for
this component.Brake wear depends on the style
of driving, particularly in the case
of vehicles used in town, over short
distances. It may be necessary to have
the condition of the brakes checked,
even between vehicle services.
Brake pads
For information on checking brake
disc wear, contact a Pe
ugeOt
dealer or a qualified workshop.
Brake disc wear Electric parking
brake
this system does not require any
routine servicing. However, in the
event of a problem, have the system
checked by a P
e
uge
Ot
dealer or a
qualified workshop.
Only use products recommended by
P
e
uge
Ot
or products of equivalent
quality and specification.
In order to optimise the operation of
units as important as those in the
braking system, P
e
uge
Ot
selects and
offers very specific products.
After washing the vehicle, dampness,
or in wintry conditions, ice can form
on the brake discs and pads: braking
efficiency may be reduced. Make light
brake applications to dry and defrost
the brakes.
Parking brake
If excessive travel or a loss of
effectiveness of this system is
noticed, the parking brake must be
checked, even between two services.
Checking this system must be done by a
P
e
uge
Ot
dealer or a qualified workshop.
un
less there is a leak in the circuit, a drop in
the brake fluid level indicates that the brake
pads are worn.
Automatic
gearbox
the gearbox does not require any
maintenance (no oil change).
Refer to the manufacturer's service
schedule for the checking interval for
this component. For more information on the
Electric parking brake
, refer to the
corresponding section.
Practical information
Page 250 of 392
248
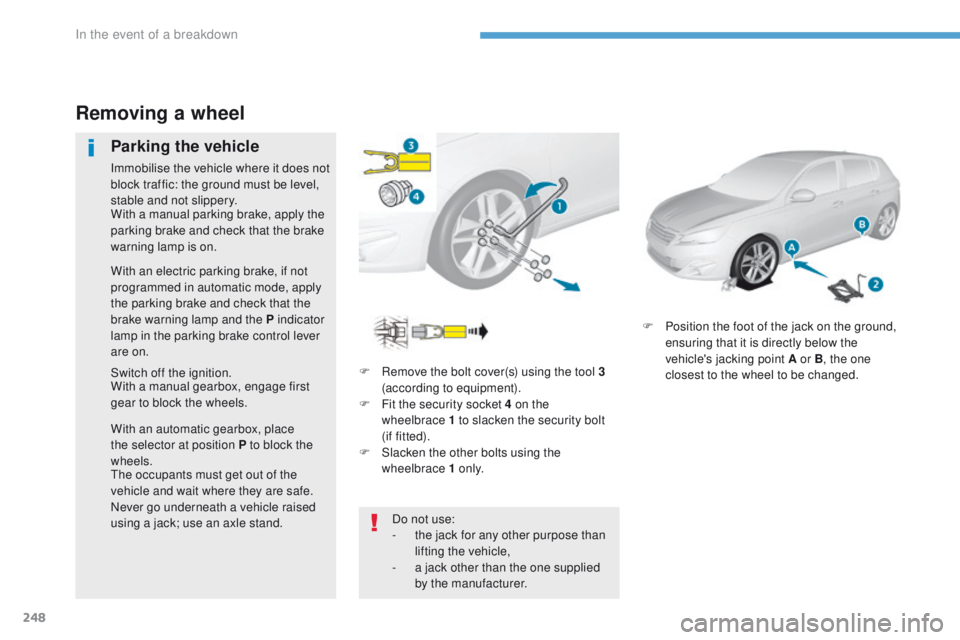
F Remove the bolt cover(s) using the tool 3 (according to equipment).
F
F
it the security socket 4 on the
wheelbrace
1 to slacken the security bolt
(if fitted).
F
S
lacken the other bolts using the
wheelbrace 1 o n l y. F
P
osition the foot of the jack on the ground,
ensuring that it is directly below the
vehicle's jacking point A or B , the one
closest to the wheel to be changed.
Removing a wheel
Parking the vehicle
Immobilise the vehicle where it does not
block traffic: the ground must be level,
stable and not slippery.
Switch off the ignition. With a manual parking brake, apply the
parking brake and check that the brake
warning lamp is on.
With an electric parking brake, if not
programmed in automatic mode, apply
the parking brake and check that the
brake warning lamp and the P indicator
lamp in the parking brake control lever
are on.
With a manual gearbox, engage first
gear to block the wheels.
With an automatic gearbox, place
the selector at position P to block the
wheels.
th
e occupants must get out of the
vehicle and wait where they are safe.
Never go underneath a vehicle raised
using a jack; use an axle stand. Do not use:
-
t
he jack for any other purpose than
lifting the vehicle,
-
a j
ack other than the one supplied
by the manufacturer.
In the event of a breakdown
Page 263 of 392
261
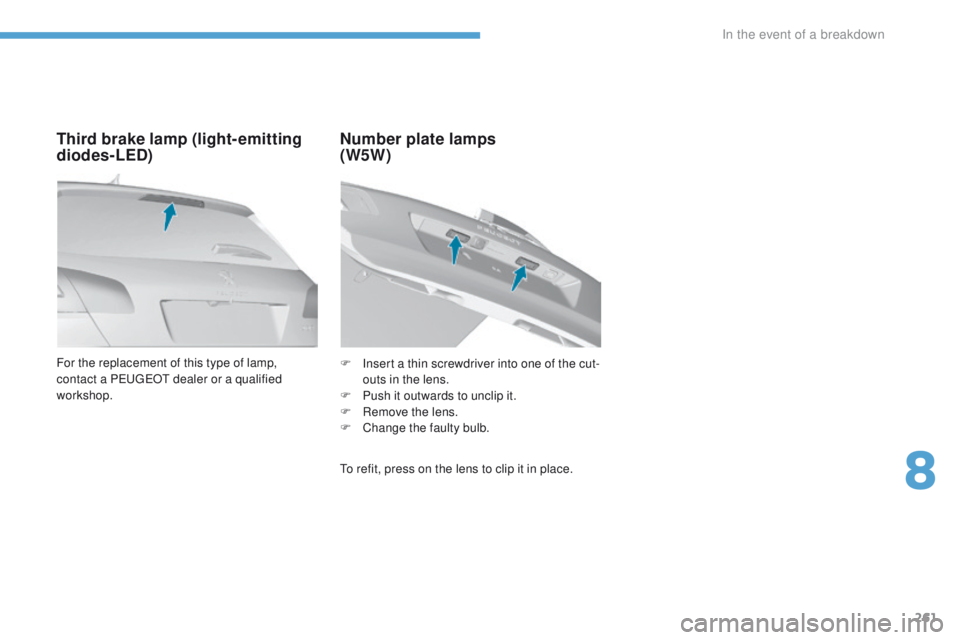
For the replacement of this type of lamp,
contact a PeugeOt dealer or a qualified
workshop.
Third brake lamp (light- emitting
diodes-LED) Number plate lamps
(W5W)
to refit, press on the lens to clip it in place. F
I
nsert a thin screwdriver into one of the cut-
outs in the lens.
F
P
ush it outwards to unclip it.
F
R
emove the lens.
F
C
hange the faulty bulb.
8
In the event of a breakdown
Page 270 of 392
268
12 V battery
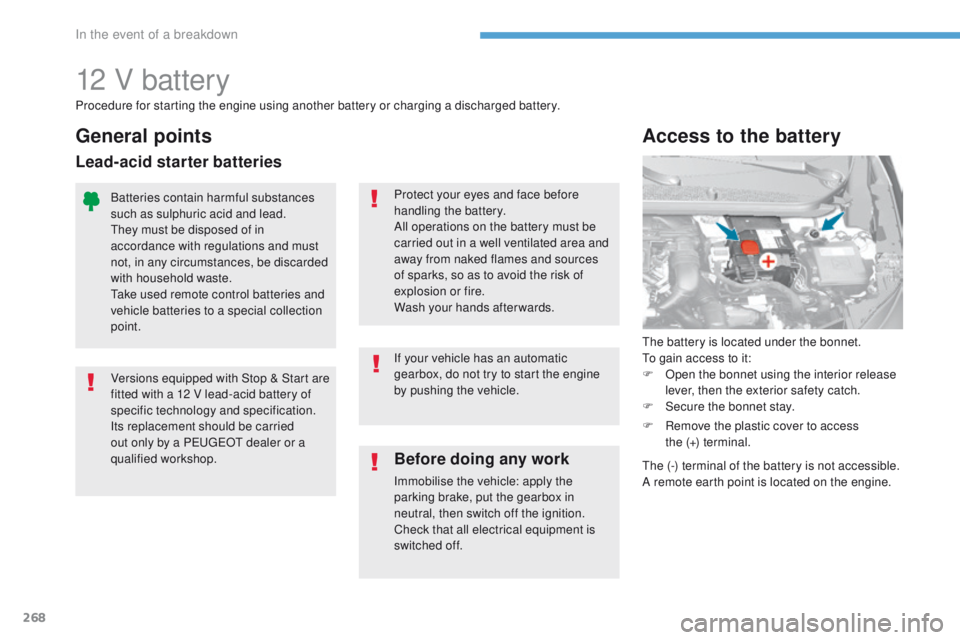
the battery is located under the bonnet.to gain access to it:
F
O
pen the bonnet using the interior release
lever, then the exterior safety catch.
F
S
ecure the bonnet stay.
Access to the battery
Procedure for starting the engine using another battery or charging a discharged battery.
Before doing any work
Immobilise the vehicle: apply the
parking brake, put the gearbox in
neutral, then switch off the ignition.
Check that all electrical equipment is
switched off. If your vehicle has an automatic
gearbox, do not try to start the engine
by pushing the vehicle.
Batteries contain harmful substances
such as sulphuric acid and lead.
th
ey must be disposed of in
accordance with regulations and must
not, in any circumstances, be discarded
with household waste.
ta
ke used remote control batteries and
vehicle batteries to a special collection
point. Protect your eyes and face before
handling the battery.
All operations on the battery must be
carried out in a well ventilated area and
away from naked flames and sources
of sparks, so as to avoid the risk of
explosion or fire.
Wash your hands afterwards.
Versions equipped with Stop & Start are
fitted with a 12 V lead-acid battery of
specific technology and specification.
Its replacement should be carried
out only by a P
e
uge
Ot
dealer or a
qualified workshop.
General points
Lead-acid starter batteries
F Remove the plastic cover to access the (+) terminal.
th
e (-) terminal of the battery is not accessible.
A remote earth point is located on the engine.
In the event of a breakdown
Page 275 of 392
273
General recommendations
Observe the legislation in force in your country.ensure that the weight of the towing vehicle is higher than that of the towed vehicle.
th
e driver must remain at the wheel of the towed vehicle and must have a valid driving licence.
When towing a vehicle with all four wheels on the ground, always use an approved towing
arm; rope and straps are prohibited.
th
e towing vehicle must move off gently.
When towing a vehicle with the engine off, there is no longer any power assistance for
braking or steering.
In the following cases, you must always call on a professional recovery service:
-
v
ehicle broken down on a motor way or fast road,
-
f
our-wheel drive vehicle,
-
w
hen it is not possible to put the gearbox into neutral, unlock the steering, or release
the parking brake,
-
t
owing with only two wheels on the ground,
-
w
here there is no approved towing arm available...
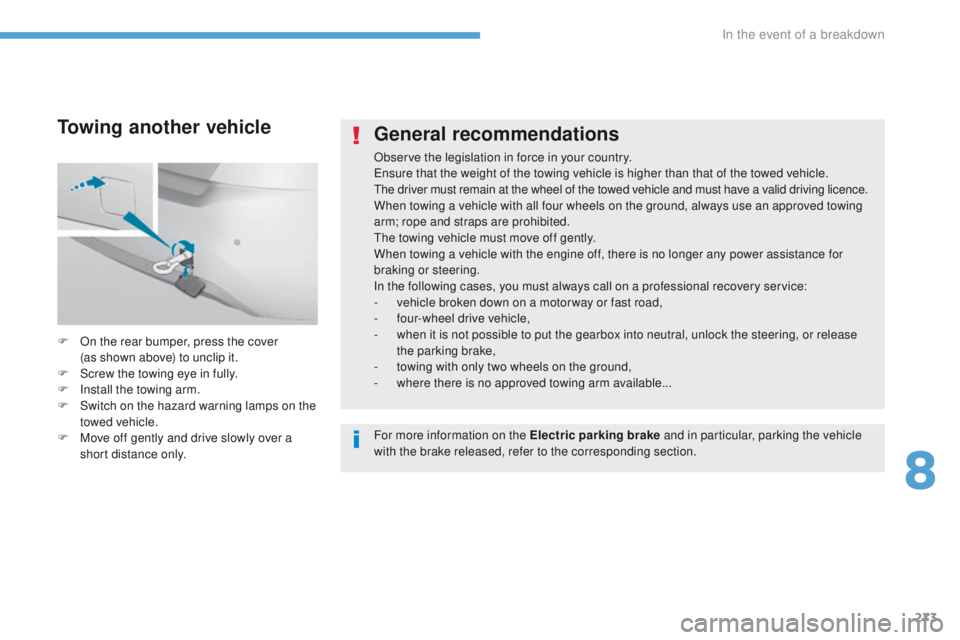
F
O
n the rear bumper, press the cover
(as
shown above) to unclip it.
F
S
crew the towing eye in fully.
F
I
nstall the towing arm.
F
S
witch on the hazard warning lamps on the
towed vehicle.
F
M
ove off gently and drive slowly over a
short distance only.
Towing another vehicle
For more information on the Electric parking brake and in particular, parking the vehicle
with the brake released, refer to the corresponding section.
8
In the event of a breakdown
Page 280 of 392
278
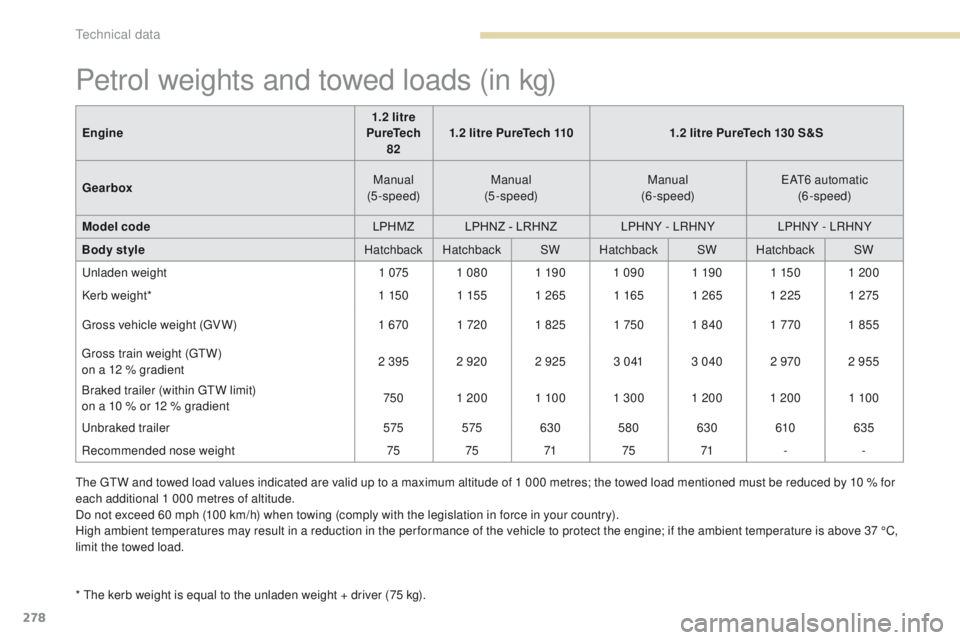
Petrol weights and towed loads (in kg)
* the kerb weight is equal to the unladen weight + driver (75 kg).Engine
1.2 litre
PureTech 82 1.2 litre PureTech 110
1.2 litre PureTech 130 S&S
Gearbox Manual
(5-speed) Manual
(5-speed) Manual
(6-speed)
eAt6
automatic
(6-speed)
Model code LPHMZLPHNZ - LRHNZ LPHNY - LRHNY LPHNY - LRHNY
Body style Hatchback HatchbackSWHatchback SWHatchback SW
un
laden weight
1 0751 080 1 19 01 090 1 19 01 1501 200
Kerb weight* 1 150 1 1551 2651 1651 265 1 225 1 275
gr
oss vehicle weight (
gV
W)
1 6701 720 1 825 1 7501 840 1 7701 855
gr
oss train weight (
g
t
W
)
on a 12 % gradient 2 395 2 920 2 925
3 0 413 040 2 9702 955
Braked trailer (within gt
W l
imit)
on a 10 % or 12 % gradient 750
1 200 1 10 01 300 1 200 1 200 1 10 0
unb
raked trailer
575 575630580 630 610635
Recommended nose weight 7575 7175 71 --
th
e gt
W a
nd towed load values indicated are valid up to a maximum altitude of 1 000 metres; the towed load mentioned must be reduced by 10 % for
each additional 1 000 metres of altitude.
Do not exceed 60 mph (100 km/h) when towing (comply with the legislation in force in your country).
High ambient temperatures may result in a reduction in the per formance of the vehicle to protect the engine; if the ambient temperature is above 37 °C,
limit the towed load.
technical data
Page 281 of 392
279
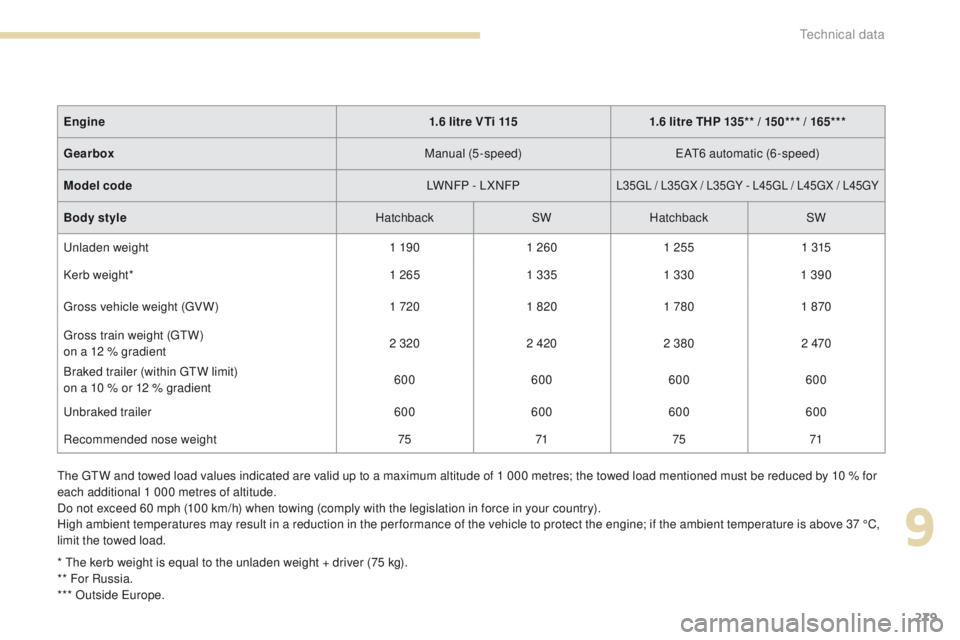
the gtW a nd towed load values indicated are valid up to a maximum altitude of 1 000 metres; the towed load mentioned must be reduced by 10 % for
each additional 1 000 metres of altitude.
Do not exceed 60 mph (100 km/h) when towing (comply with the legislation in force in your country).
High ambient temperatures may result in a reduction in the per formance of the vehicle to protect the engine; if the ambient temperature is above 37 °C,
limit the towed load.
*
t
h
e kerb weight is equal to the unladen weight + driver (75 kg).
** For Russia.
*** Outside
e
u
rope.
Engine
1.6 litre VTi 1151.6 litre THP 135** / 150*** / 165***
Gearbox Manual (5-speed)
eAt6
automatic (6-speed)
Model code LWNFP - LXNFP
L35gL / L35gX / L35gY - L 45gL / L 45gX / L 45gY
Body style HatchbackSWHatchback SW
un
laden weight 1 19 01 260 1 255 1 315
Kerb weight* 1 2651 335 1 3301 390
gr
oss vehicle weight (
gV
W) 1 7201 820 1 780 1 870
gr
oss train weight (
g
t
W
)
on a 12 % gradient 2 320
2 4202 380 2 470
Braked trailer (within
gt
W l
imit)
on a 10 % or 12 % gradient 600
600600600
unb
raked trailer 600600600600
Recommended nose weight 757175 71
9
technical data
Page 282 of 392
280
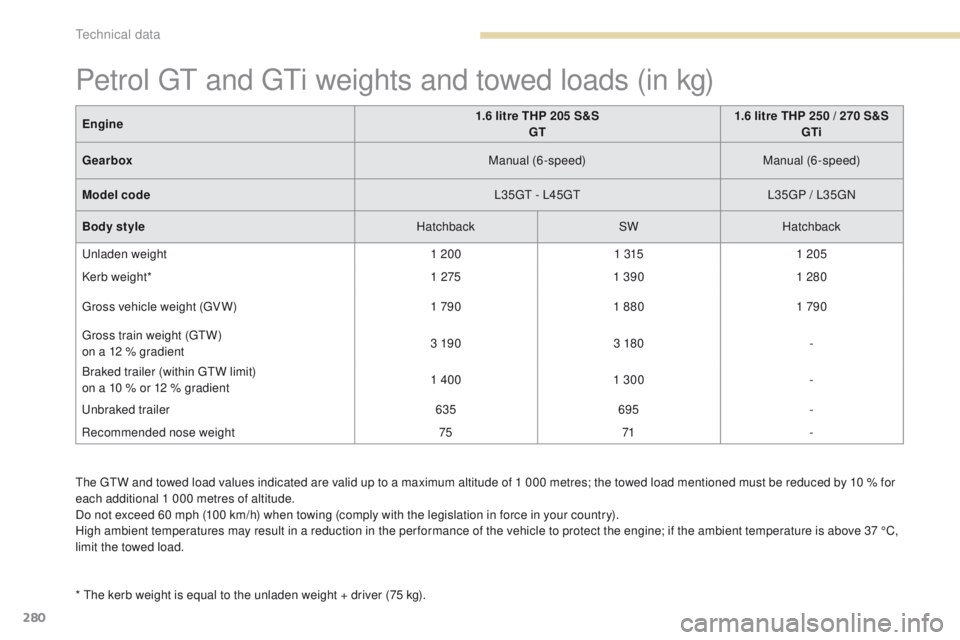
the gtW a nd towed load values indicated are valid up to a maximum altitude of 1 000 metres; the towed load mentioned must be reduced by 10 % for
each additional 1 000 metres of altitude.
Do not exceed 60 mph (100 km/h) when towing (comply with the legislation in force in your country).
High ambient temperatures may result in a reduction in the per formance of the vehicle to protect the engine; if the ambient temperature is above 37 °C,
limit the towed load.
*
t
h
e kerb weight is equal to the unladen weight + driver (75 kg).
Petrol gt and gti w eights and towed loads (in kg)
Engine 1.6 litre THP 205 S&S
GT 1.6 litre THP 250 / 270 S&S
GTi
Gearbox Manual (6-speed)Manual (6-speed)
Model code L35
gt -
L45
gtL
35
gP / L
35
gN
B
ody style HatchbackSWHatchback
un
laden weight 1 2001 3151 205
Kerb weight* 1 2751 390 1 280
gr
oss vehicle weight (
gV
W) 1 7901 880 1 790
gr
oss train weight (
g
t
W
)
on a 12 % gradient 3 19 0
3 180 -
Braked trailer (within
gt
W l
imit)
on a 10 % or 12 % gradient 1 400
1 300 -
unb
raked trailer 635695 -
Recommended nose weight 7571 -
technical data