Peugeot 308 2017 - RHD (UK, Australia) Manual Online
Manufacturer: PEUGEOT, Model Year: 2017, Model line: 308, Model: Peugeot 308 2017Pages: 392, PDF Size: 10.13 MB
Page 81 of 392
79
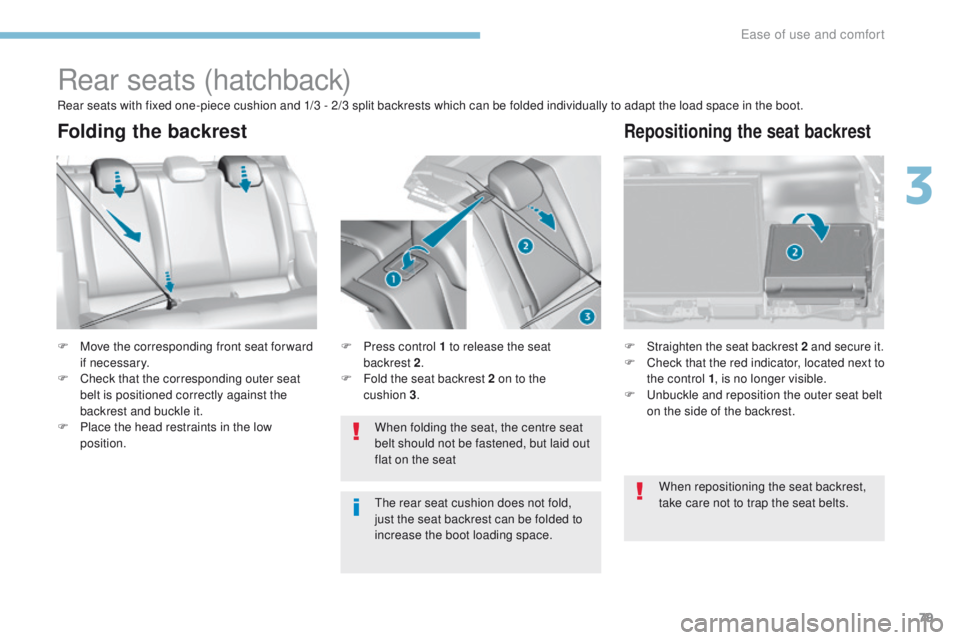
Rear seats (hatchback)
F Move the corresponding front seat for ward if necessary.
F
C
heck that the corresponding outer seat
belt is positioned correctly against the
backrest and buckle it.
F
P
lace the head restraints in the low
position. F
Straighten the seat backrest 2 and secure it.F Check that the red indicator, located next to
the control 1 , is no longer visible.
F
u
n
buckle and reposition the outer seat belt
on the side of the backrest.
When folding the seat, the centre seat
belt should not be fastened, but laid out
flat on the seat
F
P
ress control 1 to release the seat
backrest
2
.
F
F
old the seat backrest 2 on to the
cushion
3 .
Folding the backrestRepositioning the seat backrest
Rear seats with fixed one-piece cushion and 1/3 - 2/3 split backrests which can be folded individually to adapt the load space in the boot.
th
e rear seat cushion does not fold,
just the seat backrest can be folded to
increase the boot loading space. When repositioning the seat backrest,
take care not to trap the seat belts.
3
ease of use and comfort
Page 82 of 392
80
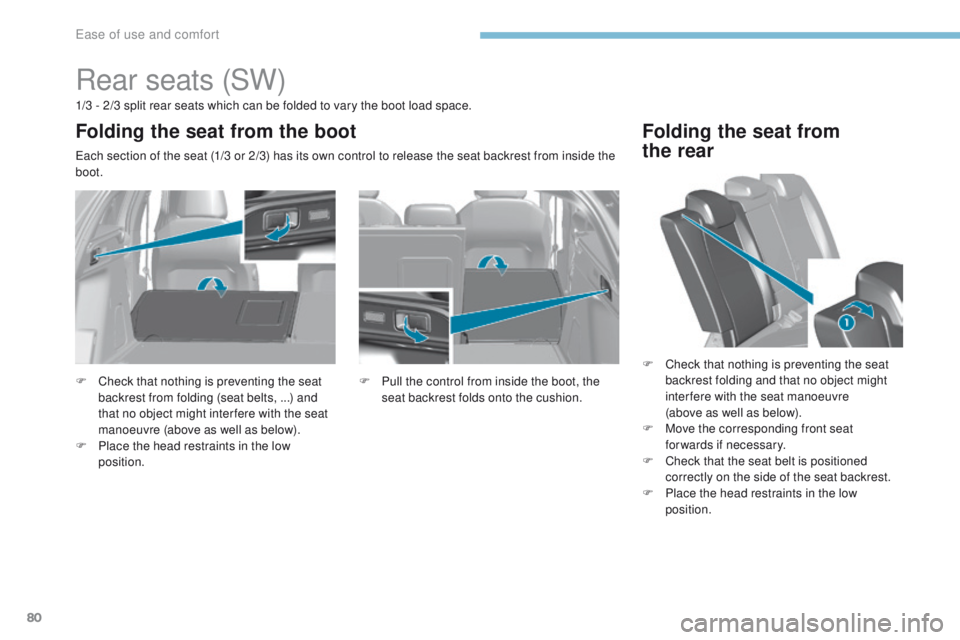
Rear seats (SW)
1/3 - 2/3 split rear seats which can be folded to vary the boot load space.
ea
ch section of the seat (1/3 or 2/3) has its own control to release the seat backrest from inside the
boot.
Folding the seat from the boot
F Check that nothing is preventing the seat backrest from folding (seat belts, ...) and
that no object might inter fere with the seat
manoeuvre (above as well as below).
F
P
lace the head restraints in the low
position. F
P ull the control from inside the boot, the
seat backrest folds onto the cushion.
Folding the seat from
the rear
F Check that nothing is preventing the seat backrest folding and that no object might
interfere with the seat manoeuvre
(above as well as below).
F
M
ove the corresponding front seat
forwards if necessary.
F
C
heck that the seat belt is positioned
correctly on the side of the seat backrest.
F
P
lace the head restraints in the low
position.
ease of use and comfort
Page 83 of 392
81
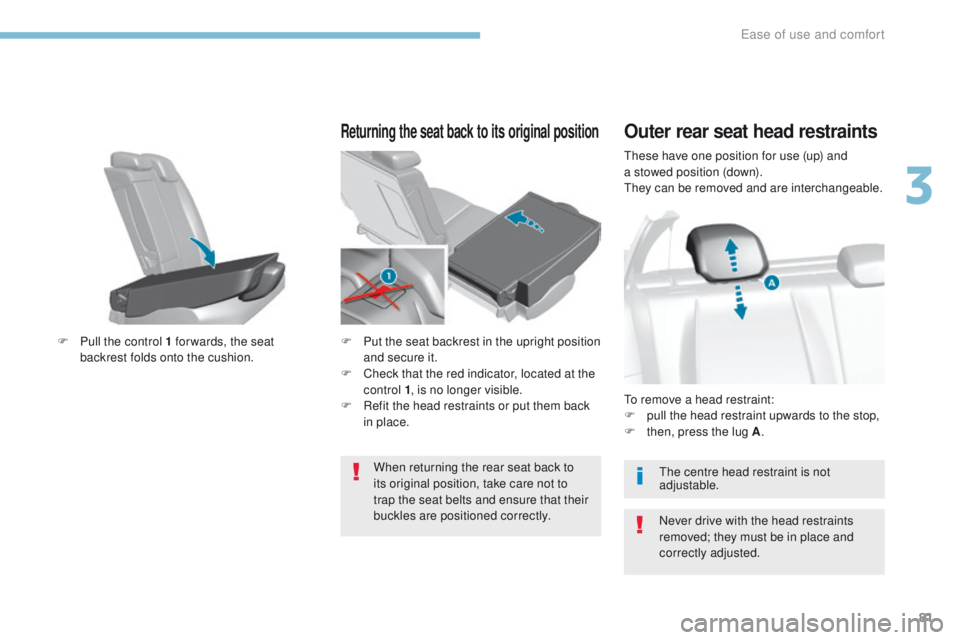
these have one position for use (up) and
a stowed position (down).
th
ey can be removed and are interchangeable.
Outer rear seat head restraints
Never drive with the head restraints
removed; they must be in place and
correctly adjusted.
to r
emove a head restraint:
F
p
ull the head restraint upwards to the stop,
F
t
hen, press the lug A
.
th
e centre head restraint is not
adjustable.
F
P
ull the control 1 for wards, the seat
backrest folds onto the cushion.
Returning the seat back to its original position
F Put the seat backrest in the upright position and secure it.
F
C
heck that the red indicator, located at the
control 1 , is no longer visible.
F
R
efit the head restraints or put them back
in place.
When returning the rear seat back to
its original position, take care not to
trap the seat belts and ensure that their
buckles are positioned correctly.
3
ease of use and comfort
Page 84 of 392
82
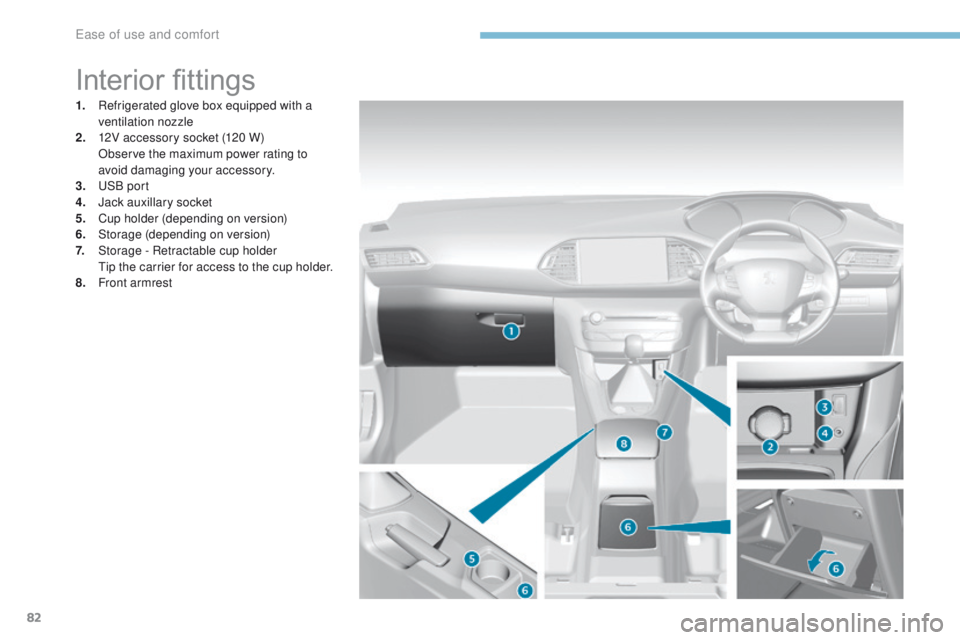
Interior fittings
1. Refrigerated glove box equipped with a ventilation nozzle
2.
1
2V accessory socket (120 W)
O
bserve the maximum power rating to
avoid damaging your accessory.
3.
u
S
B port
4.
J
ack auxillary socket
5.
C
up holder (depending on version)
6.
St
orage (depending on version)
7.
St
orage - Retractable cup holder
t
i
p the carrier for access to the cup holder.
8.
Fr
ont armrest
Ease of use and comfort
Page 85 of 392
83
Mats
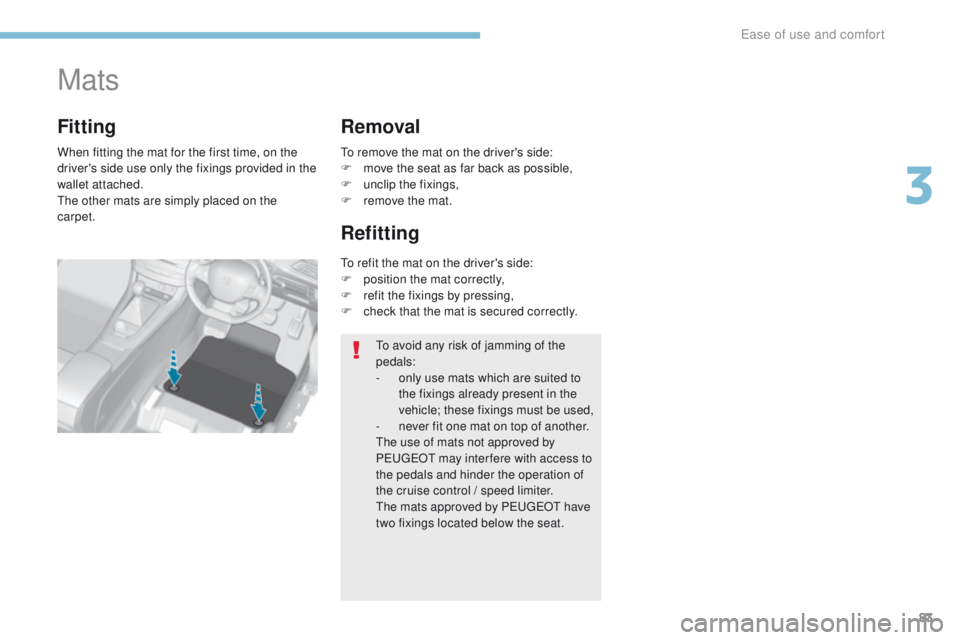
When fitting the mat for the first time, on the
driver's side use only the fixings provided in the
wallet attached.
th
e other mats are simply placed on the
carpet.
Fitting Removal
Refitting
to avoid any risk of jamming of the
pedals:
-
o
nly use mats which are suited to
the fixings already present in the
vehicle; these fixings must be used,
-
n
ever fit one mat on top of another.
th
e use of mats not approved by
P
e
uge
Ot
may inter fere with access to
the pedals and hinder the operation of
the cruise control / speed limiter.
th
e mats approved by P
e
uge
Ot
have
two fixings located below the seat.
to r
emove the mat on the driver's side:
F
m
ove the seat as far back as possible,
F
un
clip the fixings,
F
r
emove the mat.
to r
efit the mat on the driver's side:
F
p
osition the mat correctly,
F
r
efit the fixings by pressing,
F
c
heck that the mat is secured correctly.
3
ease of use and comfort
Page 86 of 392
84
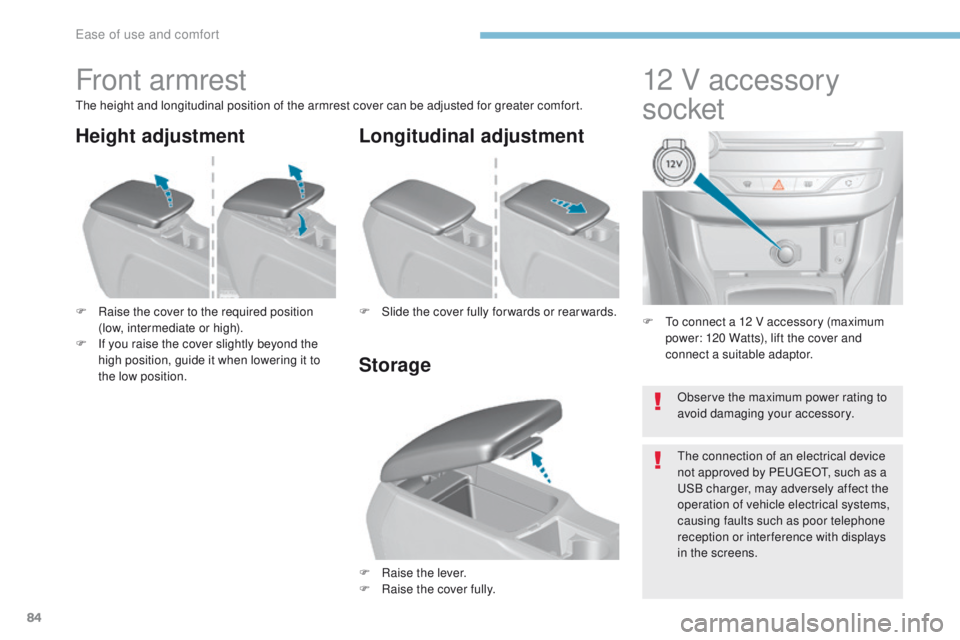
F to connect a 12 V accessory (maximum power: 120 Watts), lift the cover and
connect a suitable adaptor.
12 V accessory
socket
Front armrest
the height and longitudinal position of the armrest cover can be adjusted for greater comfort.
F
R
aise the cover to the required position
(low, intermediate or high).
F
I
f you raise the cover slightly beyond the
high position, guide it when lowering it to
the low position.
F
Ra
ise the lever.
F
Ra
ise the cover fully.
F
S
lide the cover fully for wards or rear wards.
Storage Longitudinal adjustment
Height adjustment
Observe the maximum power rating to
avoid damaging your accessory.
th
e connection of an electrical device
not approved by P
e
uge
Ot, s
uch as a
uS
B charger, may adversely affect the
operation of vehicle electrical systems,
causing faults such as poor telephone
reception or inter ference with displays
in the screens.
ease of use and comfort
Page 87 of 392
85
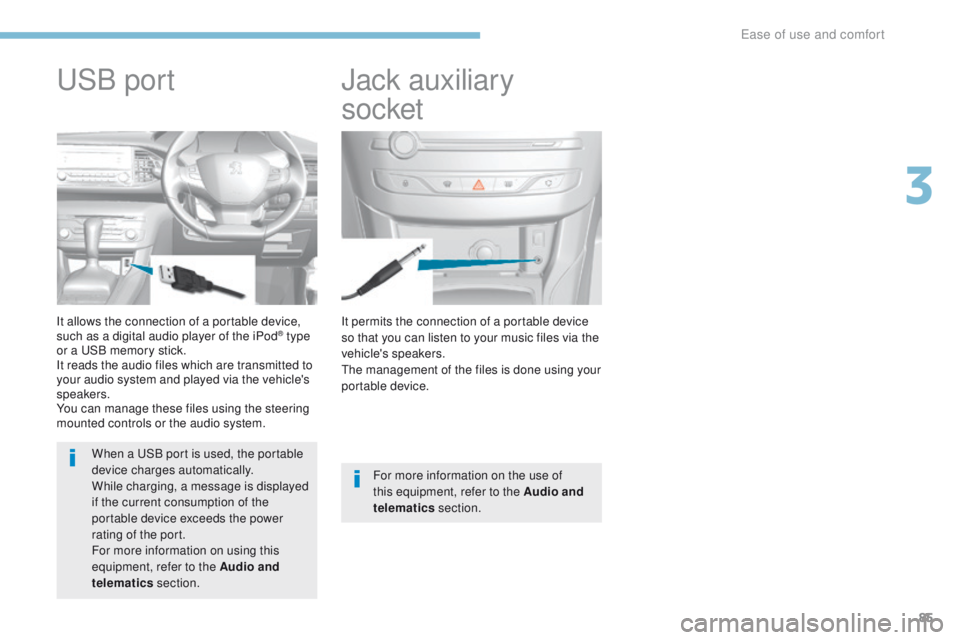
It permits the connection of a portable device
so that you can listen to your music files via the
vehicle's speakers.
th
e management of the files is done using your
portable device.
It allows the connection of a portable device,
such as a digital audio player of the iPod® type
or a
uS
B memory stick.
It reads the audio files which are transmitted to
your audio system and played via the vehicle's
speakers.
You can manage these files using the steering
mounted controls or the audio system.
Jack auxiliary
socketuSB p
ort
For more information on the use of
this equipment, refer to the Audio and
telematics section.
When a
u
S
B port is used, the portable
device charges automatically.
While charging, a message is displayed
if the current consumption of the
portable device exceeds the power
rating of the port.
For more information on using this
equipment, refer to the Audio and
telematics section.
3
ease of use and comfort
Page 88 of 392
86
Ski flap
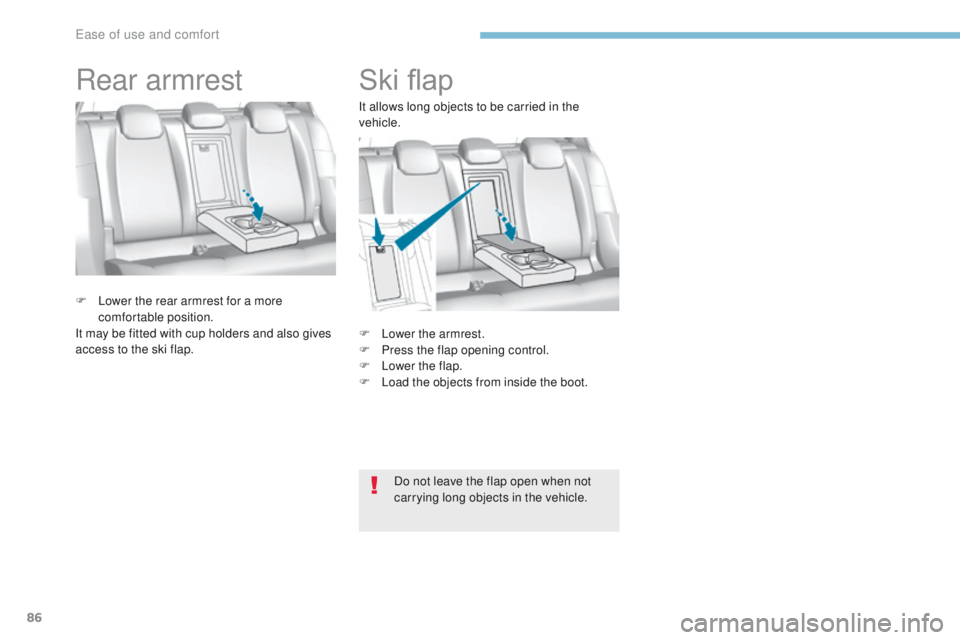
F Lower the armrest.
F P ress the flap opening control.
F
L
ower the flap.
F
L
oad the objects from inside the boot.
F
L
ower the rear armrest for a more
comfortable position.
It may be fitted with cup holders and also gives
access to the ski flap.
Rear armrest
Do not leave the flap open when not
carrying long objects in the vehicle.
It allows long objects to be carried in the
vehicle.
ease of use and comfort
Page 89 of 392
87
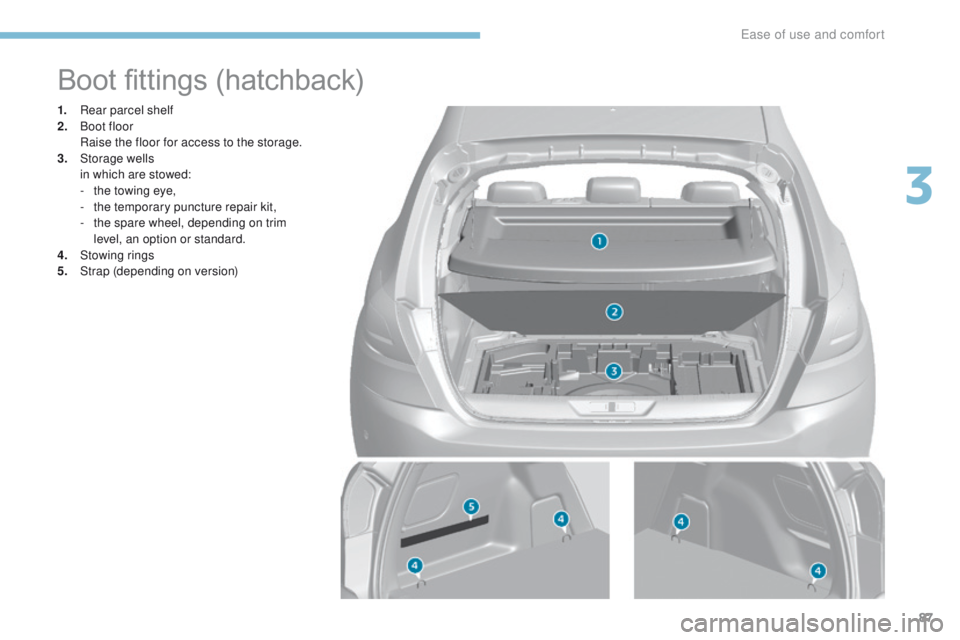
Boot fittings (hatchback)
1. Rear parcel shelf
2. Boot floor
R
aise the floor for access to the storage.
3.
St
orage wells
i
n which are stowed:
-
t
he towing eye,
-
t
he temporary puncture repair kit,
-
t
he spare wheel, depending on trim
level, an option or standard.
4.
S
towing rings
5.
S
trap (depending on version)
3
Ease of use and comfort
Page 90 of 392
88
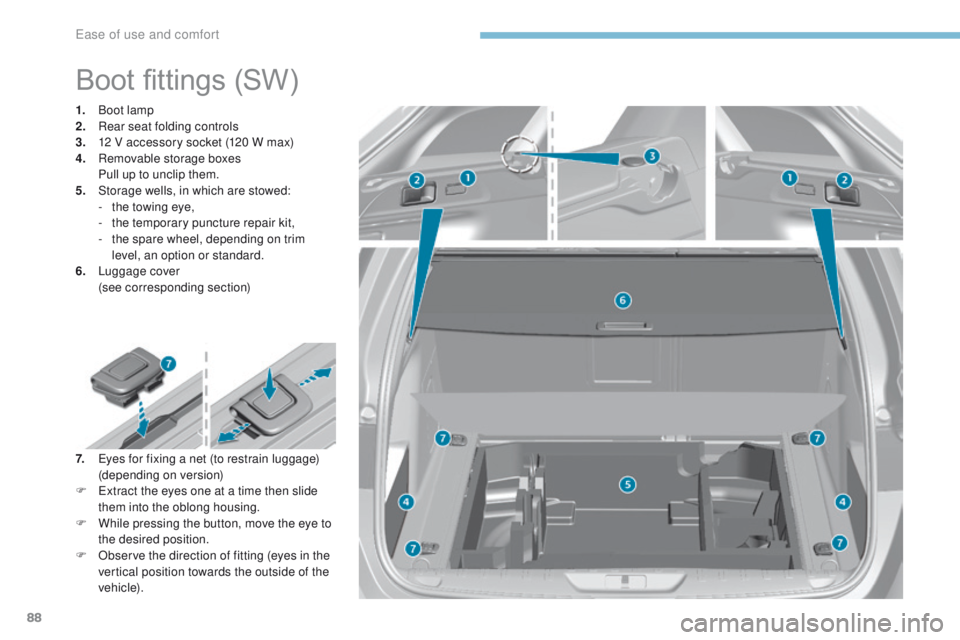
Boot fittings (SW)
1. Boot lamp
2. Rear seat folding controls
3.
1
2 V accessory socket (120 W max)
4.
R
emovable storage boxes
P
ull up to unclip them.
5.
S
torage wells, in which are stowed:
-
t
he towing eye,
-
t
he temporary puncture repair kit,
-
t
he spare wheel, depending on trim
level, an option or standard.
6.
L
uggage cover
(
see corresponding section)
7.
e
ye
s for fixing a net (to restrain luggage)
(depending on version)
F
e
x
tract the eyes one at a time then slide
them into the oblong housing.
F
W
hile pressing the button, move the eye to
the desired position.
F
O
bserve the direction of fitting (eyes in the
vertical position towards the outside of the
vehicle).
Ease of use and comfort