Peugeot 308 2017 Owner's Manual
Manufacturer: PEUGEOT, Model Year: 2017, Model line: 308, Model: Peugeot 308 2017Pages: 392, PDF Size: 10.16 MB
Page 261 of 392
259
308_en_Chap08_en-cas-de-panne_ed01-2016
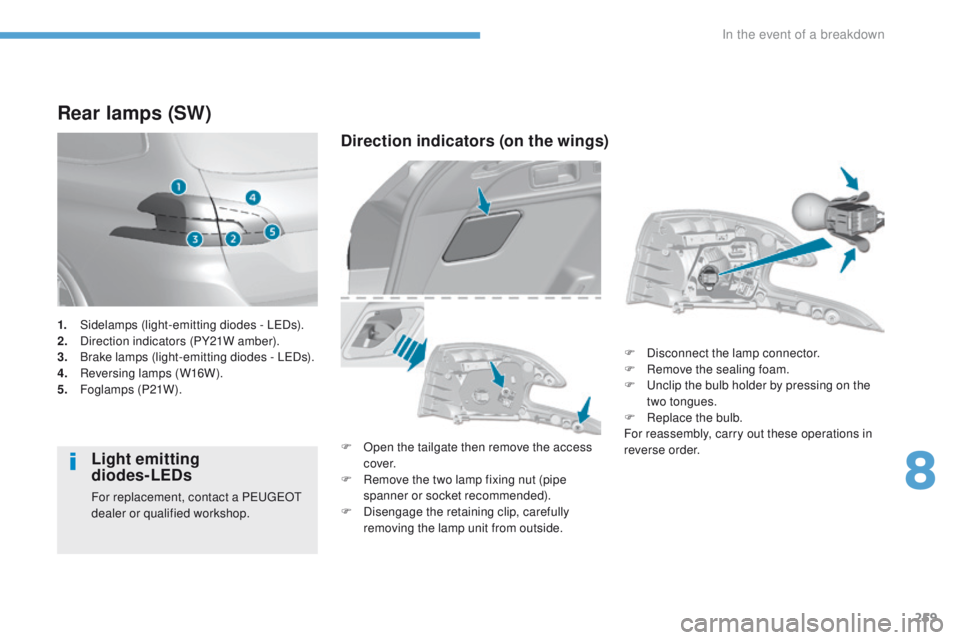
Rear lamps (SW)
Light emitting
diodes-LEDs
For replacement, contact a Pe ugeOt
dealer or qualified workshop.
Direction indicators (on the wings)
F Open the tailgate then remove the access c ove r.
F
R
emove the two lamp fixing nut (pipe
spanner or socket recommended).
F
D
isengage the retaining clip, carefully
removing the lamp unit from outside. F
D
isconnect the lamp connector.
F
R
emove the sealing foam.
F u
n
clip the bulb holder by pressing on the
two tongues.
F
R
eplace the bulb.
For reassembly, carry out these operations in
reverse order.
1.
S
idelamps (light-emitting diodes - L
eD
s).
2.
D
irection indicators (PY21W amber).
3.
B
rake lamps (light-emitting diodes - L
eD
s).
4.
R
eversing lamps (W16W).
5.
F
oglamps (P21W).
8
In the event of a breakdown
Page 262 of 392
260
308_en_Chap08_en-cas-de-panne_ed01-2016
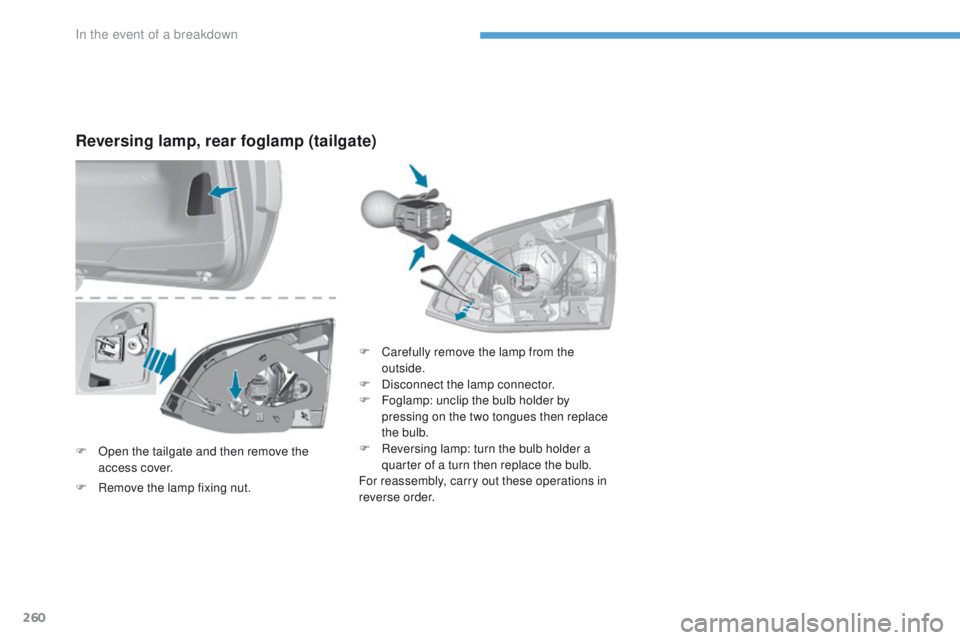
Reversing lamp, rear foglamp (tailgate)
F Open the tailgate and then remove the
access cover. F
C
arefully remove the lamp from the
outside.
F
D
isconnect the lamp connector.
F
F
oglamp: unclip the bulb holder by
pressing on the two tongues then replace
the bulb.
F R eversing lamp: turn the bulb holder a
quarter of a turn then replace the bulb.
For reassembly, carry out these operations in
reverse order.
F
R
emove the lamp fixing nut.
In the event of a breakdown
Page 263 of 392
261
308_en_Chap08_en-cas-de-panne_ed01-2016
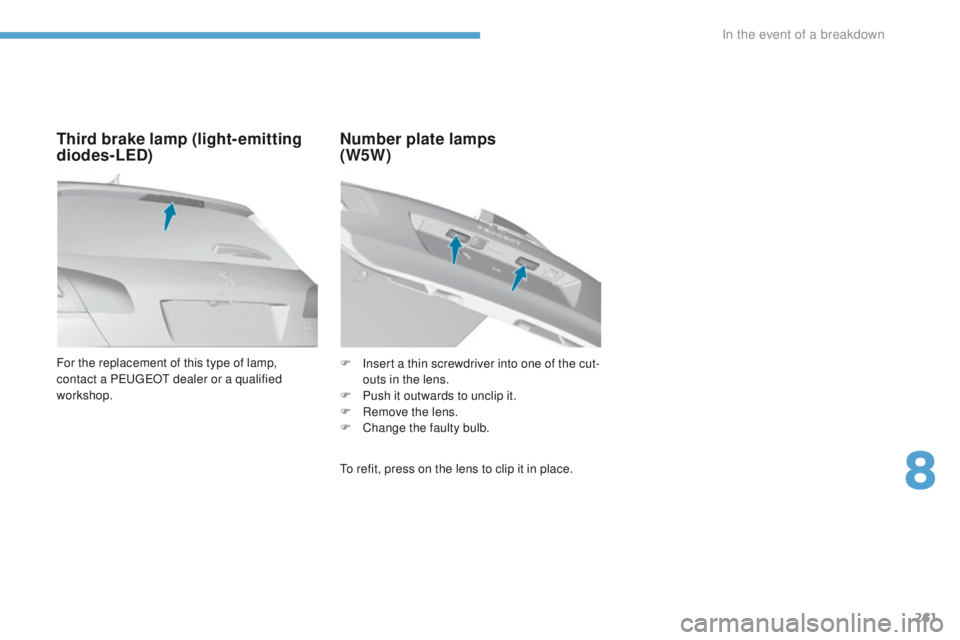
For the replacement of this type of lamp,
contact a Pe
ugeOt dealer or a qualified
workshop.
Third brake lamp (light- emitting
diodes-LED) Number plate lamps
(W5W)
to refit, press on the lens to clip it in place. F
I
nsert a thin screwdriver into one of the cut-
outs in the lens.
F
P
ush it outwards to unclip it.
F
R
emove the lens.
F
C
hange the faulty bulb.
8
In the event of a breakdown
Page 264 of 392

262
308_en_Chap08_en-cas-de-panne_ed01-2016
F unclip the cover by pulling at the top left,
then right.
F
D
isengage the cover completely and turn it
ove r.
Access to the tools
Before changing a fuse:
F t he cause of the failure must be identified
and rectified,
F
a
ll electrical consumers must be switched
of f,
F
t
he vehicle must be immobilised with the
ignition off,
F
i
dentify the failed fuse using the tables and
layout drawings in the following pages.
Changing a fuse
Good Failed
th
e replacement of a fuse not shown in
the tables below may cause a serious
malfunction of your vehicle. Contact
a P
e
uge
Ot
dealer or a qualified
workshop. Tw e e z e r
Changing a fuse
to replace a fuse, you must:
F
u se the special tweezer to extract the fuse
from its housing and check the condition of
its filament,
F
a
lways replace the failed fuse with a fuse
of the same rating (same colour); using a
different rating could cause faults (risk of
f i r e).
If the fuse fails again soon after replacement,
have the vehicle's electrical system checked by
a P
e
uge
Ot
dealer or a qualified workshop.
F
R
emove the tweezer from the back of the
cover to which it is fitted.th
e extraction tweezer is fitted to the back of
the dashboard fusebox cover.
In the event of a breakdown
Page 265 of 392
263
308_en_Chap08_en-cas-de-panne_ed01-2016
PeugeOt will not accept responsibility
for the cost incurred in repairing your
vehicle or for rectifying malfunctions
resulting from the installation of
accessories not supplied and not
recommended by P
e
uge
Ot
and
not installed in accordance with its
instructions, in particular when the
combined consumption of all of the
additional equipment connected
exceeds 10 milliamperes.Installing electrical
accessories
Your vehicle's electrical system is
designed to operate with standard or
optional equipment.
Before installing other electrical
equipment or accessories on your
vehicle, contact a P
e
uge
Ot
dealer or
a qualified workshop.
8
In the event of a breakdown
Page 266 of 392
264
308_en_Chap08_en-cas-de-panne_ed01-2016
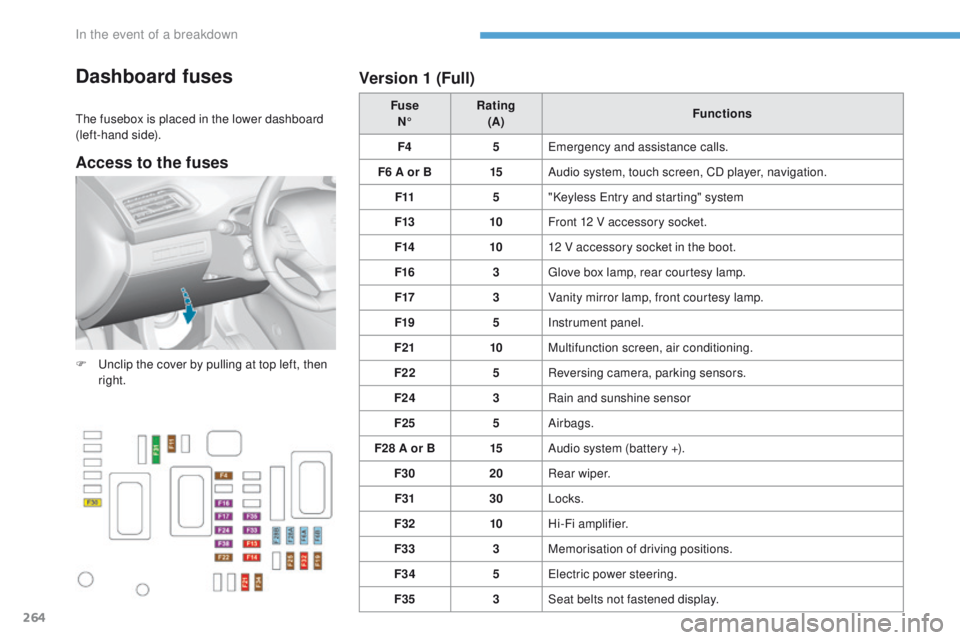
Dashboard fuses
the fusebox is placed in the lower dashboard
(left-hand side). Fuse
N° Rating
(A) Functions
F4 5
em
ergency and assistance calls.
F6 A or B 15Audio system, touch screen, CD player, navigation.
F11 5"Keyless
e
n
try and starting" system
F13 10Front 12 V accessory socket.
F14 1012 V accessory socket in the boot.
F16 3
gl
ove box lamp, rear courtesy lamp.
F17 3Vanity mirror lamp, front courtesy lamp.
F19 5Instrument panel.
F21 10Multifunction screen, air conditioning.
F22 5Reversing camera, parking sensors.
F24 3Rain and sunshine sensor
F25 5Airbags.
F28 A or B 15Audio system (battery +).
F30 20Rear wiper.
F31 30Locks.
F32 10Hi-Fi amplifier.
F33 3Memorisation of driving positions.
F34 5
el
ectric power steering.
F35 3Seat belts not fastened display.
F
u
n
clip the cover by pulling at top left, then
right.
Version 1 (Full)
Access to the fuses
In the event of a breakdown
Page 267 of 392

265
308_en_Chap08_en-cas-de-panne_ed01-2016
Version 2 (Eco)
Fuse
N° Rating
(A) Functions
F9 5
em
ergency and assistance calls.
F13 5Reversing camera and parking sensors
F15 1512 V accessory socket.
F16 15Cigarette lighter.
F17 15Audio system.
F18 20
to
uch screen, CD player, audio and navigation system.
F19 5Rain, sunshine sensor.
F20 5Airbags.
F21 5Instrument panel.
F22/F24 30Interior, exterior, front and rear locks.
F23 5
gl
ove box lamp, vanity mirror, front and rear courtesy lamps.
F25/F27 15Front/rear screenwash pump.
F26 15Horn.
F30 15Rear wiper.
8
In the event of a breakdown
Page 268 of 392
266
308_en_Chap08_en-cas-de-panne_ed01-2016
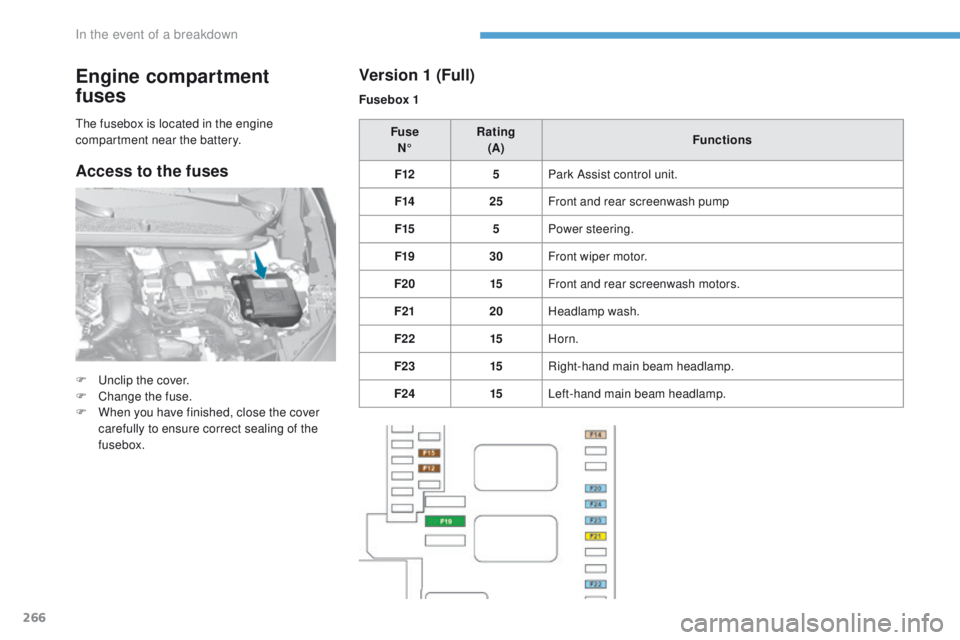
Engine compartment
fuses
F unclip the cover.
F
C hange the fuse.
F
W
hen you have finished, close the cover
carefully to ensure correct sealing of the
fusebox. Fuse
N° Rating
(A) Functions
F12 5Park Assist control unit.
F14 25Front and rear screenwash pump
F15 5Power steering.
F19 30Front wiper motor.
F20 15Front and rear screenwash motors.
F21 20Headlamp wash.
F22 15Horn.
F23 15Right-hand main beam headlamp.
F24 15Left-hand main beam headlamp.
th
e fusebox is located in the engine
compartment near the battery.
Version 1 (Full)
Fusebox 1
Access to the fuses
In the event of a breakdown
Page 269 of 392

267
308_en_Chap08_en-cas-de-panne_ed01-2016
Fusebox 2
Fuse N° Rating
(A) Functions
F8 30Diesel emissions control system (AdBlue
®).
F10 5Automatic gearbox.
F12 15Automatic gearbox.
Version 2 (Eco)
Fuse
N° Rating
(A) Functions
F13 5Built-in systems inter face.
F16 15Front foglamps.
F18 10Right-hand main beam headlamp.
F19 10Left-hand main beam headlamp.
F25 40Headlamp wash relay (aftermarket fitment).
F27 25Built-in systems inter face.
F28 30Diesel emissions control system (AdBlue
®).
F29 30Front wiper motor.
F30 80Pre-heater plugs (Diesel), additional programmable heating
(aftermarket fitment), headlamp wash pump.
8
In the event of a breakdown
Page 270 of 392
268
308_en_Chap08_en-cas-de-panne_ed01-2016
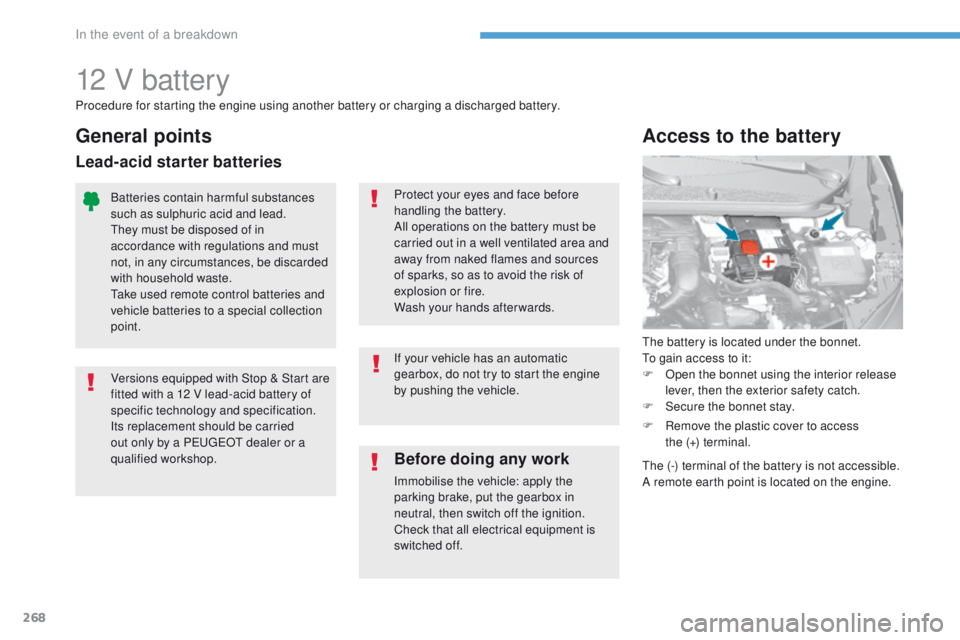
12 V battery
the battery is located under the bonnet.to g
ain access to it:
F
O
pen the bonnet using the interior release
lever, then the exterior safety catch.
F
S
ecure the bonnet stay.
Access to the battery
Procedure for starting the engine using another battery or charging a discharged battery.
Before doing any work
Immobilise the vehicle: apply the
parking brake, put the gearbox in
neutral, then switch off the ignition.
Check that all electrical equipment is
switched off. If your vehicle has an automatic
gearbox, do not try to start the engine
by pushing the vehicle.
Batteries contain harmful substances
such as sulphuric acid and lead.
th
ey must be disposed of in
accordance with regulations and must
not, in any circumstances, be discarded
with household waste.
ta
ke used remote control batteries and
vehicle batteries to a special collection
point. Protect your eyes and face before
handling the battery.
All operations on the battery must be
carried out in a well ventilated area and
away from naked flames and sources
of sparks, so as to avoid the risk of
explosion or fire.
Wash your hands afterwards.
Versions equipped with Stop & Start are
fitted with a 12 V lead-acid battery of
specific technology and specification.
Its replacement should be carried
out only by a P
e
uge
Ot
dealer or a
qualified workshop.
General points
Lead-acid starter batteries
F Remove the plastic cover to access the (+) terminal.
th
e (-) terminal of the battery is not accessible.
A remote earth point is located on the engine.
In the event of a breakdown