Page 1 Peugeot 308 2018 Owner's Manual
[x] Cancel search | Manufacturer: PEUGEOT, Model Year: 2018, Model line: 308, Model: Peugeot 308 2018Pages: 324, PDF Size: 10.72 MB
Page 10 of 324
8
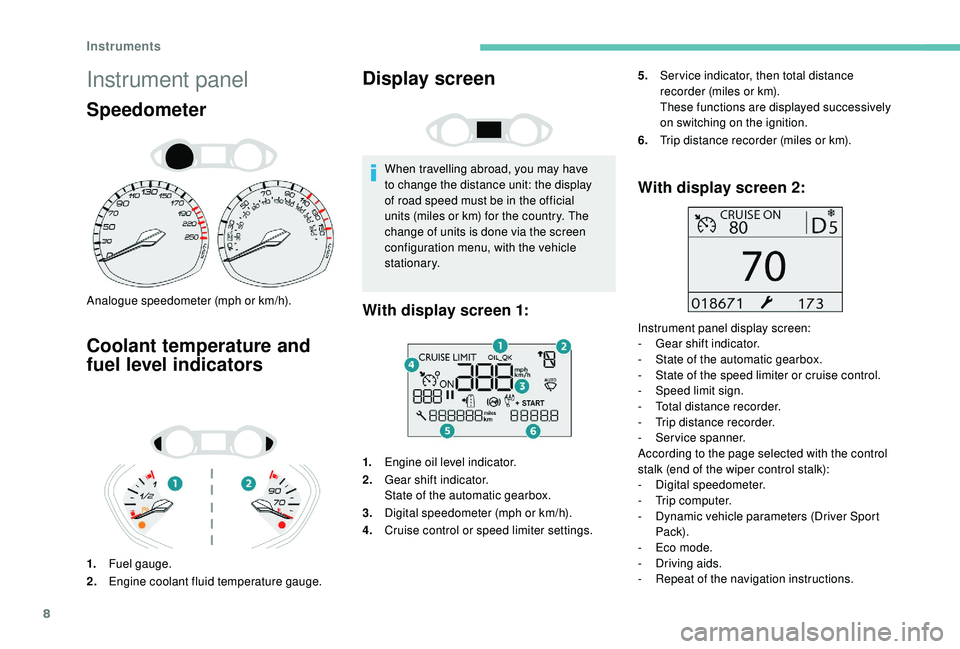
Instrument panel
Speedometer
Analogue speedometer (mph or km/h).
Coolant temperature and
fuel level indicators
1.Fuel gauge.
2. Engine coolant fluid temperature gauge.
Display screen
When travelling abroad, you may have
to change the distance unit: the display
of road speed must be in the official
units (miles or km) for the country. The
change of units is done via the screen
configuration menu, with the vehicle
stationary.
1. Engine oil level indicator.
2. Gear shift indicator.
State of the automatic gearbox.
3. Digital speedometer (mph or km/h).
4. Cruise control or speed limiter settings.
With display screen 2:
Instrument panel display screen:
-
G ear shift indicator.
-
S
tate of the automatic gearbox.
-
S
tate of the speed limiter or cruise control.
-
S
peed limit sign.
-
T
otal distance recorder.
-
T
rip distance recorder.
-
S
ervice spanner.
According to the page selected with the control
stalk (end of the wiper control stalk):
-
D
igital speedometer.
-
T
rip computer.
-
D
ynamic vehicle parameters (Driver Sport
Pack).
-
E
co mode.
-
D
riving aids.
-
R
epeat of the navigation instructions.
With display screen 1:
5.Ser vice indicator, then total distance
recorder (miles or km).
These functions are displayed successively
on switching on the ignition.
6. Trip distance recorder (miles or km).
Instruments
Page 31 of 324
29
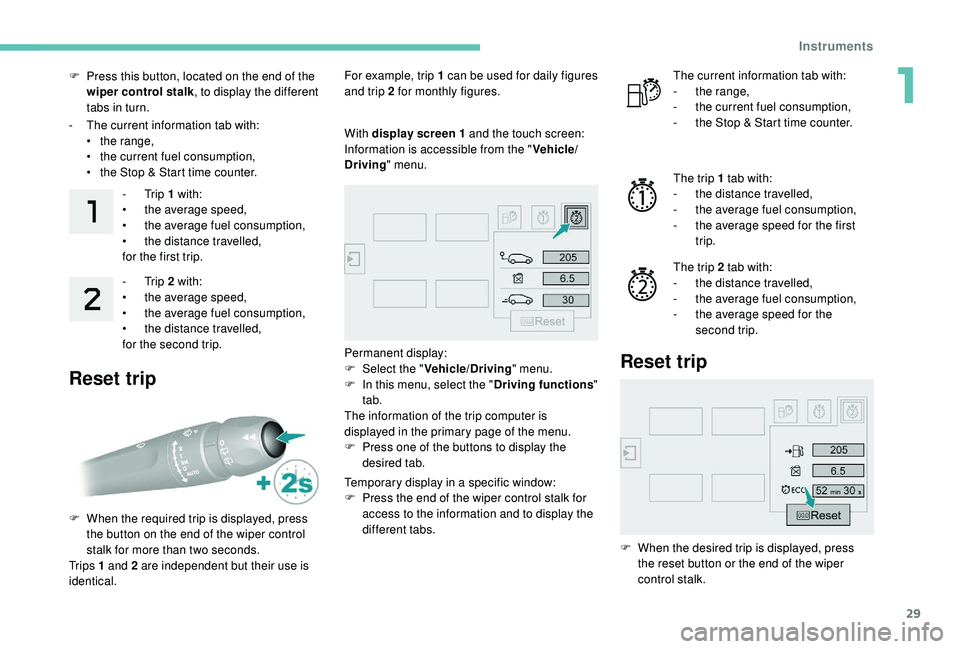
F Press this button, located on the end of the wiper control stalk , to display the different
tabs in turn.
-
T
he current information tab with:
•
t
he range,
•
t
he current fuel consumption,
•
t
he Stop & Start time counter.-
Trip 1 with:
•
t
he average speed,
•
t
he average fuel consumption,
•
t
he distance travelled,
for the first trip.
-
Trip 2 with:
•
t
he average speed,
•
t
he average fuel consumption,
•
t
he distance travelled,
for the second trip.
Reset trip
For example, trip 1 can be used for daily figures
and trip 2 for monthly figures.
F
W
hen the required trip is displayed, press
the button on the end of the wiper control
stalk for more than two seconds.
Tr i p s 1 and 2 are independent but their use is
identical. With display screen
1 and the touch screen:
Information is accessible from the " Vehicle/
Driving " menu.
Permanent display:
F
Sel
ect the " Vehicle/Driving " menu.
F
I
n this menu, select the " Driving functions"
tab.
The information of the trip computer is
displayed in the primary page of the menu.
F
P
ress one of the buttons to display the
desired tab.
Temporary display in a specific window:
F
P
ress the end of the wiper control stalk for
access to the information and to display the
different tabs. The current information tab with:
-
t he range,
-
t
he current fuel consumption,
-
t
he Stop & Start time counter.
The trip 1 tab with:
-
t
he distance travelled,
-
t
he average fuel consumption,
-
t
he average speed for the first
trip.
The trip 2 tab with:
-
t
he distance travelled,
-
t
he average fuel consumption,
-
t
he average speed for the
second trip.
Reset trip
F When the desired trip is displayed, press the reset button or the end of the wiper
control stalk.
1
Instruments
Page 34 of 324
32
Display configuration
This menu gives access to the following
settings:
-
"
Choice of units",
-
"
Date and time adjustment",
-
"
Personalise display",
-
"Language".For safety reasons, configuration of
the multifunction screen by the driver
must only be done when the vehicle is
stationary.
Touch screen
This system gives access to:
- t he permanent display of the time and
the exterior temperature (a blue symbol
appears when there is a risk of ice),
-
t
he heating/air conditioning controls,
-
m
enus for adjusting settings for vehicle
functions and systems,
-
a
udio system and telephone controls and
the display of associated information,
-
t
he display of visual parking aids (visual
parking sensor information, Park Assist,
e t c .),
-
I
nternet ser vices and the display of
associated information. For safety reasons, the vehicle must
always be stationar y for the driver to
perform operations that require close
attention.
Some functions are not accessible when
driving.
General operation
RecommendationsThis screen is of the capacitive type.
Use is possible in all temperatures.
Do not use pointed objects on the touch
screen.
Do not touch the touch screen with wet hands.
Use a soft clean cloth to clean the touch
screen.
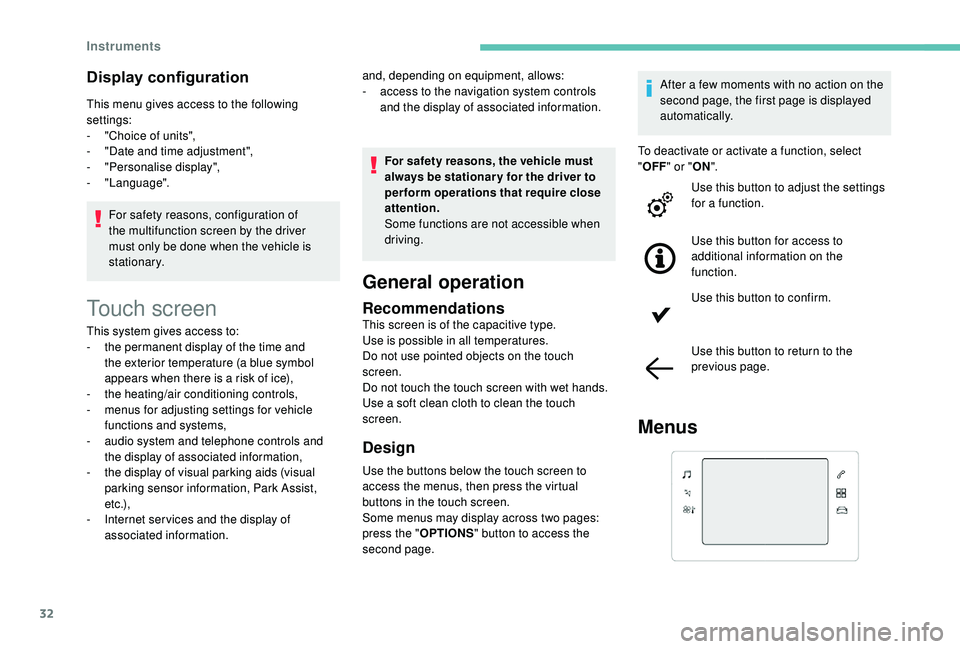
Design
Use the buttons below the touch screen to
access the menus, then press the virtual
buttons in the touch screen.
Some menus may display across two pages:
press the "
OPTIONS" button to access the
second page. After a few moments with no action on the
second page, the first page is displayed
automatically.
To deactivate or activate a function, select
" OFF " or " ON".
Use this button to adjust the settings
for a function.
Use this button for access to
additional information on the
function.
Use this button to confirm.
Use this button to return to the
previous page.
Menus
and, depending on equipment, allows:
- a ccess to the navigation system controls
and the display of associated information.
Instruments
Page 40 of 324
38
With PEUGEOT Connect
Radio
F Select the "Settings" menu.
F
Sel
ect "Date and time ".
F
Sel
ect the " Date" or "Time " tab.
F
C
hoose the display formats.
F
C
hange the date and/or time using the
numeric keypad.
F
C
onfirm with " OK".
The system does not automatically
manage the change between winter and
summer time (depending on country).
With PEUGEOT Connect
Nav
Setting of the time and date is only available if
synchronisation with the GPS is deactivated.
F
P
ress the " OPTIONS " button to go to the
secondary page.
F
Sel
ect "Setting the time- date". F
Sel
ect the "
Date" or "Time " tab.
F
S
et the date and/or time using the numeric
keypad.
Additional settings
You can choose:
- T o change the display format of the date
and time (12h/24h).
-
T
o change the time zone.
-
T
o activate or deactivate synchronisation
with the GPS (UTC).
The system does not automatically
manage the change between winter and
summer time (depending on country).
The change between winter and summer
time is done by changing the time zone.
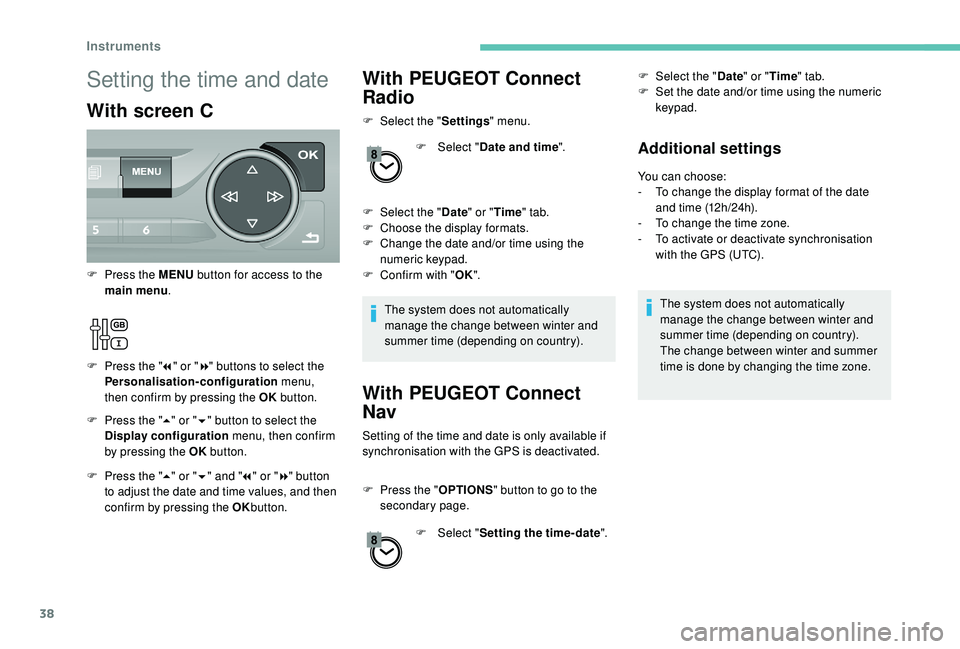
Setting the time and date
With screen C
F Press the " 5" or " 6" button to select the
Display configuration menu, then confirm
by pressing the OK button.
F
P
ress the MENU
button for access to the
main menu .
F
P
ress the "
7" or " 8" buttons to select the
Personalisation-configuration menu,
then confirm by pressing the OK button.
F
P
ress the " 5" or " 6" and " 7" or " 8" button
to adjust the date and time values, and then
confirm by pressing the OK button.
Instruments
Page 68 of 324
66
Stop & Star t
The heating and air conditioning systems
only work when the engine is running.
Temporarily deactivate the Stop &
Start system to maintain a comfortable
temperature in the passenger
compartment.
For more information on Stop & Star t,
refer to the corresponding section.
Manual air conditioning
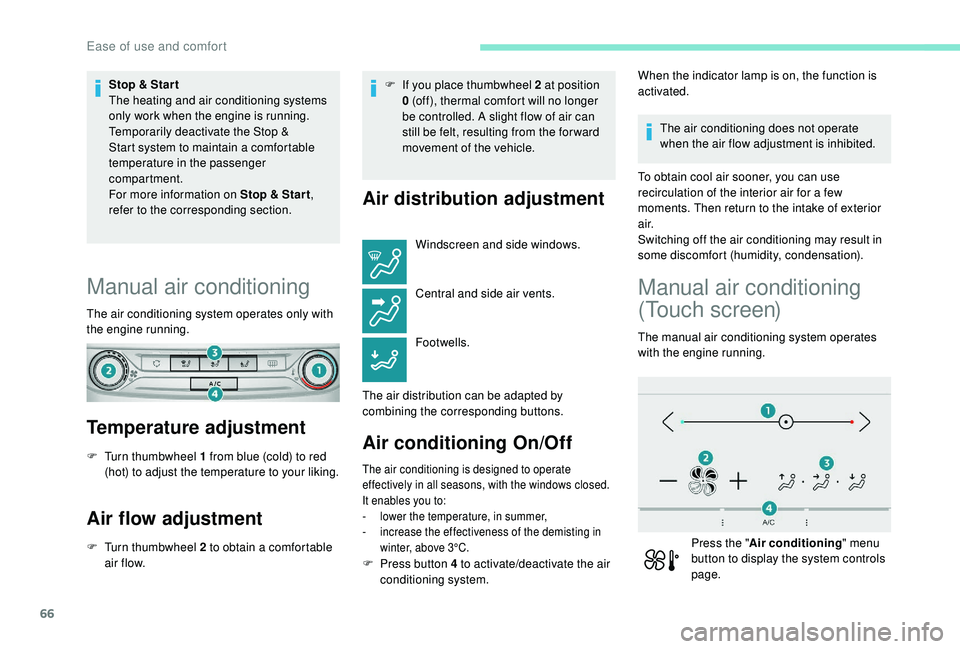
The air conditioning system operates only with
the engine running.
Temperature adjustment
F Turn thumbwheel 1 from blue (cold) to red (hot) to adjust the temperature to your liking.
Air flow adjustment
F Turn thumbwheel 2 to obtain a comfortable air f low. F
I
f you place thumbwheel 2 at position
0 (off), thermal comfort will no longer
be controlled. A slight flow of air can
still be felt, resulting from the for ward
movement of the vehicle.
Air distribution adjustment
Windscreen and side windows.
Central and side air vents.
Footwells.
The air distribution can be adapted by
combining the corresponding buttons.
Air conditioning On/Off
The air conditioning is designed to operate
effectively in all seasons, with the windows closed.
It enables you to:
-
l
ower the temperature, in summer,
-
i
ncrease the effectiveness of the demisting in
winter, above 3°C.
When the indicator lamp is on, the function is
activated.
The air conditioning does not operate
when the air flow adjustment is inhibited.
To obtain cool air sooner, you can use
recirculation of the interior air for a few
moments. Then return to the intake of exterior
a i r.
Switching off the air conditioning may result in
some discomfort (humidity, condensation).
Manual air conditioning
(Touch screen)
The manual air conditioning system operates
with the engine running.
Press the " Air conditioning " menu
button to display the system controls
page.
F
P
ress button 4 to activate/deactivate the air
conditioning system.
Ease of use and comfort
Page 69 of 324
67
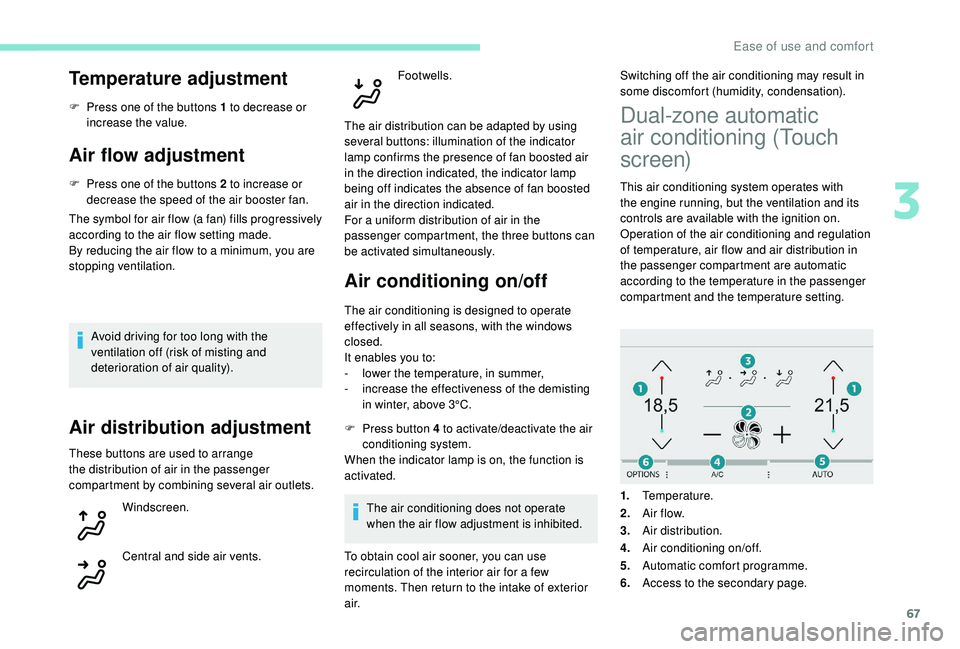
Temperature adjustment
F Press one of the buttons 1 to decrease or increase the value.
Air flow adjustment
F Press one of the buttons 2 to increase or decrease the speed of the air booster fan.
The symbol for air flow (a fan) fills progressively
according to the air flow setting made.
By reducing the air flow to a minimum, you are
stopping ventilation.
Avoid driving for too long with the
ventilation off (risk of misting and
deterioration of air quality).
Air distribution adjustment
These buttons are used to arrange
the distribution of air in the passenger
compartment by combining several air outlets. Windscreen.
Central and side air vents. Footwells.
The air distribution can be adapted by using
several buttons: illumination of the indicator
lamp confirms the presence of fan boosted air
in the direction indicated, the indicator lamp
being off indicates the absence of fan boosted
air in the direction indicated.
For a uniform distribution of air in the
passenger compartment, the three buttons can
be activated simultaneously.
Air conditioning on/off
The air conditioning is designed to operate
effectively in all seasons, with the windows
closed.
It enables you to:
-
l
ower the temperature, in summer,
-
i
ncrease the effectiveness of the demisting
in winter, above 3°C.
F
P
ress button 4 to activate/deactivate the air
conditioning system.
When the indicator lamp is on, the function is
activated.
The air conditioning does not operate
when the air flow adjustment is inhibited. Switching off the air conditioning may result in
some discomfort (humidity, condensation).
To obtain cool air sooner, you can use
recirculation of the interior air for a few
moments. Then return to the intake of exterior
a i r.
Dual-zone automatic
air conditioning (Touch
screen)
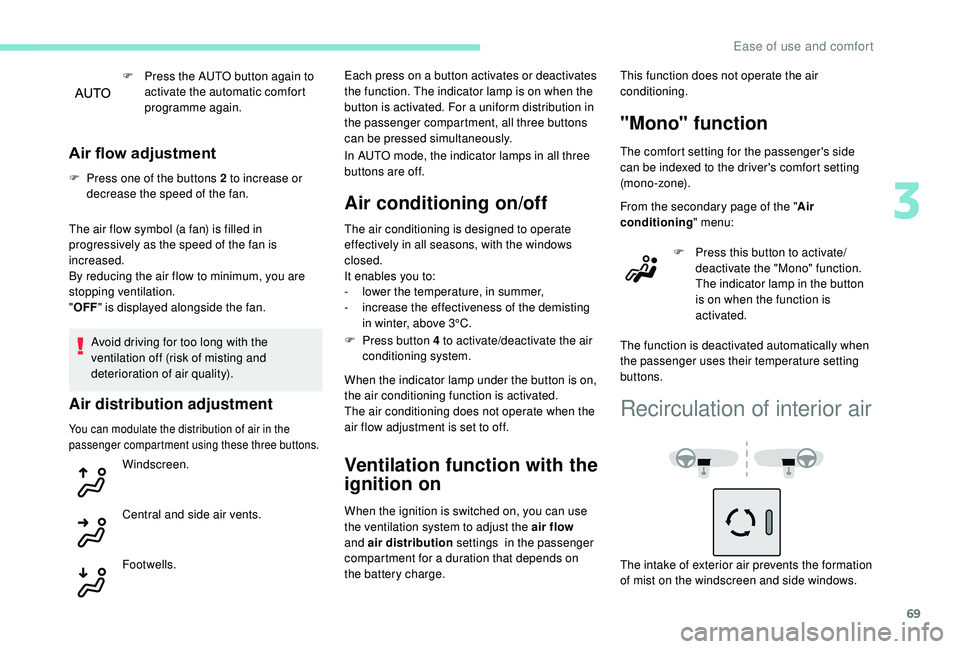
This air conditioning system operates with
the engine running, but the ventilation and its
controls are available with the ignition on.
Operation of the air conditioning and regulation
of temperature, air flow and air distribution in
the passenger compartment are automatic
according to the temperature in the passenger
compartment and the temperature setting.
1. Temperature.
2. A ir f low.
3. Air distribution.
4. Air conditioning on/off.
5. Automatic comfort programme.
6. Access to the secondary page.
3
Ease of use and comfort
Page 70 of 324

68
Press the "Air conditioning " menu
button to display the controls for the
air conditioning system.
Temperature adjustment
The driver and front passenger can each set
the temperature.
F
P
ress one of the buttons 1 to increase or
decrease the air flow.
The value displayed corresponds to a level of
comfort and not to a precise temperature.
It is recommended that you avoid a
difference between the left and right setting
of more than 3.
Automatic comfort
programme
F Press the button 5 to activate/deactivate the automatic mode of the air conditioning
system.
When the indicator lamp in the button is on, the
air conditioning system operates automatically:
the system manages the temperature, air
flow and air distribution in the passenger
compartment in an optimum way depending on
the comfort level you have selected. It is possible to modulate the
intensity of the automatic comfort
programme by choosing one of
three mode settings offered in
a secondary page of the "
Air
conditioning " menu.
To change the current setting, shown by the
green indicator lamp, press the button for the
desired mode:
"Soft": provides soft and quiet
operation by limiting air flow.
"Normal": offers the best
compromise between a comfortable
temperature and quiet operation
(default setting).
"Fast": provides strong and effective
air f low. This setting is associated with AUTO mode
only. However, on deactivation of AUTO mode,
the indicator for the last setting remains on.
Changing the setting does not reactivate AUTO
mode if deactivated.
In cold conditions and when the engine is
cold, to limit distribution of cold air in the
passenger compartment, the air flow will
change gradually until the comfort setting
is reached.
On entering the vehicle, if the interior
temperature is much colder or warmer
than the comfort value setting, there is
no need to alter the value displayed in
order to reach more quickly the required
level of comfort. The system automatically
corrects the temperature difference.
Manual control
You can manually adjust one or more of these
settings, while retaining automatic control of
the other functions:
-
a
ir flow,
-
a
ir distribution.
As soon as you modify a setting, the indicator
lamp in the " AUTO" button goes off.
Ease of use and comfort
Page 71 of 324
69
F Press the AUTO button again to activate the automatic comfort
programme again.
Air flow adjustment
F Press one of the buttons 2 to increase or decrease the speed of the fan.
The air flow symbol (a fan) is filled in
progressively as the speed of the fan is
increased.
By reducing the air flow to minimum, you are
stopping ventilation.
" OFF " is displayed alongside the fan.
Avoid driving for too long with the
ventilation off (risk of misting and
deterioration of air quality).
Air distribution adjustment
You can modulate the distribution of air in the
passenger compartment using these three buttons.
Windscreen.
Central and side air vents.
Footwells. Each press on a button activates or deactivates
the function. The indicator lamp is on when the
button is activated. For a uniform distribution in
the passenger compartment, all three buttons
can be pressed simultaneously.
In AUTO mode, the indicator lamps in all three
buttons are off.
Air conditioning on/off
The air conditioning is designed to operate
effectively in all seasons, with the windows
closed.
It enables you to:
-
l
ower the temperature, in summer,
-
i
ncrease the effectiveness of the demisting
in winter, above 3°C.
F
P
ress button 4 to activate/deactivate the air
conditioning system.
When the indicator lamp under the button is on,
the air conditioning function is activated.
The air conditioning does not operate when the
air flow adjustment is set to off.
Ventilation function with the
ignition on
When the ignition is switched on, you can use
the ventilation system to adjust the air flow
and air distribution settings in the passenger
compartment for a duration that depends on
the battery charge. This function does not operate the air
conditioning.
"Mono" function
The comfort setting for the passenger's side
can be indexed to the driver's comfort setting
(mono-zone).
From the secondary page of the "
Air
conditioning " menu:
F
P
ress this button to activate/
deactivate the "Mono" function.
The indicator lamp in the button
is on when the function is
activated.
The function is deactivated automatically when
the passenger uses their temperature setting
buttons.
Recirculation of interior air
The intake of exterior air prevents the formation
of mist on the windscreen and side windows.
3
Ease of use and comfort
Page 101 of 324
99
Deactivating the front
passenger airbag
Never install a "rear ward facing" child
restraint system on a seat protected by an
active front airbag.
This could cause the death of the child or
serious injury.
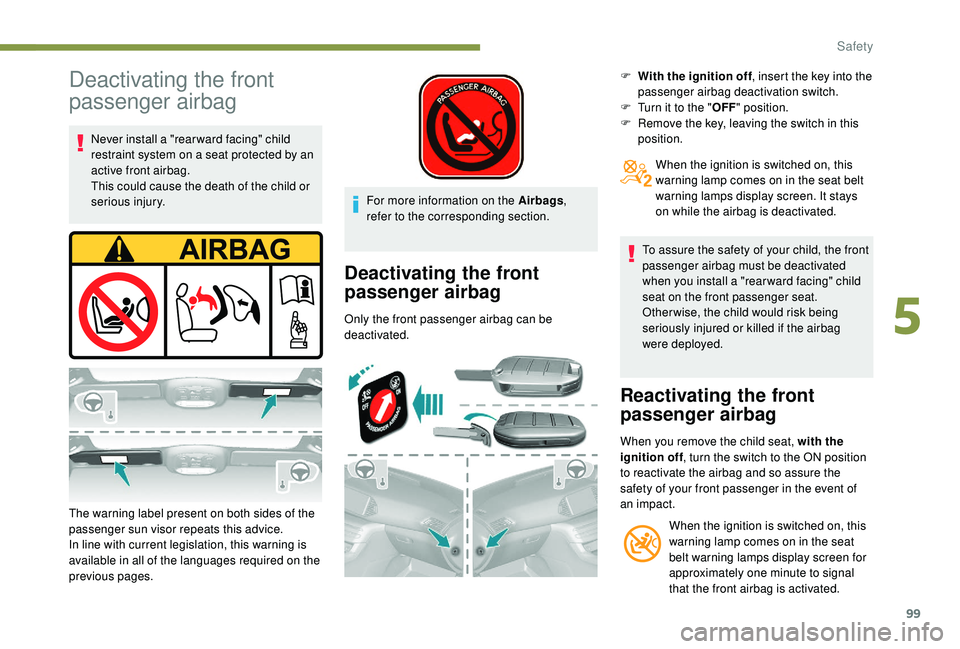
The warning label present on both sides of the
passenger sun visor repeats this advice.
In line with current legislation, this warning is
available in all of the languages required on the
previous pages. For more information on the Airbags
,
refer to the corresponding section.
Deactivating the front
passenger airbag
Only the front passenger airbag can be
deactivated. F
W
ith the ignition off
, insert the key into the
passenger airbag deactivation switch.
F
T
urn it to the "
OFF" position.
F
R
emove the key, leaving the switch in this
position.
When the ignition is switched on, this
warning lamp comes on in the seat belt
warning lamps display screen. It stays
on while the airbag is deactivated.
To assure the safety of your child, the front
passenger airbag must be deactivated
when you install a "rear ward facing" child
seat on the front passenger seat.
Otherwise, the child would risk being
seriously injured or killed if the airbag
were deployed.
Reactivating the front
passenger airbag
When you remove the child seat, with the
ignition off , turn the switch to the ON position
to reactivate the airbag and so assure the
safety of your front passenger in the event of
an impact.
When the ignition is switched on, this
warning lamp comes on in the seat
belt warning lamps display screen for
approximately one minute to signal
that the front airbag is activated.
5
Safety
Page 196 of 324
194
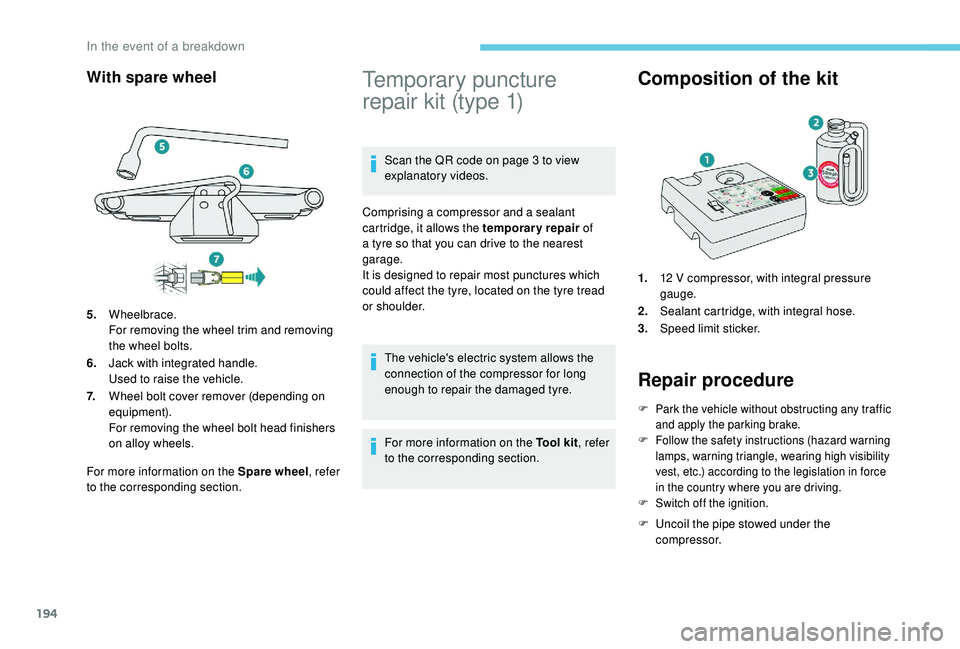
With spare wheel
For more information on the Spare wheel, refer
to the corresponding section.
Temporary puncture
repair kit (type 1)
Scan the QR code on page 3 to view
explanatory videos.
Comprising a compressor and a sealant
cartridge, it allows the temporary repair of
a tyre so that you can drive to the nearest
garage.
It is designed to repair most punctures which
could affect the tyre, located on the tyre tread
or shoulder.
The vehicle's electric system allows the
connection of the compressor for long
enough to repair the damaged tyre.
For more information on the Tool kit , refer
to the corresponding section.
Composition of the kit
1. 12 V compressor, with integral pressure
gauge.
2. Sealant cartridge, with integral hose.
3. Speed limit sticker.
Repair procedure
F Park the vehicle without obstructing any traffic
and apply the parking brake.
F
F
ollow the safety instructions (hazard warning
lamps, warning triangle, wearing high visibility
vest, etc.) according to the legislation in force
in the country where you are driving.
F
S
witch off the ignition.
F Uncoil the pipe stowed under the compressor.
5.
Wheelbrace.
For removing the wheel trim and removing
the wheel bolts.
6. Jack with integrated handle.
Used to raise the vehicle.
7. Wheel bolt cover remover (depending on
equipment).
For removing the wheel bolt head finishers
on alloy wheels.
In the event of a breakdown