wiper fluid Peugeot 308 2018 Owner's Manual
[x] Cancel search | Manufacturer: PEUGEOT, Model Year: 2018, Model line: 308, Model: Peugeot 308 2018Pages: 324, PDF Size: 10.72 MB
Page 10 of 324

8
Instrument panel
Speedometer
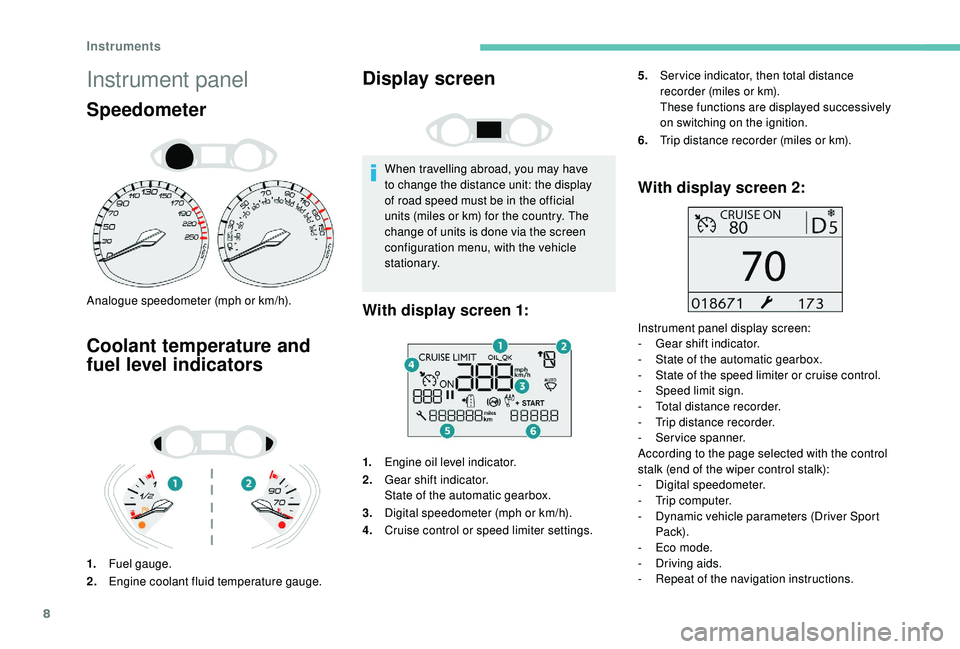
Analogue speedometer (mph or km/h).
Coolant temperature and
fuel level indicators
1.Fuel gauge.
2. Engine coolant fluid temperature gauge.
Display screen
When travelling abroad, you may have
to change the distance unit: the display
of road speed must be in the official
units (miles or km) for the country. The
change of units is done via the screen
configuration menu, with the vehicle
stationary.
1. Engine oil level indicator.
2. Gear shift indicator.
State of the automatic gearbox.
3. Digital speedometer (mph or km/h).
4. Cruise control or speed limiter settings.
With display screen 2:
Instrument panel display screen:
-
G ear shift indicator.
-
S
tate of the automatic gearbox.
-
S
tate of the speed limiter or cruise control.
-
S
peed limit sign.
-
T
otal distance recorder.
-
T
rip distance recorder.
-
S
ervice spanner.
According to the page selected with the control
stalk (end of the wiper control stalk):
-
D
igital speedometer.
-
T
rip computer.
-
D
ynamic vehicle parameters (Driver Sport
Pack).
-
E
co mode.
-
D
riving aids.
-
R
epeat of the navigation instructions.
With display screen 1:
5.Ser vice indicator, then total distance
recorder (miles or km).
These functions are displayed successively
on switching on the ignition.
6. Trip distance recorder (miles or km).
Instruments
Page 83 of 324

81
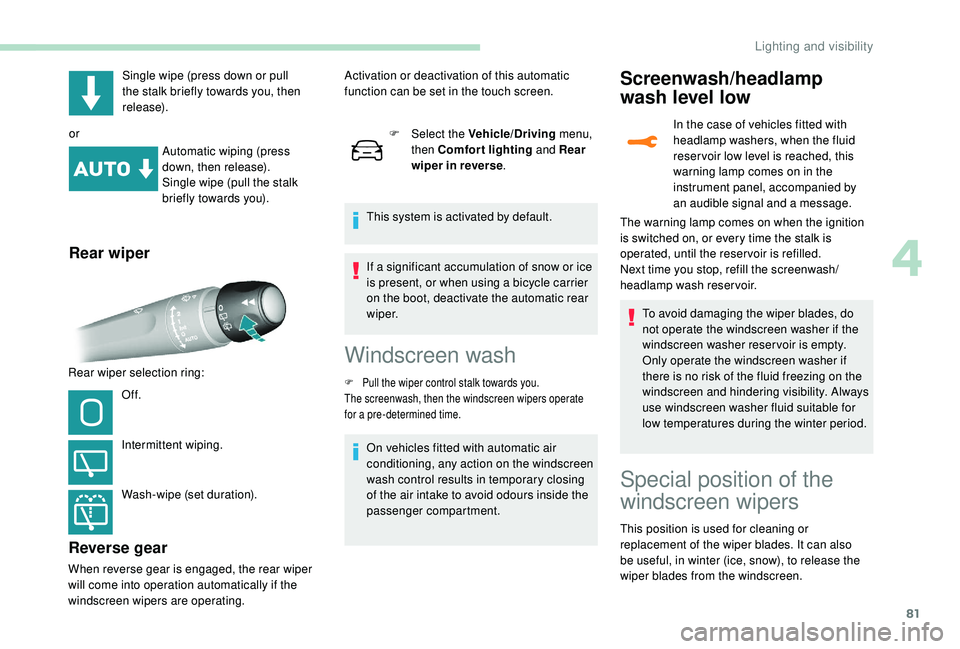
Single wipe (press down or pull
the stalk briefly towards you, then
release).
or Automatic wiping (press
down, then release).
Single wipe (pull the stalk
briefly towards you).
Rear wiper
Rear wiper selection ring:
Of f.
Intermittent wiping.
Wash-wipe (set duration).
Reverse gear
When reverse gear is engaged, the rear wiper
will come into operation automatically if the
windscreen wipers are operating. F
Sel
ect the Vehicle/Driving
menu,
then Comfort lighting and Rear
wiper in reverse .
This system is activated by default.
Activation or deactivation of this automatic
function can be set in the touch screen.
If a significant accumulation of snow or ice
is present, or when using a bicycle carrier
on the boot, deactivate the automatic rear
w i p e r.
Windscreen wash
F Pull the wiper control stalk towards you.
The screenwash, then the windscreen wipers operate
for a pre-determined time.
On vehicles fitted with automatic air
conditioning, any action on the windscreen
wash control results in temporary closing
of the air intake to avoid odours inside the
passenger compartment.
Screenwash/headlamp
wash level low
In the case of vehicles fitted with
headlamp washers, when the fluid
reser voir low level is reached, this
warning lamp comes on in the
instrument panel, accompanied by
an audible signal and a message.
To avoid damaging the wiper blades, do
not operate the windscreen washer if the
windscreen washer reservoir is empty.
Only operate the windscreen washer if
there is no risk of the fluid freezing on the
windscreen and hindering visibility. Always
use windscreen washer fluid suitable for
low temperatures during the winter period.
The warning lamp comes on when the ignition
is switched on, or every time the stalk is
operated, until the reser voir is refilled.
Next time you stop, refill the screenwash/
headlamp wash reservoir.
Special position of the
windscreen wipers
This position is used for cleaning or
replacement of the wiper blades. It can also
be useful, in winter (ice, snow), to release the
wiper blades from the windscreen.
4
Lighting and visibility
Page 84 of 324

82
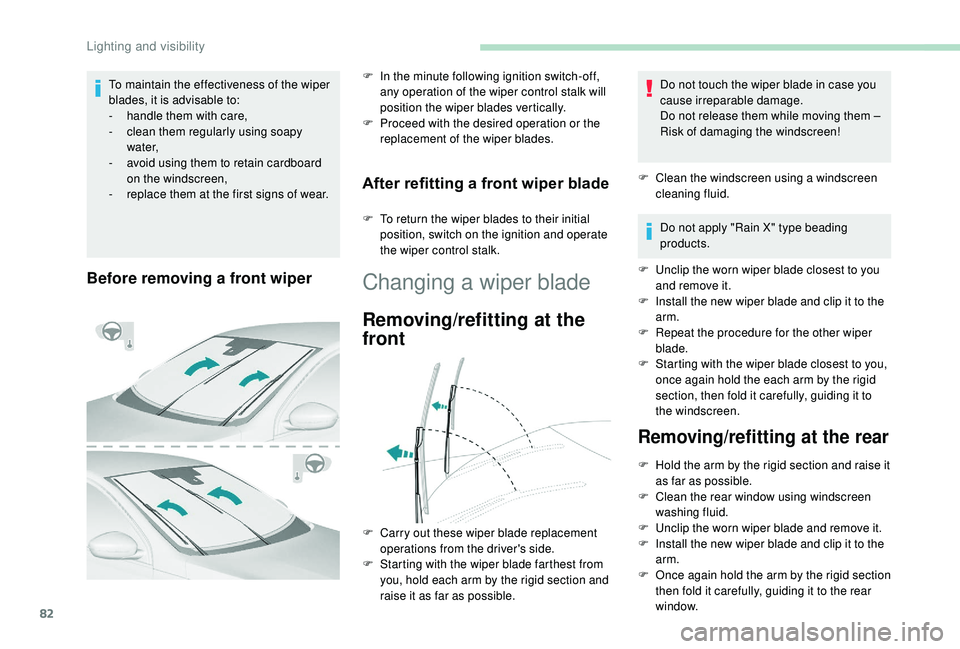
Before removing a front wiper
F In the minute following ignition switch-off, any operation of the wiper control stalk will
position the wiper blades vertically.
F
P
roceed with the desired operation or the
replacement of the wiper blades.
After refitting a front wiper blade
F To return the wiper blades to their initial position, switch on the ignition and operate
the wiper control stalk.
Changing a wiper blade
Removing/refitting at the
front
Do not touch the wiper blade in case you
cause irreparable damage.
Do not release them while moving them –
Risk of damaging the windscreen!
F
C
lean the windscreen using a windscreen
cleaning fluid.
Do not apply "Rain X" type beading
products.
F
U
nclip the worn wiper blade closest to you
and remove it.
F
I
nstall the new wiper blade and clip it to the
arm.
F
R
epeat the procedure for the other wiper
blade.
F
S
tarting with the wiper blade closest to you,
once again hold the each arm by the rigid
section, then fold it carefully, guiding it to
the windscreen.
F
C
arry out these wiper blade replacement
operations from the driver's side.
F
S
tarting with the wiper blade farthest from
you, hold each arm by the rigid section and
raise it as far as possible.
Removing/refitting at the rear
F Hold the arm by the rigid section and raise it as far as possible.
F
C
lean the rear window using windscreen
washing fluid.
F
U
nclip the worn wiper blade and remove it.
F
I
nstall the new wiper blade and clip it to the
arm.
F
O
nce again hold the arm by the rigid section
then fold it carefully, guiding it to the rear
window.
To maintain the effectiveness of the wiper
blades, it is advisable to:
-
h
andle them with care,
-
c
lean them regularly using soapy
water,
-
a
void using them to retain cardboard
on the windscreen,
-
r
eplace them at the first signs of wear.
Lighting and visibility