bonnet Peugeot 308 2021 User Guide
[x] Cancel search | Manufacturer: PEUGEOT, Model Year: 2021, Model line: 308, Model: Peugeot 308 2021Pages: 244, PDF Size: 8.21 MB
Page 143 of 244
141
Practical information
7On a long journey, check the security of the
load at every stop.
Remove the roof bars once they are no longer
needed.
Bonnet
Opening
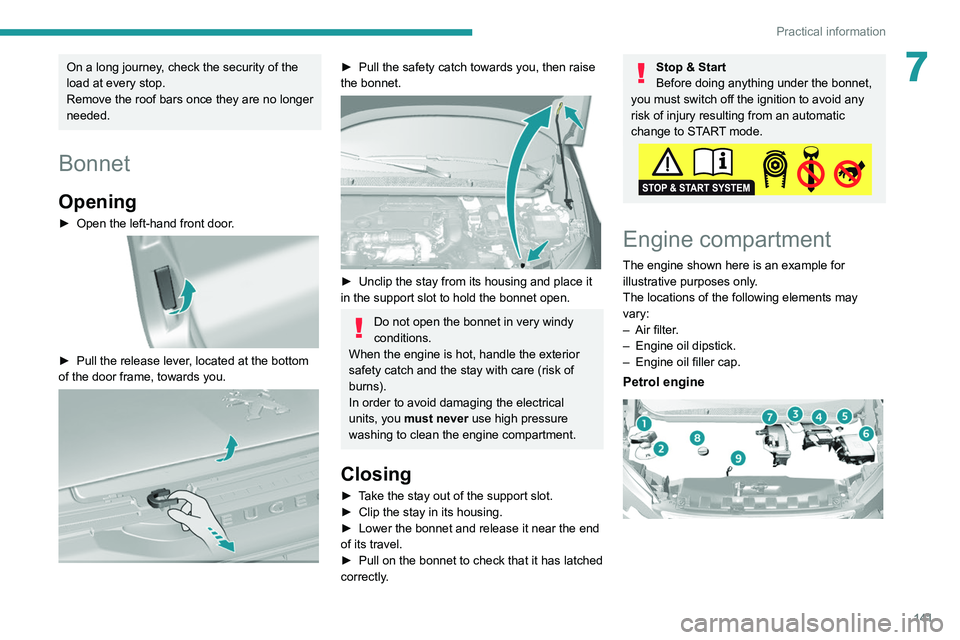
► Open the left-hand front door.
► Pull the release lever , located at the bottom
of the door frame, towards you.
► Pull the safety catch towards you, then raise
the bonnet.
► Unclip the stay from its housing and place it
in the support slot to hold the bonnet open.
Do not open the bonnet in very windy
conditions.
When the engine is hot, handle the exterior
safety catch and the stay with care (risk of
burns).
In order to avoid damaging the electrical
units, you must never use high pressure
washing to clean the engine compartment.
Closing
► Take the stay out of the support slot.
► Clip the stay in its housing.
►
Lower the bonnet and release it near the end
of its travel.
►
Pull on the bonnet to check that it has latched
correctly
.
Stop & Start
Before doing anything under the bonnet,
you must switch off the ignition to avoid any
risk of injury resulting from an automatic
change to START mode.
Engine compartment
The engine shown here is an example for
illustrative purposes only.
The locations of the following elements may
vary:
–
Air filter
.
–
Engine oil dipstick.
–
Engine oil filler cap.
Petrol engine
Page 144 of 244
142
Practical information
Diesel engine
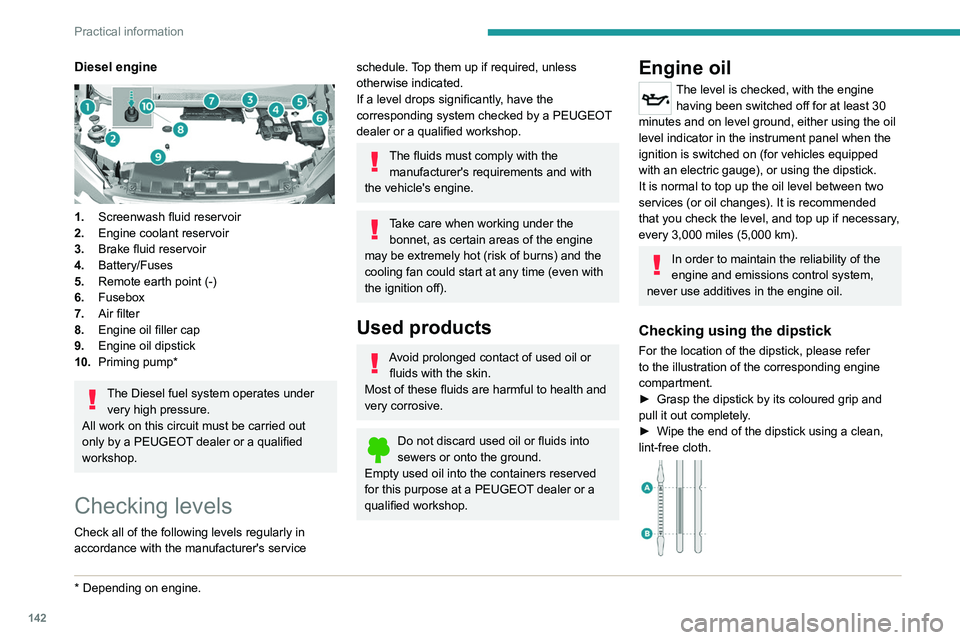
1.Screenwash fluid reservoir
2. Engine coolant reservoir
3. Brake fluid reservoir
4. Battery/Fuses
5. Remote earth point (-)
6. Fusebox
7. Air filter
8. Engine oil filler cap
9. Engine oil dipstick
10. Priming pump*
The Diesel fuel system operates under
very high pressure.
All work on this circuit must be carried out
only by a PEUGEOT dealer or a qualified
workshop.
Checking levels
Check all of the following levels regularly in
accordance with the manufacturer's service
* Depending on engine.
schedule. Top them up if required, unless
otherwise indicated.
If a level drops significantly, have the
corresponding system checked by a PEUGEOT
dealer or a qualified workshop.
The fluids must comply with the manufacturer's requirements and with
the vehicle's engine.
Take care when working under the bonnet, as certain areas of the engine
may be extremely hot (risk of burns) and the
cooling fan could start at any time (even with
the ignition off).
Used products
Avoid prolonged contact of used oil or fluids with the skin.
Most of these fluids are harmful to health and
very corrosive.
Do not discard used oil or fluids into
sewers or onto the ground.
Empty used oil into the containers reserved
for this purpose at a PEUGEOT dealer or a
qualified workshop.
Engine oil
The level is checked, with the engine having been switched off for at least 30
minutes and on level ground, either using the oil
level indicator in the instrument panel when the
ignition is switched on (for vehicles equipped
with an electric gauge), or using the dipstick.
It is normal to top up the oil level between two
services (or oil changes). It is recommended
that you check the level, and top up if necessary,
every 3,000 miles (5,000 km).
In order to maintain the reliability of the
engine and emissions control system,
never use additives in the engine oil.
Checking using the dipstick
For the location of the dipstick, please refer
to the illustration of the corresponding engine
compartment.
►
Grasp the dipstick by its coloured grip and
pull it out completely
.
►
Wipe the end of the dipstick using a clean,
lint-free cloth.
► Reinsert the dipstick and push fully down,
then pull it out again to visually check the oil
level: the correct level is between marks A (max)
and B (min).
Do not start the engine if the level is:
– above mark A: contact a PEUGEOT dealer or
a qualified workshop.
– below mark B: top up the engine oil
immediately.
Oil grade
Before topping up or changing the
engine oil, check that the oil is suitable
for your engine and complies with the
recommendations in the service schedule
supplied with the vehicle (or available
from your PEUGEOT dealer or qualified
workshop).
Use of non-recommended oil may invalidate
your warranty in the event of engine failure.
Topping up the engine oil level
For the location of the engine oil filler cap, please
refer to the corresponding under-bonnet engine
compartment illustration.
► Add oil in small quantities, avoiding any spills
on engine components (risk of fire).
► Wait a few minutes before checking the level
again using the dipstick.
► Top up the level if necessary.
► After checking the level, carefully screw the
oil filler cap back on and replace the dipstick in
its tube.
Page 145 of 244
143
Practical information
7► Reinsert the dipstick and push fully down,
then pull it out again to visually check the oil
level: the correct level is between marks A
(max)
and B (min).
Do not start the engine if the level is:
–
above mark
A: contact a PEUGEOT dealer or
a qualified workshop.
–
below mark B
: top up the engine oil
immediately.
Oil grade
Before topping up or changing the
engine oil, check that the oil is suitable
for your engine and complies with the
recommendations in the service schedule
supplied with the vehicle (or available
from your PEUGEOT dealer or qualified
workshop).
Use of non-recommended oil may invalidate
your warranty in the event of engine failure.
Topping up the engine oil level
For the location of the engine oil filler cap, please
refer to the corresponding under-bonnet engine
compartment illustration.
►
Add oil in small quantities, avoiding any spills
on engine components (risk of fire).
►
W
ait a few minutes before checking the level
again using the dipstick.
►
T
op up the level if necessary.
►
After checking the level, carefully screw the
oil filler cap back on
and replace the dipstick in
its tube.
Within 30 minutes of adding oil, the oil
level indication in the instrument panel
when the ignition is switched on is not valid.
Brake fluid
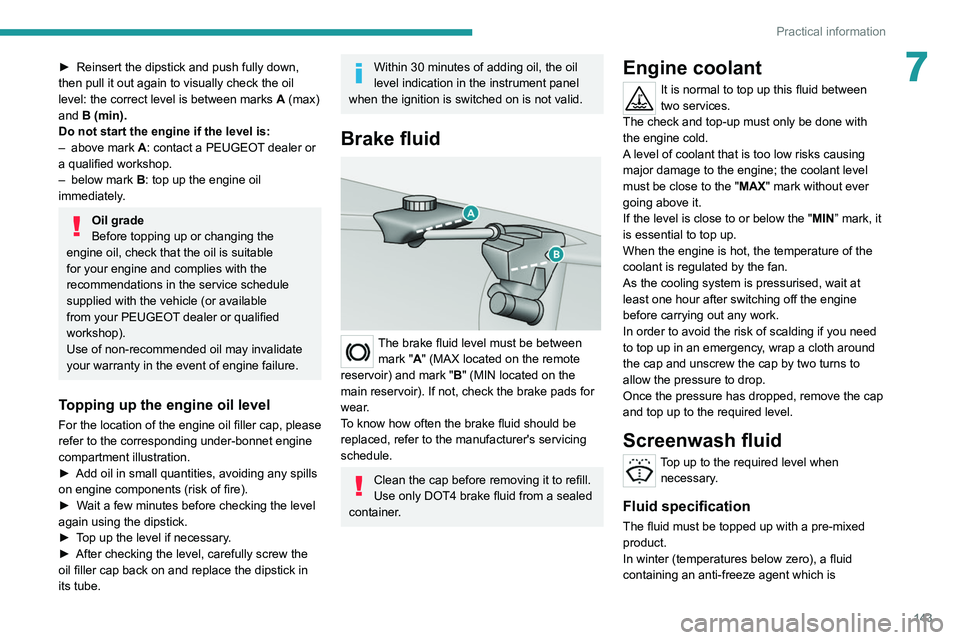
The brake fluid level must be between mark "A" (MAX located on the remote
reservoir) and mark " B" (MIN located on the
main reservoir). If not, check the brake pads for
wear.
To know how often the brake fluid should be
replaced, refer to the manufacturer's servicing
schedule.
Clean the cap before removing it to refill.
Use only DOT4 brake fluid from a sealed
container.
Engine coolant
It is normal to top up this fluid between
two services.
The check and top-up must only be done with
the engine cold.
A level of coolant that is too low risks causing
major damage to the engine; the coolant level
must be close to the "MAX" mark without ever
going above it.
If the level is close to or below the " MIN” mark, it
is essential to top up.
When the engine is hot, the temperature of the
coolant is regulated by the fan.
As the cooling system is pressurised, wait at
least one hour after switching off the engine
before carrying out any work.
In order to avoid the risk of scalding if you need
to top up in an emergency, wrap a cloth around
the cap and unscrew the cap by two turns to
allow the pressure to drop.
Once the pressure has dropped, remove the cap
and top up to the required level.
Screenwash fluid
Top up to the required level when necessary.
Fluid specification
The fluid must be topped up with a pre-mixed
product.
In winter (temperatures below zero), a fluid
containing an anti-freeze agent which is
Page 164 of 244
162
In the event of a breakdown
With "full LED" technology
headlamps
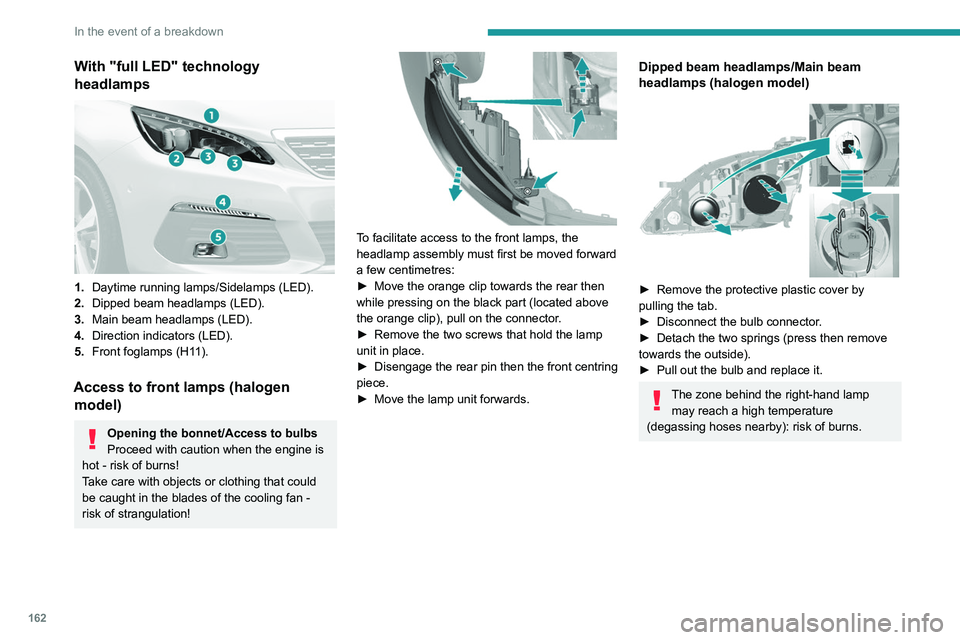
1.Daytime running lamps/Sidelamps (LED).
2. Dipped beam headlamps (LED).
3. Main beam headlamps (LED).
4. Direction indicators (LED).
5. Front foglamps (H11).
Access to front lamps (halogen
model)
Opening the bonnet/Access to bulbs
Proceed with caution when the engine is
hot - risk of burns!
Take care with objects or clothing that could
be caught in the blades of the cooling fan -
risk of strangulation!
To facilitate access to the front lamps, the
headlamp assembly must first be moved forward
a few centimetres:
►
Move the orange clip towards the rear then
while pressing on the black part (located above
the orange clip), pull on the connector
.
►
Remove the two screws that hold the lamp
unit in place.
►
Disengage the rear pin then the front centring
piece.
►
Move the lamp unit forwards.
Dipped beam headlamps/Main beam
headlamps (halogen model)
► Remove the protective plastic cover by
pulling the tab.
►
Disconnect the bulb connector
.
►
Detach the two springs (press then remove
towards the outside).
►
Pull out the bulb and replace it.
The zone behind the right-hand lamp may reach a high temperature
(degassing hoses nearby): risk of burns.
Front foglamps
► Unclip the trim by pulling at the top (notch).
► Unscrew the 2 screws to remove the unit
from its housing.
Page 171 of 244
169
In the event of a breakdown
8FuseN° Rating
(A) Functions
F25 40Headlamp
washer relay
(retrofitting).
F27 25Built-in systems
interface.
F28 30Diesel
emissions
control system
(AdBlue
®).
F29 30Windscreen
wiper motor.
F30 80Pre-heat glow
plugs (Diesel),
additional
programmable
heating
(retrofitting),
headlamp wash
pump.
12 V battery
Procedure for starting the engine using another
battery or charging a discharged battery.
Lead-acid starter batteries
These batteries contain harmful
substances (sulphuric acid and lead).
They must be disposed of in accordance
with regulations and must never under any
circumstances be discarded with household
waste.
Take used remote control batteries and
vehicle batteries to a special collection point.
Protect your eyes and face before
handling the battery.
All operations on the battery must be carried
out in a well ventilated area and away from
naked flames and sources of sparks, to avoid
any risk of explosion or fire.
Wash your hands afterwards.
Versions equipped with Stop & Start are
fitted with a 12 V lead-acid battery with
special technology and specifications.
It should only be replaced by a PEUGEOT
dealer or a qualified workshop.
Before doing any work
Immobilise the vehicle: apply the parking
brake, put the gearbox in neutral, then switch
off the ignition.
Check that all electrical equipment is switched
off.
Access to the battery
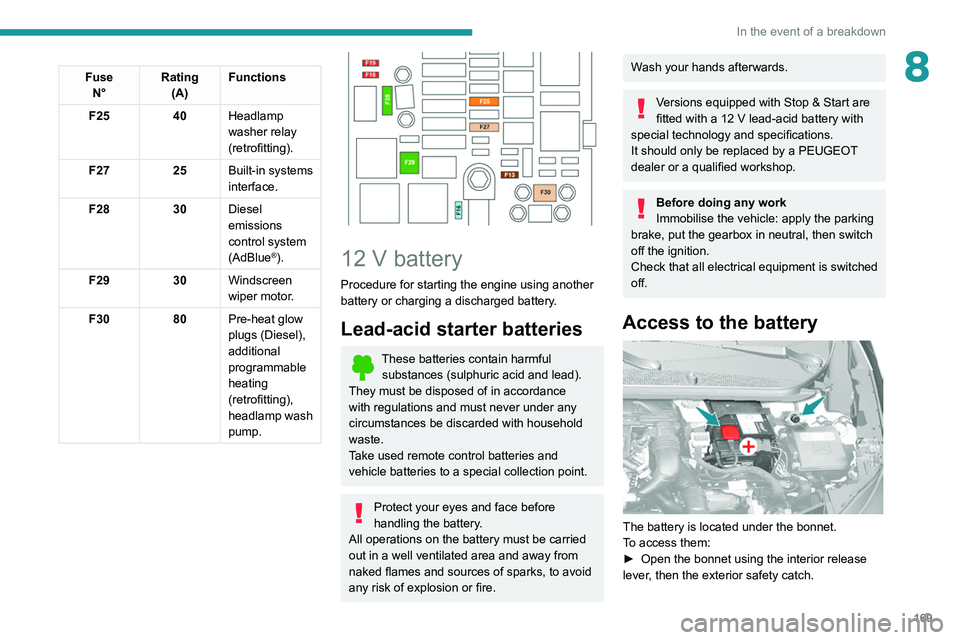
The battery is located under the bonnet.
To access them:
►
Open the bonnet using the interior release
lever
, then the exterior safety catch.
Page 172 of 244
170
In the event of a breakdown
► Secure the bonnet stay.
► Remove the plastic cover on the (+) terminal.
The battery (-) terminal is not accessible.
A
remote earth point is located on the engine.
Starting using another
battery
If your vehicle's battery is flat, the engine can be
started using a backup battery (either external or
from another vehicle) and jump leads or using a
battery booster.
Never start the engine by connecting a
battery charger.
Never use a 24
V or higher battery booster.
Check beforehand that the backup battery
has a nominal voltage of 12
V and a capacity
at least equal to that of the discharged
battery.
The two vehicles must not be in contact with
each other.
Switch off all electricity-consuming equipment
on both vehicles (audio system, wipers,
lighting, etc.).
Make sure that the jump leads are well away
from the engine’s moving parts (fan, belt,
etc.).
Do not disconnect the (+) terminal while the
engine is running.
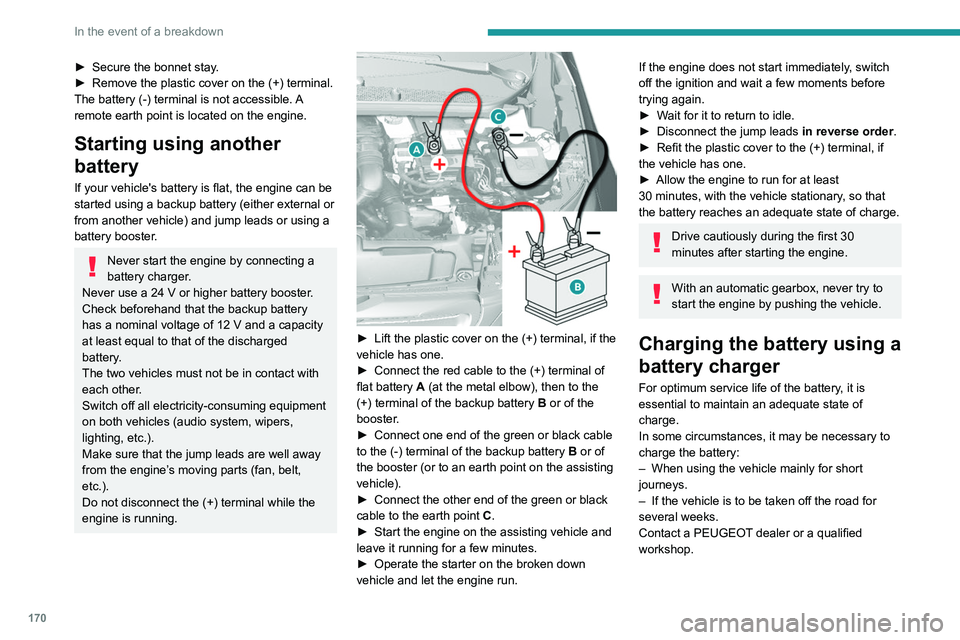
► Lift the plastic cover on the (+) terminal, if the
vehicle has one.
►
Connect the red cable to the (+) terminal of
flat battery
A (at the metal elbow), then to the
(+) terminal of the backup battery
B or of the
booster.
►
Connect one end of the green or black cable
to the (-) terminal of the backup battery
B or of
the booster (or to an earth point on the assisting
vehicle).
►
Connect the other end of the green or black
cable to the earth point
C
.
►
Start the engine on the assisting vehicle and
leave it running for a few minutes.
►
Operate the starter on the broken down
vehicle and let the engine run.
If the engine does not start immediately, switch
off the ignition and wait a few moments before
trying again.
►
W
ait for it to return to idle.
►
Disconnect the jump leads in reverse order.
►
Refit the plastic cover to the (+) terminal, if
the vehicle has one.
►
Allow the engine to run for at least
30
minutes, with the vehicle stationary, so that
the battery reaches an adequate state of charge.
Drive cautiously during the first 30
minutes after starting the engine.
With an automatic gearbox, never try to
start the engine by pushing the vehicle.
Charging the battery using a
battery charger
For optimum service life of the battery, it is
essential to maintain an adequate state of
charge.
In some circumstances, it may be necessary to
charge the battery:
–
When using the vehicle mainly for short
journeys.
–
If the vehicle is to be taken off the road for
several weeks.
Contact a PEUGEOT
dealer or a qualified
workshop.
Page 176 of 244
174
In the event of a breakdown
Accessing the tools
For more information on accessing the Tool kit,
refer to the corresponding section.
Towing your vehicle
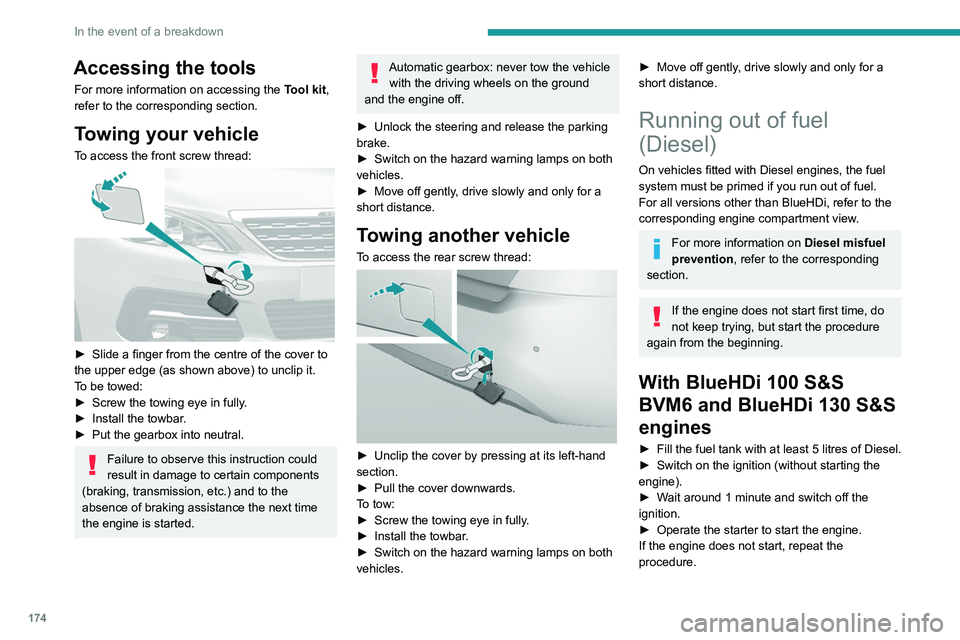
To access the front screw thread:
► Slide a finger from the centre of the cover to
the upper edge (as shown above) to unclip it.
T
o be towed:
►
Screw the towing eye in fully
.
►
Install the towbar
.
►
Put the gearbox into neutral.
Failure to observe this instruction could
result in damage to certain components
(braking, transmission, etc.) and to the
absence of braking assistance the next time
the engine is started.
Automatic gearbox: never tow the vehicle with the driving wheels on the ground
and the engine off.
►
Unlock the steering and release the parking
brake.
►
Switch on the hazard warning lamps on both
vehicles.
►
Move off gently
, drive slowly and only for a
short distance.
Towing another vehicle
To access the rear screw thread:
► Unclip the cover by pressing at its left-hand
section.
►
Pull the cover downwards.
T
o tow:
►
Screw the towing eye in fully
.
►
Install the towbar
.
►
Switch on the hazard warning lamps on both
vehicles.
► Move off gently , drive slowly and only for a
short distance.
Running out of fuel
(Diesel)
On vehicles fitted with Diesel engines, the fuel
system must be primed if you run out of fuel.
For all versions other than BlueHDi, refer to the
corresponding engine compartment view.
For more information on Diesel misfuel
prevention, refer to the corresponding
section.
If the engine does not start first time, do
not keep trying, but start the procedure
again from the beginning.
With BlueHDi 100 S&S
BVM6 and BlueHDi 130 S&S
engines
► Fill the fuel tank with at least 5 litres of Diesel.
► Switch on the ignition (without starting the
engine).
►
W
ait around 1 minute and switch off the
ignition.
►
Operate the starter to start the engine.
If the engine does not start, repeat the
procedure.
Other enginesNon-
► Fill the fuel tank with at least 5 litres of Diesel.
► Open the bonnet.
► If necessary, unclip the cover to access the
priming pump.
► Operate the priming pump repeatedly until
resistance is felt (there may be resistance on the
first press).
► Operate the starter to start the engine (if the
engine does not start at the first attempt, wait
around 15 seconds before trying again).
► If the engine does not start after a few
attempts, operate the priming pump again then
start the engine.
► Put the cover back in place and clip it in.
► Close the bonnet.
Page 177 of 244
175
In the event of a breakdown
8Other enginesNon-
► Fill the fuel tank with at least 5 litres of Diesel.
► Open the bonnet.
►
If necessary
, unclip the cover to access the
priming pump.
► Operate the priming pump repeatedly until
resistance is felt (there may be resistance on the
first press).
►
Operate the starter to start the engine (if the
engine does not start at the first attempt, wait
around 15 seconds before trying again).
►
If the engine does not start after a few
attempts, operate the priming pump again then
start the engine.
►
Put the cover back in place and clip it in.
►
Close the bonnet.
Page 184 of 244
182
Technical data
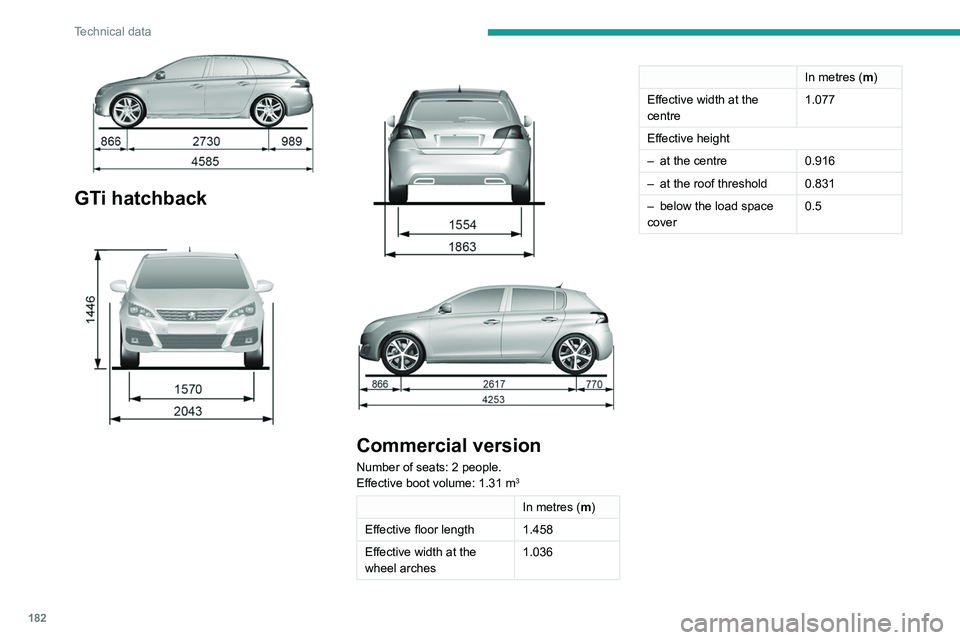
GTi hatchback
Commercial version
Number of seats: 2 people.
Effective boot volume: 1.31 m3
In metres (m)
Effective floor length 1.458
Effective
width at the
wheel arches 1.036
In metres (m)
Effective
width at the
centre 1.077
Effective height
–
at the centre 0.916
–
at the roof threshold 0.831
–
below the load space
cover 0.5
Identification markings
Various visible markings for vehicle identification
and vehicle search.
A. Vehicle Identification Number (VIN), under
the bonnet.
Stamped on the chassis, near the right-hand
front wheel arch.
B. Vehicle Identification Number (VIN), on the
dashboard.
Printed on an adhesive label visible through the
windscreen.
C. Manufacturer's label.
Affixed to the centre pillar, left-hand side or right-
hand side.
Bears the following information:
–
Manufacturer’s name.
Page 185 of 244
183
Technical data
9Identification markings
Various visible markings for vehicle identification
and vehicle search.
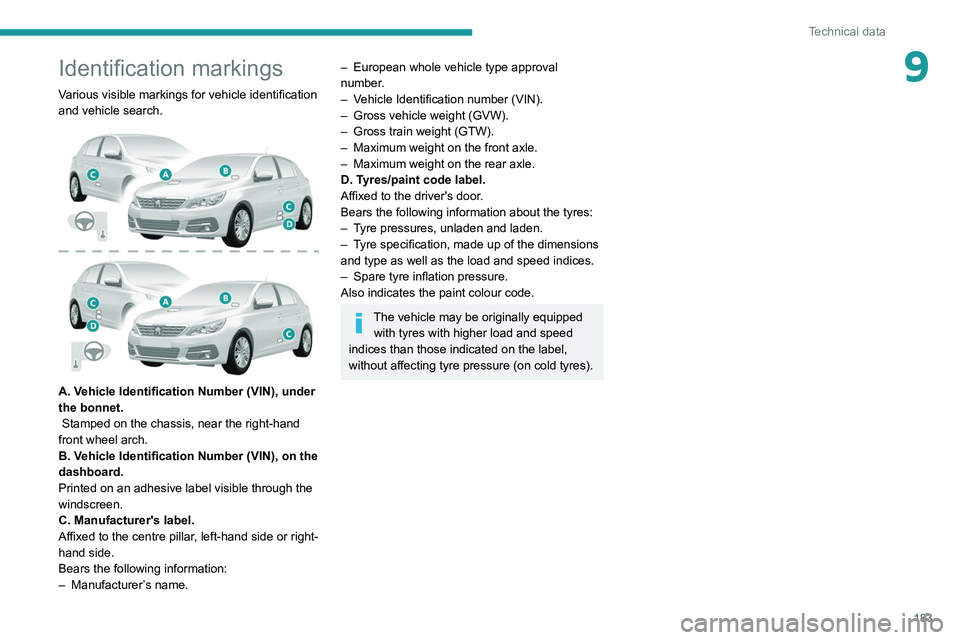
A. Vehicle Identification Number (VIN), under
the bonnet.
Stamped on the chassis, near the right-hand
front wheel arch.
B. Vehicle Identification Number (VIN), on the
dashboard.
Printed on an adhesive label visible through the
windscreen.
C. Manufacturer's label.
Affixed to the centre pillar, left-hand side or right-
hand side.
Bears the following information:
–
Manufacturer
’s name.
– European whole vehicle type approval
number .
–
V
ehicle Identification number (VIN).
–
Gross vehicle weight (GVW).
–
Gross train weight (GTW).
–
Maximum weight on the front axle.
–
Maximum weight on the rear axle.
D. T
yres/paint code label.
Affixed to the driver's door.
Bears the following information about the tyres:
–
T
yre pressures, unladen and laden.
–
T
yre specification, made up of the dimensions
and type as well as the load and speed indices.
–
Spare tyre inflation pressure.
Also indicates the paint colour code.
The vehicle may be originally equipped with tyres with higher load and speed
indices than those indicated on the label,
without affecting tyre pressure (on cold tyres).